This is the fourth article in a series entitled Stairway to Integration Services. Previous articles in the series include:
- What is SSIS? Level 1 of the Stairway to Integration Services
- The SSIS Data Pump - Level 2 of the Stairway to Integration Services
- Adding Rows in Incremental Loads – Level 3 of the Stairway to Integration Services
Introduction
In our previous installment (Adding Rows in Incremental Loads – Step 3 of the Stairway to Integration Services) you learned how to make SSIS packages re-executable. You also learned how to build a Data Flow Task so that it only loads new rows.
Reviewing Incremental Loads
Remember, incremental loads in SSIS have three use cases:
- New rows – add rows to the destination that have been added to the source since the previous load.
- Updated rows – update rows in the destination that have been updated in the source since the previous load.
- Deleted rows – remove rows from the destination that have been deleted from the source.
In this article, we’ll continue to build Incremental Load functionality in SSIS by focusing on updating rows that have changed in the source since they were loaded into the destination.
Adding the Update Code
Before we work on detecting changes and updating rows, we need to configure another test. Let’s the same approach as earlier and make changes to rows in the destination table (dbo.Contact). As before, open SSMS and connect to your instance of SQL Server. If you need a review of the steps, scroll up!
Open a New Query window and enter the following T-SQL statements:
Use AdventureWorks
go
Update dbo.Contact
 Set MiddleName = 'Ray'
 Where MiddleName Is NULL
Execute this query by pressing the F5 key. There are 8,499 rows updated in our destination table. We’ve replaced the NULLs in the MiddleName column for these records with Ray (which happens to be the coolest middle name ever… just sayin’).
Open BIDS and open the SSIS solution named My_First_SSIS_Project. Click on the Data Flow tab. We need to make some changes to the Lookup Transformation we added in the previous article, so double-click the Lookup Transformation to open the Lookup Transformation Editor:
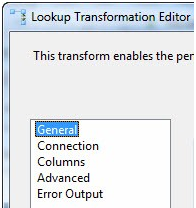
Figure 1
Click the Columns page. There are a couple table-ish looking grids in the upper right portion of the Columns page. The one on the left is labeled Available Input Columns. This contains a list of the columns entering the Lookup Transformation’s input buffer (remember, the Lookup Transformation is connected to the output off the OLE DB Source adapter – that’s where these columns are coming from). The other grid is labeled Available Lookup Columns. These are columns that exist in the table, view, or query (in our case, a query) configured on the Connection page.
In the previous article, we mapped the Email column in the Available Input Columns and to the Email column in Available Lookup Columns. I compare Lookups to a Join; with the line that appears between the Email columns signifying the ON clause of the join. This “ON line” defines the matching criterion that drives the Lookup function.
In the Adding Rows article we did not check any of the checkboxes in the Available Lookup Columns grid. The Available Lookup Columns have checkboxes next to them and a “check all” checkbox in the grid header. If the Lookup Transformation is similar to a Join, these checkboxes are a mechanism for adding columns from the joined table to the SELECT clause. Click the unlabeled “Check All” checkbox to the left of the column header “Name” in the Available Lookup Columns grid. This will check all the columns as shown in Figure 2:
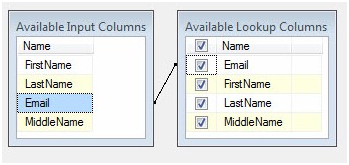
Figure 2
The grid below the Available Input Columns and the Available Lookup Columns looks like Figure 3. The Output Alias column is used to provide alternate column names to fields returned from the Available Lookup Columns. Returning to the JOIN analogy, Output Alias is similar to using AS to alias columns in the SELECT clause of the JOIN statement. I like to identify the rows returned from the Lookup operation – I often use “LkUp_” or “Dest_” to alias them. It helps me separate the columns that came in from the OLE DB Source and the columns that were returned from the Lookup Transformation. Plus, if the columns are named the same, SSIS will stick a “(1)” on the end of the column name. Yuck. Add the “LkUp_” prefix as shown in Figure 3:

Figure 3
Let’s step back for a minute and review what we have built.
The records at the input of the Lookup Transformation flow into the Data Flow pipeline from the OLE DB Source adapter, and are loaded into the Data Flow from the Person.Contact table. The destination table is dbo.Contact and we accessed using a T-SQL query. The Lookup Transformation opens the destination table and attempts to match records that exist in the Data Flow pipeline with records in the destination table. When no match is found, the non-matching rows are sent to the No Match Output.
We have altered the configuration of the Lookup Transformation to return values from the Email, FirstName, LastName, and MiddleName columns in the destination table when the Lookup Transformation finds a match between the Email columns in the source and destination tables. These columns are literally added to the Data Flow records as they flow through the Lookup Transformation.
Next drag an OLE DB Command Transformation onto the Data Flow canvas. Also drag a Conditional Split Transformation onto the Data Flow canvas. Click on the Lookup Transformation, and then drag the green Data Flow Path from the Lookup Transformation to the Conditional Split:
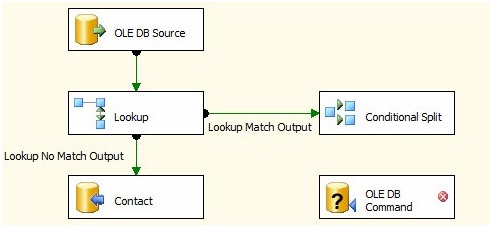
Figure 4
The only green Data Flow Path available from the Lookup Transformation is the Lookup Match Output, so we’re not prompted to select the output this time – Lookup Match Output is assumed (correctly). Besides the data they contain, there are other differences between the Lookup Transformation’s No Match Output and Match Output. The most important difference is the columns.
I want to show you the Lookup columns added to the source rows by the Lookup Transformation’s outputs. Let’s start by viewing the input columns. Right-click on the Data Flow Path between the OLE DB Source adapter and the Lookup Transformation, and then click Edit:
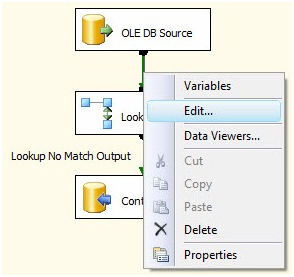
Figure 5
When the Data Flow Path Editor displays click the Metadata page. The Path metadata grid displays as show in Figure 6:
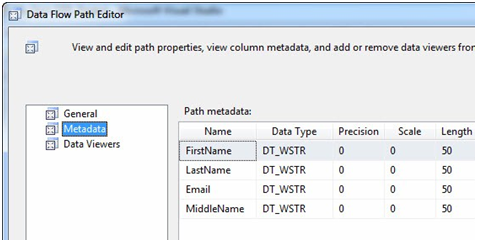
Figure 6
These are the columns coming into the Lookup Transformation from the OLE DB Source. Close the Data Flow Path Editor here and right-click on the Data Flow Path – named Lookup No Match Output – between the Lookup Transformation and the OLE DB Destination named Contact, then click Edit to display the Data Flow Path Editor. Click the Metadata page:
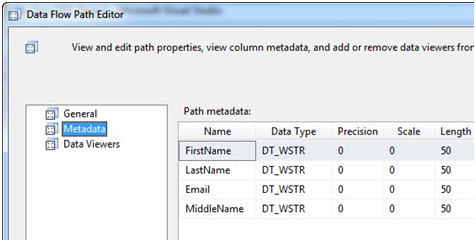
Figure 7
We looked at this metadata before, in the last article. The metadata for the Lookup Transformation’s No Match Output is identical to the metadata to the Lookup Transformation’s input. This is by design – the Lookup is simply passing these rows, for which it cannot locate matches, through the transformation. Close the Data Flow Path editor.
Because of the way we configured the Lookup Transformation, something different happens for the records that find matches: Additional columns are returned from the destination. To view these changes to the Data Flow, right-click on the Data Flow Path – named Lookup Match Output – between the Lookup Transformation and the Conditional Split Transformation:
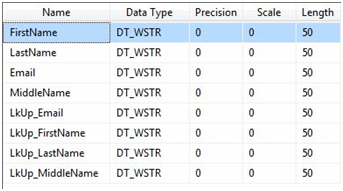
Figure 8
It’s very easy to spot the additional columns added to the Data Flow Path in Figure 8 – especially since we added aliases to denote columns returned from the Match Operation of the Lookup Transformation. Close the Data Flow Path Editor.
In the Adding Rows in Incremental Loads article, we configured the Lookup No Match Output and didn’t see the columns returned from the lookup table – remember? We didn’t need them for incrementally loading new rows, but we need them now so we can compare the column values in the source and destination tables. In this way, we can detect changes.
Change Detection 101
Change Detection is a sub-science of ETL. The method discussed here is a good start, but please keep in mind we’re demonstrating a principle.
What does “Match” mean in Lookup Match Output? It means that the Email column in the source table – Person.Contact (which is being loaded into the Data Flow Task via the OLE DB Source adapter) – has the same value as the Email column in the destination table – dbo.Contact (accessed via the Lookup Transformation). We know the Email column values match, but we simply aren’t sure about whether the other columns match. We need to know.
If all the source and destination column values match, there have been no changes to the source record and we can exclude it from further consideration. If the source has changed, we want to capture those changes and copy them to the destination. This is the goal of Incrementally Loading updates. There are two parts to this: First we need to detect the differences. Then we need to apply the updates.
Implementing Change Detection in SSIS
Open the Conditional Split Transformation Editor (double-click the Conditional Split Transformation or right-click it and select Edit). When the Condition Split Transformation Editor opens, it displays three sections. The upper left section contains two virtual folders: Variables and Columns:
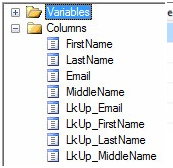
Figure 9
We’re going to work with Columns, so I’ve expanded the Columns virtual folder in Figure 9. To detect differences between columns in the source and destination tables, we’re going to compare the FirstName, LastName, and MiddleName columns. “Why are we not comparing the Email columns, Andy?” I’m glad you asked! In these rows, the Email columns already match. We matched on the Email columns inside the Lookup, remember? Email is the column we used to JOIN the source and destination tables. So they have to match.
Let’s compare the FirstName columns first. Click on FirstName in the Columns list and drag it into the Condition column in the lower section of the Conditional Split Transformation Editor:

Figure 10
When you click anywhere else after releasing the FirstName column in the Condition column of the Conditional Split case grid (the lower section of the Conditional Split Editor), validation occurs. The text turns red in this case because validation fails. Why does validation fail here? Conditions must evaluate to Boolean values – True or False. FirstName doesn’t do that because it’s a string value. If you click the OK button and try to close the Conditional Split Transformation Editor at this point, you’ll get a very helpful error message that explains it:
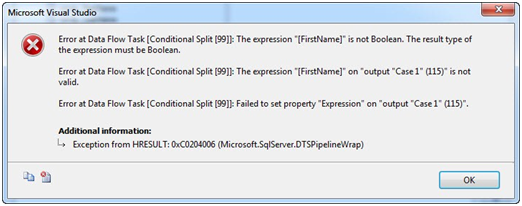
Figure 11
That’s ok, we’re not finished. The upper right section of the Conditional Split Transformation Editor contains SSIS Expression Language syntax.
SSIS Expression Language is difficult to learn. If you struggle with it, don’t feel bad! A few years ago I wrote a series of blog posts to help you learn your way around SSIS Expression Language syntax.
I want to check for rows where FirstName is not equal to LkUp_FirstName. In the SSIS Expression Language section, expand the Operators virtual folder and select the unequal operator:
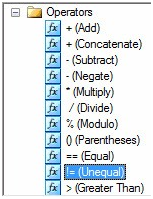
Figure 12
Click the Unequal operator and drag it to the right of the FirstName column in the case Condition expression:

Figure 13
Next, drag LkUp_FirstName from the Columns virtual Folder to the right of the Unequal operator in the case Condition expression:

Figure 14
Because the expression in the case Condition field now evaluates to a Boolean value, it validates and the text displays as black to indicate this. What is the case Condition checking? It’s checking if the value in FirstName matches the value in the LkUp_FirstName column for a row of data where the Email columns from both the source and destination tables match. If the FirstName columns are different, there’s a difference between the source and destination. Because destinations typically lag sources, the assumption is the source has newer, better, and more accurate data. We need to get that data into the destination if that’s the case.
Because we didn’t make any changes to the FirstName column when we executed our test setup query (we only changed MiddleName values, remember?) this test of FirstName columns will always evaluate False: The values are not unequal because they are all equal. We need to add to our case Condition expression to catch all changes. Let’s start by isolating this part of the change-detection Condition expression. Wrap the Condition expression in parentheses as shown in Figure 15:

Figure 15
We next need to add a test condition for MiddleName. But we need to stop and think about what we’re looking for. We’re checking for any difference between source and destination column values. If one change occurs, that’s enough to trigger an update to the destination. If more than one change occurs, that’s fine – one’s enough to trigger the update. So we want to check for inequality between one column or the other. “Or” is the operative word in that last sentence.
To represent Logical OR, scroll down in the SSIS Expression Language Operators list and drag Logical OR into the case Condition expression to the right of the closing parenthesis:
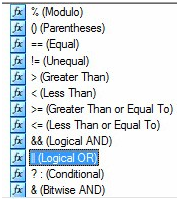
Figure 16

Figure 17
Add opening and closing parentheses after the Conditional OR operator (“||”) as shown in Figure 18:

Figure 18
Drag the MiddleName column from the Columns virtual folder in the upper-left section of the Conditional Split Transformation Editor into the parentheses:

Figure 19
Drag (or type) an Unequal SSIS Expression Language operator to the right of the MiddleName column and then drag the LkUp_MiddleName column between the unequal operator and the end parenthesis as shown in Figure 20:

Figure 20
Again, we’re at a stage where the case Condition validates. The condition tests for differences between the FirstName and LkUp_FirstName columns, or differences between the MiddleName and LkUp_MiddleName columns. Two down, one to go.
I’m not going to walk you through this one. I’m simply going to tell you to take the necessary steps to add the logic for “OR LastName does not equal LkUp_LastName”. When complete, your case Condition expression should read as shown in Figure 21:

Figure 21
Before we close the Conditional Split Transformation Editor, let’s rename the Output from Case 1 to Updated Rows. You may be bothered by unnecessary brackets in the expression – I am. In Figure 22, I clean out the unnecessary brackets and white space to make the SSIS Expression in the Condition more aesthetic:

Figure 22
What have we accomplished? The rows that flow into the Conditional Split Transformation are sent to it from the Lookup Transformation’s Match Output. That means in each of these rows, the Email column contains the same data as the LkUp_Email column – Email and LkUp_Email are the columns used by the Lookup Transformation to perform the Match operation. We configured a Condition in the Conditional Split Transformation and named it “Updated Rows”. The Updated Rows condition traps rows where there is a difference between either (one, some, or even all) of the remaining three column values and their “LkUp_” counterparts flowing into the Conditional Split Transformation: FirstName, MiddleName, or LastName.
It’s important to note that the Conditional Split Transformation diverts rows to different outputs. When we defined a condition above, we also created a new output – a new path – from which data can flow out of the Conditional Split Transformation.
“Ok, Andy. What about the rows where the source column values are the same as their matching destination column values?” That is an excellent question! If you look below the grid where we just defined the Updated Rows condition, you will see the Default Output Name.

Figure 23
This is where rows that match no conditions are sent in a Conditional Split Transformation.
Click OK to close the Conditional Split Transformation Editor. Click the Conditional Split Transformation and then drag the green Data Flow Path to the OLE DB Command. When prompted, select the Updated Rows output from the Conditional Split:
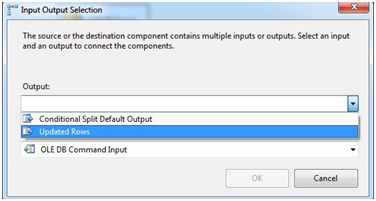
Figure 24
Your Data Flow should now appear as shown in Figure 25:
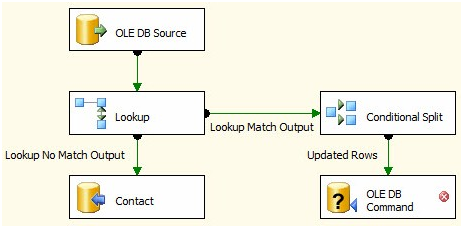
Figure 25
We’re going to use the OLE DB Command Transformation to perform the update of rows in the destination table that are different from matching rows in the source table.
At this point we’re detecting source rows that are different from destination rows, and sending these updated rows through the Updated Rows output to the OLE DB Command Transformation. It’s time to configure the update functionality of the OLE DB Command. Double-click the OLE DB Command Transformation to open the Advanced Editor for OLE DB Command. Why doesn’t the OLE DB Command have a nice, shiny Editor? Good question. I consider this fact a clue. More later…
On the Connection Managers tab of the Advanced Editor for OLE DB Command, set the Connection Manager dropdown to “(local).AdventureWorks”. Click the Component Properties tab and scroll down to the SqlCommand property. Click the ellipsis in the SqlCommand’s property value textbox to open the String Value Editor. Enter the following T-SQL statement in the String Value textbox:
Update dbo.Contact
  Set FirstName = ?
, MiddleName = ?
, LastName = ?
 Where Email = ?
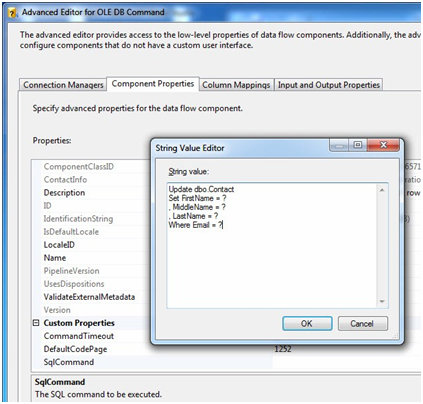
Figure 26
In OLE DB, parameter placeholders are represented with question marks. We’ll map these parameters on the next tab. Click OK to close the String Value Editor. Click the Column Mappings tab:
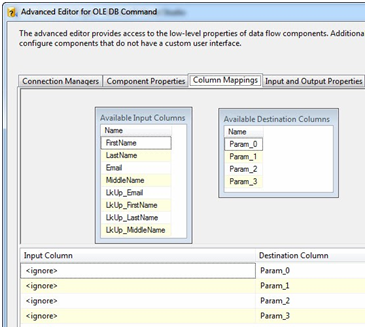
Figure 27
The question marks form a zero-based array. This means Param_0 represents the first question mark, Param_1 represents the second question mark, and so on. We achieve mapping by dragging the fields from the Available Input Columns grid and dropping them individually onto their mapped parameter in the Available Destination Columns grid. Columns from the source and destination tables exist in the Available Input Columns. Remember, the columns prefixed “LkUp_” actually contain destination data that was returned from the Lookup Transformation. So we want to map only columns from the source table (because we’re assuming the source contains the most up-to-date data). Since the first question mark maps to FirstName, we map the FirstName column to Param_0, MiddleName maps to Param_1, LastName to Param_2, and Email to Param_3:
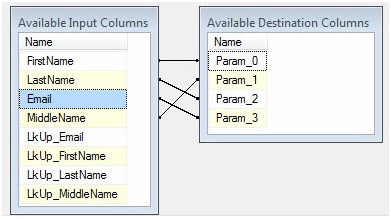
Figure 28
You’re done with the parameter mappings and the OLE DB Command configuration! Click the OK button to close the Advanced Editor for OLE DB Command. Your Data Flow Task should appear as shown in Figure 29:
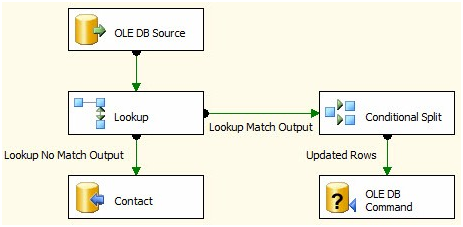
Figure 29
Let’s test it! Press the F5 key to start the debugger:
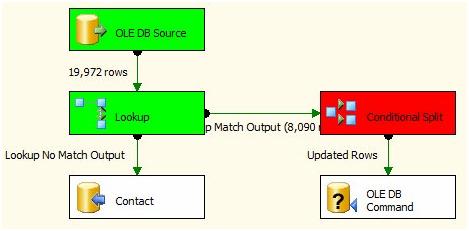
Figure 30
…and it almost works. Let’s check the error message on the Progress tab. I found the error, but it’s difficult to read:

Figure 31
But I can right-click the top-most error and copy the message text:

Figure 32
The error message reads:
[Conditional Split [99]] Error: The expression "(FirstName != LkUp_FirstName) || (MiddleName != LkUp_MiddleName) || (LastName != LkUp_LastName)" on "output "Updated Rows" (115)" evaluated to NULL, but the "component "Conditional Split" (99)" requires a Boolean results. Modify the error row disposition on the output to treat this result as False (Ignore Failure) or to redirect this row to the error output (Redirect Row). The expression results must be Boolean for a Conditional Split. A NULL expression result is an error.
The problem appears to be with my expression. Some of the expressions values are evaluating to NULL. Why? It turns out when you test for equality (or inequality) and one value is NULL, the result isn’t True or False; it’s NULL. Since NULL isn’t a Boolean value, the case Condition expression fails. Durnit!
It’s time to go NULL-hunting. There’s a technical name for this type of analysis. It’s called Data Profiling. I’ll start with the source table: Person.Contact. I execute three queries to search for NULLs:
Use AdventureWorks
go
Select *
 From Person.Contact
 Where FirstName Is Null

Select *
 From Person.Contact
 Where MiddleName Is Null

Select *
 From Person.Contact
 Where LastName Is Null
Executing these statements tell me all 8,499 MiddleName columns in my source are NULL. When we think about this, it makes sense. We updated the MiddleName columns in the destination earlier where the MiddleName columns were NULL, and there were 8,499 of them.
To fix this, stop the BIDS debugger and open the Conditional Split Transformation Editor. We need to trap NULLs in a way that allows us to compare MiddleName column values without error. We’ll use the IsNull() function in SSIS Expression Language. This function is not the IsNull() T-SQL function we know and love. The T-SQL function replaces a NULL value with another value (see http://msdn.microsoft.com/en-us/library/ms184325.aspx for more information). The SSIS Expression Language IsNull() function is a test for a NULL value. It returns a Boolean result (True or False). We can combine IsNull() with the Conditional Operator in SSIS Expression Language to check for NULLs and respond to them if they exist. To do this, update the Updated Rows case Condition expression to read:
(FirstName != LkUp_FirstName) || ((ISNULL(MiddleName) ? “Humperdinck” : MiddleName) != (ISNULL(LkUp_MiddleName) ? “Humperdinck” : LkUp_MiddleName)) || (LastName != LkUp_LastName)

Figure 33
How do we handle NULLs? First we detect them using ISNULL(MiddleName). The IsNull() function evaluates to True or False and is the “condition” argument for the Conditional Operator. The Conditional Operator functions in the following manner: <Condition> ? <True> : <False>. If MiddleName is NULL, the True part of the Conditional Operator – “Humperdinck” in this case – will be applied. If MiddleName is not NULL, the False part of the Conditional Operator – MiddleName in this case – will be applied. So if MiddleName is NULL, we replace it with the value “Humperdinck” for comparison purposes. If MiddleName is not NULL, we simply compare the value of the MiddleName column.
The same logic applies to the LkUp_MiddleName column – if the value is NULL we replace it with “Humperdinck”; if not, we use the non-NULL value for comparison. In this way, we avoid attempting to evaluate the expression NULL != NULL – which evaluates to NULL and raises the error we saw earlier.
One important thing to note here: “Humperdinck” can never appear as a valid MiddleName value in our data – ever. Consider what would happen if the name data was loaded with no middle name supplied; John Smith, for example. Later, John updates his name information online or while chatting with a Customer Service Representative. What happens if John’s middle name is Humperdinck? The value stored in our destination table is NULL. The source table has just been updated from NULL to Humperdinck. When the Conditional Split Updated Rows condition is applied to this row, it evaluates the MiddleName side of the inequality comparison (!=) as not NULL, and therefore uses the middle name (Humperdinck) for comparison. The LkUp_MiddleName side of the inequality comparison (!=) evaluates to NULL and replaces it with “Humperdinck” for comparison purposes. The inequality comparison works as designed but fails to identify these values as different. Oh no!
I use “Humperdinck” for middle names in my demos and writing because I really like The Princess Bride. In real life, I use a combination of numbers, letters, and a couple hard-to-accidentally-type characters from Character Map to form the word to replace NULL values for comparison.
Click the OK button to close the Conditional Split Transformation Editor, and then press F5 to re-execute the SSIS package in the BIDS debugger:
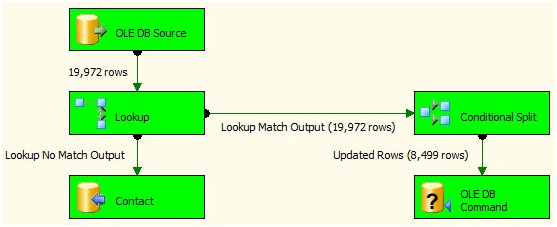
Figure 34
I notice a couple things about this execution. First, it succeeds. Second, it takes a while to complete. On my laptop, it takes over 3.5 minutes:

Figure 35
Why does this take so long to execute? Most of the execution time was taken executing the update statements in the OLE DB Command. Why? The OLE DB Command processes a single row at a time. It’s the equivalent of an SSIS cursor, and SQL Server just doesn’t like row-based operations. They execute slowly.
Set-Based Updates
Is there a way to avoid this row-based operation? Yep. Let’s take a look at how. If your SSIS package is still running in the BIDS debugger, stop it now. Then click on the OLE DB Command in the Data Flow Task and delete it. In its place, drag an OLE DB Destination from the toolbox and connect the Updated Rows Output from the Condition Split to it:
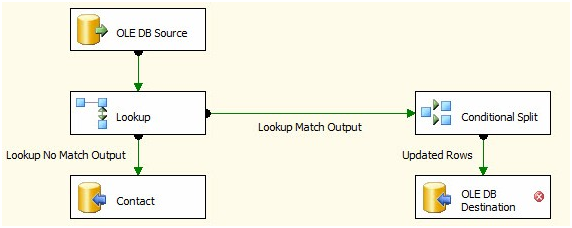
Figure 36
Right-click the OLE DB Destination and click Rename. Change the name of the OLE DB Destination to “StageUpdates”. Double-click the OLE DB Destination to open the editor. Ensure “(local).AdventureWorks” is selected for the OLE DB Connection Manager. Accept the default Data Access Mode of “Table or View – Fast Load”.
Now, the OLE DB Destination has the coolest time-saving feature ever – it’s that New button beside the “Name of the table or view” dropdown. Click it:
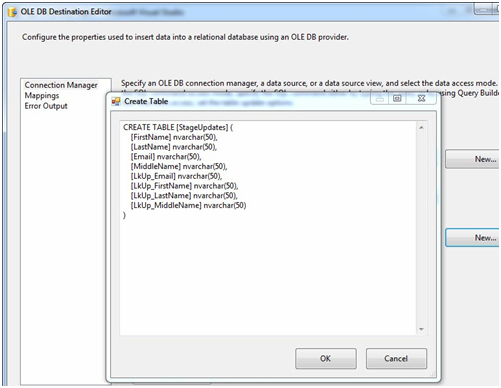
Figure 37
We’re going to make some edits before hitting the OK button, but how cool is this? The table name came from the name of the OLE DB Destination – that’s why we renamed it first. The columns Data Definition Language (DDL)? That was read from the Data Flow Path’s metadata – and it includes the data type conversions from SSIS data types (DT_WSTR, for example) to SQL Server data types (nvarchar). I ask again: How cool is that?
Before we proceed, let’s remove the columns with the “LkUp_” prefix. We only want to store the data from the source for updates (since we are presuming the source data is more up-to-date than the data in the destination). The statement should be modified to read:
CREATE TABLE [StageUpdates] (
    [FirstName] nvarchar(50),
    [LastName] nvarchar(50),
    [Email] nvarchar(50),
    [MiddleName] nvarchar(50)
)
Click the OK button. When you clicked OK just now, the StageUpdates table was created in the AdventureWorks database. Note the OK button on the OLE DB Destination Editor is disabled. And there’s a warning in the lower pane of the OLE DB Destination Editor:

Figure 38
Click the Mappings page:
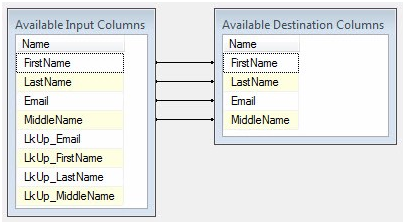
Figure 39
The columns are auto-mapped because the column names and data types match. They match because the Available Destination Columns were built from the Available Input Columns’ metadata.
Click the OK button to continue. Your Data Flow should appear as shown in Figure 40:
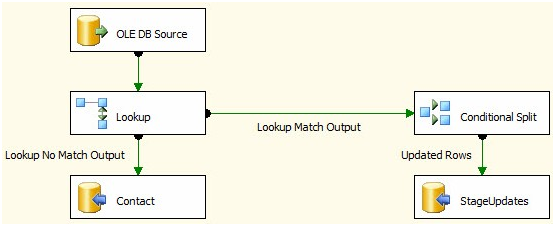
Figure 40
Before we run a test we need to manage the rows in StageUpdates. Right now they go to the StageUpdates table and nowhere else. That’s not really going to help us. We need those updates applied to the dbo.Contact table. Click on the Control Flow tab and add an Execute SQL task to the canvas. Click on the Data Flow Task and connect a green Precedence Constraint from the Data Flow Task to the Execute SQL task:
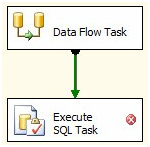
Figure 41
We’re going to execute a set-based update in this Execute SQL Task. I remember when I learned this syntax – it’s awesome! Rather than loop through the record one at a time, this applies the updates to the destination table almost all at once. Don’t believe me? Wait until we check those runtimes!
Double-click the Execute SQL Task to open the Execute SQL Task Editor. On the General page, change the Name property to “Apply Staged Updates” and the Connection property to “(local).AdventureWorks”. Click the ellipsis in the SQLStatement property to open the Enter SQL Query window, and then enter the following T-SQL statement:
Update dest
 Set dest.FirstName = stage.FirstName
  , dest.MiddleName = stage.MiddleName
  , dest.LastName = stage.LastName
 From dbo.Contact dest
   Join dbo.StageUpdates stage
    On stage.Email = dest.Email
This statement joins the StageUpdates table and the dbo.Contact table to apply the updates from stage to the destination. Before we execute the package, let’s reset the rows in the destination database to simulate a difference between the source and destination tables – as we did earlier. Execute this T-SQL statement in SSMS:
Use AdventureWorks
go
Update dbo.Contact
 Set MiddleName = 'Ray'
 Where MiddleName Is NULL
Now return to BIDS and press F5 to execute the SSIS package. My Control Flow appears as shown:
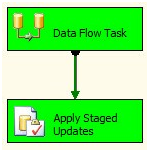
Figure 42
My Data Flow task looks like this:
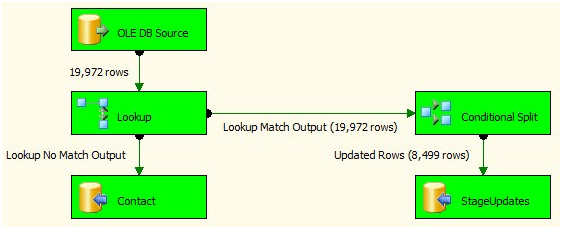
Figure 43
And – this is the part that’s so cool – the Progress tab in BIDS shows an improved execution time:

Figure 44
1.419 seconds is better than over 3 ½ minutes!
We still need to manage the StageUpdates table some more. The current configuration will continue to stack records to be updated in the StageUpdates table forever. That has to change. What we could do is delete the records from StageUpdates after we apply the updates to the dbo.Contact destination table. Here’s why I don’t: If something “bad” happens during execution, having these records hanging around between executions allows me one more data point to check for clues. Because of this, we’ll truncate the table before the Data Flow Task loads the table – leaving the records in the StageUpdates table between executions. Cool?
To accomplish this, first stop the BIDS debugger if it’s still running. Then drag another Execute SQL Task onto the Control Flow canvas. Connect the green Precedence Constraint from the new Execute SQL Task to the Data Flow Task:
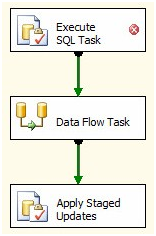
Figure 45
Double-click the Execute SQL Task to open the editor. Configure the General page for the Execute SQL Task as shown in Figure 46:
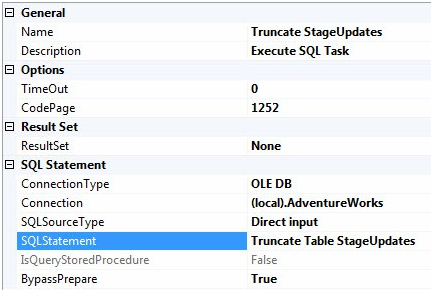
Figure 46
We’re ready to execute the next test. Press the F5 key to execute the SSIS package in the BIDS debugger:
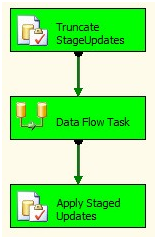
Figure 47
And the Data Flow Task is executing an Incremental Load:
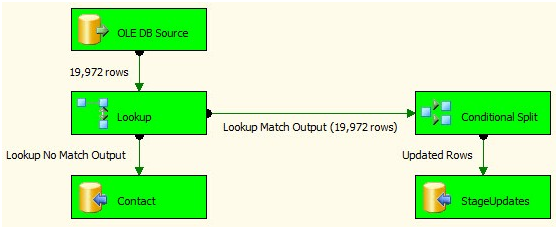
Figure 48
Cool!
Conclusion
In this article, we started with an SSIS Incremental Load that would successfully load data if there were no changes to existing data stored in the destination. This is a valid use case for data like the high temperature for a given date or currency exchange rates at the end of a day. Some data, however, changes over time. To capture these changes, we need to detect differences between the source and destination and apply updates to the destination.
This article covered a couple ways to accomplish the updates; one remarkably faster than the other.
Next up: deleting rows from the destination that have been deleted from the source.
:{>


