A permission gives a principal access to an object to perform certain actions on or with the object. SQL Server has a mind-numbingly huge number of permissions that you can grant to a principal, and you can even deny or revoke those permissions. This sounds a bit complicated, but by the end of this stairway level you’ll understand how SQL Server permissions work and how you can exert very granular control over object creation, data access, and other types of actions on database and server objects.
Permissions
A permission is like a visa that lets you visit a foreign country, usually with some basic conditions, such as that you are welcome for only six months and that you are restricted to travel in only three of the seven regions of the country. In a similar way, a SQL Server permission gives the principal access to a database object to do certain kinds of things with or to the object, or to perform an action. The permission might enable the principal the ability to read a table’s data or some portion of it, or the ability to run a specific piece of code. Perhaps it is even the ability to grant permissions to other logins. You can grant literally hundreds of different kinds of permissions to various principals.
When granting permissions you want to follow the principle of least privilege. Least privilege means that you give a principal exactly the permissions it needs to accomplish a task—no more and no less. By adhering to the principle of least privilege, you take a major step in securing a database. If the only thing a principal can do in a database is read some product information, the principal will not be able—intentionally or accidentally—to delete the contents of a table. You are essentially building a tight container around what the principal can do.
Permission Types
SQL Server has several kinds of permissions that you can grant to a principal to control access to securable objects. Here is a list of a few of the most common permissions you’ll encounter and use in SQL Server:
- CONTROL: Confers essentially all possible permissions on the securable object, making the principal a virtual owner of the securable. This includes the ability to grant permissions on the securable to other principals.
- CREATE: Confers the ability to create a particular object, depending on the scope in which it is granted. For example, the CREATE DATABASE permission allows the principal to create new databases in the SQL Server instance.
- ALTER: Confers permission to change the properties of the securable object, except to change ownership. This permission implies other permissions to alter, create, and drop objects within the same scope. For example, an ALTER permission on a database includes permission to alter tables and schemas.
- DELETE: Allows a principal to delete any or all data stored in a table. A very dangerous permission indeed!
- IMPERSONATE <login> or IMPERSONATE <user>: Confers on the principal permission to impersonate another login or user. Impersonation is often used to give a principal the permissions of another principal for a given object. This is commonly used to change the execution context of a stored procedure when it executes.
- INSERT: Allows the principal to insert new rows into a table.
- SELECT: Grants the principal the permission to read data from a specific table. This is the most common permission that users need, so that they can execute queries on the table.
- TAKE OWNERSHIP: Confers on a principal permission to take ownership of an object. Granting this permission does not immediately transfer ownership. Instead, it allows the principal to take ownership at some future time.
- UPDATE: Allows the principal to change the data in a table.
- VIEW DEFINITION: Confers on a principal permission to view the definition of a securable object. This is an important permission because structural information is useful in attacking a database. Without this permission, an attacker’s abilities to discover juicy targets in a database or server instance are severely limited.
The CREATE and ALTER permissions have variations that use the ANY keyword: CREATE ANY <object type> and ALTER ANY <object type>. These permissions confer the permission to create or change any securable object of the specified type. For example, granting ALTER ANY SCHEMA at the database level allows the principal to change the properties of any schema in the database. At the server level, ALTER ANY LOGIN allows the principal to change any login on the server. Using ANY gives you the flexibility to allow a principal to create or change an entire class of object rather than just a single specific object. Just be aware that there are some subtle differences between the two forms of the CREATE and ALTER permissions.
When you consider the number of securable objects in SQL Server and the number of potential permission types an object can have, you begin to get a sense of just how granular permissions are. You can apply the principle of least privilege to implement a permission set for any user or role by giving the user exactly the permission necessary to accomplish a task without exposing other objects to abuse.
Tip
If you’ve used very early versions of SQL Server, you’ll recognize that SQL Server 2005 and later completely revamped the available permissions. You no longer have to assign a user to a role that might have dozens of unnecessary permissions, thereby violating least privilege and exposing your database to intentional or accidental abuse.
A major consideration here is that granting a permission doesn’t necessarily effectively grant the ability to perform an action. Sometimes other permissions are required as well, providing an overall security context around the ability to perform sensitive actions. One very common example of this is the CREATE TABLE permission. It is quite possible to grant this permission, which theoretically allows a principal to create a table within a specific database. But the principal also needs the ability to create the table somewhere, specifically within a schema. If the principal doesn’t have the ALTER permission on any schema, she won’t be able to create a table.
Permission Statements
Even when you assign permissions in a graphical tool such as Management Studio, Transact-SQL permissions statements are being executed under the covers. Three statements cover the types of permissions you can assign:
- GRANT: Grants a permission on a securable object or action to a principal.
- REVOKE: “Un-grants” a permission, undoing what a GRANT statement did earlier. A revoked permission can still be inherited through membership in a group or role that has the permission. Revoke is the default permission state when you create new objects, so that specific permissions are not granted but can be inherited.
- DENY: Deny revokes a permission so that it cannot be inherited. This is the most restrictive permission, and takes precedence over all other permissions. DENY does not apply to members of the sysadmin role or the owner of an object.
Don’t underestimate the importance of being able to deny permissions—it can come in very handy. For example, suppose you have a temporary employee who comes in to do data entry and you don’t want that employee to be able to edit or delete existing records. Say you have granted full permissions on some tables to a custom editor role (which everyone in the office belongs to). You could create a special login for the temp, and then deny UPDATE and DELETE permissions on the appropriate tables. The temp would inherit enough permissions from membership in the editor role to be able to enter new records, but won’t be able to do any damage to existing records.
Granting Permissions
The most flexible way to grant permissions in Management Studio is to modify the properties of a database user or role. You can also grant permissions by modifying the properties of individual objects, but this approach is less flexible and has a higher maintenance cost.
The following exercise will create a custom database role in the AdventureWorks2012 database. The members of this role, who are in the Human Resources department, will need the permissions necessary to enter and update data in a few HR-related tables and execute a couple of relevant stored procedures, but have no other access in the database.
Tip
Once you configure permissions for a user and then have to repeat the process for another user, granting the same bundle of permissions as for the first user, it becomes clear that it is far easier to assign the permissions to a role and then simply add users to the role.
You’ll make use of the Topaz user created in Level 2 of this Stairway in the AdventureWorks2012 database. If you didn’t create the user then, execute the code in Listing 4-1 in Management Studio to create the login and user.
USE master;
GO

CREATE LOGIN Topaz WITH PASSWORD = 'yBqyZIPT8}b]b[{5al0v';
GO

USE AdventureWorks2012;
GO

CREATE USER Topaz FOR LOGIN Topaz
    WITH DEFAULT_SCHEMA = HumanResources;
GO
Listing 4-1: Create a login and map it to a database user
You’ll need a DataEntry user-defined database role in the AdventureWorks2012 database. Follow these steps to create it.
- In Management Studio, connect to a database server instance with the AdventureWorks2012 database installed. In Object Explorer, expand the Databases and AdventureWorks2012 nodes, then the Security and Roles nodes to show the Database Roles node.
- Right-click the Database Roles node and select New Database Role from the pop-up menu to open the Database Role dialog box.
- In the Role Name box, type DataEntry and enter dbo for the owner.
- Click the Add button and add the user Topaz to the role. (Create that user in the AdventureWorks2012 database if it doesn’t already exist.) After you’ve closed the Select Database User or Role dialog box, the Database Role – New dialog box should look like Figure 4.1.
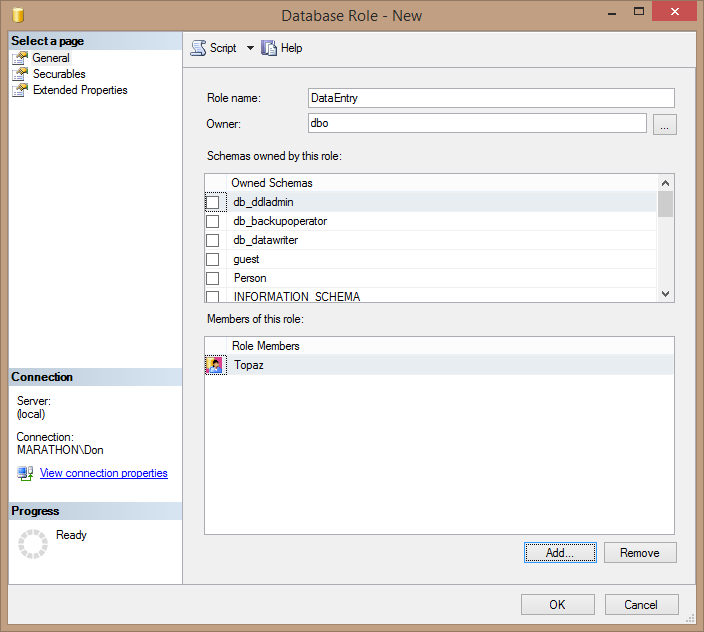
Figure 4.1. Creating the DataEntry database role and adding the user Topaz.
- Click OK to save your changes and create the DataEntry role.
At this point the DataEntry role doesn’t allow Topaz and other users you add to the role to do much, since you haven’t set any permissions for the role. The members of the DataEntry role need to be able to add and update data in the Employee, Address, and JobCandidate tables in the AdventureWorks2012 database. They also need to be able to execute the uspUpdateEmployeeHireInfo and uspUpdateEmployeePersonaInfo stored procedures. But these members should not be able to view the definitions of the stored procedures.
Use the following steps to add and deny the appropriate permissions to the DataEntry role.
- In Management Studio’s Object Explorer, expand the AdventureWorks2012 database’s Security node down into the Roles and Database Roles nodes.
- Right-click the DataEntry node and select Properties from the pop-up menu. This opens the Database Role Properties dialog box.
- Select the Securables page in the list to the left in the dialog box. This page lets you select the securable objects that this role has permissions for, and to specify the exact permissions that you want to grant to the role.
- Click the Search button to add securable objects. This opens the Add Objects dialog box, which provides options to select specific objects, all objects of a specific type, or all objects that belong to a particular schema. In this case, because you want to add permissions for both tables and stored procedures, leave the default selection of Specific objects as shown in Figure 4.2, and click OK.
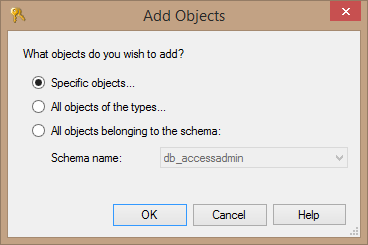
Figure 4.2. Selecting the kinds of objects on which to grant permissions.
- The Select Objects dialog box opens. Click the Object Types button to open the Select Objects Types dialog box and select Stored procedures and Tables from the list, as shown in Figure 4.3. Click OK to close the dialog box and return to the Select Objects dialog box, which now looks like Figure 4.4. You’ll see Stored procedures and Tables listed in the Object Types box.
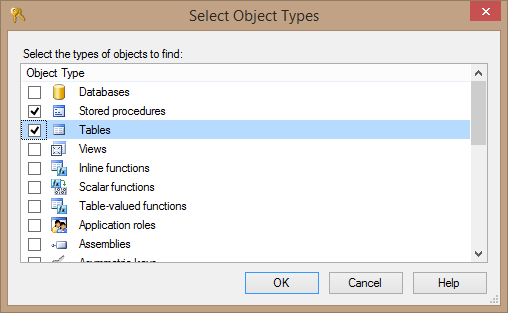
Figure 4.3. Selecting object types on which to grant permissions.
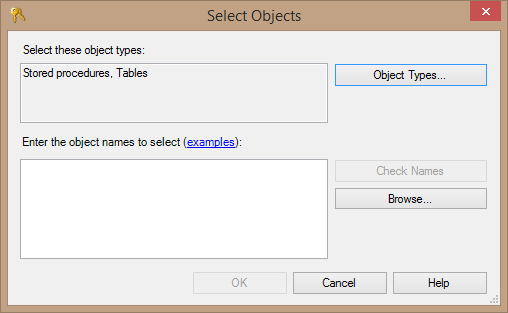
Figure 4.4. The Select Objects dialog box after selecting Stored procedures and Tables.
- Click the Browse button to see a list of the stored procedures and tables in the database. This opens the Browse for Objects dialog box. Scroll down to find and select these objects:
- HumanResources.Employee table
- HumanResources.JobCandidate table
- HumanResources.uspUpdateEmployeeHireInfo stored procedure
- HumanResources.uspUpdateEmployeePersonalInfo stored procedure
- Person.Address table
The dialog box should look like Figure 4.5 when you finish selecting the tables and stored procedures (I’ve increased the height of the dialog box to show all the selected items).
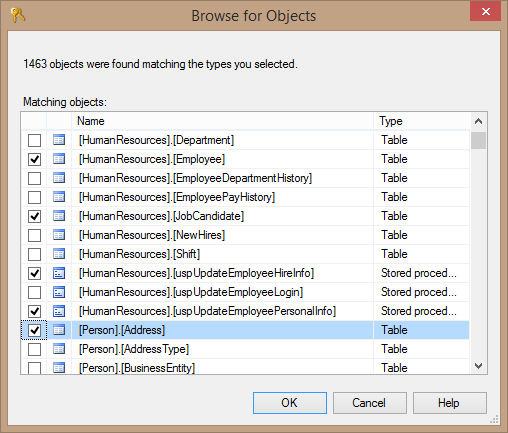
Figure 4.5. Selecting the stored procedures and tables to assign permissions.
- Click OK to close the Browse for Objects dialog box. Note that the objects you selected are now listed in the Select Objects dialog box in a semicolon-delimited list, shown in Figure 4.6. Click OK to close this dialog box and save your changes.
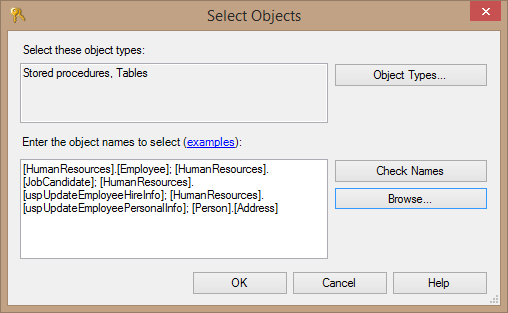
Figure 4.6. The result of selecting objects to assign permissions.
- The Database Role Properties dialog box for the DataEntry role now lists the securable objects you selected and the available permissions for each. The members of the DataEntry role need to be able to insert and update data into these tables, so one at a time, select each of the three tables, and in the lower part of the dialog, click the check box in the Grant column for these two permissions. Figure 4.7 shows how the selections look for the HumanResources.Employee table.
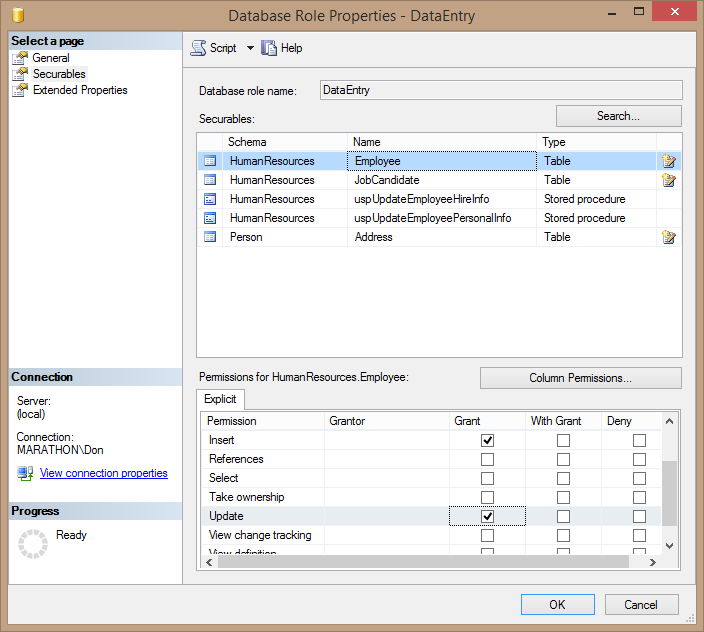
Figure 4.7. Selecting INSERT and UPDATE permissions on a table.
TIP:
Don’t be confused by the With Grant column. Grant allows the specified permission and With Grant allows the user or role to grant the permission to other principals. Be careful how you dole out the With Grant permission!
- For each of the stored procedures, grant the Execute permission and deny the View definition permission. Figure 4.8 shows how this will look for the useUpdateEmployeeHireInfo stored procedure.
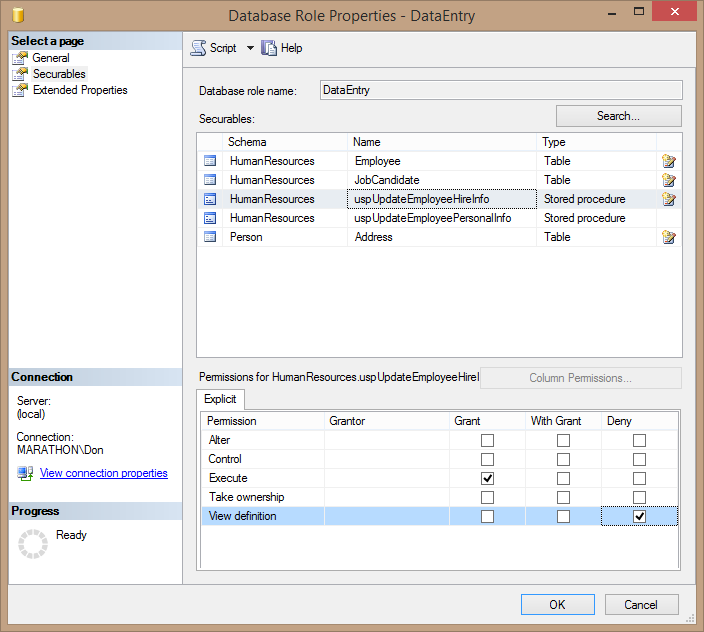
Figure 4.8. Setting Execute permission for the uspUpdateEmployeeHireInfo stored procedure and denying permission for View definition.
- Click OK in the Database Role Properties dialog box to save your changes and commit them to the database. Depending on the number of objects and permissions you selected, this may take a few moments.
Of course, you can create objects and assign permissions using T-SQL code as well. The code in Listing 4-2 creates the DataEntry role, assigns the user Topaz to it, and grants and denies the same permissions you assigned using the dialog boxes.
-- Create the DataEntry role and assign Topaz to it
CREATE ROLE [DataEntry] AUTHORIZATION [dbo];
ALTER ROLE [DataEntry] ADD MEMBER [Topaz];

-- Assign permissions to the DataEntry role
GRANT INSERT ON [HumanResources].[Employee] TO [DataEntry];
GRANT UPDATE ON [HumanResources].[Employee] TO [DataEntry];
GRANT INSERT ON [HumanResources].[JobCandidate] TO [DataEntry];
GRANT UPDATE ON [HumanResources].[JobCandidate] TO [DataEntry];
GRANT INSERT ON [Person].[Address] TO [DataEntry];
GRANT UPDATE ON [Person].[Address] TO [DataEntry];
GRANT EXECUTE ON [HumanResources].[uspUpdateEmployeeHireInfo] TO [DataEntry];
DENY VIEW DEFINITION ON [HumanResources].[uspUpdateEmployeeHireInfo] TO [DataEntry];
GRANT EXECUTE ON [HumanResources].[uspUpdateEmployeePersonalInfo] TO [DataEntry]
DENY VIEW DEFINITION ON [HumanResources].[uspUpdateEmployeePersonalInfo] TO [DataEntry];
GO
Listing 4-2: Code to assign the new role and assign permissions
Inspecting and Testing Permissions
If you want to inspect the permissions that the DataEntry role has, you can either use the GUI tools in Management Studio or execute T-SQL code that accesses database object metadata. To use Management Studio, expand the Security, Roles, and Database Roles nodes in Object Explorer for the AdventureWorks2012 database. Find the DataEntry role (you may have to refresh the list if you don’t see it), right-click the role, and select Properties from the pop-up menu. This opens the same Database Role Properties dialog box used to create a role, and you can use the Securables page to review the permissions for the role.
Or you can use T-SQL code like that in Listing 4-3 to view the permissions for the DataEntry role, making use of the sys.database_permissions and sys.database_principals security catalog views and the sys.objects catalog view.
SELECT DB_NAME() AS 'Database', p.name, p.type_desc, dbp.state_desc,
    dbp.permission_name, so.name, so.type_desc
FROM sys.database_permissions dbp
    LEFT JOIN sys.objects so ON dbp.major_id = so.object_id
    LEFT JOIN sys.database_principals p ON dbp.grantee_principal_id = p.principal_id
WHERE p.name = 'DataEntry'
ORDER BY so.name, dbp.permission_name;
Listing 4-3: Code to view the permissions metadata for the DataEntry role.
When you execute this code, you’ll see the results shown in Figure 4.9.

Figure 4.9. Permissions metadata for the DataEntry role.
You can test these permissions by opening a new instance of Management Studio and logging in as Topaz (if you used the code in this level or Level 2, the password is yBqyZIPT8}b]b[{5al0v). Then attempt to insert a new row or update an existing row in the HumanResources.Employee, HumanResources.JobCandidate, or Person.Address tables, and execute either of the stored procedures you assigned Execute permissions on. These actions should succeed. Then try to insert or update data in other tables; these actions should fail. You should only be able to perform actions allowed by the explicit permissions you’ve granted.
You can perform these same tests in T-SQL code as well, of course, using code such as that in Listing 4-4. The code starts by setting the execution context to Topaz, who is a member of the DataEntry role. Then it inserts a new row into the Person.Address table. This action succeeds, since DataEntry has INSERT permission on that table. Then the code attempts to insert a new row into the HumanResources.Department table, which fails because DataEntry has no INSERT permissions on that table. Next the code successfully executes the HumanResources.uspUpdateEmployeePersonalInfo stored procedure, since DataEntry has EXECUTE permission on that procedure. Executing the dbo.uspGetManagerEmployees fails, since DataEntry doesn’t have permission to execute that code. Finally, the code reverts the execution context back to how you logged into the database with Management Studio.
EXECUTE AS USER = 'Topaz';

-- Succeeds
INSERT INTO Person.Address
    (AddressLine1, City, StateProvinceID, PostalCode)
VALUES
    ('8 Hazelnut', 'Irvine', 9, '92602');
GO

-- Fails
INSERT INTO HumanResources.Department
    (Name, GroupName)
VALUES
    ('Advertising', 'Sales and Marketing');
GO

-- Succeeds (doesn't actually change any data)
DECLARE @RC INT;
EXECUTE @RC = HumanResources.uspUpdateEmployeePersonalInfo
   1, '295847284', '1963-03-02', 'S', 'M';
GO

-- Fails
EXECUTE dbo.uspGetManagerEmployees 1;
GO

REVERT;
Listing 4-4: Code to test the permissions on the DataEntry role.
Tip:
The sample code for this Level contains clean-up code that removes the changes made by the code and actions in this Level.
Summary
The ability to assign granular permissions on securable objects throughout SQL Server to various types of principals gives you very fine control over the security of a SQL Server instance. It lets you make good use of the security principle of Least Privilege, which limits the abilities of principals to perform actions and access your data to the absolute minimum that they need to perform their job, and no more.

