Level 3: Transactional Replication – The Publisher
The Publisher is the database where all replicated data originates. Each Publisher can have multiple publications defined within it. Each publication contains a set of articles that all need to reside in a single database. Each article corresponds to all or part of a single database object. A single database object can map to an article in more than one publication.
Setting up a publication
To be able to create a publication, you have to first associate the publisher with a distributor. The distributor can be the same SQL Server instance (Local Distributor) or it can be a separate instance on a separate machine (Remote Distributor). Details about setting up the distributor and establishing the publisher to distributor link can be found in Level 2 of this Stairway.
Who can create a publication?
Any member of the db_owner fixed database role can define a publication in a database, once the database has been enabled for replication by a member of the sysadmin fixed server role. To enable a database for replication, connect to the publisher in Object Explorer and right click on the replication folder. Select “Publisher Properties…” in the drop down menu, as shown in Figure 1.

Figure 1: Publisher Properties
The dialog that opens has two pages. The first (“General”) allows you to change the Administrative Password that is used to connect to the distributor. The second page (Publication Databases), shown in Figure 2, is the place to enable databases for publishing. For each database you can select if transactional and/or merge replication should be allowed.
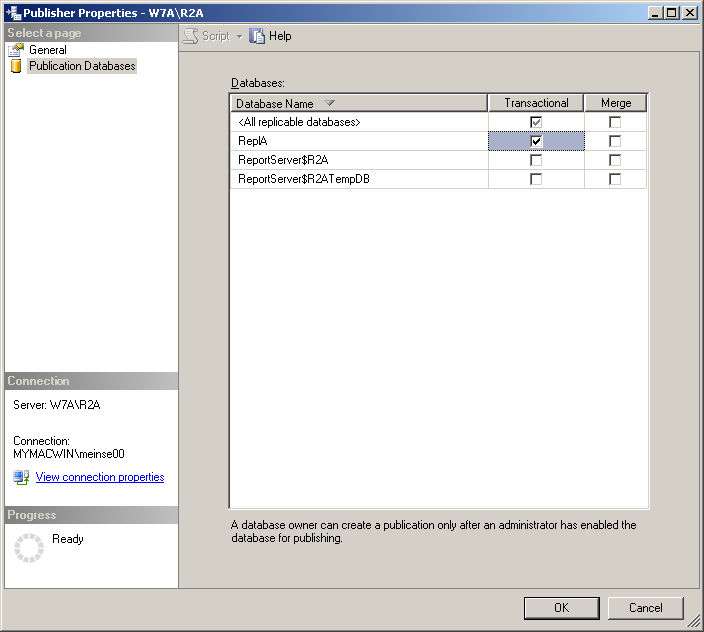
Figure 2: Enabling databases for publishing
New Publication
Once you have a distributor associated with your publisher and the database you want to publish from is enabled for publishing, connect to the publisher in Object Explorer. Open the “Replication” folder and right click on “Publications”. Select “New Publication…” in the drop down as shown in Figure 3.

Figure 3: Selecting "New Publication..."
The “New Publication Wizard” opens. The first screen in the wizard that requires a selection is the “Publication Database” screen, as you can see in Figure 4.
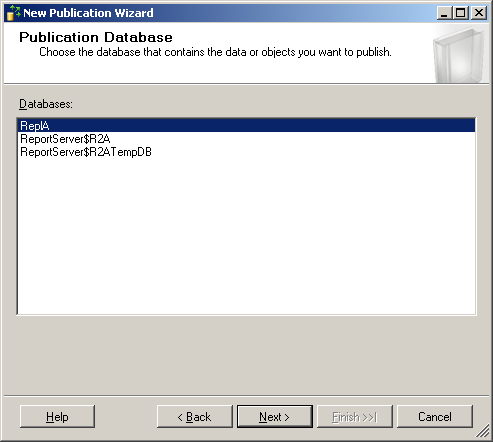
Figure 4: Choosing the publication database
Select the database that you want to publish from and move on to the following screen. Here, as you can see in Figure 5, you get to select the publication type. As we’re discussing transactional replication at the moment, choose “Transactional publication”.
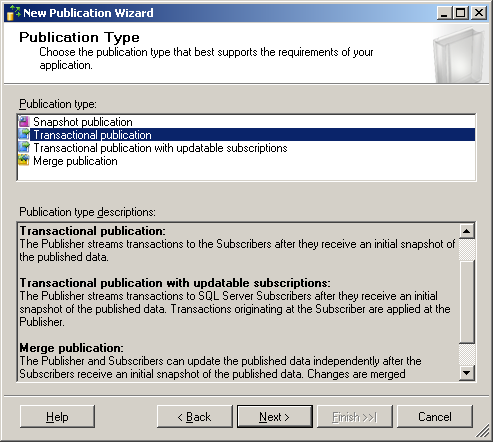
Figure 5: Selecting the Publication Type
The other options are “Snapshot publication”, “Transactional publication with updatable subscriptions” and “Merge replication”. Snapshot and Merge replication have been briefly introduced in Level 1 of this Stairway. Merge replication will also be covered in greater detail during later Levels.
Transactional replication with updateable subscription is an advanced topic that allows a subscriber to relay changes back to the publisher. This is however not a truly bidirectional setup, so if your goal is bidirectional replication check out Merge Replication. If you have Enterprise Edition of SQL Server you can also use Peer-To-Peer Transactional Replication which is truly bidirectional. For more information on these advanced topics check out Books Online.
Articles
After the publication type is selected, the next step is to define the articles for the publication. An article is always based on a single object in the publisher database. As you can see in Figure 6, the Articles page of the New Publication Wizard lists all objects that can be replicated. The list of objects includes Tables, Stored Procedures, Views, Indexed Views and User Defined Functions.
A table article by default replicates the data in the table as well as schema changes to the table. For a stored procedure you can choose to replicate the procedure definition, or the definition and each execution. Views and functions replicate the schema only. Indexed views get replicated as tables, including schema changes and data. For a complete list of possible articles and their restrictions check out Publishing Data and Database Objects in Books Online.
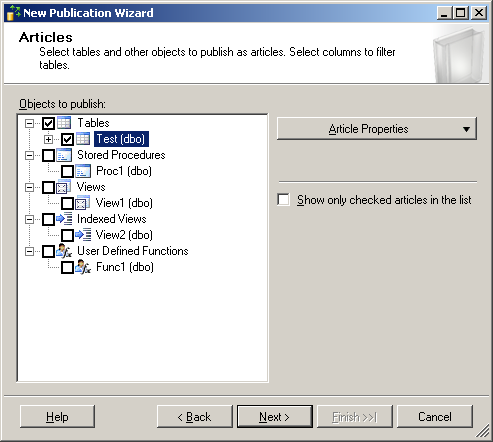
Figure 6: Articles
For table articles you have a choice of having all columns published or only a subset. If you click on the little plus sign next to a table on the Articles form in Figure 6, all columns of that table appear beneath it. An example of this is shown in Figure 7. The only requirement for filtering columns is that the primary key needs to be replicated. All other columns can be omitted. (The Wizard does not allow all types of columns to be dropped. See Publishing Data and Database Objects in Books Online for details). This type of filter that chooses individual columns is called a “vertical filter”.

Figure 7: Select Columns for Publication
With the “Article Properties” button (see Figure 6) you can set several options for each article in your publication. Some of these options are shown in Figure 8. You can also set the options for all articles of a single type in one shot. The list of available options changes depending on the type of article you have selected. Here you can define the name of the target object, what to do if the target object does already exist, if you want to replicate only the definition or also each execution of a stored procedure, etc. For a detailed list I again refer you to the above mentioned article Publishing Data and Database Objects in Books Online.
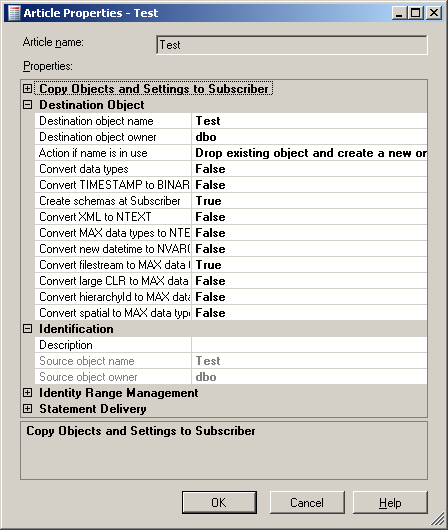
Figure 8: Article Properties
If you selected at least one table for publication, the following screen in the wizard will allow you to define row filters. A filter looks like a SELECT statement in which you can define a WHERE clause. This type of filter is called a “Horizontal Filter” and is shown in Figure 9.
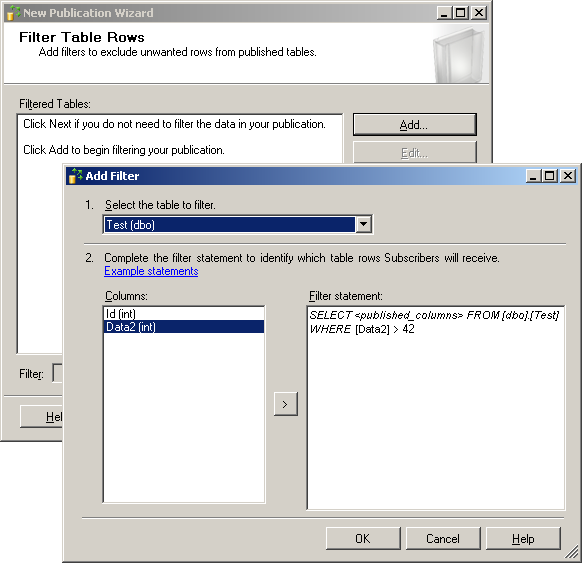
Figure 9: Defining a Horizontal Filter
Snapshot
After the articles are defined, the next step in setting up a publication is to schedule a snapshot for the initial synchronization from source to target. The snapshot agent is responsible for creating this initial copy of object definitions and data and storing it in the snapshot folder on the distributor.
You can choose to run this step right away, or schedule it for execution at a later time, as you can see in Figure 10. If you are going to schedule the execution, you can create a schedule using all the options that are available for scheduling a SQL agent job.
In the case where you are setting up a publication that is going to have only one subscriber, your best bet is probably to go for immediate snapshot creation. If you have the need to often synchronize or resynchronize subscribers, having the snapshot refreshed regularly will insure that you always work with fresh data. Keep in mind however that creating a snapshot, particularly of big tables, can be quite expensive. The snapshot generation by default takes a table lock on all tables involved until the entire snapshot generation process is finished. Depending on the size of the tables and the network speed, this can take several hours. There are ways to make snapshot generation less intrusive, but the SSMS GUI does not give us access to those settings.
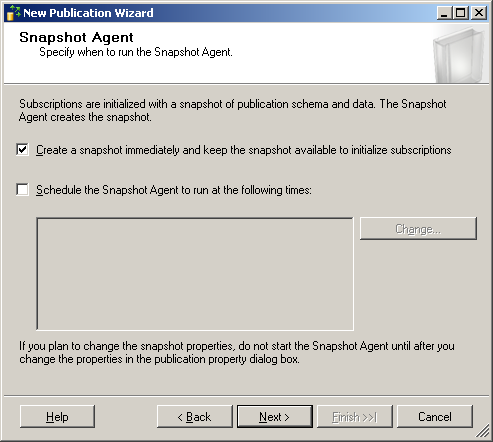
Figure 10: Snapshot Schedule
Security
The next step on our way to a working publication is to set the accounts under which the agents are to run. This selection happens on the “Agent Security” page of the New Publication Wizard, shown in Figure 11.
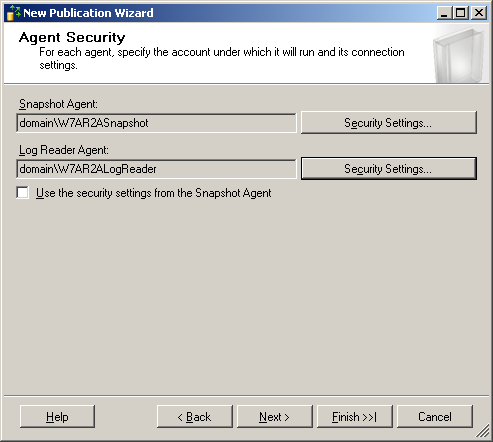
Figure 11: Agent Security
The two agents that are involved in the processing of a transactional publication are the snapshot agent and the log reader agent.
For the snapshot agent you can provide a Windows login or you can choose to run the agent using the SQL Server Agent Service Account. Figure 12 shows you these two choices. The documentation however warns that the latter is not a recommended security best practice.
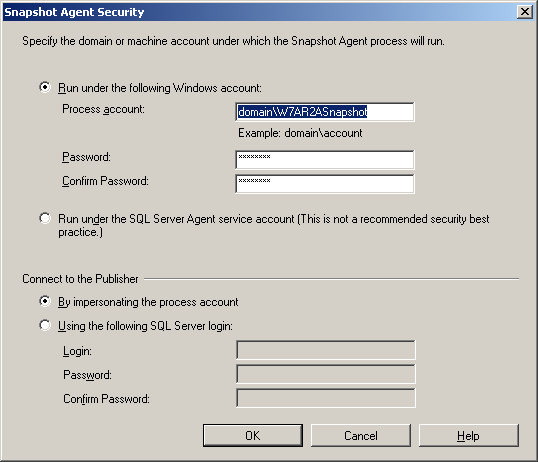
Figure 12: Agent Accounts
The second choice on this form tells the agent how to connect to the publisher. You can either select for the agent to use Windows authentication, or provide a SQL Login for the connection to the publisher.
For the log reader agent you have the same options to choose from. You can also just pick to use the same settings that you provided for the snapshot agent.
While there is one snapshot agent per publication, there is only a single log reader agent for each publication database. If you already have a publication defined you cannot change the log reader agent account at this point. You can however still define a different SQL Server Login for the log reader to use to connect to the publication database for the new publication.
The snapshot agent is responsible for moving data from the publication database to the snapshot folder/share as well as to the distribution database. To be able to do that, the snapshot agent account needs to be a member of the db_owner fixed database role in the publication database and in the distribution database. The account also needs to have write permission on the snapshot folder/share. If you selected to use SQL Server authentication to connect to the publication database, that account needs to be a member of the db_owner fixed database role in the publication database. The snapshot agent account does not need to have access to the publication database in this case.
The log reader agent also copies data from the publication database to the distribution database, but it does not make use of the snapshot folder share. Therefore the log reader agent account needs to be a member of the db_owner fixed database role in the distribution database. The account used to connect to the publisher (either the log reader agent account itself or a provided SQL Server Login) needs to be a member of the db_owner fixed database role in the publication database.
Completing the Publication Setup
After the agent accounts are setup you have two more wizard pages remaining. The first asks you to specify whether the publication should be creating immediately on completion of the wizard, or if a script should be created to allow execution at a later time.
The last page, shown in Figure 13, displays a summary and asks for a publication name. The name needs to be unique per publication database. If you publish from several databases you can reuse the same name. However, if you have multiple publications, I strongly recommend using meaningful and distinguishable names for them. There are a lot of moving parts involved in each replication setup. There is no need to cause additional confusion by choosing the same or similar names for multiple publications.
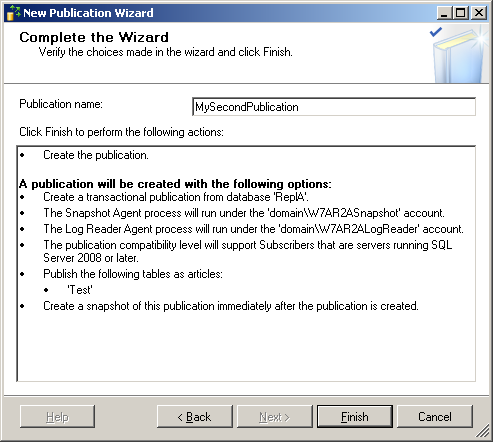
Figure 13: Selecting a Publication Name
Potential Problems
Because there are so many steps and so many decisions when setting up replication, there is a chance that some aspect of the replication process might not be set up correctly. The most common problem is that one of the accounts does not have appropriate rights.
If you run into problems go through all accounts used in this setup and make sure that the right permissions have been granted. The error messages are not always pointing in the right direction. For example “The remote server "W7A\R2A" does not exist, or has not been designated as a valid Publisher...” means that the snapshot agent cannot access the distribution database. It is also not always straight forward to find the error messages in the first place. Details on how to troubleshoot replication will be given in Level 9 of this Stairway.
If you are using a snapshot share that is located on the Distributor, you will have to grant write access for the snapshot agent account on both the share and the underlying folder.
If you use Windows domain accounts for the different agents and use impersonation to connect to the other servers, you might have to grant the Windows account that is executing the SQL Server Service read access to the Active Directory. Check out Books Online and the Windows documentation for details on this.
In general it is advisable to execute the replication wizards when connected using a SQL Server Login (e.g. SA), instead of a Windows login. There are a lot of reasons for this that go beyond the scope of this article. But in general you will have a lot less issues, particularly but not only with replication, if the objects you are dealing with are owned by a user associated with a SQL Login and not a Windows login.
Executing the wizard as ‘SA’ will make sure that you do not run into any issues because of this.
Summary
This Stairway Level introduced the publisher. We learned who is allowed to create a publication, how to add articles to a publication and what article types there are. We discovered how to schedule snapshot generation and what permissions are required by the different agents involved in a transactional replication publication. Some potential problems you might run into where also pointed out.
As with the distributor, after setting up the publisher there is really not a lot to see yet. But there are two signs now. One you can see by drilling down into the Local Publications in Object Explorer. This is shown in Figure 14.
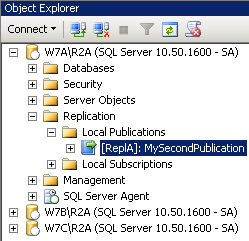
Figure 14: Local Publications
The other one is not directly visible but might become a visible problem. It is the fact that all changes to the publication articles are now recorded in the distribution database, but nobody is reading it from there. So the distribution database will grow, potentially a lot. To prevent that from happening continue on with this Stairway and learn about how to set up a subscriber to this publication in the next step.
