SQL Server Agent is SQL Server's job scheduling and alerting service and, when used properly, it can greatly simplify the workload of a Database Administrator (DBA).
At the heart of SQL Server Agent is the facility to run batch jobs. A 'batch' is simply a "set of actions", often defined using a Transact-SQL script. These can then be run as a job, on a specific schedule, which you might choose to be at times when few users are accessing the system; in other words, they are scheduled as batch jobs, using SQL Server Agent. These batch jobs can be anything from trivial T-SQL tasks to complex, multi-system jobs run across several SQL Server instances and multiple computers. SQL Server Agent also allows you to notify users, via email for example, when a particular batch job completes, or when an error happens (the Notification engine is covered in Level 3).
It is very likely that you, as a DBA, will immediately be able to make use of SQL Server Agent to schedule jobs on a new SQL Server deployment. For example, your first job might be to backup the system databases, with a mail alert to tell you whether the backup job completed or failed. Subsequent jobs will probably include setting up and scheduling backups of your user databases, index maintenance operations (rebuilds or reorganizations), and so on. If you are managing a fairly simple SQL Server system, then you will enable maintenance plan job scheduling, for example, using the SSMS database maintenance plan wizard.
This article is the first level in a Stairway exploring the features of SQL Server Agent, and discussing how to take full advantage of SQL Server Agent. It will introduce the majority of the components and capabilities of SQL Server Agent, show to the get the services running, and demonstrate how to create and run a simple batch job from SSMS. Subsequent levels will then drill into each major component in much greater depth, including how to use SQL Server Agent using SMO, PowerShell, and Transact-SQL.
This series will focus on SQL Server 2005, SQL Server 2008, and SQL Server 2008 R2; however, the majority of the information in this series also applies to SQL Server 2000.
Getting SQL Server Agent Running
SQL Server Agent is not enabled by default during the initial setup of SQL Server, so the first simple step to using SQL Server Agent is to get the SQL Server Agent service running.
Setting the Agent to Auto-start with SQL Server
To set SQL Server Agent to auto-start, open up the SQL Server Configuration Manager utility, found in the "Microsoft SQL Server 2008" | "Configuration Tools" folder. You will need to be a local windows administrator (or be best friends with one) to run this utility.
Once started, the utility should automatically be connected to your local machine. Click on the "SQL Server Services" option in the tree. In the right panel you should see a list of the installed SQL Server services. One of these should be "SQL Server Agent (instancename)" where instancename is either the name of the instance used when you installed SQL Server or "MSSQLSERVER" if you're configuring a default instance. If the Start Mode is already set to automatic, great, it was correctly configured during setup. If not, double click SQL Server Agent, click on the "Service" tab in the properties dialog that appears, and click on the drop-down next to Start Mode. Select Automatic, then click Apply (see figure 1.1 for what this should look like). Now SQL Server Agent will automatically start when the server is restarted, and SQL Server is running. If for some reason SQL Server Agent is not running, start the service now.

Figure 1.1 – SQL Server Configuration Manager for SQL Server Agent
Service Account Selection
You need to ensure that you have an appropriate service account configured based upon what you plan on doing with SQL Server Agent. If you were following along, you are on the Service tab of the SQL Server Agent properties. Click over to the Log On tab. For basic operations of SQL Server Agent, you can use a built-in account, such as Network Service (the service account will be set to whatever was selected during the initial installation of SQL Server). Figure 2 shows the selection dialog. Simply select Network Service from the list under "Built-In Account". If you intend to have SQL Server Agent connect to remote machines (to copy files, for example, or to administer multiple systems) then you will want to switch to using a domain user account (the "This account" option covered by the drop-down in Figure 1.2); probably one specifically created for this purpose. This is something you would need to request from your Domain Administrator. You will need an ordinary user account from the Domain Administrator's perspective. In either event, select the correct service account, and once you've made any changes, you will need to select the Restart button to have the new changes take effect. Once you've completed that, click the OK button to finish configuring the SQL Server Agent service. You can read more about service account selection at http://msdn.microsoft.com/en-us/library/cc281953.aspx.

Figure 1.2 – Service Account selection for SQL Server Agent
Creating your first Job
Now that SQL Server Agent is running, you can create your first job. By way of demonstration, we'll set up a job to perform one of the critical DBA tasks, which is to back up your system databases so that, rather than having to remember to manually back up these databases, you can create an automated job that will do it for you.
Jobs
A job is the core container for a single logical task, such as backing up a database. That task will contain one or more job steps. The job may include notifications (for example, email the DBA if a job fails), schedules (when you want the job to run), and may even run on multiple systems. For our first backup job, however, we will keep it simple.
To create the job, open SSMS and connect to your instance of SQL Server. Expand the SQL Server Agent node, then right-click on Jobs. Select the option to create a new job ("New Job…") as shown in Figure 1.3.

Figure 1.3 – Launch the New Job Dialog
A job has a number of components, as you can see in Figure 1.4.
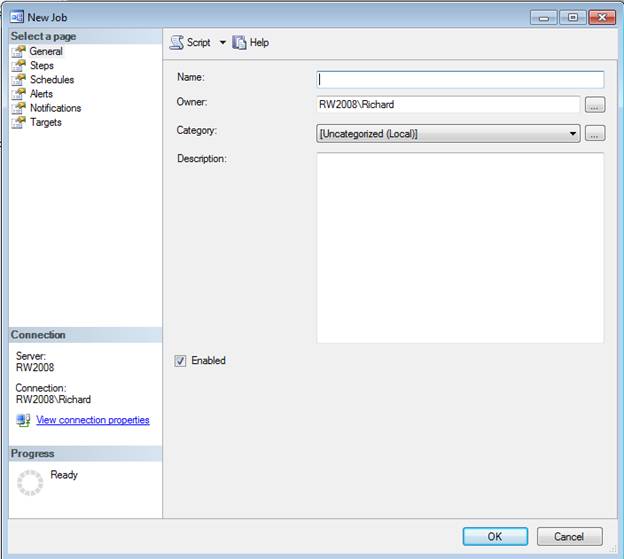
Figure 1.4 – The New Job Dialog
We will name the job "Back Up Master Database". This will be the name used to refer to the job in the SSMS GUI or from PowerShell. Job Categories can be a useful way of organizing your jobs, but it's not important for your first job to set a category. You'll learn how to specify categories in a later level. In the Description box, write something that will help you remember why you created this job and what it's supposed to do. Remember that someone else may well have to administer this system later and, since they didn't create this job, they won't know what it's supposed to accomplish and whether or not it's critical.
Having done all this, you're basically done creating the job 'shell', which is just the 'shell container' for all the components you see as tabs on the New Job Dialog. The most important parts of the job are the components that are on the other tabs.
Job Steps
A job within SQL Server Agent is made up of at least one job step. When most people think of a SQL Server job performing some work, what they really mean is a job step. A job step is defined by the type of action you wish to perform, and includes the ability to run the following job subsystems:
- ActiveX
- Operating System (CMDExec)
- PowerShell
- A variety of replication tasks
- SQL Server Analysis Services (SSAS) Command (i.e. XML/A)
- SQL Server Analysis Services (SSAS) Query (MDX)
- SQL Server Integration Services (SSIS) Package (DTS Package in SQL Server 2000)
- Transact-SQL Script (T-SQL)
For most SQL Server DBAs, the majority of your jobs will be using the last type of job step, T-SQL. A job can be run as the job owner, or using another security context, depending upon the permissions of the job owner and configuration of proxies. Job Steps and Subsystems will be covered in more detail in the next level.
As you can see in the SSMS GUI, the tab to control Job Steps is simply called "Steps". Click on that now, and we will create a job step. Click the "New" button on the bottom of the dialog, and the "New Job Step" dialog launches (see Figure 1.5).
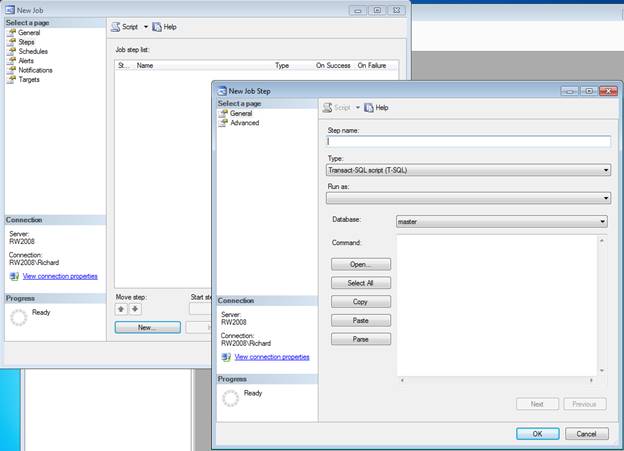
Figure 1.5 – New Job Step
Give the Job Step a useful name – in our case, the job name and the step name are probably identical – "Backup Master Database". The job step type will be T-SQL, as we will use a simple BACKUP command for our database backup. You can ignore "Run as" for now, as by default we will run the job step as the owner of the job (i.e. you). The database is set correctly by default for what we are doing, which is to work in master.
For the command itself, you can open a file , or copy and paste in some valid T-SQL you've written in a query window. To keep it simple, we're doing a simple backup command. You will need to change the file location to one that works on your computer if you didn't install SQL Server on your C drive. The samples I'm showing come from a simple Virtual Machine install of SQL Server, all on a single hard drive. You shouldn't see a production SQL Server all on a single hard drive like this!
     BACKUP DATABASE master
TO DISK='C:\Program Files\Microsoft SQL Server\MSSQL10.MSSQLSERVER\MSSQL\Backup\master.bak'
WITH INIT
When complete it should look like Figure 1.6. Click OK to create the job step.
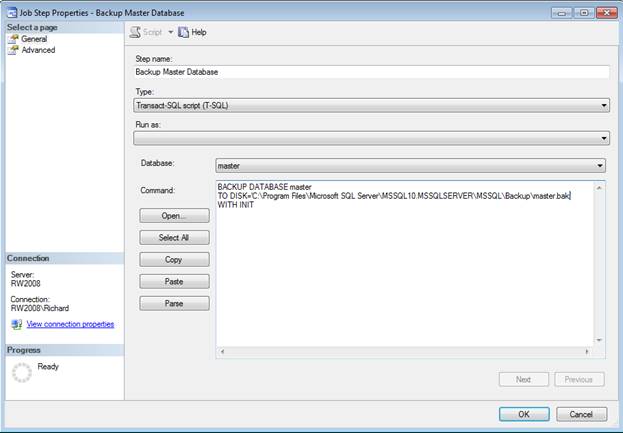
Figure 1.6 – the completed Job Step
Job Schedules
Job Schedules control when a job will actually be started. There are four types of job schedules:
- Start automatically when SQL Server Agent starts
- Start whenever the CPUs become idle
- Recurring
- One Time
The majority of the job schedules will be of the Recurring type (for example, run my backup once a week on Sunday at 7pm). Schedules are separate objects within SQL Server Agent, and a schedule may be connected to multiple jobs.
For our job, we want the database to be backed up weekly. So, click on the Schedules tab, and select New to create a new job schedule, as in Figure 1.7. Name the job schedule something practical (because they can be shared between jobs). I'll call this schedule "Weekly System backups". Luckily for us, the defaults on this page will work great! We'll have it run once a week, on Sunday, at Midnight. Click OK when you've named the schedule, then click OK again to finish the job creation.
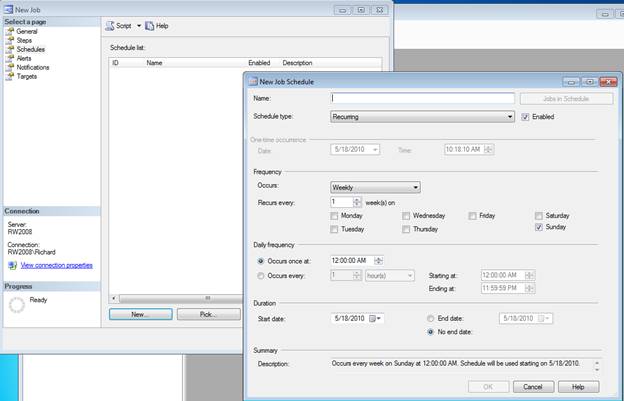
Figure 1.7 – New Job Schedule
Run the Job you just created
Now that we have created our backup job, it's a good idea to run the job to verify we did everything correctly. Even though we scheduled this job to run weekly, we can always run a job manually on demand. In SSMS, under the Jobs folder, you should now see your job. Right-click on the Job, and select "Start Job at Step…", as in figure 1.8. The job will run, and now your master database is backed up.
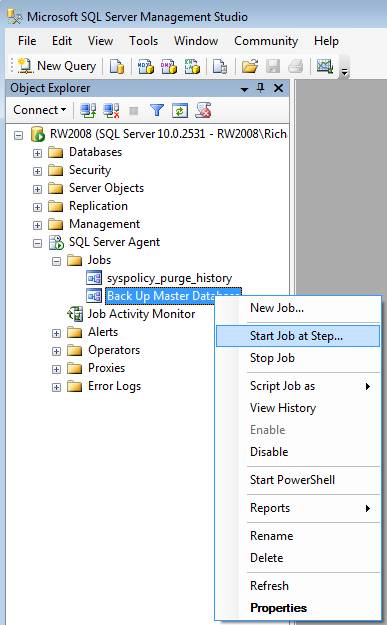
Figure 1.8 – Start Job in SSMS
What's Next?
Over the next several levels we will explore each area of SQL Server Agent in much more depth, along with specific examples of situations where jobs and alerts can greatly enhance the capabilities of your SQL Server system and make your life easier. The next level will focus on creating and configuring job steps, understanding the various job subsystems, and job step security.


