In this level we continue our journey into the SQL Server space by looking at the SQL Provider that comes with modules for PowerShell. You saw a little bit of the provider for SQL 2008 R2 in Level 2 of this Stairway. Table 8.1 shows how the form the SQL Server Provider takes in different SQL Server versions.
| SQL Server Version | Provider Source |
| SQL 2008/R2 | Snapins: SqlServerCmdletSnapin, SqlServerProviderSnapin |
| SQL 2012 | Module: SQLPS |
| SQL 2014 | Module: SQLPS |
Table 8.1 SQL Provider source by SQL Server Version
You will notice that in the SQL 2008/R2 line in Table 8.1 there is reference to Snapins. This is because in that version snapins, loaded with Add-PSSnapin, were used instead of modules. . In SQL 2012 and 2014 you see that the provider is contained in a module which can be loaded with Import-Module. Snapins are a PowerShell v1 concept although v2 could still load Snapins, Modules were introduced in v2 and can be deployed using xcopy. Snapins must be referenced in the registry which requires elevated permissions so modules are the preferred way to provide cmdlets today.
Loading the Provider and Pre-requisites
Let’s quickly look at how we load these items and their pre-requisites since newer versions are available, released since earlier levels of this Stairway. The providers are installed when you install the Workstation Tools from the SQL Server install media. If you do not want to do an install of SQL Server Management Studio and other tools, then you will need to download the providers and install the items from there. The components are in “Feature Packs” for each version of SQL Server. You can use your favorite Search Engine and search on “SQL 2012 Feature Pack” and choose the version that you want. In many cases you will see feature packs that have service packs referenced in the name, such as “SQL Server 2012 SP1 Feature Pack”. When you choose that feature pack for your particular version of SQL Server you will see items to download. In Table 8.2 you will see the items and URLs based on the version of SQL Server you have. These have to be installed in the order you see them in the table because each one relies on the previous one.
| SQL Server Version | Download Items |
| SQL 2008 SP 2 Feature Pack | http://www.microsoft.com/en-us/download/details.aspx?id=6375 SqlClrTypes.msi SharedManagementObjects.msi PowerShellTools.msi |
| SQL 2008 R2 SP2 Feature Pack | http://www.microsoft.com/en-us/download/details.aspx?id=30440 SqlClrTypes_x86.msi or SqlClrTypes_amd64.msi SharedManagementObjects_x86.msi or SharedManagementObjects_amd64.msi PowerShellTools_x86.msi or PowerShellTools_amd64.msi |
| SQL 2012 SP1 Feature Pack | http://www.microsoft.com/en-us/download/details.aspx?id=35580 ENU\x86\SQLSysClrTypes.msi or ENU\x64ENU\x86\SharedManagementObjects.msi or ENU\x64ENU\x86\PowerShellTools.msi or ENU\x64\ |
| SQL 2014 Feature Pack | http://www.microsoft.com/en-us/download/details.aspx?id=42295 ENU\x86\SQLSysClrTypes.msi or ENU\x64ENU\x86\SharedManagementObjects.msi or ENU\x64ENU\x86\PowerShellTools.msi or ENU\x64 |
Table 8.2 Feature Pack installation
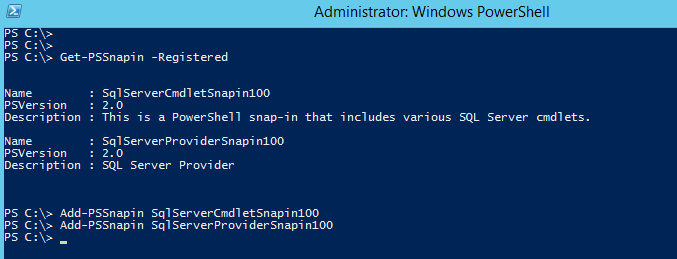
Once these are installed, you will be able to load the providers illustrated in Listing 8.1. The output is in Figure 8.1. If you do not install the objects listed above, and attempt to load the providers, you will get an error that the required object does not exist. If you get this error, it means that the objects that provide the modules have not been installed correctly. Refer to the links above to download the appropriate ones.
#SQL 2008/R2
Get-PSSnapin –Registered
Add-PSSnapin SqlServerCmdletSnapin
Add-PSSnapin SqlServerProviderSnapin

#SQL 2012
Import-Module SQLPS –DisableNameChecking

#SQL 2014
Import-Module SQLPS –DisableNameChecking
Listing 8.1 Loading SQL Provider by Version

Figure 8.1 Loading 2008 Specific Snapins

Figure 8.2 Loading SQL 2012 Module SQLPS

Figure 8.3 Loading SQLPS Module without DisableNameChecking
Figure 8.1 is showing the loading of the 2008/R2 Provider. You can see by its name that each snapin refers to the objects they load, either Cmdlet100 for the cmdlets or Provider100 for the SQL provider. The Cmdlet100 snapin contains the cmdlets that are available to you after it is loaded and the Provider100 is the snapin that exposes the PSDrive for SQL Server (also called the SQL Provider for PowerShell). Technically you could load either one, both or none. But for the sake of this article we will need at least the Provider100 snapin for 2008. In Figure 8.2 you see the loading of a SQL 2012/2014 SQLPS module. (The module has the same name for both versions.) The outcome of loading the module is simply changing to the PSDrive you just loaded. (We’ll cover more about PSDrives later.) Finally, in Figure 8.3, I left off the -DisableNameChecking parameter to show what message you get when you omit it. The warning (it is yellow, not red) indicates that inside this set of cmdlets, there is a cmdlet that uses a verb that is not in the list of approved verbs. This is due to the Decode-XXXXXX and Encode-XXXXXX cmdlets that are contained in the module. Encode and Decode are not approved verbs and results in the warning, though the cmdlets still work despite the warning. Once the provider is loaded, we can take a look at what it can be used for.
The SQL Provider
When you think of the SQL Provider for SQL Server, you can simply think of a drive, just like your C: drive. You can see C:\Windows\System32 as a directory and that would refer to the drive named C: and the folder Windows\System32. The SQL Provider is similar, although it doesn’t correspond to a physical disk location. You can think of it as a view into the SQL Server space. Starting with SQLSERVER: which takes the place of the drive letter, you will specify a ‘path’ rt into the provider which will always start with \sql. This nomenclature allows you to get to SQL Server objects using a path-like structure, which has been partially covered in previous levels. This level will discuss the uses of the provider. You can tell if you have the provider loaded by using the cmdlet Get-PSDrive and looking for the SQLSERVER: drive.
Paths into SQL Server
Once you have loaded the snapins or the module for your version of SQL Server, you can start looking for objects using the server and instance name. In the case of the SQL Provider, a default instance is represented by the word “default” for the instance name, so we can be consistent in the number of elements in our paths. So the following would reference the server “localhost” and the instance “I2008R2” (SQLSERVER:\sql\localhost\I2008R2). You can change directories (which of course are not really directories, but rather levels within SQL Server)with Set-Location or CD or you can reference a level in a path-like way. Examples are below in Listing 8.2 and the output is in Figure 8.4.
# change directories to the SQL Provider at the Instance level
Cd SQLSERVER:\sql\localhost\I2008R2

# list the databases in the instance
Dir Databases | Select Name

# See if database Ben exists
Test-Path SQLSERVER:\sql\localhost\I2008R2\Databases\Ben

# See system databases
Dir Databases –Force | Select Name
Listing 8.2 Examples of Path-Like structures in SQL Server
 Figure 8.4 Results of Listing 8.2 commands
As you can see in Listing 8.2 using the SQL Provider allows you to specify a path into the SQL Server engine. The SQL Provider is there to provide navigation through the SQL Server.Note that when you retrieve objects like the database Ben by using Get-Item or a similar command, an SMO (Shared Management Object) will be returned. In Listing 8.2 if the database Ben exists, Test-Path will return True, and if not it will return False. You will notice that you do not see the system databases in the first command in Figure 8.4. By default the provider does not return the system objects but as you can see in the next command, the -Force option will allow the command to show the system databases.
How do I use this Provider?
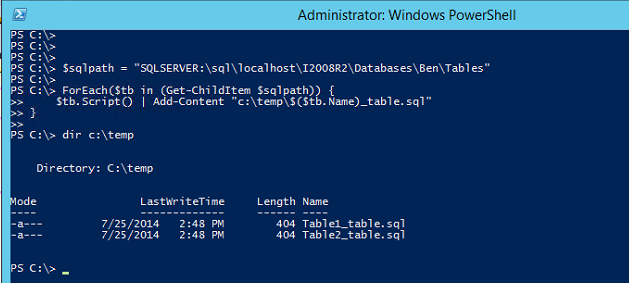
Here is the meat of this level. We have discussed what the SQL Provider is and how you load it, as well as some basic syntax, but you might be wondering how or why would I use this tool? It is a powerful one, so there must be a practical use for this. Indeed there is. In Listing 8.3 you will see an example of how to script out a CREATE statement for every table you have in a database, to a set of files, one per table. Be sure and change the instance name (I2009R2) and the database name (Ben) to values that are meaningful on your system.
$sqlpath = "SQLSERVER:\sql\localhost\I2008R2\Databases\Ben\Tables"

ForEach($tb in (Get-ChildItem $sqlpath)) {
    $tb.Script() | Add-Content "c:\temp\$($tb.Name)_table.sql"
}
Listing 8.3 PowerShell to get the Tables and Script them in SQL using the Provider

Figure 8.5 Dynamically generate table creation scripts
Let’s walk through Listing 8.3 in detail. We first set a path ($sqlpath) used to specify the set of table in the specified database in the specified instance of SQL Server. The code performs a Foreach, which iterates through each item in the list produced by the Get-ChildItem cmdletFor each item return , which is a table in this case, the Script() method (notice the parenthesis) on the Table object is called to generate ascript for the object and send the output to c:\temp\tablename_table.sql where tablename is replace by the actual table name. My path looks like SQLSERVER:\sql\localhost\I2008R2\Databases\Ben\Tables. This path into the SQL Server Provider illustrates that to getting to tables is straightforward. The cmdlets Get-Item and Get-ChildItem work well with SQL Server Provider paths . Upon inspection into the file Table1_table.sql, I see the definition of my Table1, as shown in Listing 8.4. This table is specific to my version of the database so you may not have this table in your database, but you can create it with the script in Listing 8.4.
SET ANSI_NULLS ON
SET QUOTED_IDENTIFIER ON
CREATE TABLE [dbo].[Table1](
      [Id] [bigint] IDENTITY(1,1) NOT NULL,
      [Name] [varchar](30) COLLATE SQL_Latin1_General_CP1_CI_AS NOT NULL
) ON [PRIMARY]
Listing 8.4 Table script of Table1 produced by Script()
Summary
The SQL Provider for PowerShell provides you with a path-like structure similar to a directory structure in your file system, so that you can navigate SQL Servers like you navigate in Explorer or in a command prompt. There are many other things you can do with this provider and I invite you to explore the possibilities by navigating inside the structure one level at a time and executing a “dir” command to see what is at that level. Also remember that any object you get back by using Get-Item or Get-ChildItem will be returning an SMO object which allows you to manipulate it with methods and properties, just as if you created it with a New-Object command in PowerShell. This capability can be very powerful and allow for some very nice automation for your future DBA activities.
