Like any good relational system, Snowflake uses the concept of a database to collect related data and objects together. Snowflake has some pretty interesting database-related features, including cloning. It’s time for us to take a look at what Snowflake can offer when it comes to databases.
The Usual Suspects
As you might imagine, Snowflake’s SQL implementation supports the usual database statements.
- CREATE DATABASE
- ALTER DATABASE
- DROP DATABASE
However! Not all standard database statements are created equal, as we’ll see.
Creating Databases
At its simplest, you can use CREATE DATABASE to create a database with just three words:
CREATE DATABASE NEWDB;
The statement also supports the OR REPLACE option:
CREATE OR REPLACE DATABASE NEWDB;
And you can also create special types of database:
CREATE TRANSIENT DATABASE NEWTRANSIENTDB;
CREATE DATABASE LISTINGDB FROM LISTING 'listingname';
CREATE DATABASE SHAREDB FROM SHARE account.sharename;
CREATE DATABASE REPLICADB AS REPLICA OF account.db_name;
The first statement creates what Snowflake calls a transient database. In a transient database, all tables will be created as transient. This means the tables are available to any users with appropriate permissions, but they do not offer any fail-safe mechanism. This saves you money but also means you cannot retrieve the data using Snowflake’s built-in protections if you need to. These tables are intended for loading temporary data, much like a staging table. You do what you need to with the data, then you ditch it.
Snowflake allows users to list data for sale in its marketplace. If you have access to a listing, you can create a database directly from that listing. Creating a database from a share is a pretty similar mechanism – a Snowflake account creates a share and drops some data into the share. You can then create a database from the information in that share by specifying the account and share name.
The last statement creates a replica database. This implements secondary replication on the database it was created from. The secondary database exists in read-only mode and refreshes the data at specified intervals.
ALTER DATABASE
ALTER DATABASE, much like the Transformer toys of the 1980s, has more than meets the eye. You can set various settings, such as the data retention time in days (for Time Travel purposes), options for integration with Apache Iceberg, as well as standardized options for collations and log levels. Here’s an example which renames a database:
ALTER DATABASE IF EXISTS OLDDBNAME RENAME TO NEWDBNAME;
And here’s how you could change the data retention time in days. Snowflake Enterprise Edition and higher allows you to store up to 90 days of data! This means you can check what the database looked like at any point in the past 90 days. It’s not so good for Standard Edition users – you only have one day of Time Travel.
ALTER DATABASE IF EXISTS DBNAME SET DATA_RETENTION_TIME_IN_DAYS = 45;
You can also unset these commands back to their default value.
ALTER DATABASE IF EXISTS DBNAME UNSET DATA_RETENTION_TIME_IN_DAYS;
ALTER DATABASE also supports setting (and unsetting!) tags on the database, as well as options for replication and failover (enabling and disabling replication, refreshing the database, and failing over). Tags allow users to monitor sensitive data within Snowflake.
DROP DATABASE
I’ve written about multiple database systems down the years, and the DROP DATABASE section is always one of the shortest. And guess what – Snowflake is no different! It does have two additional options though. The usual statement would be:
DROP DATABASE IF EXISTS DBNAME;
But there’s also a CASCADE option and a RESTRICT option. If CASCADE is used, the database is dropped even if the database contains tables that are referenced by foreign keys. RESTRICT is a protection against this – it will warn you about existing foreign key references and will not drop the database. To see this in action, run this code to create a database with a foreign key relationship (you can pull all of the code for this article from GitHub).
CREATE DATABASE IF NOT EXISTS TESTDB;


USE DATABASE TESTDB;


CREATE TABLE IF NOT EXISTS Customer
(
 CustomerId INT PRIMARY KEY,
 CustomerName VARCHAR(30)
);


CREATE TABLE IF NOT EXISTS CustomerOrder
(
 OrderId INT PRIMARY KEY,
 CustomerId INT
);


ALTER TABLE CustomerOrder
    ADD CONSTRAINT fk_Customer_CustomerOrder
        FOREIGN KEY (CustomerId)
        REFERENCES Customer (CustomerId);


INSERT INTO Customer (CustomerId, CustomerName)
    VALUES
        (1, 'Bob'),
        (2, 'Jack');


INSERT INTO CustomerOrder (OrderId, CustomerId)
    VALUES
        (1, 1),
        (2, 1),
        (3, 2),
        (4, 2),
        (5, 2);
Now type this statement and run it:
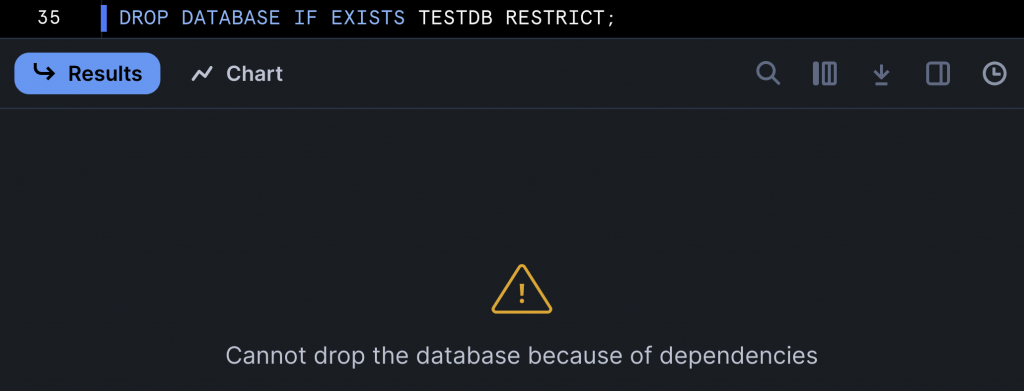
DROP DATABASE IF EXISTS TESTDB RESTRICT;
And you’ll see Snowflake shows you a message which essentially tells you to get lost!
If you run it with the CASCADE option, the database is dropped (running it without CASCADE would also drop the database).

Note how USE DATABASE is written in the example script. In SQL Server, we’d just write USE <dbname>. In Snowflake, you have to specify the DATABASE keyword before the database name.
UNDROP DATABASE
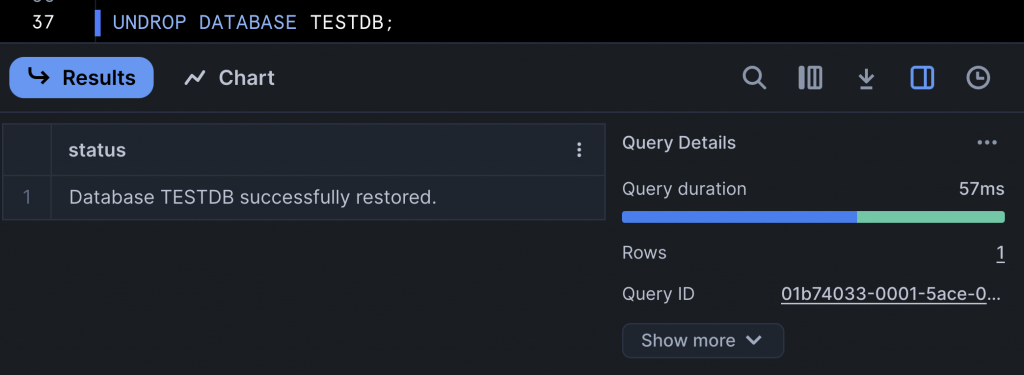
I mentioned Time Travel before. This is one of Snowflake’s bravura features. It allows you to go back in time – not quite the way Marty McFly did, but you can at least traverse up to 90 days’ worth of your data. With the simple UNDROP DATABASE command, you can restore a deleted database as long as you are within the data retention period. Give it a go! Try running the UNDROP DATABASE statement for the TESTDB we just dropped.
UNDROP DATABASE DBNAME;
It’s magically restored! I know, it’s awesome!
Bear in mind the default data retention period is just one day! But you can set it anywhere between 0 and 90 if you use Snowflake Enterprise Edition.
Database Information Statements
There are two last statements to mention, which you can use to view information about your databases. DESCRIBE DATABASE lists the schemas in the database. You can then execute DESCRIBE SCHEMA to list the tables within the schema.
USE DATABASE TESTDB; DESCRIBE DATABASE TESTDB; DESCRIBE SCHEMA PUBLIC;
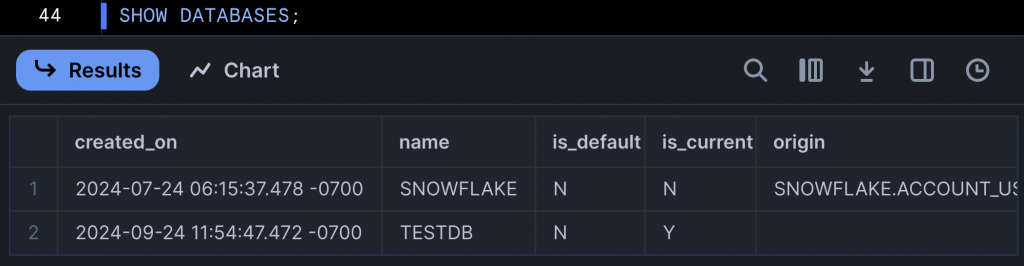
The other useful statement is SHOW DATABASES. This lists the databases your user account has access to, and also shows whether one of those databases is your default database and whether you are currently using a particular database, as well as other bits of useful information.
Cloning
If you haven’t already, execute the UNDROP DATABASE statement we saw earlier to bring the TESTDB back to life. We’re going to have some cloning fun with that database! You create database clones using the CREATE DATABASE statement. You can also use other CREATE statements to clone other objects, like schemas and tables.
There are two ways to clone a database:
- A full clone, including all data
- A Time Travel clone, including all data up to a certain, specified point in time
For what it’s worth, I think this is an amazing feature. It’s brilliant for development purposes, such as needing to create a version of the database for testing.
To create a full clone, run this statement:
CREATE DATABASE IF NOT EXISTS TESTDBFULLCLONE CLONE TESTDB;
You can then run a SELECT statement against this, and you’ll find it contains exactly the same data as the TESTDB!

You will need certain permissions on databases to clone a database. You’d need OWNERSHIP on the database role and CREATE DATABASE ROLE on the target database to create a successful clone. If you want to create a Time Travel version of the database, with data up to a certain time, you can run something like this statement:
CREATE DATABASE IF NOT EXISTS TESTDBEMPTYCLONE
CLONE TESTDB
AT (TIMESTAMP => TO_TIMESTAMP_TZ('09/24/2024 20:35:00', 'mm/dd/yyyy hh24:mi:ss'));A few last things to be aware of. When cloning is executing, you should avoid running DML statements on the source until cloning is complete. And cloning can take quite a while, depending upon the size of the database.
Summary
Databases in Snowflake, like any other system, allow you to gather similar objects together. You can use the usual DDL commands to manage databases, but there are also a few additional features in Snowflake, such as creating transient databases and creating databases from listings and shares.
Snowflake also supports cloning databases. You can create an exact clone of a database just by adding a couple of keywords to the CREATE DATABASE statement, and you can also create a clone up to a certain point in time using Time Travel. Have a mess around with databases and cloning – we’ll be looking at the various types of table next time!
