In this level, we're going to continue the philosophy of learning by example, and get a database into our SVN repository. In fact, we'll put into source control not one but two copies of the AdventureWorks database. First, we'll use a manual process, via the native source control client and then we'll use Redgate SQL Source Control.
Before we get to the practicalities, however, we need to consider, just briefly, our overall approach to source control for databases, and the manner in which our team will develop these databases, concurrently.
Approaches to Source Control for Databases
To a certain extent we can, and should, approach database source control in the same way as any other application code, and using the same source control system for both.
However, there are specific considerations for databases. Firstly, common source control systems (such as Subversion, GIT, Mercurial) are file-based, and this means that for us to source control our database a method is needed to script our database to files. We will also need a way to compare these scripts and incorporate changes. One of the reasons I use SQL Source Control is that it takes over the heavy lifting of scripting, comparing and integrating my database into source control system. Database items can have interrelationships that are not immediately apparent, and scripting objects sometimes removes features (such as passwords, which are masked when scripting out users with SQL Logins from the database server).
You also need to be aware that deployment will be different for databases; quite often an application update will replace a previous instance, whereas a database update, such as a change of data type of a column, will change an object's structure, needing to keep existing data in place. These can necessitate different handling of the objects and scripts in source control.
Before starting the development project, the team needs to decide on the database development model, in terms of whether they will work together on one shared database server, or each use your own development installation, and collaborate through the VCS.
The following two sections describe each model in turn, and their pros and cons. Although you can use Source Control with either model, we will be using the dedicated model in this stairway.
Shared Database Development Model
Figure 2-1 depicts the shared model, where all developers work on one SQL Server.
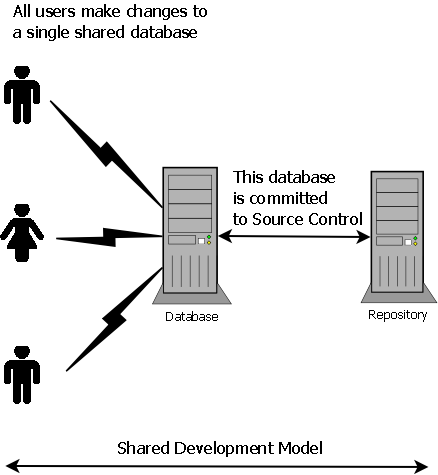
Figure 2-1: Shared database development model
The shared model offers lower licensing costs, and the need to generate and manage only one copy of test data. It means that the DBA can perform regular maintenance of the shared instance, performing database backups, installing service pack updates, and so on. It also means that the DBA can manage the environment much like a production instance, and can, for example set up the appropriate security roles and permissions and ensure that all options the developers choose can be supported in production. This can be a disadvantage however, as it is proscriptive and reduces the options of a developer to code the best application, simultaneously raising the workload on the DBA.
Sometimes, the need to control strictly the proliferation of sensitive data necessitate use of the shared model. Occasionally, company policy prohibits developers from having local databases, perhaps because database management falls strictly under the DBA team, or as a result of concerns about intellectual property where many of the development team work offsite or for a subcontractor.
The most problematic aspect of the shared model is the need to assure atomicity of commits, and therefore to ensure that the work of one developer does not overlap and interfere with another, on the same object. This requires greater discipline both in the development but also the scheduling and planning of the development. It can lead to the temptation to commit several changes at once, perhaps by different developers, which can lead to audit problems when later trying to confirm who made a given change.
When using the shared model, regular database builds from the authoritative copy of the objects in source control become less routine, at least, in the absence of a Continuous Integration system and so the representation of the database in source control is rarely tested. It means that the team can get a situation where the repository does not contain a working database, but rather a "half-way" state between changes; clearly this is not desirable, so suitable practices should be put in place to ensure that the veracity of the source control version is periodically proven.
Dedicated Database Development Model
The alternative is the dedicated model, where each developer has his or her own dedicated copy of the database and they develop separately, as illustrated in Figure 2-2.
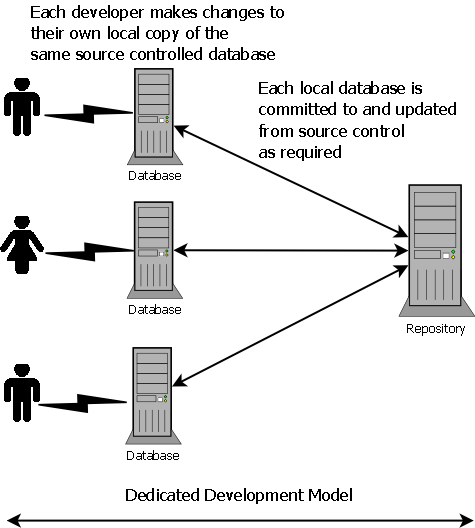
Figure 2-2: Dedicated database development model
Developers can work independently, without the risk of interfering with each other, until they are ready to share their work and integrate the changes. Since each developer works, typically, on a given feature and commits their own changes, it becomes much easier to identify changes related to each feature, and roll back changes that aren't working as desired.
A dedicated model allows different developers to develop different features, potentially using branching to separate the development of those features, without the potential to clash when modifying related objects (although any such clashes would then need to be resolved, when merging changes). We will cover branching and merging in more detail later in this stairway.
Although there is additional cost attached to each developer having a local installation, in my experience the increased developer productivity gained from this model outweighs the additional cost of buying SQL Server Developer Edition licenses for each developer.
Of course, there are some risks associated with the dedicated development model. For example, there is an increased risk of development under privileged access (i.e. administrative permissions). However, I have found that a discussion between the developer and the DBA as to what is permissible, together with policy and a CI system set up to mimic the required production environment can help to lessen the potential difficulties associated with this issue. Of course, environments where this is not feasible may be better suited to the shared development model.
In addition, the dedicated development model can cause a proliferation of SQL servers in an organization, and we need to ensure that no sensitive production data resides on unsecured development servers or laptops. It is a best practice not to develop with production data, but rather to use generated test data in development (for example, using Redgate's SQL Data Generator), and for rare times when more representative data is required a dedicated test environment should be used, appropriately secured, and managed by the DBA team.
Getting a database into source control: the manual approach
While for the majority of this stairway, we intend to work with our sample AdventureWorks database through SQL Source Control, we'll start by putting a copy of this database into source control manually, both to provide a basis for comparison and to illustrate how SQL Source Control alters and often simplifies the manual source control processes.
To create a new copy of AdventureWorks, I simply restored a backup of my existing AdventureWorks2012 database with a new name of MyAW2012 (the script I used is available in the code download file).
Installing AdventureWorks
I am going to assume you already have some version of AdventureWorks installed. Specifically, I use AdeventureWorks2012 in the examples. If not, you can download it here, and also find instructions on attaching the database. If you see an "Access Denied" error message when trying to attach the database, refer to this Connect article. Finally, note that some versions of AdventureWorks require installation of FileStream and Full Text Search to work correctly. If you cannot install these components then you should still be able to follow along most of the steps, but may encounter problems in some areas, so chose an appropriate version of AdventureWorks for the features you have installed.
To get MyAW2012 into source control, the first task is to create a repository to hold it. Following the same steps as in Level 1, we connect to our SVN system (in my case, located at http://localhost:3343/csvn/), navigate to Repositories, and click on Create. Call the new repository MyAW2012, and create it with the trunk/branches/tags structure. Copy the repository URL to the clipboard, in preparation for the next step.
In order to set up working folder for our MyAW2012 project, create a regular folder in Windows Explorer (for example, C:\SVN) and then perform what SVN calls a checkout operation, which will register the working folder with the repository and perform the initial synchronization.
Right-click in the empty C:\SVN folder and select SVN Checkout. On the Checkout screen, paste in the URL to our MyAW2012 repository and establish the checkout directory as C:\SVN\MyAW2012. This will be the working folder for our MyAW2012 project.
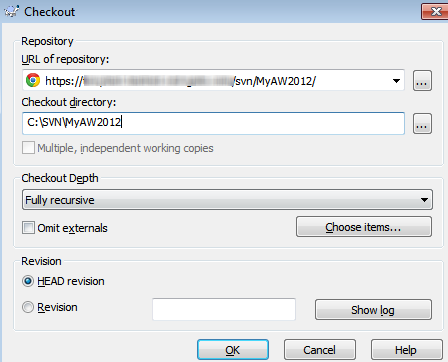
Figure 2-3: Create a working folder corresponding to the MyAW2012 repository
Navigate to the MyAW2012 working folder in Windows Explorer to verify that it has the green tick mark, denoting synchronization of the working folder with the SVN server.

Figure 2-4: The MyAW2012 working folder with branches/tags/trunk structure
Within the directory, we see the Branches, tags and trunk folder structure that we created in the repository. Also (hidden in Figure 2-4) in here is a read only .SVN file, which is used by SVN internally, and we should not touch it.
As discussed previously, we'll do the majority of our development work in trunk, so create a new folder within trunk, called Database, which is where we'll store our database code. I'm not calling it MyAW2012, our database name, because we may not want to restrict ourselves to a specific database name when developing, and it is easy to establish the purpose of a folder named Database!
The next question becomes how to get our existing MyAW2012 database into source control. The easiest way is to script out the files. Within SSMS Object Explorer, right click on the MyAW2012 database and select Tasks | Generate Scripts. The wizard interface walks through the scripting process and, in this case, we want to script the entire database and all objects, with a single file per object, and save it to our chosen destination, in this case to the Database subdirectory of our MyAW2012 working folder (C:\SVN\MyAW2012\trunk\Database).
Once finished, we should see a whole host of .sql script files in the Database folder, for all the schemas, tables and modules (views, stored procedures and so on) as well as the database creation script (MyAW2012.Database.sql)

Figure 2-5: Scripting out the MyAW2012 database into the working folder
We may wish to organize the files a little more, for example creating Security, Tables, Views, Programmability, Modules and DBCreation subdirectories and allocating the appropriate files to each.
More complex arrangements
Of course this is just a very basic source control architecture, and you may choose something completely different, depending on your overall application architecture. One alternative might be to create folders for each schema, representing a logical area of the project (Sales, Purchasing and so on), and each matching up to the corresponding application that needs to access the data in that schema's database objects. In fact, you may decide to put the base tables in a separate schema and then build the interface for each logical area of the applications in the appropriate schema, so that users can never access the base tables directly, and can only retrieve the data to which they have permission. We'll discuss source control architectures in a little more detail in Level 3.
Once you're done, simply right-click on the MyAW2012 folder and select SVN Commit. This brings up the Commit window shown in Figure 2-6. We can and should enter a descriptive commit message, which will serve to tell others, or remind ourselves, of the purpose of this commit. The folders and files in the bottom half of the screen are not ticked since they are not yet version controlled (if you can't see the files at all, ensure that the "show unversioned files" box at the bottom is activated). Select ctrl-A and tick them all, and then click OK to commit our files to the repository
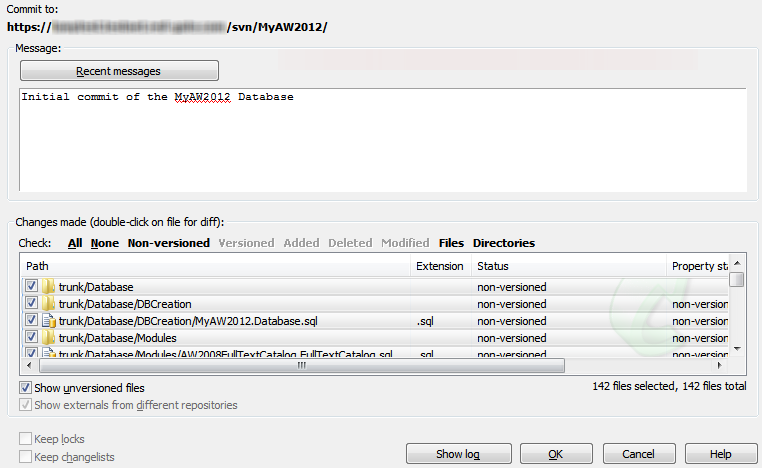
Figure 2-6: Committing the database scripts to the MyAW2012 repository
All being well, you'll see a Commit Finished! dialog and a summary of what SVN committed to the MyAW2012 repository.
Of course, having all these files in the VCS does not necessarily make it easy for a developer who doesn't currently have the database to build it, or indeed for the team to build and deploy the database to the test, staging and production environments. For example, in which order do we have to run all the scripts? As the developers get to work modifying these scripts, how do we know in what order to apply the changes?
A lot of careful planning and scripting is required to build complex databases from source control, and upgrade an existing database from one version to the next, from source control. Alexander Karmanov's series of article provides an excellent example of a hand-rolled solution that applies some measure of control and automation to an otherwise very manual process.
We'll move on now to consider technique based on use of SQL Source Control that remove some of the manual lifting (use of which still requires proper planning, of course).
Getting AdventureWorks under Source Control using SQL Source Control
We'll now see how to use SQL Source Control to put the AdventureWorks database into AdventureWorks repository that we created in Chapter 1.
In SSMS, right-click on your copy of the AdventureWorks database, whichever version you're using, and select Link database to source control..., which will open up the source control window, as shown in Figure 2-7.
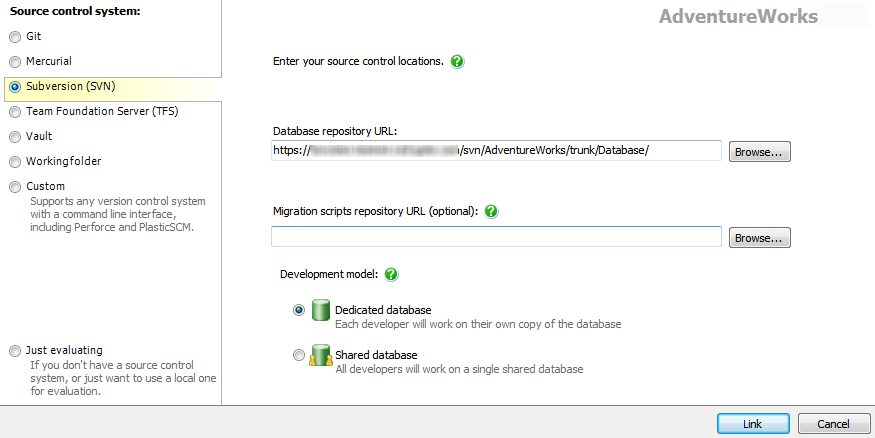
Figure 2-7: Linking a database to an SVN repository, using SQL Source Control
Select SVN as the repository system. In SVN, we can't browse the repository just from the machine name, so enter the full repository URL (if you can't remember it, connect back to the SVN server and copy the connection URL for the AdventureWorks repository).
Click the Browse button, and we can select the exact scripts location. Within the trunk folder, create a new folder called Database, enter a commit comment, and SVN will create the folder in the repository. Back at the screen in Figure 2-7, select the new Database folder as the location for the database files.
We have the option at this point to enter a migrations script location. For the moment leave this blank; we'll cover migrations in a later level. Finally, select the Dedicated database mode and click Link to link the database to source control. This will create a structure in our source control system, and return us to the Setup summary page of Source Control.
Note that this doesn't actually commit all our objects, so right-click on Adventureworks2012, and select Commit Changes to source control. We see a long list comprising all the objects in the database. Add a commit message and click Commit to commit the database objects to source control.

Figure 2-8: Commit to source control in SQL Source Control
Finally, return to TortoiseSVN, create a new directory, C:\SVN\AdventureWorks, and perform an SVN Checkout, connecting to the AdventureWorks repository on the SVN server.
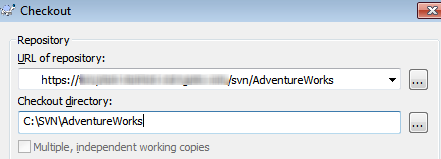
Figure 2-9: SVN Checkout working folder for the AdventureWorks repository, in Windows Explorer
Once complete, we can browse the repository structure that SQL Source Control created for us. We have in source control all the same files as we saw for MyAW2012, just in a different source control structure. SQL Source Control scripted every object into a folder corresponding to its object type.
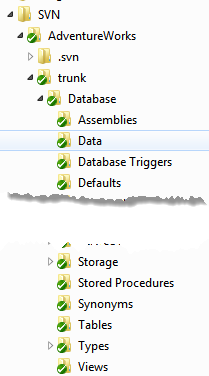
Figure 2-10: Viewing the SQL Source Control-generated working folder structure
One of the real advantages of this approach to database source control, for the development team, is that they can work with their own copy of the database, making changes, testing them, and committing them, right from within SSMS. Each team member can simply right-click and select "get latest changes" in order to apply to their local database the changes of other members of the team.
Any developer joining the team, who needs to create their own local copy of the latest version of the database simply needs to create an empty database, link the database to the same AdventureWorks repository and perform a "get latest".
The same simple process can be used when deploying via continuous integration, or to a test environment. For user acceptance testing, we'll want to deploy using the same deployment method as to production, integrating into the team's automated build-and-deployment mechanism.
Summary
This second level introduced, briefly, the two possible database development models, and their pros and cons in terms of coordinating the team's development efforts through a source control system. We then walked through a manual way to script a database into the source control system, and a way to link a 'live' database to source control, using the SQL Source Control plug-in for SSMS.
We're now all set up for Level 3, where we will start working with the AdventureWorks database into source control, adding and editing tables and reference data.
If you're looking to continue along the path of database source control, this eBook gives a detailed walkthrough of the concepts, complete with code samples.


