Having described tables, Joe Celko explains how to make them work together as a database and touches on what entity relationships and Views are.
In level one, we named data elements for what they are and classified them. In level two, we modeled the data elements with data types and simple row or column constraints in SQL to give us rows. In level three, we put these rows into tables for entities, relationships and auxiliary data.
Now that we have the base tables, it is time to make them work together as a database and to add other schema objects to the mix. This requires looking at what we have from a higher level than just one table or a few tables at a time. A useful tool for this is the E-R (Entity-Relationship) diagram. The bad news is that there are lots of styles of ERDs, some of which get pretty complicated. The first version of this tool was due to Peter Chen in his 1976 paper and it is still a good place to start. Every system agrees that an entity table is shown as a rectangle with the name of table in it. But some systems will put all of the column names, mark the key(s) another things with special symbols and so forth.
Chen originally used a diamond for relationship tables. This was a good idea in that it made it easy to draw an n-ary relationship and you could quickly see a pattern of alternating boxes and diamonds. There was some confusion if a table was used both ways. For example, a marriage is a relationship between a husband and a wife, but it also has data about the date of the marriage, the license number, presiding official, and so forth.
The later systems dropped the diamond, put relationship tables in rectangles and use a line which can only show binary relationships But ends of the lines have symbols for optional or mandatory membership and for 0, 1 or many relationship degree that gives it some power. The three graphics are a bar for 1, a circle for zero and a “chicken foot'” for many. This might be easier to see than to say.
We can agree that a lecturer teaches courses and therefore courses are taught by lecturers.

That is good to know, but we should express more rules. For example, what if we have a policy that each lecturer must teach exactly one course? We can add a maximum of one with the bar symbol and minimum of one with a second bar toward the center of the line that represents the teaching relationship. The logic applies to the courses involved in the relationship.

Now, let's relax the rules a bit. We agree to keep a lecturer employed even if he is not teaching anything at this time, but in exchange for this job security, we want him to give one or more courses sometimes. The circle symbol goes toward the center of the line and the chicken foot comes off the Courses box.

This is all fine and good until we decide to have a many-to-many relationship, which would look like this:

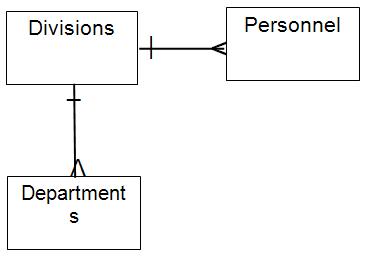
We need to have an explicit relationship table, call it “Teaching Assignments”, between the Lecturers and the Courses. The ER diagram makes this easy to see without having to read a lot of SQL DDL. There are other patterns that that stick out, such as a fan trap:

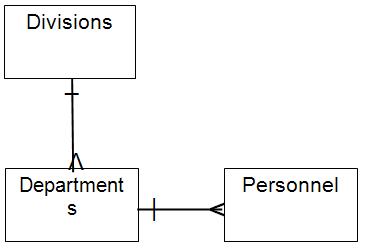
I cannot get the departments and personnel matched up correctly. Assuming the usually organizational hierarchy, this should have been modeled without two 1:m relationships coming off of the Divisions.

You can get an ER diagram from the SQL DDL with several tools and look for other problem patterns at a high level. I am not going to give you a full lesson in ER modeling and diagramming here; I just want to you be aware of them for now. You can learn to use them on your own later.
Once you have some faith in the tables, it is time to think about accessing the data. This usual means that you will add indexes to the tables. There are two kinds of indexing; primary and secondary. A primary index has to be on the table to enforce a uniqueness constraint, like a PRIMARY KEY and UNIQUE constraints. Secondary indexes are added for performance improvement.
The SQL engine will create primary indexes automatically for you, but it makes assumptions that might not be good for you. In SQL Server, you can have only one clustered index on a table, so use it carefully. For example, instead of using it for a Customers table keyed on a customer_id column, you might want to use it to keep the physical file sorted by department number because this is how your reports are grouped and summarized. An unclustered index will be just fine for looking for one customer at a time.
The tree structure of an index is determined by the order of the columns in the CREATE INDEX statement. That means
is logically the same as, but functionally different from:
CREATE INDEX Barfoo ON Customers (city_name, state_code);
Picking secondary indexes is an NP-Complete problem, so you cannot have a general method for creating them. The best you can do is to follow a few simple heuristics. The first heuristic is not to over-index. Newbies like to add lots of indexes to make their queries faster. This is not always true; the optimizer will ignore the ones it does not use so they become “dead code” in effect. But every insert, update and delete statement will have to change these useless indexes when a base table changes. This can be a lot of overhead.
The second heuristic is that if a column is never used in a search condition (that means in a WHERE, ON or HAVING clause) then it probably should not be in an index.
The third heuristic is that you should not have indexes with a common prefix list of columns. That means if you have an index like this:
you also, in effect, have these indexes for free:
CREATE INDEX Floob_2 ON ExampleTable (a, b);
CREATE INDEX Floob_1 ON ExampleTable (a);
Explicitly creating these implied indexes is usually redundant.
The next thing to add to the schema is the VIEWs you will be using most often. Most programmers think of a VIEW as a shorthand to save the user from writing the same thing over and over. That is true, but the major advantage of a VIEW is that it does the same thing the same way every time- for everybody. Human beings are not always that consistent. Without any malice, one programmer will implement a business rule differently than another programmer. Fred read the specs as (shipping_qty > 100) and Sam read it as (shipping_qty >= 100); if they had used a VIEW, then the rule would be applied one and only one way.
Generally speaking, VIEWs act two ways. Either they are local to a statement (usually a SELECT) and are expanded as in-line text, from their definition as kept in the schema. The other alternative is to materialize their definition as a physical tables from their declaration. As a generalization, a good SQL engine will materialize views when several sessions are using them at the same time so the virtual table can be shared in main storage or so one session can use the same view many times. In SQL Server, you also have options about indexed VIEWs that effect performance.
There is another part of VIEWs that even experienced SQL do not know about; WITH CHECK OPTION clause. If WITH CHECK OPTION is specified, the viewed table has to be updatable. The idea is to prevent the WHERE clause from being violated by the updates. Let's explain this with a skeleton:
AS
SELECT *
FROM Personnel
WHERE city_name = 'New York';
and now UPDATE it with
SET city_name = 'Birmingham'; –- everyone moved!!
The UPDATE will take place without any trouble, but the rows that were previously seen now disappear when we use NYC_Personnel again. They no longer meet the WHERE clause condition! Likewise, an INSERT INTO statement with (col1 = 'B') would insert just fine, but its rows would never be seen again in this VIEW.
The WITH CHECK OPTION makes the system check the WHERE clause condition upon insertion or UPDATE. If the new or changed row fails the test, the change is rejected and the VIEW remains the same. Thus, the previous UPDATE statement would get an error message and you could not change certain columns in certain ways.
The WITH CHECK OPTION an be used as a schema level CHECK() clause. For example, consider a hotel registry that needs to have a rule that you cannot add a guest to a room that another guest is or will be occupying. Instead of writing the constraint directly, like this:
(room_nbr INTEGER NOT NULL,
arrival_date DATE NOT NULL,
departure_date DATE NOT NULL,
guest_name CHAR(30) NOT NULL,
CONSTRAINT schedule_right
CHECK (H1.arrival_date <= H1.departure_date),
–- valid Standard SQL, but going to to work!!
CONSTRAINT no_overlaps
CHECK (NOT EXISTS
(SELECT *
FROM Hotel AS H1, Hotel AS H2
WHERE H1.room_nbr = H2.room_nbr
AND H2.arrival_date < H1.arrival_date
AND H1.arrival_date < H2.departure_date)));
The schedule_right constraint is fine, since it has no subquery, but many products will choke on the no_overlaps constraint. Leaving the no_overlaps constraint off the table, we can construct a VIEW on all the rows and columns of the Hotel base table and add a WHERE clause which will be enforced by the WITH CHECK OPTION.
AS
SELECT H1.room_nbr, H1.arrival_date, H1.departure_date, H1.guest_name
FROM Hotel AS H1
WHERE NOT EXISTS
(SELECT *
FROM Hotel AS H2
WHERE H1.room_nbr = H2.room_nbr
AND H2.arrival_date < H1.arrival_date
AND H1.arrival_date < H2.departure_date)
AND H1.arrival_date <= H1.departure_date
WITH CHECK OPTION;
For example,
VALUES (1, '2011-01-01', '2011-01-03', 'Ron Coe');
Followed by
VALUES (1, '2011-01-03', '2011-01-05', 'John Doe');
will give a WITH CHECK OPTION clause violation on the second INSERT INTO statement, as we wanted.
The real advantage is that this gets the constraints into declarative code which an optimizer can use.
VIEWs also keep users from seeing unauthorized or unneeded data by simply leaving it out. Ideally, you want to construct a set of VIEWs for a given set of users that make it look as if the database was designed just for them and nobody else. This can take some time to do and you need to know how to use the third (most neglected) sub-language of SQL – the DCL (Data Control Language).
DCL is not a security system; it is a simple access control tool for SQL databases. It does not expose data based on a security clearance level.
In a security system, at the lowest security level, we are told that Superman is a strange visitor from another planet, with powers and abilities far beyond those of mortal men. But we need to be a much higher level clearance to know that he is disguised as Clark Kent, mild-mannered reporter for a great metropolitan newspaper.
The Series
Read about the rest of The Stairway to Database Design Series and view the other articles.

