The demo for the two previous articles (Stairway to Biml Level 7 – Populating the Database for a Custom Biml Framework and Stairway to Biml Level 8 – Using the Relational Database Metadata to Build Packages) left us with two SSIS packages: Load DimChannel.dtsx and Load DimCurrency.dtsx. Both packages were generated using the same Biml files: LoadBimlRelationalHierarchy.biml and CreatePackages.biml. It might not have been obvious, but our code was implementing a specific SSIS design pattern using our metadata and Biml files. With the same metadata and modified Biml files, we could implement totally different patterns with altered semantics, performance characteristics, decoupling, and much more. After implementing multiple such patterns, we might even want to create a mechanism to select the desired pattern for a given transformation through the metadata itself. In fact, let’s go ahead and do that right now.
In this article we will decouple the SSIS design pattern from the earlier demo code, persist the pattern name in the BRMetadata database, map target tables to the pattern in the BRMetadata database, add a design pattern for test purposes, update Biml to retrieve and apply said metadata, and test our results.
Identifying the Design Pattern
LoadBimlRelationalHierarchy.biml contains code that retrieves Biml Relational Hierarchy values from a database named BRMetadata and uses these values to populate the Biml Relational Hierarchy. CreatePackages.biml contains Biml that builds the SSIS packages from the metadata contained in the Biml Relational Hierarchy.
More specifically, CreatePackages.biml contains the design pattern for constructing the SSIS packages. The pattern builds a Data Flow Task that:
- Loads all rows from a source table;
- Performs a lookup against a destination table, outputting new rows only;
- Adds two ETL Instrumentation columns named ETLLoadID and LoadDate; and
- Writes new rows to a destination table.
We will call this pattern Instrumented New Only. Please note the design pattern is hard-coded into the Biml. It longs to be free. Let’s set it free.
Decoupling the Design Pattern
Create a new SSIS project in SSDT or reuse the Chapter7 project from the two previous articles – it’s your call. If you create a new project, import the CreatePackages.biml and LoadBimlRelationalHierarchy.biml files from the project you created while working through the Custom Biml Framework articles.
Open the CreatePackages.biml file. For our purposes, we are going to define the design pattern portion of the Biml in CreatePackages.biml as the portion contained within the Package open and closing tags. These are lines 10-54 in Figure 1. In order to create a new architecture where our patterns are isolated so that we can easily choose among, we need to move these lines of code into a new Biml file. The following sections will walk you through the process of refactoring our code do so.
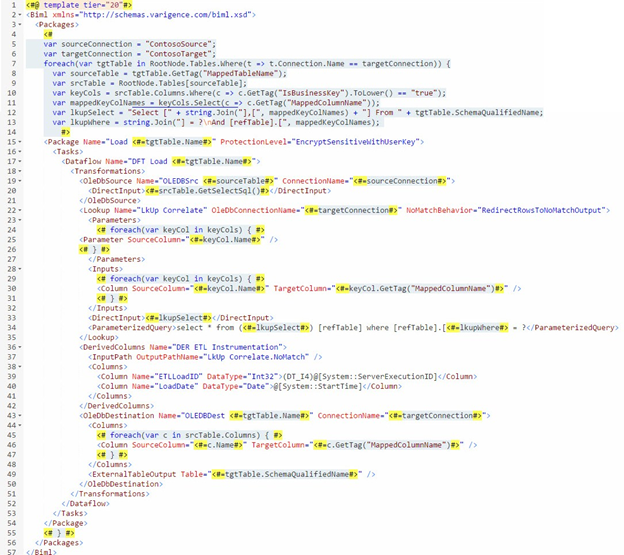
Figure 1. The CreatePackages.biml File
For more information on SSIS design patterns please see the book SQL Server Integration Services Design Patterns (https://smile.amazon.com/Server-Integration-Services-Design-Patterns/dp/1484200837).
Select these lines of BimlScript code, and then cut them into the clipboard. Create a new Biml file named InstrumentedNewOnly.biml and paste the contents of the clipboard into this file, overwriting the opening and closing Biml tags. CreatePackages.biml will now appear as shown in Figure 2:

Figure 2. CreatePackages.biml after the Cut
Add an initial “<#” to the new InstrumentedNewOnly.biml file so that it appears as shown in Figure 3:
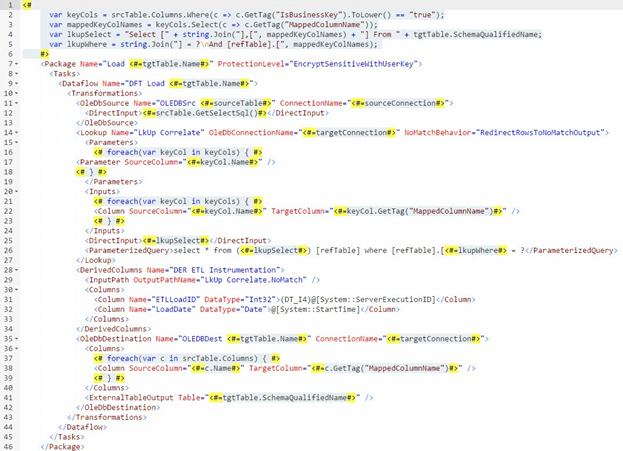
Figure 3. The InstrumentedNewOnly.biml File
Since the contents of the InstrumentedNewOnly.biml file were cut from the CreatePackages.biml file, some variable declarations are no longer in scope. The BimlExpress preview pane shows these errors with InstrumentedNewOnly.biml – they are displayed in Figure 4:

Figure 4. Errors in InstrumentedNewOnly.biml
To solve this problem, we will need to pass these variables from the parent Biml file into our new pattern Biml file. We already know how to do that using CallBimlScript and property directives. Let’s go ahead and edit InstrumentedNewOnly.biml for use as a CallBimlScript target.
To ensure that our code editor feature continue to work, begin by adding a template directive to the InstrumentedNewOnly.biml file with the “designerbimlpath” attribute set to “Biml/Packages”. Next add properties for the variables that were declared in CreatePackages.biml but are not declared in InstrumentedNewOnly.biml. The beginning of InstrumentedNewOnly.biml should now read as follows, with the added syntax highlighted:
<#@ template designerbimlpath="Biml/Packages" #>
<#@ property name="sourceConnection" type="String" #>
<#@ property name="targetConnection" type="String" #>
<#@ property name="sourceTable" type="String" #>
<#@ property name="srcTable" type="AstTableNode" #>
<#@ property name="tgtTable" type="AstTableNode" #>
<#
  var keyCols = srcTable.Columns.Where(c => c.GetTag("IsBusinessKey").ToLower() == "true");
  var mappedKeyColNames = keyCols.Select(c => c.GetTag("MappedColumnName"));
…
The error “The property 'tgtTable' was not supplied by the caller” indicates we’ve not passed a value to the tgtTable property. How can we? We aren’t technically calling the InstrumentedNewOnly.biml file at this time, we are merely previewing the code execution. This is a normal and expected error when viewing CallBimlScript targets in the preview pane.
Next we will modify the parent package to call our new pattern Biml file. Edit the CreatePackages.biml file to call the InstrumentedNewOnly.biml file by adding the highlighted code:
<#@ template tier="20"#>
<Biml xmlns="http://schemas.varigence.com/biml.xsd">
  <Packages>
    <#
    var sourceConnection = "ContosoSource";
    var targetConnection = "ContosoTarget";
    foreach(var tgtTable in RootNode.Tables.Where(t => t.Connection.Name == targetConnection)) {
      var sourceTable = tgtTable.GetTag("MappedTableName");
      var srcTable = RootNode.Tables[sourceTable];
    #>
    <#=CallBimlScript("InstrumentedNewOnly.biml", sourceConnection, targetConnection, sourceTable, srcTable, tgtTable)#>
    <# } #>
  </Packages>
</Biml>
We add a call to the CallBimlScript method, passing for the first argument the name of the Biml file we desire to call – InstrumentedNewOnly.biml – followed by values for each of the property directives we added to InstrumentedNewOnly.biml.
Tip: Please see The Biml Book chapter titled Reusing Code, Helper Classes, and Methods or Cathrine Wilhelmsen’s excellent blog post titled Don’t Repeat Your Biml – CallBimlScript to learn more about the CallBimlScript method.
In Solution Explorer, multi-select the CreatePackages.biml and LoadBimlRelationalHierarchy.biml files. Right-click and click Generate SSIS Packages as shown in Figure 5:
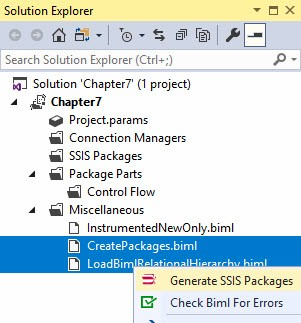
Figure 5. Generating the SSIS Packages
When the Biml expands, we see two SSIS Packages generated from metadata: Load DimChannel.dtsx and Load DimCurrency.dtsx as show in Figure 6:
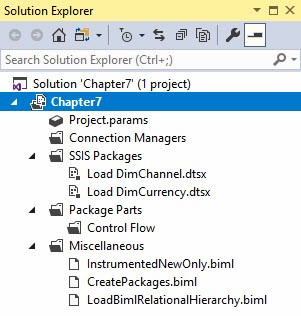
Figure 6. Generated SSIS Packages
At this point, we are generating the same output as in the previous article, and we have done so after decoupling our pattern from the CreatePackages.biml file. Success! Let’s proceed by editing the names of the SSIS Packages to include the name of the design pattern and adding design pattern metadata to our BRMetadata database.
Adding the Design Pattern Name to the SSIS Package Name
Edit the InstrumentedNewOnly.biml file’s Package opening tag to read:
<Package Name="Load_<#=tgtTable.Name#>_InstrumentedNewOnly" ProtectionLevel="EncryptSensitiveWithUserKey">
We added an underscore between the word “Load” and the name of the target table contained in the tgtTable variable. We also added another underscore followed by the hard-coded name of the design pattern: InstrumentedNewOnly.
When we regenerate the SSIS Packages we see the updated SSIS Package names as shown in Figure 7:
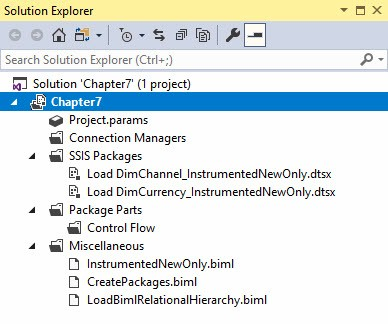
Figure 7. Viewing Renamed SSIS Packages
Adding the Design Pattern Name to the Metadata Database
We need to add two tables to properly store design pattern information in our metadata database named BRMetadata. If we’re going to adhere to a normal form, we need one table to hold the list of available design patterns and another table to contain a “mapping” of design pattern to the destination tables described in our metadata database.
Let’s first build the design pattern table using the following Transact-SQL:
Use BRMetadata
go
Create Table [di].[Patterns]
(PatternID int identity(1,1) Not NULL
,PatternName varchar(255) Not NULL)
This Transact-SQL statement creates a table named [di].[Patterns] in the BRMetadata database. Let’s populate it with the name of our pattern, InstrumentedNewOnly using the following Transact-SQL statement:
Insert Into [di].[Patterns]
(PatternName)
Values('InstrumentedNewOnly')
Before moving forward let’s query the [di].[Tables] table using the following Transact-SQL statement:
Select *
From [di].[Tables]
We see results similar to those shown in Figure 8:

Figure 8. Viewing the Data in the Tables Table
Let’s next build and populate a table to hold a “mapping” of tables and patterns using the following Transact-SQL statements (or similar, depending on the TableID values returned from your query):
Create Table [di].[TablePatterns]
(TablePatternID int identity(1,1) Not NULL
,TableID int Not NULL
,PatternID int Not NULL)

Insert Into [di].[TablePatterns]
(TableID, PatternID)
Values
 (2, 1)
,(4, 1)
Please note we are only assigning design patterns to destination tables (DimChannel and DimCurrency).
The additions and updates to the BRMetadata database persist the names of available design patterns in the [di].[Patterns] table and map design patterns to tables in the [di].[TablePatterns] table. Let’s next update the Biml project to consume this metadata.
Using the Design Pattern Tables
Please recall from the two previous articles that our approach to a metadata-driven Biml solution is to load metadata from the BRMetadata database into the Biml Relational Hierarchy using the Biml file named LoadBimlRelationalHierarchy.biml, then use the metadata loaded into the Biml Relational Hierarchy to construct SSIS packages.
We will modify the LoadBimlRelationalHierarchy.biml file to retrieve the name of our pattern. It makes the most sense to modify the query for Table metadata, which begins on line 67 as shown in Figure 9:

Figure 9. Viewing the Current Tables BimlScript of LoadBimlRelationalHierarchy.biml
Beginning with the Tables BimlScript that starts at line 28, we modify the BimlScript as shown (new and updated BimlScript is highlighted):
<!-- Tables -->
<#
var sqlTbl = @"
Select distinct mm.SourceDatabaseName + '.' + mm.SourceSchemaName As SourceQualifiedSchemaName
, mm.SourceSchemaName, mm.SourceTableName, mm.SourceTableID, mm.SourceTableName
, mm.TargetDatabaseName + '.' + mm.TargetSchemaName As TargetQualifiedSchemaName
, mm.TargetSchemaName, mm.TargetTableName, mm.TargetTableID
, mm.TargetSchemaName, mm.TargetTableName, mm.TargetTableID
, p.PatternName
From [di].[metadataMappings] As mm
Join [di].[TablePatterns] tp On tp.TableID = mm.TargetTableID
Join [di].[Patterns] p On p.PatternID = tp.PatternID;";

var sqlCol = @"
Select mm.SourceTableID, mm.SourceColumnName
, sc.DataType As SourceDataType, sc.[Length] As SourceLength
, sc.IsNullable As SourceIsNullable, mm.TargetTableID, mm.TargetTableName
, mm.TargetColumnName, tc.DataType As TargetDataType
, tc.[Length] As TargetLength, tc.IsNullable As TargetIsNullable
, mm.IsBusinessKey
From [di].[metadataMappings] As mm
Join [di].[Columns] sc
  On sc.ColumnID = mm.SourceColumnID
Join [di].[Columns] tc
  On tc.ColumnID = mm.TargetColumnID";

var tblDataTable = ExternalDataAccess.GetDataTable(connectionString, sqlTbl);
var colDataTable = ExternalDataAccess.GetDataTable(connectionString, sqlCol);
#>
<Tables>
  <# foreach(DataRow row in tblDataTable.Rows) { #>
  <Table Name="<#=row["SourceTableName"]#>" SchemaName="<#=row["SourceQualifiedSchemaName"]#>">
    <Columns>
      <# foreach(var scr in colDataTable.Rows.OfType<DataRow>().Where(r => r["SourceTableID"].ToString() == row["SourceTableID"].ToString())) { #>
      <Column Name="<#=scr["SourceColumnName"]#>" DataType="<#=scr["SourceDataType"]#>" Length="<#=scr["SourceLength"]#> IsNullable="<#=scr["SourceIsNullable"]#>">
        <Annotations>
          <Annotation AnnotationType="Tag" Tag="IsBusinessKey"><#=scr["IsBusinessKey"]#></Annotation>
          <Annotation AnnotationType="Tag" Tag="MappedColumnName"><#=scr["TargetColumnName"]#></Annotation>
        </Annotations>
      </Column>
      <# } #>
    </Columns>
    <Annotations>
      <Annotation AnnotationType="Tag" Tag="MappedTableID"><#=row["TargetTableID"]#></Annotation>
      <Annotation AnnotationType="Tag" Tag="MappedTableName"><#=row["TargetTableName"]#></Annotation>
    </Annotations>
  </Table>
  <Table Name="<#=row["TargetTableName"]#>" SchemaName="<#=row["TargetQualifiedSchemaName"]#>">
    <Columns>
      <# foreach(var tcr in colDataTable.Rows.OfType<DataRow>().Where(r => r["TargetTableID"].ToString() == row["TargetTableID"].ToString())) { #>
      <Column Name="<#=tcr["TargetColumnName"]#>" DataType="<#=tcr["TargetDataType"]#>" Length="<#=tcr["TargetLength"]#> IsNullable="<#=tcr["TargetIsNullable"]#>">
        <Annotations>
          <Annotation AnnotationType="Tag" Tag="IsBusinessKey"><#=tcr["IsBusinessKey"]#></Annotation>
          <Annotation AnnotationType="Tag" Tag="MappedColumnName"><#=tcr["SourceColumnName"]#></Annotation>
        </Annotations>
      </Column>
      <# } #>
    </Columns>
    <Annotations>
      <Annotation Tag="MappedTableID"><#=row["SourceTableID"]#></Annotation>
      <Annotation Tag="MappedTableName"><#=row["SourceTableName"]#></Annotation>
      <Annotation Tag="PatternName"><#=row["PatternName"]#></Annotation>
    </Annotations>
  </Table>
  <# } #>
</Tables>
The Tables and Columns BimlScript snippet should now appear as shown in Figure 10:
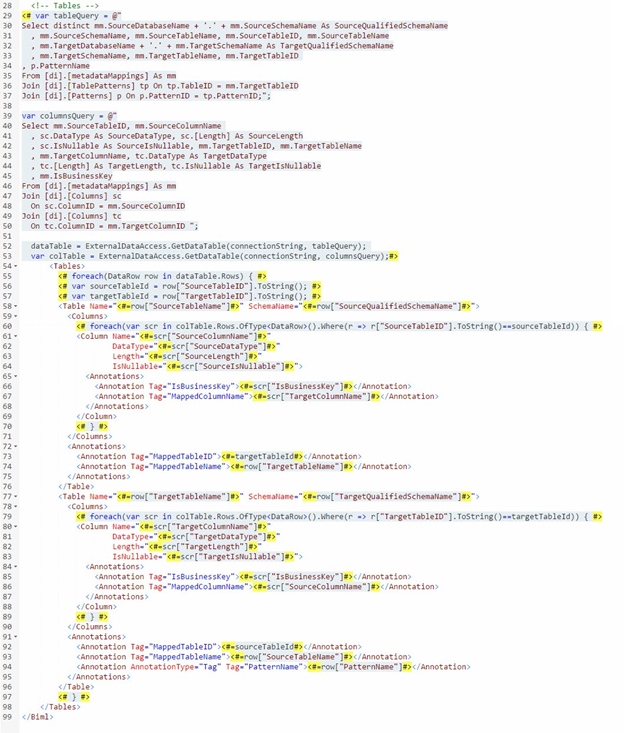
Figure 10. Updated LoadBimlRelationalHierarchy.biml BimlScript
When the Biml is updated in the preview pane it appears as shown in Figure 11:
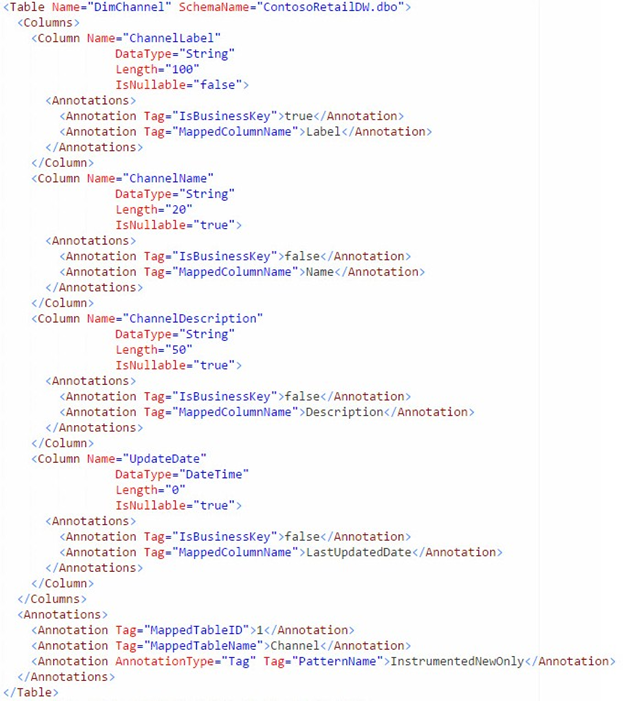
Figure 11. Viewing the Biml for the DimChannel Target Table
As you can see toward the bottom of the code excerpt shown in Figure 11, the name of the design pattern is stored in a Biml annotation for the target table.
Let’s next update the CreatePackages.biml file to read and use this value as our design pattern value by making the highlighted changes to the BimlScript:
<#@ template tier="20"#>
<Biml xmlns="http://schemas.varigence.com/biml.xsd">
  <Packages>
    <#
    var sourceConnection = "ContosoSource";
    var targetConnection = "ContosoTarget";
    foreach(var tgtTable in RootNode.Tables.Where(t => t.Connection.Name == targetConnection)) {
      var sourceTable = tgtTable.GetTag("MappedTableName");
      var srcTable = RootNode.Tables[sourceTable];
      var patternName = tgtTable.GetTag("PatternName");
    #>
    <#=CallBimlScript(patternName + ".biml", sourceConnection, targetConnection, sourceTable, srcTable, tgtTable)#>
    <# } #>
  </Packages>
</Biml>
With a relatively small code change, we’ve introduced an almost incredible level of flexibility. Through metadata stored in our BRMetadata database, we can now specify the pattern we want to use to load each destination table. Furthermore, while we presently have implemented just the one pattern from the previous article, we can now add arbitrarily many new patterns to accommodate whatever novel data integration scenarios we might encounter.
Let’s verify that in making this powerful change, we haven’t broken anything. The preview pane in BimlExpress is truly awesome but you cannot preview Biml generated by multiple files in BimlExpress unless you have all Biml files open and updated. If you have access to a copy of BimlStudio, however, and execute LoadBimlRelationalHierarchy.biml prior to opening CreatePackages.biml in Logical View, the BimlStudio preview pane will display the Biml. The Biml for the Load_DimCurrency_InstrumentedNewOnly SSIS package appears as shown in Figure 12:
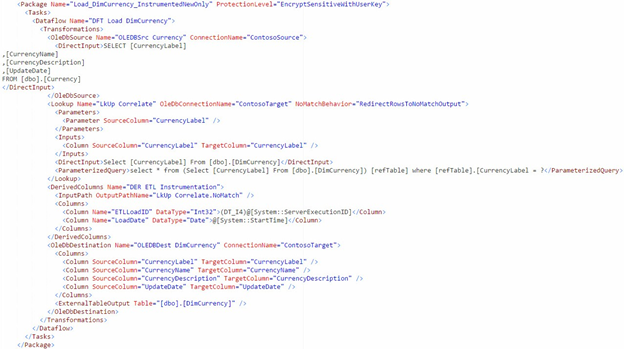
Figure 12. Viewing Load_DimCurrency_InstrumentedNewOnly SSIS Package Biml
Perfect! It looks exactly as it did when the pattern was hardcoded. Now we’ll verify that our new architecture still works when we have multiple options available for our choice of pattern.
Testing Metadata-Driven Design Pattern Selection
Before we can fully test our new metadata-driven design pattern functionality, we need to add a new design pattern. Rather than walk you through building another pattern Biml file, we’re just going to provide you with a new pattern that manages new rows and updates to existing rows. Rather than use an SSIS OLE DB Command Transformation to manage the updates – which is the equivalent of an “SSIS cursor” – we will implement a set-based update solution. The Biml and BimlScript shown here is complex. For many data integration scenarios, this pattern is Production-ready code.
Add the IncrementalLoad Pattern
First, let’s create some Update-staging tables in our target database, ContosoRetailDW, using the following Transact-SQL statements:
USE [ContosoRetailDW]
GO
CREATE TABLE [dbo].[stage_DimChannel](
      [ChannelKey] [int] NOT NULL,
      [ChannelLabel] [nvarchar](100) NOT NULL,
      [ChannelName] [nvarchar](20) NULL,
      [ChannelDescription] [nvarchar](50) NULL,
      [ETLLoadID] [int] NULL,
      [LoadDate] [datetime] NULL,
      [UpdateDate] [datetime] NULL)

CREATE TABLE [dbo].[stage_DimCurrency](
      [CurrencyKey] [int] NOT NULL,
      [CurrencyLabel] [nvarchar](10) NOT NULL,
      [CurrencyName] [nvarchar](20) NOT NULL,
      [CurrencyDescription] [nvarchar](50) NOT NULL,
      [ETLLoadID] [int] NULL,
      [LoadDate] [datetime] NULL,
      [UpdateDate] [datetime] NULL)
Add the Biml and BimlScript listed below to a new file in your project called IncrementalLoad.biml:
    <#@ template designerbimlpath="Biml\Packages" #>
    <#@ property name="sourceConnection" type="String" #>
    <#@ property name="targetConnection" type="String" #>
    <#@ property name="sourceTable" type="String" #>
    <#@ property name="srcTable" type="AstTableNode" #>
    <#@ property name="tgtTable" type="AstTableNode" #>
    <#
    var bkList = srcTable.Columns.Where(c => c.GetTag("IsBusinessKey").ToLower() == "true");
    var nonBkList = srcTable.Columns.Where(c => c.GetTag("IsBusinessKey").ToLower() != "true");
    var bkListMappedNames = bkList.Select(c => c.GetTag("MappedColumnName"));
    #>
    <Package Name="Load_<#=tgtTable.Name#>_IncrementalLoad" ProtectionLevel="EncryptSensitiveWithUserKey" ConstraintMode="Linear">
      <Tasks>
        <ExecuteSQL Name="Manage stage_<#=tgtTable.Name#>" ConnectionName="<#=targetConnection#>">
          <DirectInput>
            <#=tgtTable.GetDropAndCreateDdl().Replace(tgtTable.Name, "stage_" + tgtTable.Name)#>
          </DirectInput>
        </ExecuteSQL>
        <Dataflow Name="DFT Load <#=sourceTable#> Source" >
          <Transformations>
            <OleDbSource Name="OLEDBSrc <#=sourceTable#>" ConnectionName="<#=sourceConnection#>">
              <DirectInput>Select <#=srcTable.GetColumnList()#> From <#=srcTable.SchemaQualifiedName#></DirectInput>
            </OleDbSource>
            <DerivedColumns Name="DER <#=tgtTable.Name#> ETL Instrumentation">
              <Columns>
                <Column Name="ETLLoadID" DataType="Int32">(DT_I4)@[System::ServerExecutionID]</Column>
                <Column Name="LoadDate" DataType="Date">@[System::StartTime]</Column>
              </Columns>
            </DerivedColumns>
            <Lookup Name="LkUp <#=tgtTable.Name#> Correlate" OleDbConnectionName="<#=targetConnection#>" NoMatchBehavior="RedirectRowsToNoMatchOutput">
              <Parameters>
                <# foreach(var c in srcTable.Columns) { #>
                <Parameter SourceColumn="<#=c.Name#>" />
                <# } #>
              </Parameters>
              <Inputs>
                <# foreach(var kc in bkList) { #>
                <Column SourceColumn="<#=kc.Name#>" TargetColumn="Dest_<#=kc.Name#>" />
                <# } #>
              </Inputs>
              <DirectInput>
    Select <#=string.Join(",", srcTable.Columns.Select(c => "[" + c.GetTag("MappedColumnName") + "] As [Dest_" + c.Name + "]"))#>
    From <#=tgtTable.SchemaQualifiedName#>
              </DirectInput>
              <Outputs>
                <# foreach(var c in srcTable.Columns) { #>
                <Column SourceColumn="Dest_<#=c.Name#>" TargetColumn="Dest_<#=c.Name#>" />
                <# } #>
              </Outputs>
            </Lookup>
            <OleDbDestination Name="OLEDBDest <#=tgtTable.Name#>" ConnectionName="<#=targetConnection#>">
              <InputPath OutputPathName="LkUp <#=tgtTable.Name#> Correlate.NoMatch" />
              <Columns>
                <# foreach(var c in srcTable.Columns) { #>
                <Column SourceColumn="<#=c.Name#>" TargetColumn="<#=c.GetTag("MappedColumnName")#>" />
                <# } #>
              </Columns>
              <ExternalTableOutput Table="<#=tgtTable.SchemaQualifiedName#>" />
            </OleDbDestination>
            <ConditionalSplit Name="Filter <#=tgtTable.Name#>">
              <InputPath OutputPathName="LkUp <#=tgtTable.Name#> Correlate.Match" />
              <OutputPaths>
                <OutputPath Name="Changed Rows">
                  <Expression><#=string.Join(" || ", nonBkList.Select(GetExpression))#></Expression>
                </OutputPath>
              </OutputPaths>
            </ConditionalSplit>
            <OleDbDestination Name="OLEDBDest stage_<#=tgtTable.Name #>" ConnectionName="<#=targetConnection#>">
              <InputPath OutputPathName="Filter <#=tgtTable.Name#>.Changed Rows" />
                <Columns>
                  <# foreach(var c in srcTable.Columns) { #>
                  <Column SourceColumn="<#=c.Name#>" TargetColumn="<#=c.GetTag("MappedColumnName")#>" />
                  <# } #>
                </Columns>
                <ExternalTableOutput Table="[dbo].[stage_<#=tgtTable.Name#>]" />
              </OleDbDestination>
            </Transformations>
          </Dataflow>
        <ExecuteSQL Name="Apply stage_<#=tgtTable.Name #>" ConnectionName="<#=targetConnection#>">
          <DirectInput>
    Update Dest Set
    <#=tgtTable.GetColumnAssignmentList(c => c.GetTag("IsBusinessKey").ToLower() != "true", "Dest", "Upd")#>
    From <#=tgtTable.SchemaQualifiedName#> Dest
    Join [dbo].[stage_<#=tgtTable.Name#>] Upd On <#=string.Join(" AND ", bkListMappedNames.Select(c => "Upd." + c + " = Dest." + c)) #>
          </DirectInput>
        </ExecuteSQL>
      </Tasks>
    </Package>
    <#@ import namespace="System.Data" #>
    <#+
    private string GetExpression(AstTableColumnBaseNode col) {
      var name = col.Name;
      switch(col.DataType) {
        case DbType.Guid:
          return "((DT_WSTR,55)" + name + " != (DT_WSTR,55)Dest_" + name + ") || ";
        case DbType.String:
          return "((IsNull(" + name + ") ? \"\" : " + name + ") != (IsNull(Dest_" + name + ") ? \"\" : Dest_" + name + "))";
        case DbType.Int64:
        case DbType.Decimal:
        case DbType.Double:
        case DbType.Int32:
        case DbType.Int16:
        case DbType.Currency:
        case DbType.Single:
        case DbType.Time:
          return "(IsNull(" + name + ") ? 0 : " + name + ") != (IsNull(Dest_" + name + ") ? 0 : Dest_" + name + ")";
        case DbType.Boolean:
            return "(IsNull(" + name + ") ? False : " + name + ") != (IsNull(Dest_" + name + ") ? False : Dest_" + name + ")";
        case DbType.Date:
        case DbType.DateTime:
        case DbType.DateTime2:
        case DbType.DateTimeOffset:
            return "(IsNull(" + name + ") ? (DT_DBTimeStamp)\"1/1/1900\" : " + name + ") != (IsNull(Dest_" + name + ") ? (DT_DBTimeStamp)\"1/1/1900\" : Dest_" + name + ")";
      }
      return "";
    }
    #>
Be sure to save the code listed above as a new file named IncrementalLoad.biml. The Incremental Load design pattern is more complex than the Instrumented New Only pattern.
Add Pattern BimlScript to CreatePackages.biml
Let’s next update the CreatePackages.biml file so that it responds to the PatternName Annotation now stored with the Target Table by adding the highlighted BimlScript:
<#@ template tier="20"#>
<Biml xmlns="http://schemas.varigence.com/biml.xsd">
  <Packages>
    <#
    var sourceConnection = "ContosoSource";
    var targetConnection = "ContosoTarget";
    foreach(var tgtTable in RootNode.Tables.Where(t => t.Connection.Name == targetConnection)) {
      var sourceTable = tgtTable.GetTag("MappedTableName");
      var srcTable = RootNode.Tables[sourceTable];
      string patternName = tgtTable.GetTag("PatternName");
      string scriptName = patternName + ".biml";
      string packagesBiml = "";
      switch(patternName) {
            case "InstrumentedNewOnly":
                  packagesBiml = CallBimlScript(scriptName, sourceConnection, targetConnection, sourceTable, srcTable, tgtTable);
                  break;
            case "IncrementalLoad":
                  packagesBiml = CallBimlScript(scriptName, sourceConnection, targetConnection, sourceTable, srcTable, tgtTable);
                  break;
        }
            #><#=packagesBiml#>
    <# } #>
  </Packages>
</Biml>
Your CreatePackages.biml file should appear as shown in Figure 13:
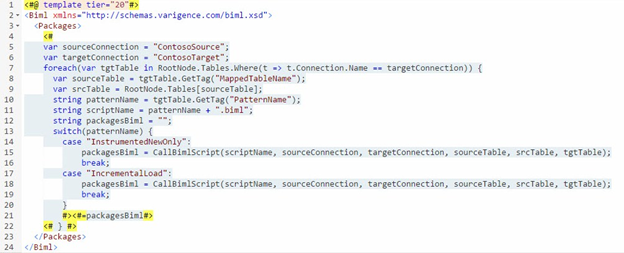
Figure 13. CreatePackages.biml File After Adding Patterns Selection BimlScript
Update Metadata
Let’s add IncrementalLoad metadata to our BRMetadata [di].[Patterns] and [di].[TablePatterns] tables. The Transact-SQL that follows adds IncrementalLoad to the list of SSIS design patterns in the [di].[Patterns] table, and then assigns the IncrementalLoad pattern to the DimChannel table loader:
Use BRMetadata
go
Select * From [di].[Patterns]

Insert Into [di].[Patterns]
(PatternName)
Values
('IncrementalLoad')

Select * From [di].[Patterns]

Select t.TableName, p.[PatternName]
From [di].[Tables] t
Join [di].[TablePatterns] tp
  On tp.[TableID] = t.[TableID]
Join [di].[Patterns] p
  On p.[PatternID] = tp.[PatternID]

Update tp
Set tp.PatternID = (Select [PatternID]
                    From [di].[Patterns]
                              Where [PatternName] = 'IncrementalLoad')
From [di].[Tables] t
Join [di].[TablePatterns] tp
  On tp.[TableID] = t.[TableID]
Join [di].[Patterns] p
  On p.[PatternID] = tp.[PatternID]
Where t.TableName = 'DimChannel'

Select t.TableName, p.[PatternName]
From [di].[Tables] t
Join [di].[TablePatterns] tp
  On tp.[TableID] = t.[TableID]
Join [di].[Patterns] p
  On p.[PatternID] = tp.[PatternID]
The Transact-SQL shown above includes before and after queries for the [di].[Patterns] and [di].[TablePatterns] tables as shown in Figure 14:
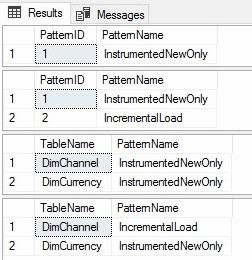
Figure 14. Before and After Queries of the Patterns and TablePatterns Tables
Build the Packages
To test, multi-select LoadBimlRelationalHierarchy.biml and CreatePackages.biml in Solution Explorer, then right-click and click Generate SSIS Packages as shown in Figure 15:
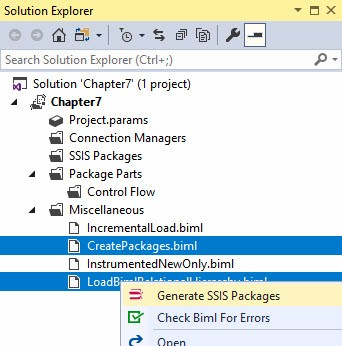
Figure 15. Generating SSIS Packages
When the Biml expands, we see two SSIS packages in Solution Explorer.
Test execute the SSIS Packages in SSDT. If all goes as planned you should see two successful executions as shown in Figure 17:
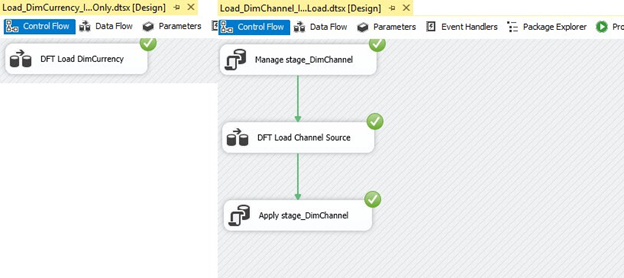
Figure 17. Successful Test Executions!
Green circles with white check marks mean success!
Conclusion
In this article we decoupled the SSIS design pattern from an earlier demo, persisted the pattern name and mapped target tables to patterns in the BRMetadata database, added a design pattern (Incremental Load), and updated Biml to retrieve and apply said metadata.
Given this new architecture, you can add as many new patterns as your solution requires, and drive everything through the metadata database we have already configured. In the next article, we will dig a bit deeper into design patterns to show you a few additional options that you might want to add to your pattern library.
Now that we have a flexible framework, let’s next orchestrate and manage its execution.

