You walk the long hallway to Big Boss’s office and knock tentatively on the big oak door for the unsolicited meeting.
“ENTER!” His voice booms. With expectations of being told to direct your attention away from the man behind the curtain, you open the door and cross the threshold.
Five minutes later you walk out of his office with your head spinning and slowly head back to your desk. Before you leave, you should make sure that all of your reports are available for others. You can use this last article of the series to learn how to manage your reports once development is complete, including how to use the Report Manager, deploy reports, secure items, and send reports to the appropriate end users. To learn about creating reports, read the rest of the series at http://www.sqlservercentral.com/stairway/72382/.
Management
Managing your reports and report server, also known as administration, is a job within itself. Reporting Services should be thought of as any other application, which needs to be maintained and supported. Management includes making sure that the items are made available to everyone who needs them, based on security, availability, and even disaster recovery. By keeping track of the administration portions of Reporting Services, you can be sure that everyone will continue to enjoy the reports you have worked so hard to create.
We’re going to make a few assumptions: Reporting Services has been installed successfully on the server and we are using Reporting Services in native mode. With these two assumptions, there are a few tasks that we want to ensure that we can do on a regular basis. These tasks include: deployment, execution, and delivery.
Deployment
Once a report has been created, the next step is to put it somewhere that other people can get to it. That place is Report Manager, which we saw briefly in our first article. To deploy a report, go to Report Manager which, in a default installation, can be found at http://<<servername>>/Reports. Traverse to the appropriate folder and click the Upload File button, as shown in Figure 1.

Figure 1.
Next to the File to upload area, select the Browse… button. Find the report on your local machine, and click Open. If the file already exists in that folder, you will need to select the Overwrite item if it exists checkbox. Otherwise, select OK, and your report has been published.
If you’re using the Report Manager for deployments, you’ll also need to create the data source, so that the report knows where to get its information. To create a data source, go to the desired folder (which could be different than the folder where the report resides), and select the New Data Source button, as shown in Figure 2.

Figure 2.
Provide the name, data source type, connection string, and credential information needed for the report to connect. You can use the Test Connection button to ensure everything has been set up correctly, and then push the OK button to save the data source.
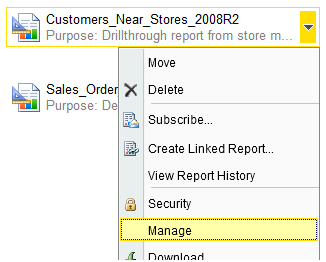
Finally, you need to tie the report to use the appropriate data source. Using the down arrow next to the report, open the menu and select the Manage menu option, as shown in Figure 3. This opens a properties screen that contains a Data Sources menu.

Figure 3.
On the Data Sources menu, you can choose the shared data source that you just created. Don’t forget to hit the Apply button at the bottom of the page to push the change through.
Execution
Now that the reports are in Report Manager and have been assigned a data source, either you or an end-user can execute them. Go to the location (URL) of the report and click it once. It will switch to the report. If you have default parameters or no parameters, it will run automatically. Otherwise, you will need to select the desired values and push the “View Report” button.
Notice the toolbar across the top of the report, as shown in Figure 4, which allows you some control over how the report looks. You can zoom in or zoom out of the report, search for specific phrases, or save/export the report to a different format. The save options available to you include XML, CSV, PDF, MHTML, Excel, TIFF, and Word in Reporting Services 2008 R2.

Figure 4.
Delivery
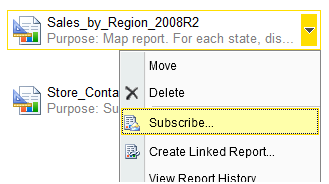
If a user wants the same set of reports every day, they shouldn’t need to go to the Report Manager to run each report every day. And just as important, we shouldn’t need to go to the Report Manager to run each report every day! To avoid this daily activity, we can set up subscriptions that will automatically execute and deliver a report. To set up subscriptions, click the drop-down arrow next to the report name, and select the Subscribe button, which is shown in Figure 5. You can then decide what type of subscription you want to create. Subscriptions come in two different flavors: regular and data-driven.

Figure 5.
Regular subscriptions are set up on a particular report to execute the report on a scheduled basis. Once the report is run, it can be delivered to a windows file share or an email address. The subscription will contain information on the end location of the report, how often it should be run, and what parameter information is provided to the report if necessary.
Data-driven subscriptions are only available in the Enterprise edition of Reporting Services. This subscription type is very powerful, in that it allows you to use information from a table to determine the report destination and parameters to use. For example, if you have a report that needs to be run for all store managers for just their particular store, you could use a regular subscription for every store manager, or you could use one data-driven subscription that would achieve the same purpose. This is not only easier to create, but also easier to maintain moving forward.
Security
Reporting Services has two layers of security: system-level and item-level. Windows integrated security is used to assign users or groups to roles to allow different types of access to the systems/items. Both server-level and item-level security should be utilized correctly to only allow the needed permission for each user or group.
System-level security focuses on who has access and the level of access to the Report Manager page. The two built-in roles are System User, which provides view access to the site, and System Administrator, which provides permission to set security and manage additional features on the site. To assign server-level security, select the Site Settings link in the top right corner of the Report Manager page. On the Security tab, you can now create a New Role Assignment which will tie a role to a Windows user or group.
Item-level security provides access to the individual items within Report Manager, such as folders, reports, and data sources. To assign item-level security, click the drop down next to the item you are interested in securing and select the Security option. Similarly to setting security at the system-level, you will push the New Role Assignment button on the Security tab, and assign a user to a role. While you can create your own roles with a set of permission, the built-in roles available at the item-level are:
- Content Manager
- Publisher
- Browser
- Report Builder
- My Reports
Other
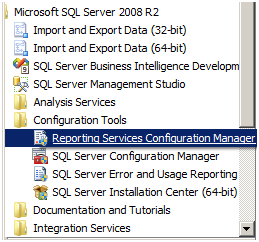
Finally, you should make sure that you have implemented administration and maintenance levels so that you can restore in the event of a disaster. Your Reporting Services database should be included in all backups that are set up at your organization. In addition, you must make a backup of the encryption key from Reporting Services. To do this, go to the Reporting Service Configuration Manager, as shown in Figure 6.

Figure 6.
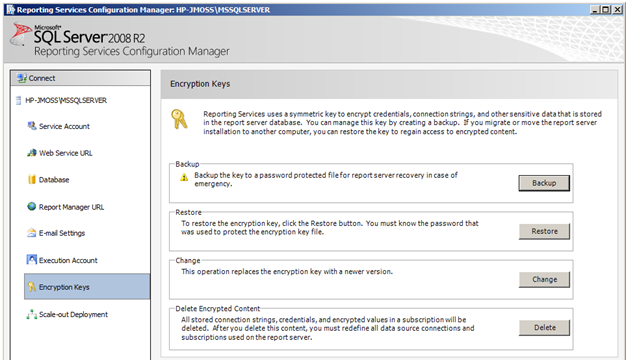
On the Encryption Keys menu, push the Backup button, as shown in Figure 7. This will allow you to specify the location and name of the key. Be sure to store this encryption key on a different server, to make it accessible if anything happens to the Reporting Services server.

Figure 7.
Promotion
All of your reports have now been deployed to the Report Manager and are available for others to access and modify. You can export, modify, and save reports to the Report Manager. In addition, you can use subscriptions to prepare long-running reports or email reports to users. Your job is now done.
As you carry a box filled with your desk paraphernalia, you pass your manager in the hallway. He stops in his tracks and demands to know where you are going.
“I’ve been promoted,” you share. “Big Boss liked my reports so much that he wants me to work directly with him.” As you share your good news, your manager's jaw drops in surprise. "B-b-but what about this next set of reports that Big Boss needs? Who will write all of them?"
You smile sweetly at his expression. "Here, let me show you this great article series on SQLServerCentral.com called Stairway to SQL Server Reporting Services..."
