Update: changed the reset password comment below Use to say that that was not possible in the Azure interface but this is not possible.
This article is for the beginner. This is the first in a series of articles I will be writing on Microsoft Azure DBs. They will get more advanced as we more forward. We have to start somewhere and creating a database seemed like a logical place. I will assume that you have an Azure account or access to one. If you do not, you can get a free account at www.azure.com (follow the Get Started for Free links… they're everywhere) and it will give you $240.00 of free credit for the first month.
Once that runs out, you can get the free Visual Studio subscription (https://www.visualstudio.com/) along with Visual Studio community edition (fully functional version) and you get several benefits with it:
- $25/month of azure free.
- SQL Server 2014 Developer Edition (All the features of enterprise) free.
- And tons more, so check it out.
I will try to use my $25/month subscription for as many of these articles as possible; just to show you can learn this without it costing you much/anything; except your time.
You will notice that I will put definitions where I feel a term might not be clear. This is because it is difficult to talk about only one aspect of Azure (say Databases), without understanding other components of the platform (storage, datacenters, resources etc…). Therefore the definitions will be my way of keeping from going on 100 different tangents.
Creating our first Database
First you will need to log into the Azure Portal at www.azure.com. I am going to use the new Portal and not the Classic Portal. The new Portal has a slick black interface as opposed to the blue interface of old portal; but that can all be changed using the Settings (gear) button in the top right of the window.
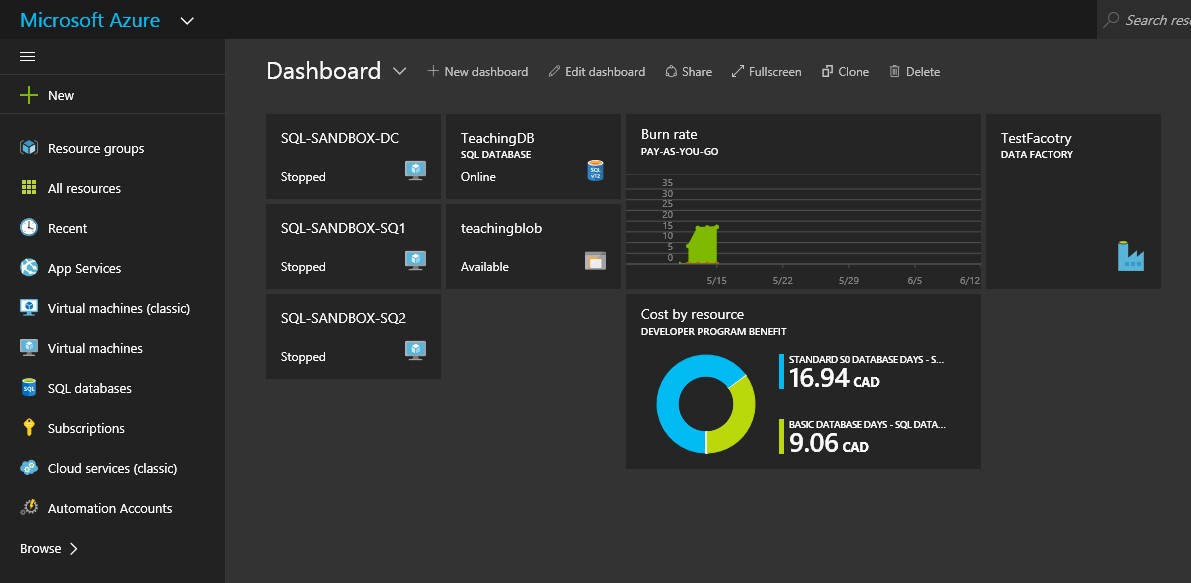
Once you have logged in you should see something like the screen shot below with fewer tiles in the Dashboard area. As the lessons go on I will add tiles to my dash board and configure them. Customizing the dashboard is an article on its own.
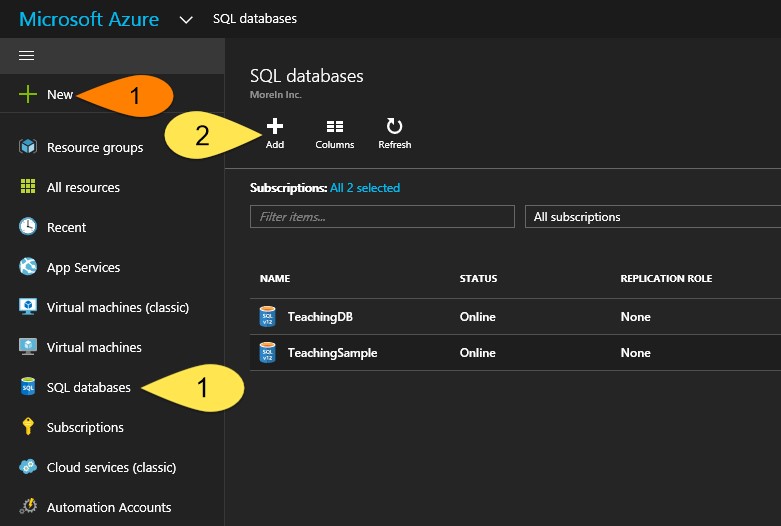
There are several ways to create new resources, (in our case a database). One way is to go to the New button (orange 1) in the top left of the Dash Board screen. Another is to choose SQL databases (yellow 1) from the left menu. When the new Blade appears you select Add (2).
Definition:
Resource: Resourses are the objects you create in Azure. These objects take memory, CPU and disk space up at Microsoft’s Datacenters. A Database is a resource, just as a Virtual Machine or Web Site would be.
Blade: As you select various menu items and links, small windows slide open to reveal settings, properties and actions for that selection. These new windows are called Blades.
Step 1
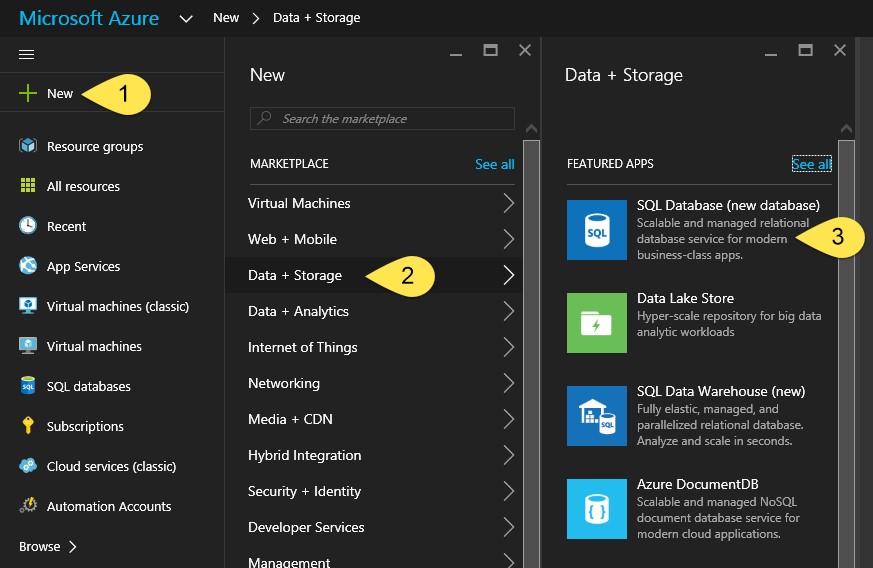
We are going to start by clicking New (1) >> Data + Storage (2) >> SQL Database (new database) (3).
Step 2
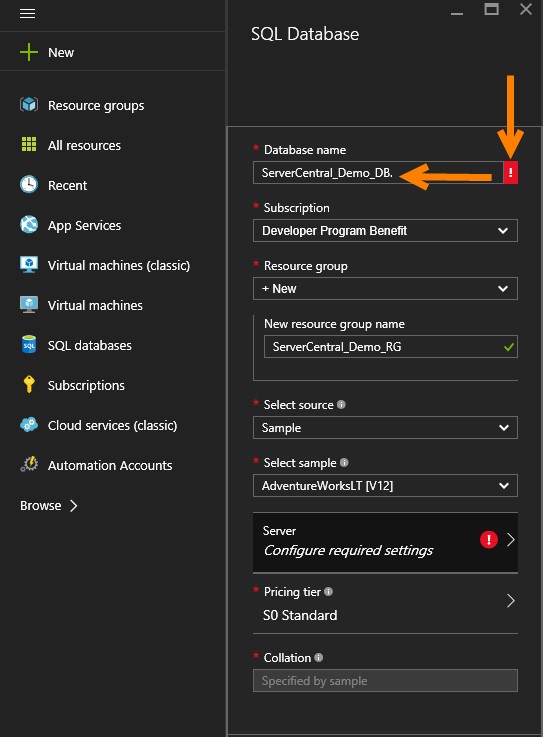
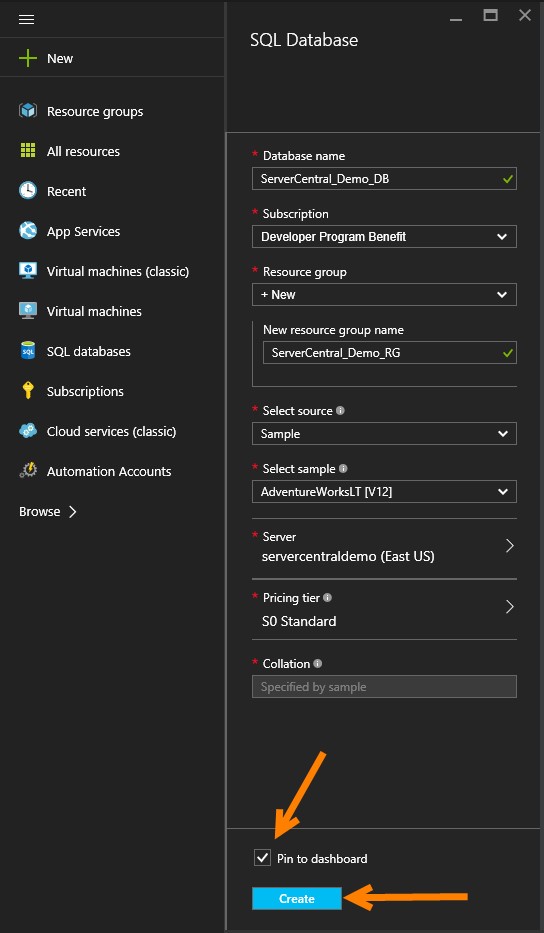
This will open a new Blade where we can start to enter in the details of the database we are creating. The first two fields, Database Name and Subscription, are pretty self-explanatory. Let’s enter “ServerCentral_Demo_DB” as the DB name and use the dropdown box to choose the Subscription that you want this resource created under.
The database name can’t end in a “.” or “ “ and can’t have any special characters. If you enter a valid name there will be a green checkmark at the end of the checkbox. Otherwise a red exclamation will appear (see image below) Any time this happens simply hover over the exclamation point and you will see an explanation of what needs to be corrected. Microsoft has done a pretty good job of giving you the information you need about issues so take the time to read the errors and warnings.
Step 3
In the Resource Group field we will use the drop down and select new to create a new Resource group. When the New Resource Group text box appears enter ServerCentral_Demo_RG.
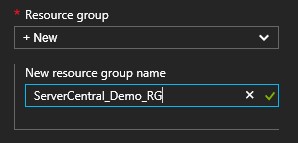
Definition:
Resource Group: A resource group is Azures way of keeping together resources that belong together. For example virtual machines, networks and databases for the same department/company. They allow you to monitor, control user access, and bill based on the group and in that way provide a very efficient way to manage cloud resources. Resource Groups are a feature only available in the new portal, the clasic does not have them.
Step 4
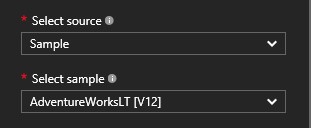
Next comes the Source. In the Select source drop down select Sample but you have 3 options:
- Blank: This is an empty database.
- Sample: This is a DB that has some sample data (AdventureWorks).
- Backup: Allows you to restore from a backup. (More on that in a later article).
Under Select sample leave the AdventureWorksLT (V12).
Step 5
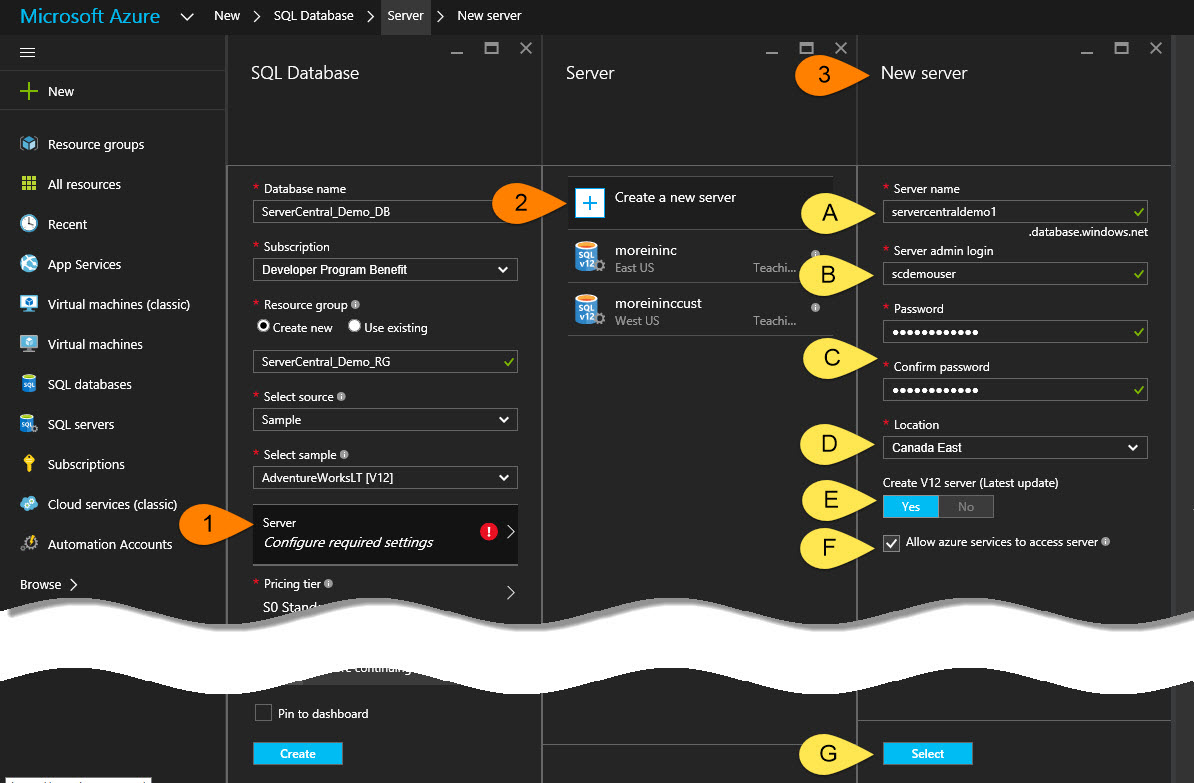
Now we will create a server (if one was available you could always select it). Start by:
- Clicking on the Server button.
- In the Blade that appears select New Server.
- In the Blade that appears enter the following information:
- Server name (will always be lowercase). If you look you will see this will be appended with a “.database.windows.net”. What that means is that your server name has to be unique in that domain, so you will have to find a unique name. As before the field will get a exclamation point to warn you of issues. Check the message because it could be format or naming conflict.
- Server admin Login enter a user name for the Server Admin.
- Enter and confirm a password for that user.
Note: There is a Reset Password button in the server properties but you neeed to be able to log into the portal as an Admin to use it. - In the Location select which datacenter your server will be created in. In my case I am selecting the Canada East.
- Note that not every resource can be created in every region. SQL Server is one resource available in all regions. For a full list of the regions and what is supported in each see https://azure.microsoft.com/en-us/regions/#services.
- This is an important configuration to be aware of. Some companies have restrictions on their data and cannot store it outside certain geographic regions. Make sure you understand those requirements.
- Last but not least, your database can be replicated to another datacenter but there is a cost involved. In a later article we will set this up and test a few things but for now, if you want to learn more, you can start here.
- Keep the selection to Create V12 Server (Latest Update). This will create a server with the latest and greatest updates and with the Sample Database as a V12, you don’t have a choice. In most cases this is likely what you want. If you want to see what language features are available in V12 click here. For the list of language features that are not supported in V12 click here.
- Keep the Allow azure services to access server checked as you will not be able to uncheck it. This can be unchecked in the firewall settings of the server later. What this is saying is that any resources in the cloud will be able to connect to the server (so long as they have credentials). Unchecking this will require any VM or other resource running in Azure to have a static IP and have that IP, or range, setup in the servers firewall settings in order to connect. But more on that later.
- Click the Select button in the bottom of the New Server Blade.
Step 6
Now it’s time to pick a pricing tier. By default the database will be created as a S0 Standard tier, and we will leave that selection, but let’s look at some of the options by clicking on the Pricing tier button on the SQL Database Blade. You will notice there are 3 different tiers. Premium, Standard and Basic.
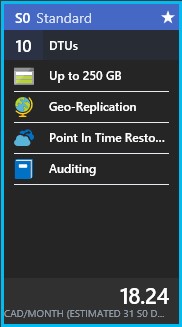
- All tiers have the following items that are static:
- Auditing: Using this you can track DB usage, connections performance etc…
- Point in time restore: This is like SQL Server Full Recovery Mode.
- Geo-Replication: As explained above (7.f.iii) your Database will be replicated to the partner datacenter.
- All tiers have the following items that are variable:
- Size: in GB (so with the S0 Standard tier we get 250 GB).
- 10 DTUs (See definition below)
Definition
DTUs: Or Database Transaction units are Microsoft’s way of assigning a measurement to how performant the DB is. Basically, it is a count of the number of transactions/per second that the database can perform under fully loaded conditions. If you want to read more you can review their description here or read Steve Jones’ attempt to explain the math here… (10 minutes I will never get back). Bottom line is that even after reading all that, you will know about as much as you do now. The reason is because mapping a DTU to your requirements is, as Steve Jones says, “fuzzy” at best, This makes sense becuase if Mircosoft upgrades their datacenter resources (memory, disks, CPUs etc...), they can generate that same "fuzzy" DTU for less of their datacenter resources, thereby selling more DTUs.
Step 7
Your Blade should now look something like the one below. Select the check box Pin to dashboard and click the Create button at the bottom of the Blade.
Step 8
In the top right of the window you will see that under the Alterts section there is a “Deployment started”. Now you wait till it finishes (< 5 minuets).

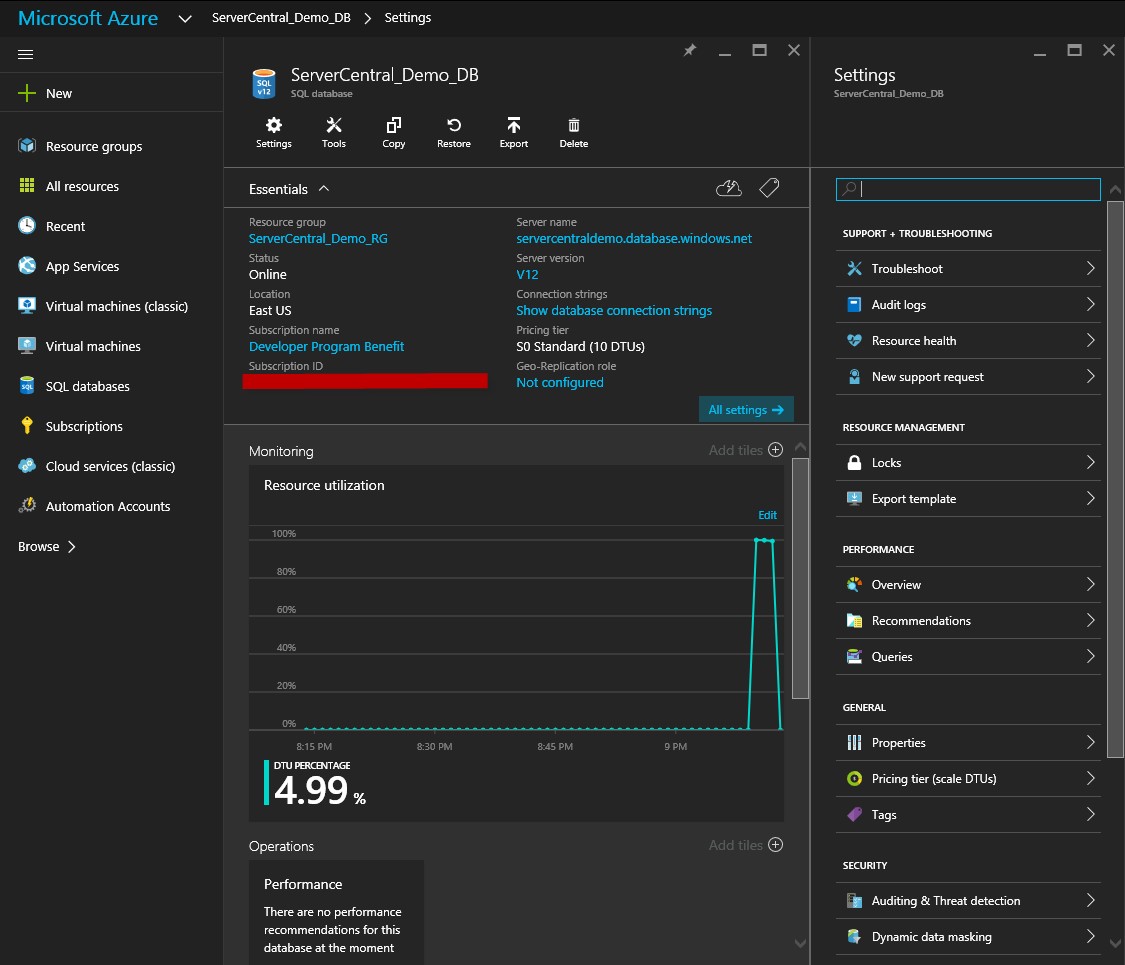
Once done the alert will say “Deployments succeeded” and the Database Blade along with its Settings Blade will open.
Configuring and Connecting to the Database
Next we will look at how you can begin working with your database. There are six steps to begin using your sample Azure SQL database.
Step 1
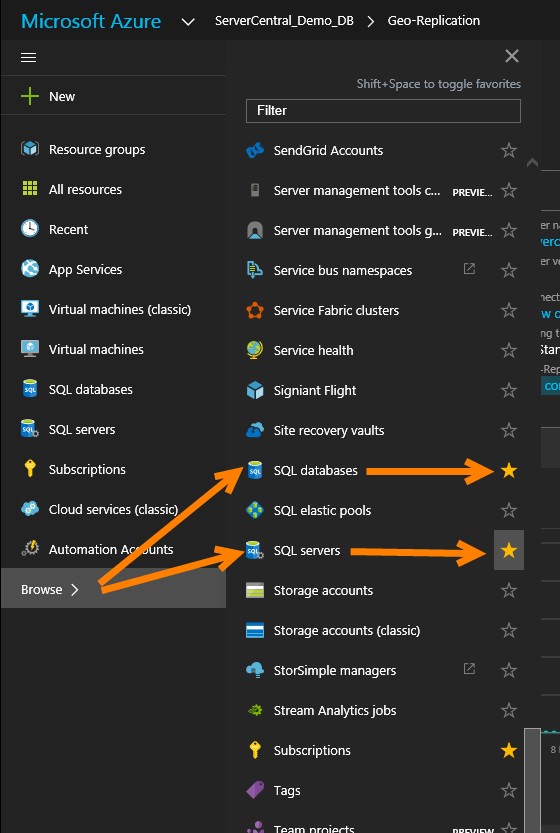
If you have closed the Blades you can get back to your database by clicking the SQL databases in the left hand menu. If the SQL databases option is not there you should be able get it into the menu by clicking on the Browse button and clicking the star beside the SQL Database option in the list. I have also included the SQL Severs shortcut as well.
Step 2
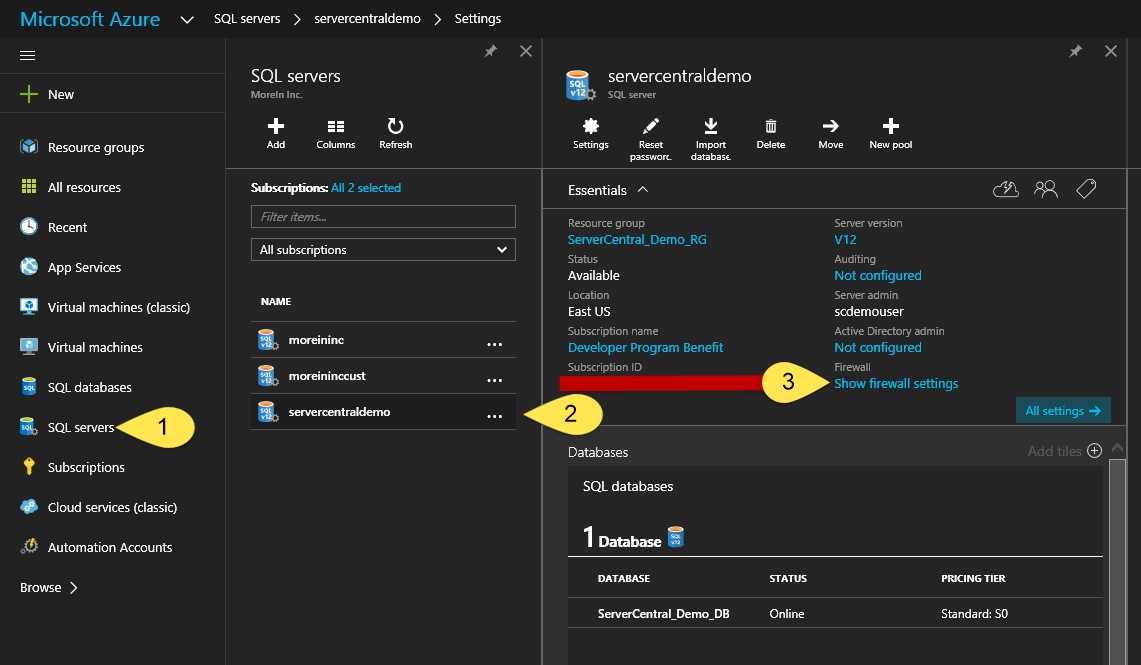
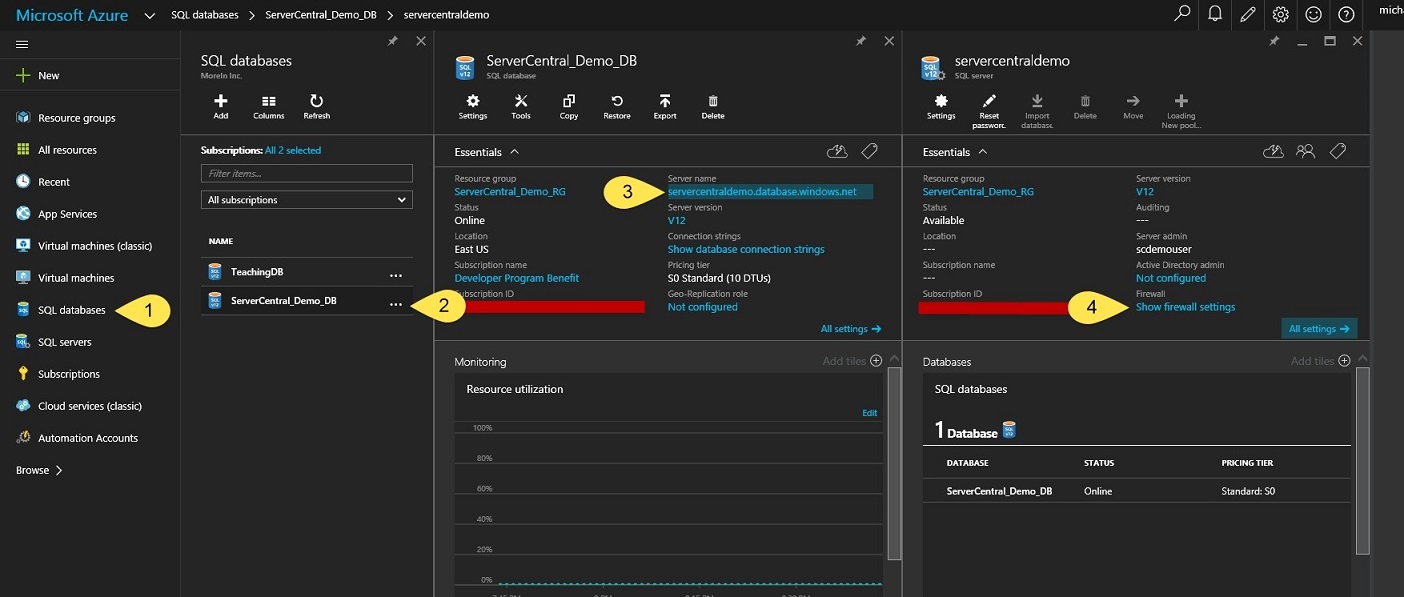
First thing we will do is set up the firewall security for our server. You can get to your server firewall settings by click on the SQL Servers (1) >> Show firewall settings or, if you have your Database’s Blade open you can click on the Server link (1) under Server Name (2) then Show firewall settings (3).
Or
Step 3
In the Firewall setting Blade:
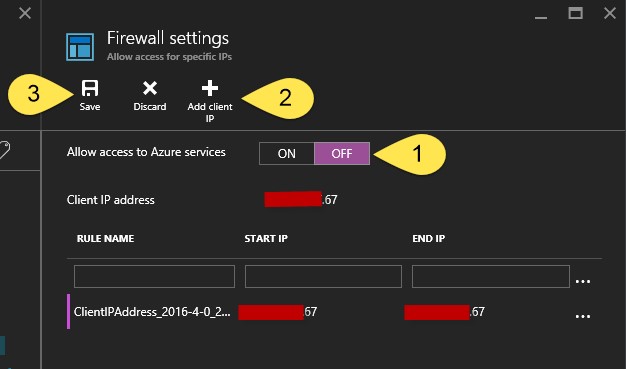
- Select “Off” in the Allow access to Azure services. This will stop other Azure VMs and Services from connecting to your server. For now we want to keep this off. However we may turn it on later to perform some automation tasks.
- Select “Add client IP” and you will see your IP added to the green list of IPs that can connect to this server. Notice you can add ranges as well.
- Save the configuration.
Note: Make sure you maintain this list. If you move around a lot doing your work you may end up with a list of old IPs in there that should be removed. Just make sure you remove IPs or ranges that no longer require access.
Definition
Automation task: The portal provides you with a way to automate work on your Azure Cloud resources. In the menu you will see Automation Account and that is where you access automation. Basically what this is doing is running powershell scripts for you on a schedule. So you can automate your backups, start up VMs etc... There are many scripts available in the automation seciton that others have written and made avaiable.
Step 4
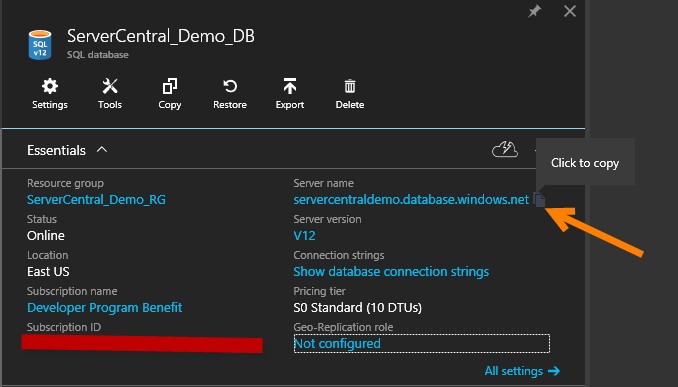
Now we are ready to connect. In order to do so you will need to know the Admin username and Password that you entered in Step 5 3(b) and 3(c) of Creating our first Database. You will also need the Server name. To get the Server name open up the server Blade for the server you are connecting to and copy the name.
Step 5
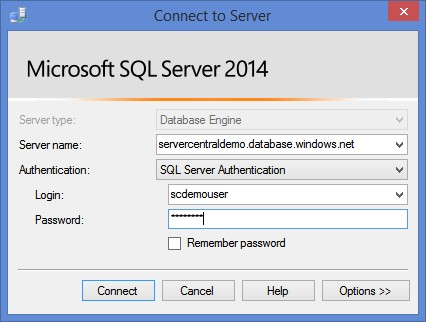
Open up SSMS or Visual Studio (use the SQL Server Object Explorer under the View menu) and click Add SQL Server connection. Once the Connect to Server dialog open enter your connection information and click connect.
Step 6
If you get any errors please read the message, Its likely your IP is incorrect or you have not entered the Server Admin ID and Password correctly. And remember that if you do try to log in from a different IP, you will not be able to connect until you add the IP to the firewall setting of the server using the Azure portal.
Conclusion
We have seen how to create and connect to a SQL Server and SQL Database in Azure. If you consider what you have done here (in minutes) as opposed to the requirement of doing an on premises install, you should be impressed. You just assigned all the hardware for the SQL Server, installed all the software and finally setup some of the basic security around the server (firewall). Not bad. You could also use powershell to automate the entire process, but that is another article.
I have tried to give you links to as much information as I could in the article. This was not meant to be an exhaustive and detailed explanation of SQL Server and Databases in Azure, but a way to get your feet wet to some of the nomenclature and get you into a database. You will also notice that it is very easy to go on tangents when poking around in azure. The rabbit hole is deep.
I hope you enjoyed this article and I look forward to writing more regarding specific components of SQL Server in Azure.


