This is the third article in a series entitled Stairway to Integration Services. Previous articles in the series include:
- What is SSIS? Level1 of the Stairway to Integration Services
- The SSIS Data Pump - Level 2 of the Stairway to Integration Services
Introduction
In our previous installment (The SSIS Data Pump - Level 2 of the Stairway to Integration Services) you learned how the basics of configuring an SSIS Data Flow Task to load data. Are you ready to make this process re-executable? Let's roll!
SQL Server Integration Services was built to move data and the Data Flow Task provides this functionality. For this reason, when introducing people to SSIS, I like to start with the Data Flow Task. Let's start with a little theory before we pick up developing where we left off with My_First_SSIS_Project, k?
"What is an Incremental Load, Andy?"
That's a spectacular question! An incremental load loads only the differences since the previous load. Differences include:
- New rows
- Updated rows
- Deleted rows
By its very nature, an incremental load is re-executable, which means you can execute the loader over and over again without harm. More than that, re-executable means the loader is designed to be executed multiple times without causing unnecessary or repetitive work on the server.
In this and the next two installments of the Stairway to Integration Services we'll examine adding, updating, and deleting rows in an incremental load. This article focuses on adding rows.
To The Keyboard (and Mouse)!
Let's open the project from The SSIS Data Pump - Level 2 of the Stairway to Integration Services - My_First_SSIS_Project (Start |All Programs | Microsoft SQL Server 2008 | SQL Server Business Intelligence Development Studio). If you don't see My_First_SSIS_Project in the Recent Projects section of the Start Page, click File | Open | Project/Solution and navigate to the directory where you built My_First_SSIS_Project. If you still cannot find the project, you can download it here.
When the project opens, you may need to open Solution Explorer and double-click Package.dtsx to open the SSIS package designer:
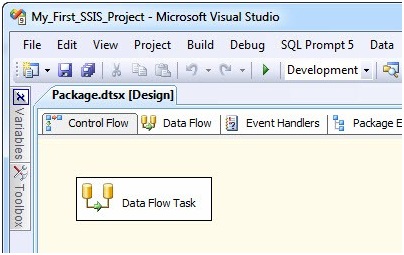
Figure 1
In Figure 1 we see the package as we left it. Open the Data Flow Task editor (you can do this by clicking on the Data Flow tab, double-clicking the Data Flow Task, or right-clicking the Data Flow Task and selecting "Edit..."). Once the editor opens, we see the OLE DB Source and OLE DB Destination adapters connected by a Data Flow Path:
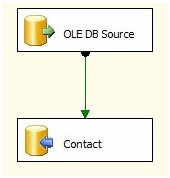
Figure 2
If you've been playing along at home, the last thing you did in The SSIS Data Pump - Level 2 of the Stairway to Integration Services was execute this package, which loaded 19,972 rows of data from the Person.Contact table in the AdventureWorks database into a table you created in the AdventureWorks database named dbo.Contact.
Question: What would happen if you re-executed the SSIS package right now? Answer: It would load the same 19,972 rows of data from Person.Contact into dbo.Contact! Don't believe me? Let's take a few minutes to test it. In SSMS, execute the following T-SQL script:
Use AdventureWorks
go
Select *
From dbo.Contact
If the script returns more than 19,972 rows, the SSIS package has executed more than once. You can clean up the dbo.Contact table by adding the following T-SQL script:
Delete dbo.Contact
If you highlight the Delete statement, you can execute it standalone by pressing the F5 key in SSMS.
Return to BIDS and press the F5 key to re-execute the SSIS package:
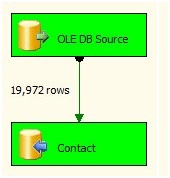
Figure 3
The Data Flow Task will appear as shown in Figure 3 once the load is complete.
Return to SSMS and comment-out the Delete T-SQL statement.
Want to know a cool way to comment-out code in SSMS? The Delete statement is already selected. You selected it and executed the statement before reloading the dbo.Contact table from SSIS. You can comment-out this selection by holding down the Ctrl key and pressing K and then C. Try it! You can un-comment code by holding Ctrl and pressing K and then U. Commented code looks like Figure 4:

Figure 4
That's it! Problem solved. A re-test in SSMS should reveal 19,972 rows in dbo.Contact. And you can run that test in the same query window as your commented-out Delete statement without worrying about deleting the rows in the table. I like that. I also like that I can select the Delete statement text - even if it's commented-out - and execute it. Now that's flexibility right there.
Stop It!
If the BIDS Debugger is running, the Debug menu will appear as shown in Figure 5:

Figure 5
If you look at the Toolbox for the Control Flow or the Data Flow Task, you'll see a frightening message:
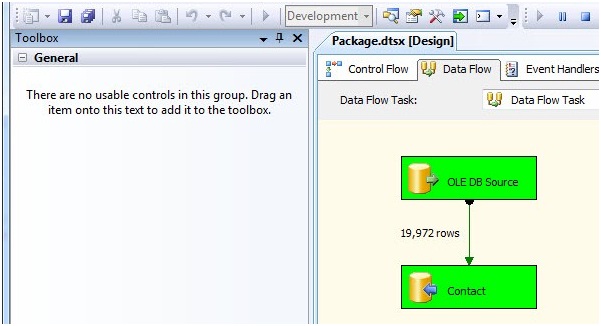
Figure 6
This is because the BIDS Debugger is still running. You can see it in the upper right of Figure 6 - the Debug menu shows the "VCR-Play" button (Start Debugging) as disabled because the package is already executing in Debug mode. If I'm asking myself, "Self, where are my toolbox items?" I know to look at the Debug menu.
There are several ways to stop the BIDS Debugger. You can click the square "VCR-Stop" button on the Debug menu (the one highlighted in Figure 5). You can press and hold the Shift key and press the F5 key. You can click on the BIDS Debug menu and select Stop Debugging:
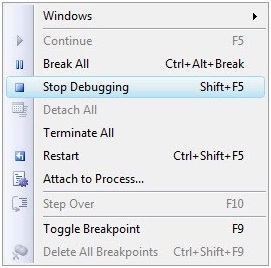
Figure 7
You can click the link beneath the Connection Managers tab at the bottom of the Package designer:

Figure 8
Pick one of these methods and stop the BIDS debugger.
Now that we're stopped, we can edit the SSIS package. A quick check of the toolbox reveals our SSIS components have returned (Yay!).
Incremental Load Goals
Before we start making a bunch of changes, let's define the goals of an incremental load:
- We want to insert rows that are new in the source and not yet loaded into the destination.
- We want to update any rows that have changed in the source since we loaded them to the destination.
- We want to delete rows in the destination that have been removed from the source.
The remainder of this article will focus on the first objective; adding new rows from the source into the destination.
Detect New Rows
Before we begin, let's return to SSMS and create a test for new rows. Remember, SSMS is your friend! Thinking it through, there are a couple ways to set up this test:
- Add rows to the Person.Contact table (the Source) in the AdventureWorks database. After all, that's what will happen in the real world - rows will be added to the source and then loaded to the destination. Depending on your setup, that may be simple to accomplish.
- Delete rows from the destination.
Think about it: either way produces the desired test conditions for this scenario. There are records in the source that do not exist in the destination. I choose option 2, deleting rows from the destination table. Let's set this up in SSMS by executing the following T-SQL statement against the AdventureWorks database:
Use AdventureWorks
go
Delete dbo.Contact
Where MiddleName Is NULL
This statement deletes all the rows from dbo.Contact where the MiddleName column contains a NULL value. When I execute this statement, I get the following message in the SSMS Messages pane:
(8499 row(s) affected)
This leaves 11,473 rows in the dbo.Contact table out of the original 19,972 we loaded previously. We have our desired test conditions: There are rows in the source that are not present in the destination.
Our test conditions exist and we have (simulated) new rows to load. The first thing we have to do when incrementally loading new rows is to detect the new rows. Since our source and destination are SQL Server tables that reside in the same database (AdventureWorks), we can return to SSMS and execute some T-SQL to identify new rows. There are a couple methods to accomplish this.
Method 1: We can look for rows that are in the source (Person.Contact) that do not appear in the destination (dbo.Contact). Execute the following T-SQL statement in an SSMS query window:
Use AdventureWorks
go
Select
 FirstName
,MiddleName
,LastName
,EmailAddress
From Person.Contact
Where EmailAddress Not In
 (Select Email
 From dbo.Contact)
This query returns rows in the Person.Contact table (the source) for which it cannot locate a matching Email Address entry in the dbo.Contact (destination) table. Note the Email Address columns are named differently in the Person.Contact and dbo.Contact tables (this was done as part of an earlier exercise). In Person.Contact, the column is named EmailAddress; in dbo.Contact, the column is named Email.
Method 2: Another way to get new rows from the source is to employ a JOIN. Basically, the JOIN operator gets related rows from more than one table. There several flavors of JOINs in T-SQL. The one we want is called a LEFT JOIN because it returns all the rows from one table whether it finds a match in the other table or not. Here's the LEFT JOIN query we will use to detect new rows in the source that are missing from the destination:
Use AdventureWorks
go
Select
src.FirstName
,src.MiddleName
,src.LastName
,src.EmailAddress
From Person.Contact src
Left Join dbo.Contact dest
On src.EmailAddress = dest.Email
Where dest.Email Is NULL
This query joins the tables on the Person.Contact.EmailAddress and dbo.Contact.Email columns.
I can hear you thinking, "So which query is best, Andy?" I'm glad you asked! My answer is: the second. I bet you wonder how I came up with that answer. I know I would wonder if I were reading this right now. Here's how I did it: I placed both queries in SSMS and executed them several times.
The first query takes about 6 seconds to return the 8,499 new rows:
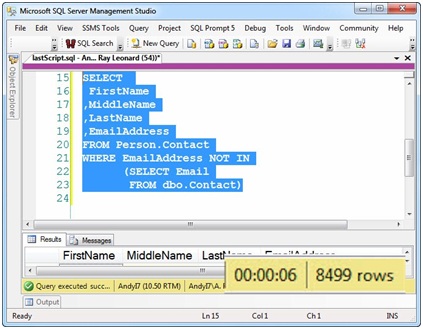
Figure 9
The second query returns the same 8,499 rows in 0 seconds:
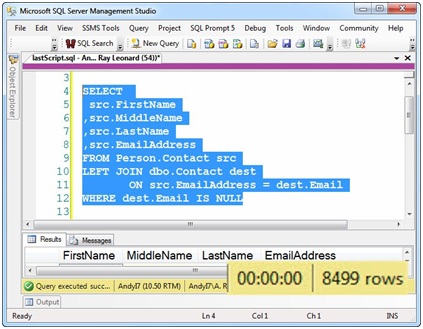
Figure 10
There are much better methods to determine which query is better, but that explanation is beyond the scope of this article (see articles about Query Execution Plans). So how do we code this in SSIS? As always, there are at least a couple ways. I'm going to show you one way and tell you about another, cool?
Breaking a Few Eggs...
Return to BIDS and My_First_SSIS_Project. You probably already guessed we need to add components to the Data Flow Task between the OLE DB Source and Contact (OLE DB) Destination adapters. So the first thing we need to do is delete the Data Flow Path connecting them. Right-click on the Data Flow Path connecting the OLE DB Source adapter and the OLE DB Destination adapter named Contact inside the Data Flow Task, then click Delete:
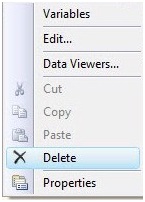
Figure 11
Once the Data Flow Path is deleted, the OLE DB Destination adapter named Contact sports an error indication - that red circle with a white X inside:
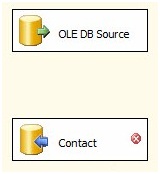
Figure 12
"What does that mean, anyway? Why is it here now?" Those are great questions! It's here now because we deleted the previously configured Data Flow Path. Remember back in The SSIS Data Pump - Level 2 of the Stairway to Integration Services, around Figure 33, we opened the Data Flow Path and examined the Metadata page? That contained the list of columns the Data Flow Task was exposing to the OLE DB Destination adapter named Contact. One way to think about that is: The Data Flow Path is an interface between the Data Flow Task and the Destination adapter.
Interface is a loaded term in software development. Interfaces are often referred to as "contracts" between objects. By removing the Data Flow Path, we just violated one side of the contract. The OLE DB Destination is paying attention. It's not happy.
As we did in from The SSIS Data Pump - Level 2 of the Stairway to Integration Services, let's get more information about the error from the Error List. Click View | Error List to open the Error List window:

Figure 13
The OLE DB Destination adapter is reporting a missing input column. It cannot locate FirstName. I can almost hear it complaining: "Hey! Where's my FirstName column? It was right here just a minute ago..." The OLE DB Destination adapter has every right to complain - the FirstName column is indeed missing. But note the other columns are also missing. How come the OLE DB Destination adapter isn't complaining about them? Simple, it doesn't care how many columns are missing; it knows it needs them all. So if one is missing, that's enough to raise the error.
Adding the Lookup and Some Quirks
Drag a Lookup Transformation onto the Data Flow canvas between the OLE DB Source and the Contact Destination. You may need to move the Contact Destination down some to make room. Click on the OLE DB Source, and then click the Data Flow Path (the green arrow) on the OLE DB Source and drag it over the Lookup Transformation:
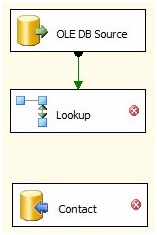
Figure 14
It's important to note I'm using SQL Server 2008 R2 Integration Services. The Lookup Transformation changed dramatically after SSIS 2005. The following applies to SSIS 2008 and 2008 R2.
A Lookup Transformation does exactly what the name implies: it looks in another table, view, or query for a match to the rows flowing through the transformation. There are few key concepts here and we will point them out as we configure the Lookup, but the general idea is "go to this other table, view, or query, and see if you find a match on this (or these) column(s). If you find a match, bring back this (or these) other column(s)." It sounds relatively simple - and it is. But there are a couple quirks.
Quirk #1: If no match is found between the column(s) in the data flow and the Lookup table, view, or query; the default Lookup Transformation configuration makes the transformation fail.
Quirk #2: If there is more than one match found in the lookup table, the Lookup Transformation returns only the very first match it finds.
I describe these quirks as a vicious top 1 join. Vicious, because the operation fails if there's no match found. Top 1 JOIN because the Transform returns only the first match found when joining the rows in the Data Flow to the rows in the Lookup table, view, or query.
Configuring the Lookup
Double-click the Lookup Transformation to open the editor. The General page displays by default. At the top of the General page is the Cache Mode property configuration:
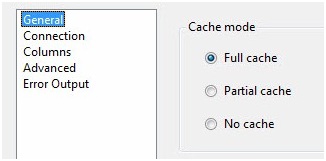
Figure 15
If you worked with SSIS 2005 you had these same three options but they were in the Properties list for the Lookup Transformation and not in the Lookup Transformation Editor. Bummer. "What do these settings mean, Andy?" I'm glad you asked! The Cache Mode property controls when and how the actual lookup operation will occur.
Matt Masson, Microsoft developer and SSIS guru, wrote an excellent post about Lookup Cache Modes. I summarize here...
In No Cache mode, the lookup operation occurs as each row flows through the transformation. Whenever a row passes through the Lookup, the Transform executes a query against the Lookup table, view, or query; and adds any returned values to the rows as they flow through the Transformation.
In Full Cache mode, the lookup operation attempts to load all the rows from the Lookup table, view, or query into the Lookup cache in RAM before the Data Flow Task executes. Did you catch the word "attempts" in that last sentence? If the Lookup table, view, or query returns a large data set - or if the server is RAM-constrained (either running low or doesn't have enough RAM installed) - the Lookup will fail. The Lookup cache holds the values from the configured table, view, or query. Matches found in this cache are applied / added to the rows as they flow through the Transformation.
What do you do if the Lookup Transformation fails to load in Full Cache mode due to RAM constraints? One option is to use No Cache mode. A second option is to use Partial Cache mode (described next). There are other options beyond the scope of this article.
In Partial Cache mode, the Transformation first checks the Lookup cache as each row flows through - seeking a match. If there's no match in the cache, a lookup operation occurs. Matching data is added to the row and to the Lookup cache. If another row seeking the same matching columns flows through the Transformation, matching data is supplied from the Lookup cache.
For this load I select the default: Full Cache mode. Why? The Lookup dataset is relatively small (19,972 records) at this time. I will monitor the performance of this SSIS package and adjust this setting if needed.
Next, change the dropdown labeled "Specify how to handle rows with no matching entries" to "Redirect rows to no match output":

Figure 16
This is a nice addition to SSIS 2008 and SSIS 2008 R2 Lookup Transformations. There are a couple "green" (valid, or non-error) outputs in this updated version of the Lookup; the Match Output and the No Match Output. Redirecting rows with no match to a non-error Data Flow Path fits my sense of aesthetics. It's like I meant for these rows to go somewhere! (And I do.)
Click on the Connection page and set the OLE DB Connection Manager property to "(local).AdventureWorks". Like the OLE DB Source adapter, we are configuring an interface to the Connection Manager here:
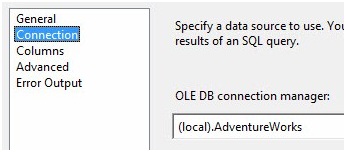
Figure 17
Also like the OLE DB Source adapter, here we select either a table or enter a SQL Query to access data from the SQL Server instance and database configured in the Connection Manager. In this case, I'm entering the following T-SQL query:
SELECT
 Email
 ,FirstName
 ,LastName
 ,MiddleName
FROM dbo.Contact
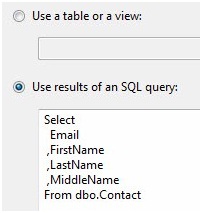
Figure 18
Click the Columns page. There are a couple table-ish looking grids in the upper right portion of the Columns page. The one on the left is labeled Available Input Columns. This contains a list of the columns entering the Lookup Transformation's input buffer (remember, the Lookup Transformation is connected to the output off the OLE DB Source adapter - that's where these columns are coming from). The other grid is labeled Available Lookup Columns. These are columns that exist in the table, view, or query (in our case, a query) configured on the Connection page.
Click on the Email column in the Available Input Columns and drag it over the Email column in Available Lookup Columns. Remember I compared Lookups to a Join? The line that appears when you drop Email onto Email - between the Email column in Available Input Columns and the Available Lookup Columns Email column - is analogous to the ON clause of the join. It defines the matching criterion that drives the Lookup function.
The Available Lookup Columns have checkboxes next to them and a "check all" checkbox in the grid header. If the Lookup Transformation is similar to a Join, the checkboxes are a mechanism for adding columns from the joined table to the SELECT clause. At this point, I don't want to check any of the columns as shown in Figure 19:
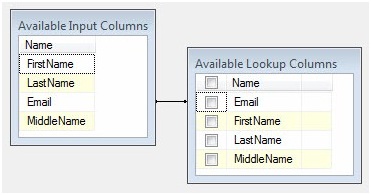
Figure 19
We have configured a Lookup Transformation to open the destination table and match records that exist in the Data Flow pipeline with records in the destination table. The records that exist in the Data Flow pipeline come from the OLE DB Source adapter, and are loaded into the Data Flow from the Person.Contact table. The destination table is dbo.Contact and we accessed it using a T-SQL query on the Lookup Transformation's Connections page (see Figure 18). We configured the Lookup Transformation to look for matches by comparing the Email column values in the Destination table with the Email column values from the Source table (via the OLE DB Source adapter). We configured the Lookup Transformation to send rows that do not match to the Lookup Transformation's No Match Output. If the rows find a match between the Email column values in the Destination table and the Email column values in the Source table, the Lookup Transformation will send those rows to the Match Output.
Let's continue building the incremental load.
Click the OK button to close the Lookup Transformation editor. Then click on the Lookup Transformation and drag the green Data Flow Path from beneath the Lookup to the OLE DB Destination named Contact. When prompted, select the Lookup No Match Output:
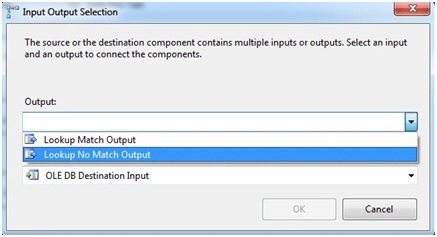
Figure 20
Let's review what we've accomplished here. It bears repeating. It's a lot and it's important.
Why the Lookup No Match Output? In SSIS 2008 and SSIS 2008 R2, the Lookup Transformation provides this built-in output to catch records in the Lookup table (the dbo.Contact destination table, in this case) that do not exist in the source (the Person.Contact table) - it's the Lookup No Match Output.
Why would there be no match? Because the value in the Email column doesn't exist in the destination table! If it's in the source table and not in the destination table, it's a new row - one that's been added to the source table since the last load. This is a row we want to load - it's new.
Let's look under the hood of the Data Flow Task to examine the impact of adding a Lookup Transformation. Right-click the Data Flow Path between the OLE DB Source adapter and the Lookup Transformation, and then click Edit:
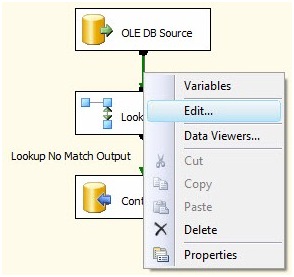
Figure 21
When the Data Flow Path Editor displays, click the Metadata page. The Path metadata grid displays as show in Figure 22:
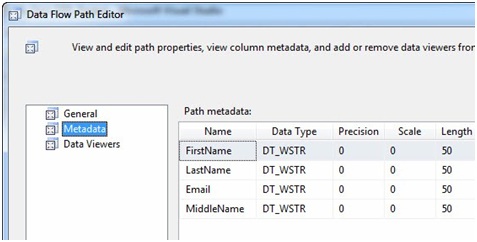
Figure 22
These are the columns coming into the Lookup Transformation from the OLE DB Source. Close the Data Flow Path Editor here. Right-click the Data Flow Path between the Lookup Transformation and the OLE DB Destination named Contact, then click Edit to display the Data Flow Path Editor:
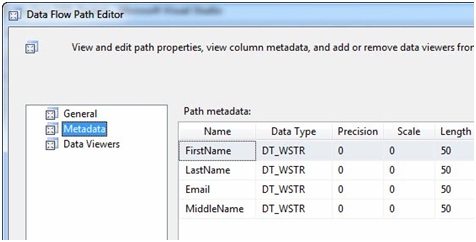
Figure 23
"Gosh Andy - they look identical." They are identical! The Lookup Transformation's No Match Output is an exact copy of the Lookup Transformation's Input. This makes sense. If we do not find a match, we want to pass all the data columns through the Lookup Transformation's No Match Output so it can be used downstream. Close the Data Flow Path Editor.
When you're done, the Data Flow Task canvas will appear as shown in Figure 24:
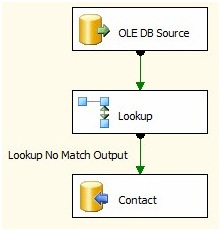
Figure 24
Let's test it! Press the F5 key. You should see a beautiful sight - green boxes:
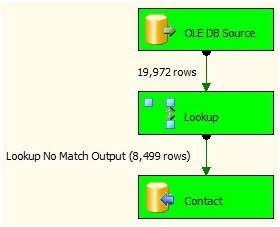
Figure 25
We just loaded 8,499 new rows, incrementally. Where'd the 8,499 rows come from? Look at Figure 9. Remember: To simulate new rows, we removed 8,499 rows from the dbo.Contact destination. We just reloaded them.
Now we can do something really cool - re-execute the load. I like the Restart button for this. It's located on the Debug menu with the VCR controls:

Figure 26
Click the Restart button and the SSIS package will stop debugging and then start debugging again. This time, note the Lookup Transformation finds all of the rows from the source in the destination table:
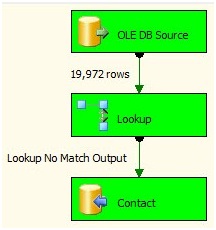
Figure 27
Since those rows find matches inside the Lookup Transformation, they are not sent to the Lookup Transformation's No Match Output. Why? We just loaded them. That's why!
Conclusion
We've accomplished a couple goals. First, we've built a loader that only adds new rows from the source table to the destination table. Second, the loader we've built is re-executable; it doesn't pile duplicate copies of the rows into the destination. Cool.
Before we leave this topic, I want to emphasize that you've built an SSIS package that is functional. Many SSIS packages contain Data Flow tasks that perform similar loads in Production environments. Incremental Loads sometimes only load new rows. Consider a table that contains historical daily currency-conversion rates; this data isn't going to change over time. It's fixed at the end of each day. Another use case is a table that holds the high temperature for each day. Again, this data is never updated; new data is appended. The loader you just built will serve well in these cases.
Another consideration is the source data may change more or less rapidly. This incremental load pattern gives you the flexibility to load data once per year, once per minute, or at any interval - regular or irregular - in between. Only new rows are loaded into the destination. How flexible is that?
Good job!
:{>


