Azure Data Factory (ADF) offers a convenient cloud-based platform for orchestrating data from and to on-premise, on-cloud, and hybrid sources and destinations. But it is not a full Extract, Transform, and Load (ETL) tool. For those who are well-versed with SQL Server Integration Services (SSIS), ADF would be the Control Flow portion.
You can scale out your SSIS implementation in Azure. In fact, there are two (2) options to do this: SSIS On-Premise using the SSIS runtime hosted by SQL Server or On Azure using the Azure-SSIS Integration Runtime.
Azure Data Factory is not quite an ETL tool as SSIS is. There is that transformation gap that needs to be filled for ADF to become a true On-Cloud ETL Tool. The second iteration of ADF in V2 is closing the transformation gap with the introduction of Data Flow.
Let’s build and run a Data Flow in Azure Data Factory v2.
Overview
Just to give you an idea of what we’re trying to do in this post, we’re going to load a dataset based on a local, on-premise SQL Server Database, copy that data into Azure SQL Database, and load that data into blob storage in CSV Format.
In this post we discuss the following topics in a step-by-step fashion:
- Azure Data Flow
- Data Transformation in Azure Data Factory with Data Flow
- Data Flow Components:
- Select
- Derived Column
- Aggregate
- Pivot
- Sort
- CSV Sink
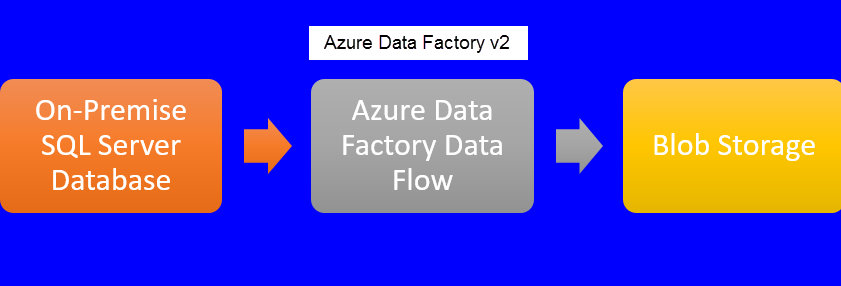
First thing first: If this is the first time you’re using Azure Data Factory, you need to create a data factory in Azure, and for the purpose of the demo in this post, you also need to set up a blob storage.
Prerequisite: Copy the Working Data
Create a new pipeline with copy activity. If you follow the instruction from the previous post, Copy Data From On-Premise SQL Server To Azure Database Using Azure Data Factory, that is our first step.
Change the copy activity source and sink as follow:
Source Query:
SELECT c.CustomerName
       , p.FullName AS SalesPerson
       , o.OrderDate
       , s.StockItemName
       , l.Quantity
       , l.UnitPrice
 FROM Sales.Orders o
 JOIN Sales.OrderLines l
   ON o.OrderID = l.OrderID
 JOIN Sales.Customers c
   ON o.CustomerID = c.CustomerID
 JOIN Warehouse.StockItems s
   ON l.StockItemID = s.StockItemID
 JOIN Application.People p
   ON p.PersonID = o.SalespersonPersonID ;
Sink (New table)
CREATE TABLE SalesReport (
 CustomerName NVARCHAR (100),
 SalesPerson NVARCHAR (50),
 OrderDate DATE,
 StockItemName NVARCHAR (100),
 Quantity INT,
 UnitPrice DECIMAL (18, 2)) ;
Create A Data Flow
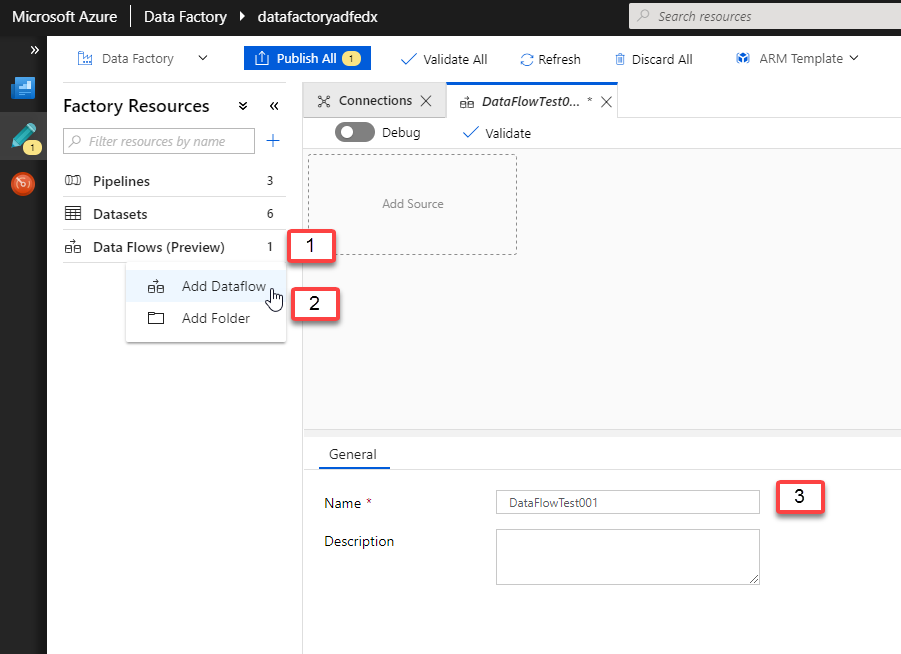
Navigate to your Azure Data Factory. Click the Author & Monitor tile to open the ADF home page. From there, click on the pencil icon on the left to open the author canvas.
- Click on the ellipsis next to Data Flows (which is still in preview as of this writing).
- Select Add Dataflow in the context menu.
- Let’s name our Data Flow DataFlowTest001.
Add the Data Source
As of this writing, there are only a few supported sources in Data Flow: Azure Data Warehouse, Azure SQL Database, CSV, and Parquet (column-oriented data storage format of Hadoop). Other sources such as Amazon S3, Oracle, ODBC, HTTP, etc. are coming soon.
Let’s set up the Source.
- Click on the Add Source tile.
- Let’s name our source as DataFlowTest001DataSource.
- Next, create a new dataset.

Create New Source Dataset
We need to set up a new dataset. You should have completed the Prerequisite (see above) by now so you will have a working data for this demo.
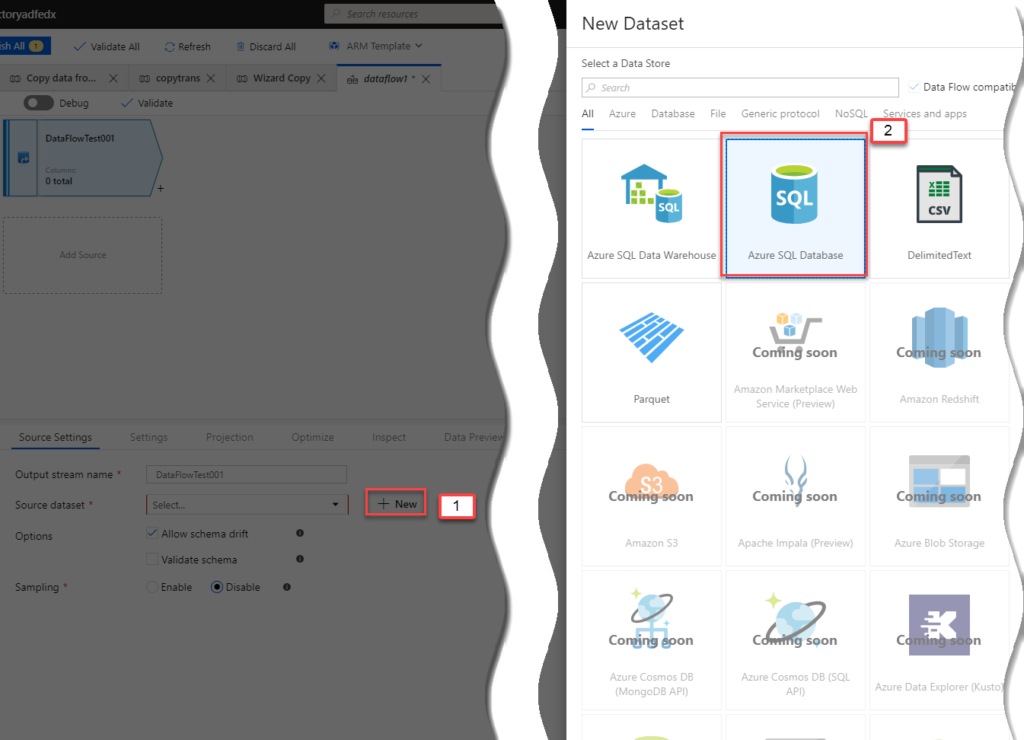
There are only a few supported data sources as of this writing: Azure SQL Data Warehouse, Azure SQL Database, CSV, and Parquet (column-oriented data storage format for Hadoop).
- In the Source Dataset, click New.
- Select Azure SQL Database. Click Finish.
Set up the Source Dataset
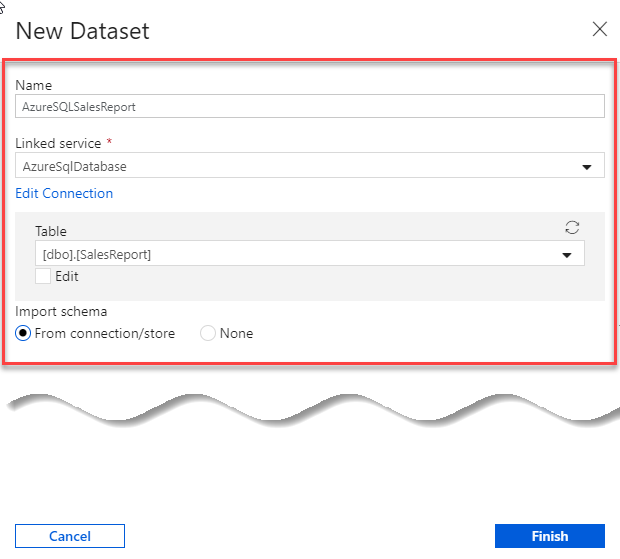
Set the dataset as follows:
- Name the dataset as AzureSQLSalesReport.
- Select the Linked Service AzureSqlDatabase.
- For the Table, select the SalesReport. Click Finish.
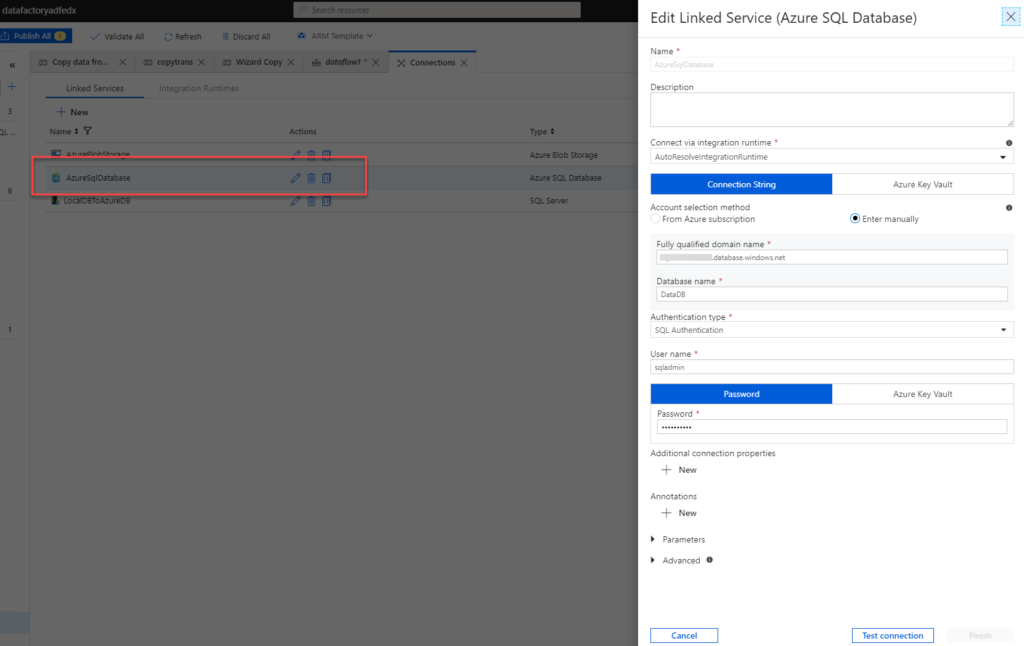
If you are wondering what that Linked Service is, that would be the connection in SSIS. It is easy to set up. At the bottom of the left-hand blade, click on Connection. This gives you the list of your Linked Services and Integration Runtimes. You can also create new Linked Services from this page.
The AzureSqlDatabase linked service was set up as follows:
Add a Select Component
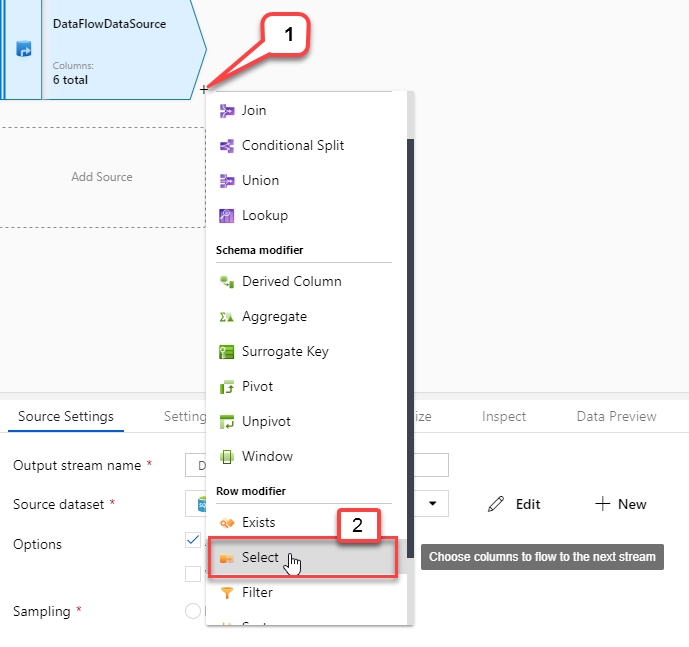
- To add a component to the Data Flow, click the Plus sign at the bottom of the DataFlowDataSource component.
- In the Row Modifier section of the context menu, select Select.
Set up the Select Component
What the Select component does is just that, selecting columns like you would if execute a Select command.
- Name the component as SalesPersonData.
- Add the following columns if they aren’t yet added.
- SalesPerson
- OrderDate
- Quantity
- UnitPrice

You may notice the information on the left-hand side that says, “4 items: 2 column(s) from the inputs left unmapped.” That’s what we want.
You may want to Inspect and Preview the data. But make sure you switch the Debug mode on top before you preview.
Add a Derived Column Component
- Name the Derived Column component or stream as DerivedYearOrderDate. Make sure that the incoming stream is the SalesPersonData (Component).
- Add a new derived column called Year and set the expression to
year(Orderdate)

Add an Aggregate Component
- Name the Aggregate component as LineSalesTotal. The incoming stream should be DerivedYearOrderDate.
- Click the Group By Column and add the following Columns
- SalesPerson
- Year (derived column based on the OrderDate)
- Click the Aggregates tab. Add a new column and call it
Linesales . Set the expression tosum(multiply(UnitPrice, Quantity))

Add a Pivot Component
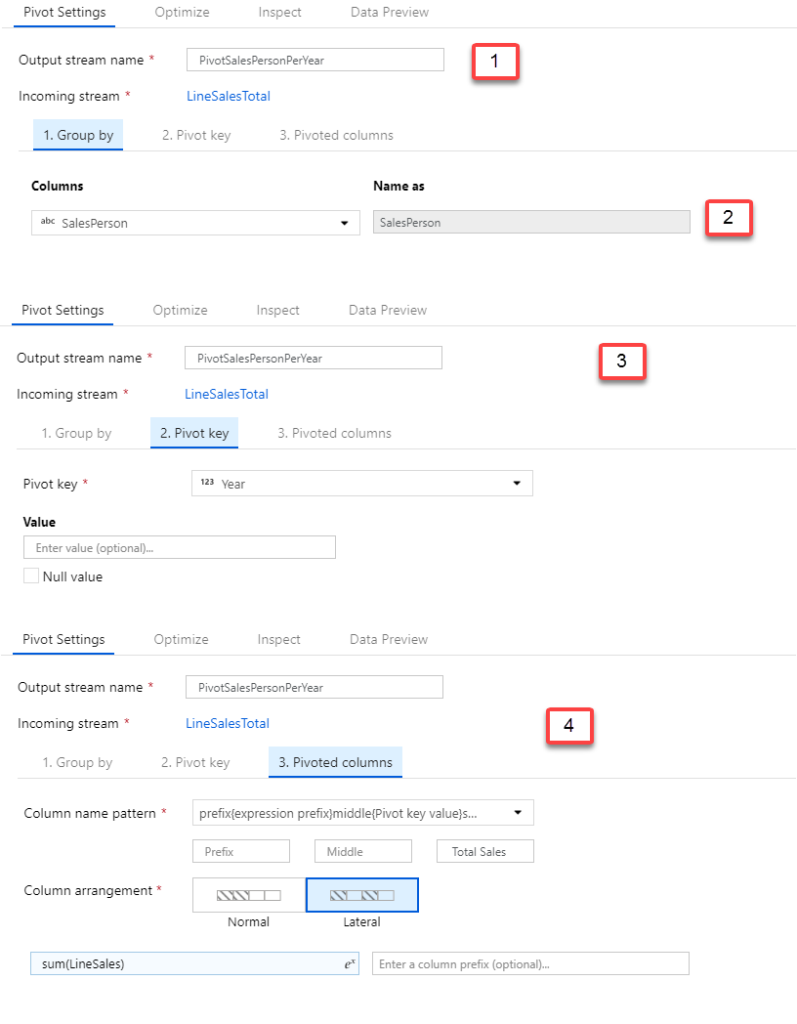
- Name the component as PivotSalesPersonPerYear. Make sure that the incoming stream is from our aggregate, LineSalesTotal.
- Click on the Group By tab. Select SalesPerson. Keep the alias as is or assign a different alias.
- Click on the Pivot Key tab. Select Year.
- Click on the Pivoted Column tab. Set up as follows:
- For the Column name pattern, select the first pattern in the dropdown.
- Select Lateral for Column arrangement.
- Type [space] Total Sales in the Suffix box.
- In the expression box, add
sum(LineSales) - Leave the column prefix empty.
Add a Sort Component
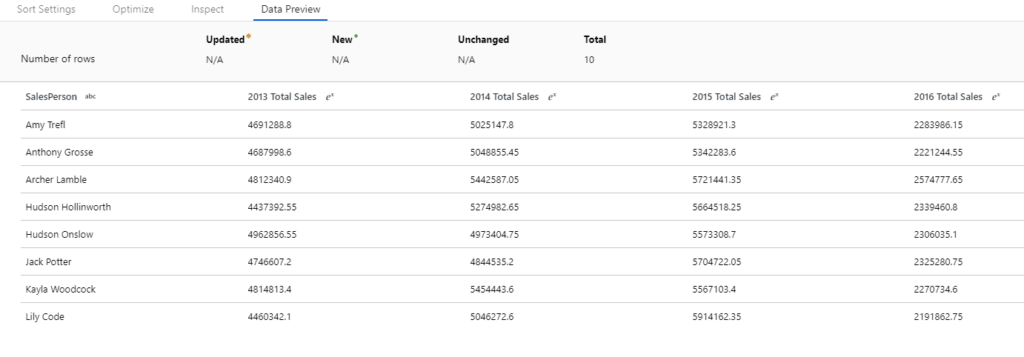
Let’s sort the stream by name, alphabetically sorted ascending.
- Name the Sort component as SortSalesPersonByName. Make sure that the incoming stream is PivotSalesPersonPerYear.
- On the Sort Condition, select SalesPerson.
- Toggle the Order arrow so it is pointing up.

If you preview the data on the Sort component, you should now see something like this:
Add Destination Sink Component
- Let’s call the Sink, SalesReportByYearCSV.
- I have previously created a CSV dataset on Azure Blob
Storage . You can also create a New dataset in your Data Flow. Create, or in our case, select SalesReportCSV dataset from the Sink dataset dropdown. - Navigate to the Settings tab. On the File name option, select Output to
single file. - For the
File name, type 2013-2016_SalesReportByYear.
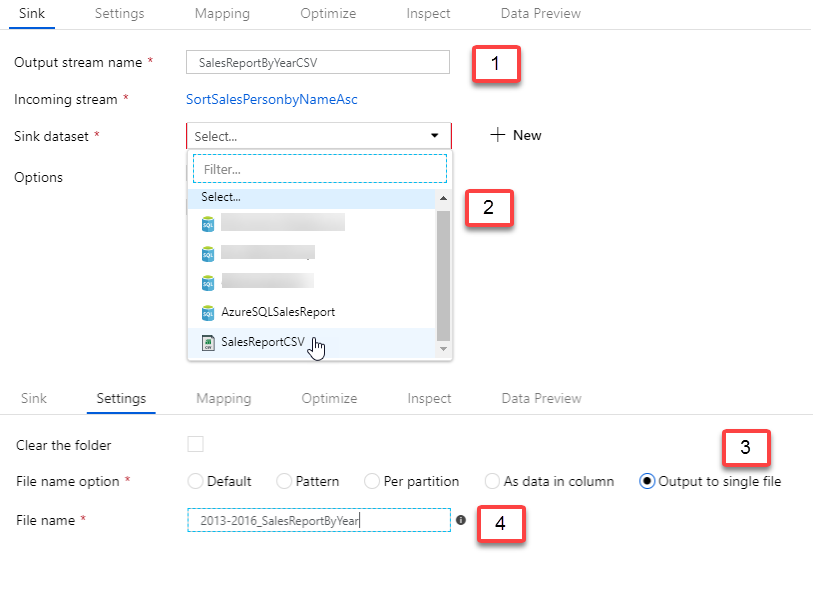
Note: The Column Count on the last 3 components don’t look right. Even the mapping is not showing the right number of the streamed columns. The preview shows the expected results, though.
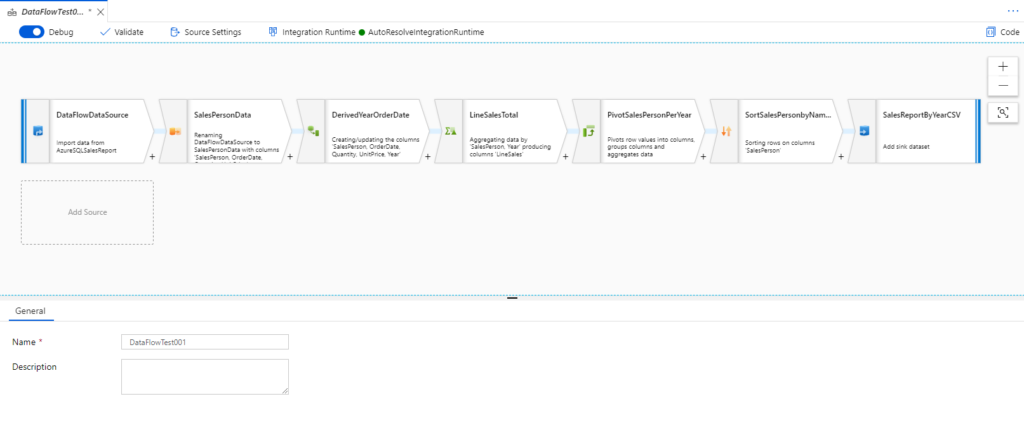
Overview of the Azure Data Factory Data Flow
If you’ve completed all the above steps, you should now have something like this:
Run the Data Flow
Just like in SSIS, you can not run the Data Flow itself in the data flow context. It needs to be in the Control Flow, or Pipeline in ADF, for its execution.
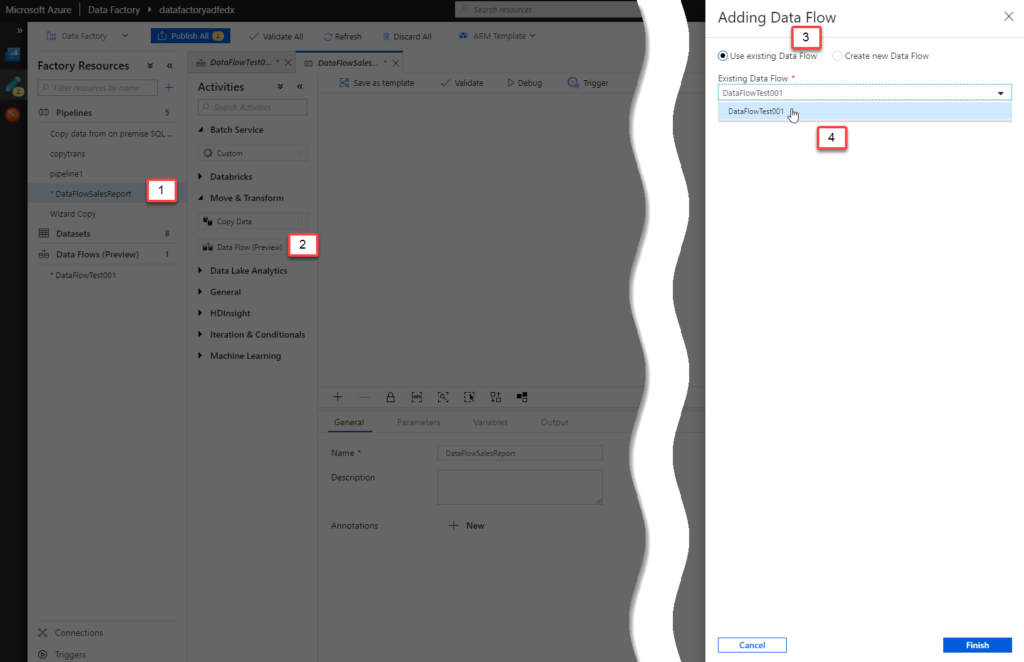
- Create a new Pipeline. Name it DataFlowSalesReport.
- Navigate to Activities > Move & Transform. Drag the Data Flow activity component to the canvas. That opens the blade on the left-hand side where you can set up the Data Flow that we just created above with the pipeline activity.
- In the Adding Data Flow blade, select Use Existing Data Flow.
- Select the Existing Data Flow dropdown, DataFlowTest001. Click Finish.
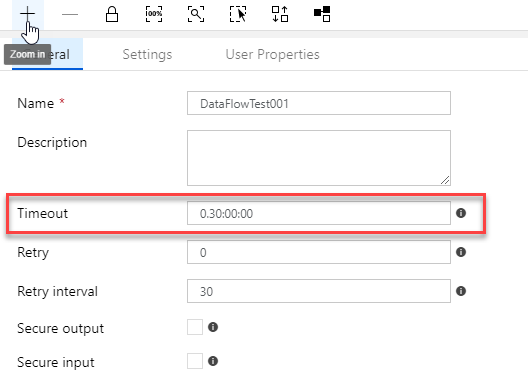
The only setting that I would change in the pipeline setting is the Timeout. Set the pipeline to time out after 30 minutes.
Publish the Changes and Trigger the Activity Now
- Click Publish (should be on top, right-hand-side.
- Click on the Trigger, then select Trigger Now to execute the pipeline (and essentially the Data Flow).

Here are some of the few ways of checking the status of the pipeline activity processing:
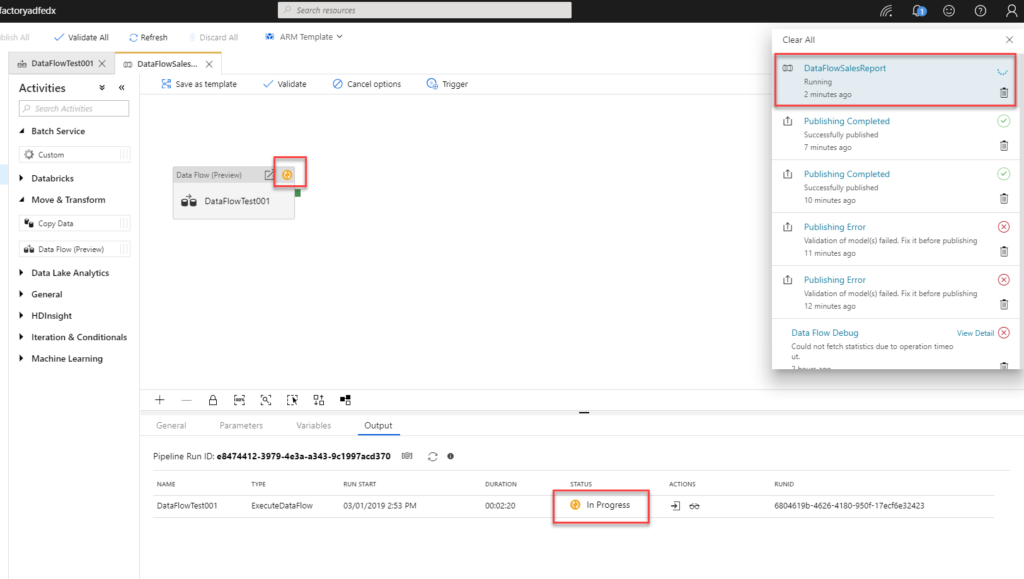
Check the CSV File Output
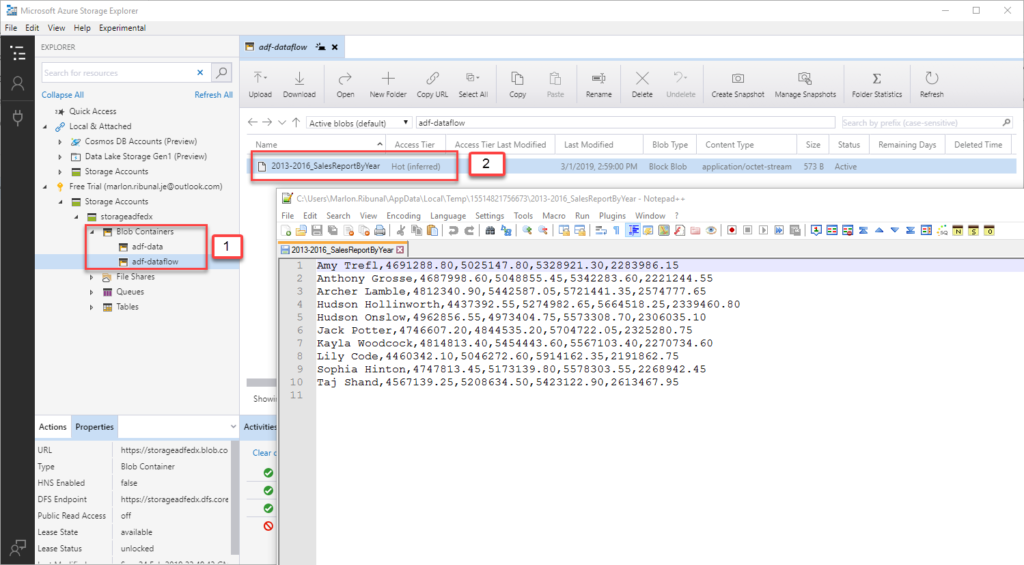
- To check the file, open your Azure Storage Explorer and Navigate to your Blob storage. You can download the Azure Storage Explorer here.
- And you should find the CSV output file produced by the Data Flow.
The post Transforming Data With Azure Data Factory Data Flow appeared first on SQL, Code, Coffee, Etc..


