I used to think that Docker Compose was used solely to spin up multiple containers, in fact I blogged about doing just that here.
That opinion changed when I went to DockerCon in 2018 and had a chance to speak to some Docker Captains who told me that they used compose for everything!
And it makes sense, let’s have a look at spinning up one container running SQL Server 2019: –
docker run -d -p 15789:1433 `
--env ACCEPT_EULA=Y `
--env MSSQL_SA_PASSWORD=Testing1122 `
--name testcontainer `
mcr.microsoft.com/mssql/server:2019-CU5-ubuntu-18.04
Quite a bit to type there, no? Do we really want to be typing that out every time we run a container?
And it gets even worse if we want to persist our databases from one container to another: –
docker container run -d `
-p 15789:1433 `
--volume systemdbs:/var/opt/mssql `
--volume userdbs:/var/opt/sqlserver `
--env MSSQL_SA_PASSWORD=Testing1122 `
--env ACCEPT_EULA=Y `
--env MSSQL_BACKUP_DIR="/var/opt/sqlserver" `
--env MSSQL_DATA_DIR="/var/opt/sqlserver" `
--env MSSQL_LOG_DIR="/var/opt/sqlserver" `
--name testcontainer `
mcr.microsoft.com/mssql/server:2019-CU5-ubuntu-18.04
That’s a lot of typing! And if we try to create a database with the default values set in that statement, we’ll get the following error: –
CREATE FILE encountered operating system error 2(The system cannot find the file specified.) while attempting to open or create the physical file ‘/var/opt/sqlserver/testdatabase.mdf’.
This is because SQL in 2019 runs as non-root. This is a good thing but it means that after the container comes up, we have to run: –
docker exec -u 0 testcontainer bash -c "chown mssql /var/opt/sqlserver"
The solution here is to create a custom image with the volume created and permissions set.
But wouldn’t it be easier to just have to run one command to spin up a custom 2019 image, with volumes created and permissions set?
Enter Docker Compose.
I’ve created a GitHub repository here with all the necessary files: –
https://github.com/dbafromthecold/SqlServerDockerCompose
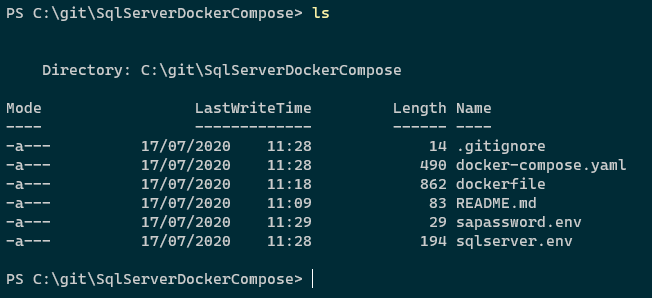
If we clone that repo down, we’ll get the following: –
Let’s go through each of the files
.gitignore
Standard ignore file, this is to prevent the sapassword.env file from being uploaded to Github
docker-compose.yaml
Compose file that when executed will reference our dockerfile and build us a custom image
dockerfile
File to create a custom SQL 2019 image
sapassword.env
Environment variable file to contain our SA password. We’ll need to create this file, it’s not in the repo
sqlserver.env
Environment variable file that contains all the environment variables required to spin up SQL Server in a container
Let’s dive in a little deeper and first have a look at the dockerfile: –
# build from the Ubuntu 18.04 image
FROM ubuntu:18.04

# create the mssql user
RUN useradd -u 10001 mssql

# installing SQL Server
RUN apt-get update && apt-get install -y wget software-properties-common apt-transport-https
RUN wget -qO- https://packages.microsoft.com/keys/microsoft.asc | apt-key add -
RUN add-apt-repository "$(wget -qO- https://packages.microsoft.com/config/ubuntu/18.04/mssql-server-2019.list)"
RUN apt-get update && apt-get install -y mssql-server

# creating directories
RUN mkdir /var/opt/sqlserver
RUN mkdir /var/opt/sqlserver/data
RUN mkdir /var/opt/sqlserver/log
RUN mkdir /var/opt/sqlserver/backup

# set permissions on directories
RUN chown -R mssql:mssql /var/opt/sqlserver
RUN chown -R mssql:mssql /var/opt/mssql

# switching to the mssql user
USER mssql

# starting SQL Server
CMD /opt/mssql/bin/sqlservr
This file when executed is going to create a custom SQL 2019 image, not from the microsoft images but installed via apt-get (the way you would install SQL on Linux).
It’s based on the Ubuntu 18.04 image and the steps are: –
- Pull down the Ubuntu 18.04 image and base this new image off it
- Create the mssql user
- Install SQL Server as you would on Linux, detailed instructions here
- Create the required directories
- Change the owner of those directories to the mssql user
- Switch over to run the next command as the mssql user
- Start SQL Server
Ok, cool. Let’s now have a look at the docker-compose.yaml file: –
version: '3.7'
services:
    sqlserver1:
        build:
          context: .
          dockerfile: dockerfile
        ports:
          - "15789:1433"
        env_file:
          - sqlserver.env
          - sapassword.env
        volumes:
          - sqlsystem:/var/opt/mssql/
          - sqldata:/var/opt/sqlserver/data
          - sqllog:/var/opt/sqlserver/log
          - sqlbackup:/var/opt/sqlserver/backup
volumes:
  sqlsystem:
  sqldata:
  sqllog:
  sqlbackup:
Stepping through this we: –
- Define a service called sqlserver1, setting a build context to the current directory and specifying our dockerfile
- Set our ports, mapping 15789 on the host to 1433 in the container
- Specify our environment variable files
- Then set our volumes, matching the directories created in the dockerfile
And finally, let’s have a look at the two environment variable files: –
sqlserver.env
ACCEPT_EULA=Y
MSSQL_DATA_DIR=/var/opt/sqlserver/data
MSSQL_LOG_DIR=/var/opt/sqlserver/log
MSSQL_BACKUP_DIR=/var/opt/sqlserver/backup
sapassword.env
MSSQL_SA_PASSWORD=Testing1122
The SA password is set in a separate file so that we don’t end up putting it somewhere public 
The other file can contain any environment variable for SQL Server, a full list is here.
Awesome stuff. OK, now we can run: –
docker-compose up -d
And we can check the objects created by compose by running: –
docker network ls
docker volume ls
docker image ls
docker container ls
There we can see our custom network, volumes, image, and container up and running!
So we’re good to do our work on SQL Server 2019 and when we’re finished we can just run: –
docker-compose down
That’ll delete our custom network and the container but we’ll still have our custom image and volumes, ready for next time we want to do some work against SQL Server 2019.
Thanks for reading!


