I’ve previously blogged about running SQL Server in ACS but Microsoft has now released a new version still called Azure Container Services (AKS instead of ACS however) but now specifically tailored to building Kubernetes clusters.
There are some differences to the original ACS (making the process simpler) so let’s run through setting up a Kubernetes cluster running SQL Server in AKS.
DISCLAIMER! AKS does seem to be in active development so there may be changes made that will cause the following scripts to fail. Let me know if you run into any issues
Ok, first thing to do is install the CLI (I’m going to work from a Bash shell on my desktop): –
echo "deb [arch=amd64] https://packages.microsoft.com/repos/azure-cli/ wheezy main" |      sudo tee /etc/apt/sources.list.d/azure-cli.list


sudo apt-key adv --keyserver packages.microsoft.com --recv-keys 52E16F86FEE04B979B07E28DB02C46DF417A0893
sudo apt-get install apt-transport-https
sudo apt-get update && sudo apt-get install azure-cli
Check the version of the CLI installed (make sure it’s at least version 2.0.20): –
az --version
Then login to Azure in the shell (and follow the instructions): –
az login
As AKS is still in preview a flag needs to be enabled on your Azure subscription.
To do this run: –
az provider register -n Microsoft.ContainerService
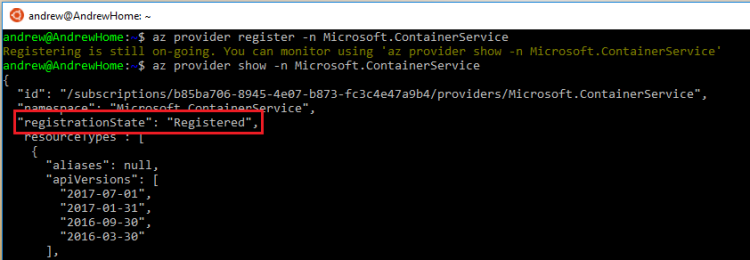
You can check that the flag has been successfully enabled by running: –
az provider show -n Microsoft.ContainerService
Cool. Now we’re good to go with setting up a Kubernetes cluster! Same as the original ACS, a resource group needs to be created to hold all the objects in the cloud: –
az group create --name ApResourceGroup1 --location ukwest
And now the cluster can be created. I’m going to create a two node cluster by running: –
az aks create --resource-group ApResourceGroup1 --name mySQLK8sCluster1 --node-count 2 --generate-ssh-keys

EDIT: updated agent-code to node-count has this switch seems to have changed since I wrote this post
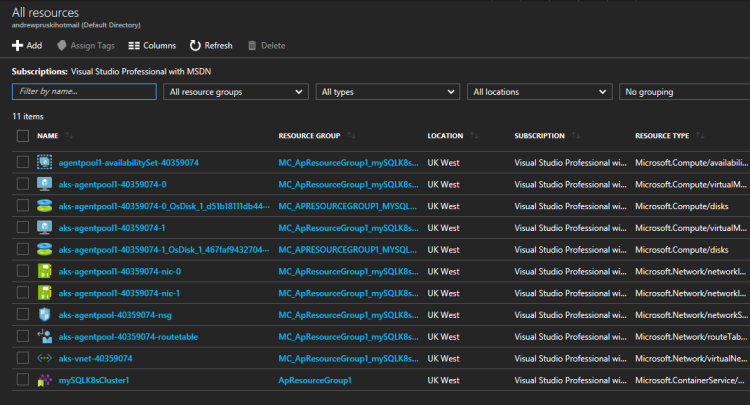
What’s cool about this is the amount of objects it’s creating in the background: –
All that from one line of code!
Once that’s complete, Kubectl needs to be installed locally to manage the cluster: –
az aks install-cli
And then I need to connect my local shell to the cluster: –
az aks get-credentials --resource-group ApResourceGroup1 --name mySQLK8sCluster1
Ok, let’s check the nodes in the cluster: –
kubectl get nodes
Awesome, I have two nodes up and running in my cluster!
Next thing to do is spin up SQL Server in a container within the cluster. To do this I’m going to build it from a yaml file: –
nano sqlserver.yml
And drop the following into it: –
apiVersion: apps/v1beta1
kind: Deployment
metadata:
  name: sqlserver
  labels:
    app: sqlserver
spec:
  replicas: 1
  template:
    metadata:
      labels:
        name: sqlserver
    spec:
      containers:
      - name: sqlserver1
        image: microsoft/mssql-server-linux:latest
        ports:
        - containerPort: 1433
        env:
        - name: SA_PASSWORD
          value: "Testing1122"
        - name: ACCEPT_EULA
          value: "Y"
---
apiVersion: v1
kind: Service
metadata:
  name: sqlserver-service
spec:
  ports:
  - name: sqlserver
    port: 1433
    targetPort: 1433
  selector:
    name: sqlserver
  type: LoadBalancer
This will spin up a container within the cluster (as a deployment) and create a load balanced service with an external IP so that I can connect to SQL Server from my desktop. So now run: –
kubectl create -f sqlserver.yml
Once that’s complete we can run some commands to view the objects created. To check the SQL Server container created: –
kubectl get pods
To check on the deployment:-
kubectl get deployments
And finally, to check on the service: –
kubectl get service
Once the service has an external IP, I can use that to connect to SQL Server within my Kubernetes cluster in AKS!
How awesome is that! Microsoft have made this a nice and simple way of getting into running Kubernetes in Azure. I’m going to play around with this some more 
Last thing, to remove all the objects built in this demo you just need to run: –
az group delete --name ApResourceGroup1
Thanks for reading!


