When we talk about snapshots of SQL Server there are two types, application consistent snapshots and crash consistent snapshots.
Application consistent snapshots require freezing IO on a database allowing for a checkpoint to be performed in order to write all dirty pages to disk.
In the past, application consistent snapshots relied on the third party software to call the SQL Writer service but now with SQL Server 2022 T-SQL snapshot backups we have the ability to use T-SQL commands to freeze IO on a database in order for us to take an application consistent snapshot of the database.
This is great as we can now easily take a snapshot of a database, bring it up in restoring mode (overwriting the existing database or as a new database), and then perform a point-in-time restore with any transaction log backups that we have.
Crash consistent snapshots are different in that they just take a snapshot of the disks that the database files are on, without freezing IO on the database. This loses us the ability to perform point-in-time restores but they can be useful in certain situations…for example, the recovery of data that was incorrectly updated in say a relatively static table.
I am not suggesting for one second that snapshots replace native SQL Server backups…not at all. What I am saying is that snapshots can be used to complement native SQL backups.
In this post I want to run through one such situation.
Note – Different storage vendors will allow snapshots to be taken in different ways. I work for Pure Storage so in this example…I’m going to be using the Pure Storage powershell module to take the snapshot of volumes on a Pure FlashArray. The commands may differ for different vendors but the concepts remain the same.
So the setup here is one SQL Server instance, running on VMWare with vVols presented from a Pure Storage FlashArray. The server has three volumes presented to it, on three separate disks, presented as C:, E:, and F: drives respectively. I’m using the AdventureWorks database which is hosted on the E: drive and we’ll overwrite the volume presented as the F: drive with the snapshot taken.
The vVols on the array are in a Pure Storage construct called a Protection Group. A Protection Group is a logical entity allowing us to group volumes together…so for example…if we had our database’s data and log files on separate volumes…we could group them in a Protection Group and take a snapshot of that group. This allows for that snapshot to contain individual snapshots of the two volumes at the same time.
But for simplicity’s sake in this example…the database is hosted on one volume…presented as the E: drive on the server.
What we’re going to simulate here is an incorrect UPDATE statement executed against the HumanResources.Employee table in the AdventureWorks database. So the steps are: –
- Take a snapshot of the volume that hosts the database using the functions from the Pure Storage powershell module
- Run an UPDATE statement without a WHERE clause
- Overwrite another volume on the server with the snapshot taken
- Attach the database, and retrieve the data
OK, let’s run through the process. First thing, install the Pure Storage powershell module: –
Install-Module PureStoragePowerShellSDK
Then import the module into our powershell session: –
Import-Module PureStoragePowerShellSDK
Now set variables for the storage array management IP address, the volume we’re going to take the snapshot, and the name of the protection group: –
ADD IN INFO ABOUT WHAT PROTECTION GROUPS ARE!!!!!!!!!!!!!!!!!!!!!!!!!!!!!
$FlashArrayIp = "<<STORAGE ARRAY MANAGENENT IP>>"
$SourceVolume = "<<VOLUME NAME ON THE ARRAY>>"
$ProtectionGroup = "<<PROTECTION GROUP NAME>>"
Set your credentials to connect to the array: –
$Cred = Get-Credential
Then connect to the array, storing the connection in a variable: –
$FlashArray = New-PfaArray -EndPoint $FlashArrayIp -Credentials $Cred -IgnoreCertificateError
Then take the snapshot: –
New-PFAProtectionGroupSnapshot -Array $FlashArray -ProtectionGroupName $ProtectionGroup
Excellent, we have our crash consistent snapshot of the protection group that the database resides in.
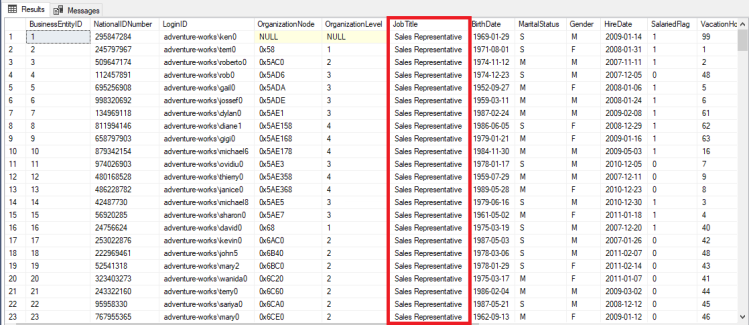
OK, now we’re going to simulate an incorrect data update in the AdventureWorks database….in this case an UPDATE statement executed without a WHERE clause: –
UPDATE [AdventureWorks2019].[HumanResources].[Employee]
SET JobTitle = 'Sales Representative'
Has happened to us all, right? 
Accidentally missing off a WHERE clause and updating all the records in a table?
Not great, we need to get this data back asap.
So we have the option of a point in time restore…either overwriting the existing database or doing this side-by-side and then updating the data from the restored database.
But we have our crash consistent snapshot.
What we can do is overwrite another volume on the same (or different) server, reattach the database, and then retrieve the data.
So let’s run through how to do that.
First thing…a disk has to be presented to the server that is the same size as the disk that we took the snapshot of. In this example, it’s the F: drive on the same server that the snapshot was taken (of the E: drive).
OK…so let’s run through overwriting that disk on the server with the snapshot taken.
In a new powershell session, import the Pure Storage powershell module: –
Import-Module PureStoragePowerShellSDK
Then set a whole bunch of variables: –
$TargetVM = "<<TARGET VM NAME>>"
$TargetDisk = "<<TARGET DISK ID>>" # this is retrieved by Get-Disk on the target server
$SourceVolume = "<<SOURCE VOLUME NAME ON THE ARRAY>>"
$TargetVolume = "<<TARGET VOLUME NAME ON THE ARRAY>>"
$ProtectionGroup = "<<PROTECTION GROUP NAME>>"
$FlashArrayIp = "<<STORAGE ARRAY MANAGENENT IP>>"
Set your credentials to connect to the array: –
$Cred = Get-Credential
Then connect to the array, storing the connection in a variable: –
$FlashArray = New-PfaArray -EndPoint $FlashArrayIp -Credentials $Cred -IgnoreCertificateError
Create session on target VM: –
$TargetVMSession = New-PSSession -ComputerName $TargetVM
Offline the target volume:-
Invoke-Command -Session $TargetVMSession -ScriptBlock { Get-Disk | ? { $_.SerialNumber -eq $using:TargetDisk } | Set-Disk -IsOffline $True }
Confirm that the volume is offline: –
Invoke-Command -Session $TargetVMSession -ScriptBlock { Get-Disk | Select-Object Number, SerialNumber, OperationalStatus | Format-Table}
Get most recent snapshot, the one that we took earlier: –
$MostRecentSnapshot = Get-PfaProtectionGroupSnapshots -Array $FlashArray -Name $ProtectionGroup | Sort-Object created -Descending | Select-Object -Property name -First 1
$MostRecentSnapshot.Name
Perform the volume overwrite: –
New-PfaVolume -Array $FlashArray -VolumeName $TargetVolume -Source ($MostRecentSnapshot.name + ".$SourceVolume") -Overwrite
Online the target volume: –
Invoke-Command -Session $TargetVMSession -ScriptBlock { Get-Disk | ? { $_.SerialNumber -eq $using:TargetDisk } | Set-Disk -IsOffline $False }
Confirm that the volume is online: –
Invoke-Command -Session $TargetVMSession -ScriptBlock { Get-Disk | Select-Object Number, SerialNumber, OperationalStatus | Format-Table}
And to further confirm, list database files on new volume: –
Invoke-Command -Session $TargetVMSession -ScriptBlock { Get-ChildItem F:SQLData1}
Awesome, OK we have the data back. Now we have some work to do in SQL Server.
Attach the database from files on restored volume: –
CREATE DATABASE [AdventureWorks2019_REATTACH]
 ON  PRIMARY
( NAME = N'AdventureWorks2017', FILENAME = N'F:SQLData1AdventureWorks2019.mdf')
 LOG ON
( NAME = N'AdventureWorks2017_log', FILENAME = N'F:SQLTLog1AdventureWorks2019_log.ldf')
 FOR ATTACH
GO
Confirm that the data is correct in the newly attached database: –
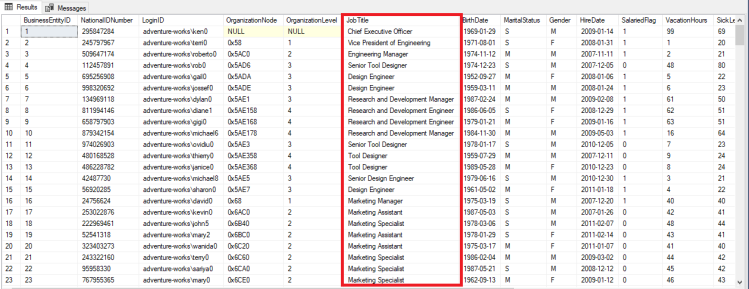
SELECT * FROM [AdventureWorks2019_REATTACH].[HumanResources].[Employee]
Looks good! Now it’s just a matter of updating the data in the original database: –
UPDATE e
SET e.JobTitle = e1.JobTitle
FROM [AdventureWorks2019].[HumanResources].[Employee] e
INNER JOIN [AdventureWorks2019_REATTACH].[HumanResources].[Employee] e1
ON e.BusinessEntityID = e1.BusinessEntityID
Looks good! And that’s how to use snapshots to recover data that has been incorrectly altered.
Thanks for reading!


