Abstract
Monitoring disk space utilization of server(s) is a critical and important job for any administrator. Keeping things organized might improve application availability and server availability. Being a database administrator for 10 years, I have faced and handled/managed lot of issues with disk space. This article takes us through the in-detail steps to read each drive and report every drive details based on threshold values. The output is integrated with excel charts. The step by step process quickly take us through the disk space utilization details of server(s). You’ll basically feed a list of servers to watch over, and it will report back on these for you, meaning you could also use it as a more general “daily server disk space report”
Table of Contents
Introduction
This article talks about the use of credentials. The credentials can be used to query external servers which have a trust relationship between the domains. Also, list various methods to secure the password. The process iterates through a list of servers and drives that you have listed in a csv file. Checking for disk space status of every listed drive and its status may fall under one of the four statuses that is defined as critical, warning, low and good. If the disk in question is below the threshold then increment the corresponding status counter which acts as a data source for depicting excel charts. The nice thing about this script is that it will consolidate health status of each listed disks and gives a summary that needs your attention (you set the threshold as per requirement because the size of the drive may vary from server to server).
Querying WMI objects – Win32_LogicalDisks
- Using Credentials
- Without using Credentials
Using Credentials
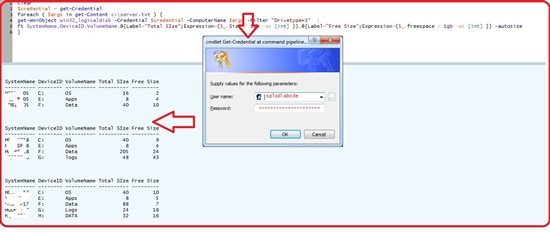
Get-credential always pop-up dialog box for entering a password, however, you can save your securestring password to a file or directly feed the password. The problem with this is that the password will be exposed to anyone with access to the file.
- Using Get-Credential cmdlet – Pop up dialog box
- Directly using password
- Using secured file
Using Get-Credential cmdlet – Pop dialog box
The Get-Credential displays a window to enter credential details. This will appear every time when you run the script.The $credential variable store the username and password. It’s then fed to the respective queries for further processing.
clear$credential = Get-Credential foreach ( $args in get-Content c:\server.txt ) {get-WmiObject win32_logicaldisk -Credential $credential -ComputerName $args -Filter "Drivetype=3" |ft SystemName,DeviceID,VolumeName,@{Label="Total SIze";Expression={$_.Size / 1gb -as [int] }},@{Label="Free Size";Expression={$_.freespace / 1gb -as [int] }} -autosize}Hard code the credentials
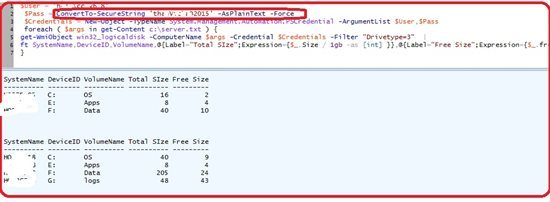
The password is hard coded in the script. Of course, the problem with this is that your password will be exposed to anyone with access to the script file.
$User = 'hqnt\abcd' $Pass = ConvertTo-SecureString 'abcd@2015' -AsPlainText -Force $Credentials = New-Object -TypeName System.Management.Automation.PSCredential -ArgumentList $User,$Pass foreach ( $args in get-Content c:\server.txt ) {get-WmiObject win32_logicaldisk -ComputerName $args -Credential $Credentials -Filter "Drivetype=3" |ft SystemName,DeviceID,VolumeName,@{Label="Total SIze";Expression={$_.Size / 1gb -as [int] }},@{Label="Free Size";Expression={$_.freespace / 1gb -as [int] }} -autosize}Using Secured file
First, Password has to be written to a file
ps:\>read-host -AsSecureString |ConvertFrom-SecureString |Out-File C:\SecurePassword.txtSecond, The credentials are read from the file using PSCredential class. You don’t need to re-enter the password over and over again.
clear$User = 'hqnt\abcdv'$pass= cat C:\passwordstring.txt |ConvertTo-SecureString$Credentials = New-Object -TypeName System.Management.Automation.PSCredential -ArgumentList $User,$Passforeach ( $args in get-Content c:\server.txt ) {get-WmiObject win32_logicaldisk -ComputerName $args -Credentials $cred -Filter "Drivetype=3" |ft SystemName,DeviceID,VolumeName,@{Label="Total SIze";Expression={$_.Size / 1gb -as [int] }},@{Label="Free Size";Expression={$_.freespace / 1gb -as [int] }} -autosize}Without using CredentialsYou don’t need to pass credential parameter in any of the cmdlet execution.
clearforeach ( $args in get-Content c:\server.txt ) {get-WmiObject win32_logicaldisk -ComputerName $args -Filter "Drivetype=3" |ft SystemName,DeviceID,VolumeName,@{Label="Total SIze";Expression={$_.Size / 1gb -as [int] }},@{Label="Free Size";Expression={$_.freespace / 1gb -as [int] }} -autosize}Download – Gallery link
Code in detail
This section describes the coding and other details
Input File
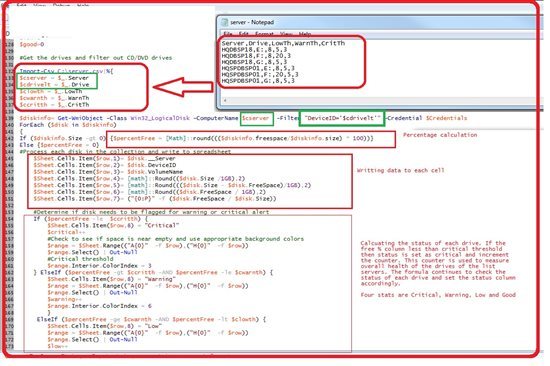
The template of server.csv is given below. Change the content as per your requirement/environment
Server,Drive,LowTh,WarnTh,CritThHQDBSP008,E:,8,5,3HQDBSP008,F:,8,20,3HQDBSP0018,G:,8,5,3HQSPDB9901,E:,8,5,3HQSPDB0901,F:,20,5,3HQSPDB8001,G:,8,5,3Output and filename
This below code defines the output file location and filename. The $date variable hold the date formatting part. It’s then appended to the $filename to generate the most meaningful filename. For example, c:\DMZ_Server_Space_Utilization-2016-09-16
$DirectoryToSaveTo = "c:\"$date=Get-Date -format "yyyy-MM-d"$Filename="DMZ_Server_Space_Utilization_$($date)"Password
This portion of code decides whether to pass credentials or not. The Get-credential always pop-up dialog box for entering a password, however, you can save your securestring password to a file or directly feed the password. The problem with this is that the password will be exposed to anyone with access to the file. If you want to use the default login credentials then you don’t need to mention anything in the code. You can comment the line of code.
$User = 'abcd'$Pass = ConvertTo-SecureString ''abcd@#2016' -AsPlainText -Force$Credentials = New-Object -TypeName System.Management.Automation.PSCredential -ArgumentList $User,$PassInvoking Excel components
PowerShell is made available to use Excel component by invoking excel.application COM object that will allow us to work with excel to add data and format that data. The New-object -ComObject creates a new excel object using COM components and it made visible for troubleshooting using visible property set to true. Once everything is defined, we can call the respective methods and properties to create workbook by adding sheet as its item
#Create a new Excel object using COM$Excel = New-Object -ComObject Excel.Application#you can see the Excel sheet and helpful in troubleshooting$Excel.visible = $True#After instantiating the excel objects, It's a time use its respective methods and properties$Excel = $Excel.Workbooks.Add()$Sheet = $Excel.Worksheets.Item(1)Workbook number and details
FileFormat numbers in Mac Excel. These are the main file formats in Windows Excel 2007-2016:
51 = xlOpenXMLWorkbook (without macro’s in 2007-2013, xlsx)
52 = xlOpenXMLWorkbookMacroEnabled (with or without macro’s in 2007-2013, xlsm)
50 = xlExcel12 (Excel Binary Workbook in 2007-2013 with or without macro’s, xlsb)
56 = xlExcel8 (97-2003 format in Excel 2007-2013, xls)
$xlOpenXMLWorkbook=[int]51Header and Coloring
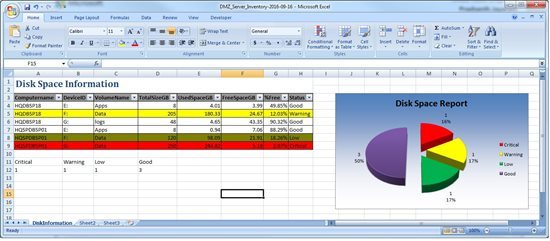
Create a header for Disk Space Report, setting each cell to Bold and add a background color. The excel generates Computername, DeviceID, VolumeName,TotalSizeGB,
UsedSpaceGB, FreeSpaceGB, %Free and Status columns. The variable $column is incremented by 1 each time to create a new column.
$Sheet.Cells.Item($row,$column)= 'Computername'$Sheet.Cells.Item($row,$column).Interior.ColorIndex =48$Sheet.Cells.Item($row,$column).Font.Bold=$True$Column++$Sheet.Cells.Item($row,$column)= 'DeviceID'#Making the font Bold and adjusting the background color (using the Interior.ColorIndex property of each cell$Sheet.Cells.Item($row,$column).Interior.ColorIndex =48$Sheet.Cells.Item($row,$column).Font.Bold=$True$Column++$Sheet.Cells.Item($row,$column)= 'VolumeName'$Sheet.Cells.Item($row,$column).Interior.ColorIndex =48$Sheet.Cells.Item($row,$column).Font.Bold=$True$Column++$Sheet.Cells.Item($row,$column)= 'TotalSizeGB'$Sheet.Cells.Item($row,$column).Interior.ColorIndex =48$Sheet.Cells.Item($row,$column).Font.Bold=$True$Column++$Sheet.Cells.Item($row,$column)= 'UsedSpaceGB'$Sheet.Cells.Item($row,$column).Interior.ColorIndex =48$Sheet.Cells.Item($row,$column).Font.Bold=$True$Column++$Sheet.Cells.Item($row,$column)= 'FreeSpaceGB'$Sheet.Cells.Item($row,$column).Interior.ColorIndex =48$Sheet.Cells.Item($row,$column).Font.Bold=$True$Column++$Sheet.Cells.Item($row,$column)= '%Free'$Sheet.Cells.Item($row,$column).Interior.ColorIndex =48$Sheet.Cells.Item($row,$column).Font.Bold=$True$Column++$Sheet.Cells.Item($row,$column)= 'Status'$Sheet.Cells.Item($row,$column).Interior.ColorIndex =48$Sheet.Cells.Item($row,$column).Font.Bold=$True$Column++#Set up a header filter$headerRange = $Sheet.Range("a3","o3")$headerRange.AutoFilter() | Out-NullImport Server and Drive details
Import-Csv C:\server.csv|%{$cserver = $_.Server$cdrivelt = $_.Drive$clowth = $_.LowTh$cwarnth = $_.WarnTh$ccritth = $_.CritTh$diskinfo= Get-WmiObject -Class Win32_LogicalDisk -ComputerName $cserver -Filter "DeviceID='$cdrivelt'" -Credential $CredentialsForEach ($disk in $diskinfo){If ($diskinfo.Size -gt 0) {$percentFree = [Math]::round((($diskinfo.freespace/$diskinfo.size) * 100))}Else {$percentFree = 0}#Process each disk in the collection and write to spreadsheet $Sheet.Cells.Item($row,1)= $disk.__Server $Sheet.Cells.Item($row,2)= $disk.DeviceID $Sheet.Cells.Item($row,3)= $disk.VolumeName $Sheet.Cells.Item($row,4)= [math]::Round(($disk.Size /1GB),2) $Sheet.Cells.Item($row,5)= [math]::Round((($disk.Size - $disk.FreeSpace)/1GB),2) $Sheet.Cells.Item($row,6)= [math]::Round(($disk.FreeSpace / 1GB),2) $Sheet.Cells.Item($row,7)= ("{0:P}" -f ($disk.FreeSpace / $disk.Size)) #Determine if disk needs to be flagged for warning or critical alert If ($percentFree -le $ccritth) { $Sheet.Cells.Item($row,8) = "Critical" $critical++ #Check to see if space is near empty and use appropriate background colors $range = $Sheet.Range(("A{0}" -f $row),("H{0}" -f $row)) $range.Select() | Out-Null #Critical threshold $range.Interior.ColorIndex = 3 } ElseIf ($percentFree -gt $ccritth -AND $percentFree -le $cwarnth) { $Sheet.Cells.Item($row,8) = "Warning" $range = $Sheet.Range(("A{0}" -f $row),("H{0}" -f $row)) $range.Select() | Out-Null $warning++ $range.Interior.ColorIndex = 6 } ElseIf ($percentFree -ge $cwarnth -AND $percentFree -lt $clowth) { $Sheet.Cells.Item($row,8) = "Low" $range = $Sheet.Range(("A{0}" -f $row),("H{0}" -f $row)) $range.Select() | Out-Null $low++ $range.Interior.ColorIndex = 12 } Else { $Sheet.Cells.Item($row,8) = "Good" $good++ } $row++}}Charting
The first part of the code is preparing an heading and second part assigns the corresponding values to its respective column headers.
$Sheet.Cells.Item($row,$Column) = 'Critical'$Column++$Sheet.Cells.Item($row,$Column) = 'Warning'$Column++$Sheet.Cells.Item($row,$Column) = 'Low'$Column++$Sheet.Cells.Item($row,$Column) = 'Good'$Column = 1$row++#Critical formula$Sheet.Cells.Item($row,$Column)=$critical$Column++#Warning formula$Sheet.Cells.Item($row,$Column)=$warning$Column++#low formula$Sheet.Cells.Item($row,$Column)=$low$Column++#Good formula$Sheet.Cells.Item($row,$Column)= $goodFor example,
| Critical | Warning | Low | Good |
| 1 | 1 | 1 | 3 |
The expanded value of pie char is 70
#Configure the chart##Use a 3D Pie Chart$chart.ChartType = 70$chart.Elevation = 40The below code places the graph to the top left of the sheet.
#Set the location of the chart$sheet.Shapes.Item("Chart 1").Placement = 3$sheet.Shapes.Item("Chart 1").Top = 30$sheet.Shapes.Item("Chart 1").Left = 600Code
<#.SYNOPSIS
Name : Disk Space Utilizaiton Report (Get-DiskSpaceExcel.ps1)
Description : Get disk space usage informations from remote server(s) with WMI and ouput Excel file
Author : Prashanth Jayaram
* Some ideas extracted Joe Prox Excel Charting. Refer the reference secion for more information
* Select list of servers from a CSV file
* Get remote Servers informations with WMI and Powershell :
* Disk (Disk type, letter, capacity in GB, free space in GB, % free , Status + display a Excel output)
.INPUT
.csv file with servers to activate
.OUTPUTS
Console outputs : You can alter the code to write the data to file or console
.NOTES
Version: 1.0
Author: Prashanth Jayaram
Creation Date: 2016-26-09
Purpose/Change: Initial script development
.EXAMPLE
.\Get-DiskSpaceExcel.ps1
#>
#########################################################################################
#DirectoryPath - Make sure you have enough rights to write to that path
#########################################################################################
#### Spreadsheet Location - Make sure you change as per your requirement
$DirectoryToSaveTo = "c:\" $date=Get-Date -format "yyyy-MM-d" $Filename="DMZ_Server_Space_Utilication_$($date)" ##Get-credential always pop-up dialog box for entering a password, however you can save your securestring password to a file or directly feed the password. ##The problem with this is that the password will be exposed to anyone with access to the file. ####User Credentials to access servers $User = "ccov648" $Pass = ConvertTo-SecureString "thanVitha@2015" -AsPlainText -Force $Credentials = New-Object -TypeName System.Management.Automation.PSCredential -ArgumentList $User,$Pass # before we do anything else, are we likely to be able to save the file?# if the directory doesn't exist, then create itif (!(Test-Path -path "$DirectoryToSaveTo")) #create it if not existing { New-Item "$DirectoryToSaveTo" -type directory | out-null } #PowerShell is made available to use Excel componment by invoking excel.application COM object that will allow us to work with excel to add data and format that data.#Create a new Excel object using COM$Excel = New-Object -ComObject Excel.Application#you can see the Excel sheet and helpful in troubleshooting$Excel.visible = $True#After instantiating the excel objects, It's a time use its respective methods and properties$Excel = $Excel.Workbooks.Add()$Sheet = $Excel.Worksheets.Item(1) #Save the initial row so it can be used later to create a border#Counter variable for rows$intRow = $row #FileFormat numbers in Mac Excel #These are the main file formats in Windows Excel 2007-2016: #51 = xlOpenXMLWorkbook (without macro's in 2007-2013, xlsx)#52 = xlOpenXMLWorkbookMacroEnabled (with or without macro's in 2007-2013, xlsm)#50 = xlExcel12 (Excel Binary Workbook in 2007-2013 with or without macro's, xlsb)#56 = xlExcel8 (97-2003 format in Excel 2007-2013, xls) $xlOpenXMLWorkbook=[int]51 #define the sheet name $sheet.Name = 'DiskSpace' $Sheet.Activate() | Out-Null #Create a Title for the first worksheet$row = 1$Column = 1$Sheet.Cells.Item($row,$column)= 'Disk Space Information' $range = $Sheet.Range("a1","h2")$range.Merge() | Out-Null # [Enum]::getvalues([Microsoft.Office.Interop.Excel.XLVAlign]) | select @{n="Name";e={"$_"}},value__#To fetch the list of alignment values using the above the enumerator. $range.VerticalAlignment = -4160 #Give it a nice Style so it stands out$range.Style = 'Title' #Increment row for next set of data$row++;$row++ #Save the initial row so it can be used later to create a border$initalRow = $row #Create a header for Disk Space Report; set each cell to Bold and add a background color$Sheet.Cells.Item($row,$column)= 'Computername'$Sheet.Cells.Item($row,$column).Interior.ColorIndex =48$Sheet.Cells.Item($row,$column).Font.Bold=$True$Column++$Sheet.Cells.Item($row,$column)= 'DeviceID'#Making the font Bold and adjusting the background color (using the Interior.ColorIndex property of each cell$Sheet.Cells.Item($row,$column).Interior.ColorIndex =48$Sheet.Cells.Item($row,$column).Font.Bold=$True$Column++$Sheet.Cells.Item($row,$column)= 'VolumeName'$Sheet.Cells.Item($row,$column).Interior.ColorIndex =48$Sheet.Cells.Item($row,$column).Font.Bold=$True$Column++$Sheet.Cells.Item($row,$column)= 'TotalSizeGB'$Sheet.Cells.Item($row,$column).Interior.ColorIndex =48$Sheet.Cells.Item($row,$column).Font.Bold=$True$Column++$Sheet.Cells.Item($row,$column)= 'UsedSpaceGB'$Sheet.Cells.Item($row,$column).Interior.ColorIndex =48$Sheet.Cells.Item($row,$column).Font.Bold=$True$Column++$Sheet.Cells.Item($row,$column)= 'FreeSpaceGB'$Sheet.Cells.Item($row,$column).Interior.ColorIndex =48$Sheet.Cells.Item($row,$column).Font.Bold=$True$Column++$Sheet.Cells.Item($row,$column)= '%Free'$Sheet.Cells.Item($row,$column).Interior.ColorIndex =48$Sheet.Cells.Item($row,$column).Font.Bold=$True$Column++$Sheet.Cells.Item($row,$column)= 'Status'$Sheet.Cells.Item($row,$column).Interior.ColorIndex =48$Sheet.Cells.Item($row,$column).Font.Bold=$True$Column++#Set up a header filter$headerRange = $Sheet.Range("a3","o3")$headerRange.AutoFilter() | Out-Null #Increment Row and reset Column back to first column$row++$Column = 1$critical=0$warning=0$low=0$good=0 #Get the drives and filter out CD/DVD drives Import-Csv C:\server.csv|%{$cserver = $_.Server$cdrivelt = $_.Drive$clowth = $_.LowTh$cwarnth = $_.WarnTh$ccritth = $_.CritTh $diskinfo= Get-WmiObject -Class Win32_LogicalDisk -ComputerName $cserver -Filter "DeviceID='$cdrivelt'" -Credential $CredentialsForEach ($disk in $diskinfo){If ($diskinfo.Size -gt 0) {$percentFree = [Math]::round((($diskinfo.freespace/$diskinfo.size) * 100))}Else {$percentFree = 0}#Process each disk in the collection and write to spreadsheet $Sheet.Cells.Item($row,1)= $disk.__Server $Sheet.Cells.Item($row,2)= $disk.DeviceID $Sheet.Cells.Item($row,3)= $disk.VolumeName $Sheet.Cells.Item($row,4)= [math]::Round(($disk.Size /1GB),2) $Sheet.Cells.Item($row,5)= [math]::Round((($disk.Size - $disk.FreeSpace)/1GB),2) $Sheet.Cells.Item($row,6)= [math]::Round(($disk.FreeSpace / 1GB),2) $Sheet.Cells.Item($row,7)= ("{0:P}" -f ($disk.FreeSpace / $disk.Size)) #Determine if disk needs to be flagged for warning or critical alert If ($percentFree -le $ccritth) { $Sheet.Cells.Item($row,8) = "Critical" $critical++ #Check to see if space is near empty and use appropriate background colors $range = $Sheet.Range(("A{0}" -f $row),("H{0}" -f $row)) $range.Select() | Out-Null #Critical threshold $range.Interior.ColorIndex = 3 } ElseIf ($percentFree -gt $ccritth -AND $percentFree -le $cwarnth) { $Sheet.Cells.Item($row,8) = "Warning" $range = $Sheet.Range(("A{0}" -f $row),("H{0}" -f $row)) $range.Select() | Out-Null $warning++ $range.Interior.ColorIndex = 6 } ElseIf ($percentFree -ge $cwarnth -AND $percentFree -lt $clowth) { $Sheet.Cells.Item($row,8) = "Low" $range = $Sheet.Range(("A{0}" -f $row),("H{0}" -f $row)) $range.Select() | Out-Null $low++ $range.Interior.ColorIndex = 12 } Else { $Sheet.Cells.Item($row,8) = "Good" $good++ } $row++}} #Add a border for data cells have used with the VerticalAlignment property.#[Enum]::getvalues([Microsoft.Office.Interop.Excel.XlBordersIndex]) | select @{n="Name";e={"$_"}},value__$row--$dataRange = $Sheet.Range(("A{0}" -f $initalRow),("H{0}" -f $row))7..12 | ForEach { $dataRange.Borders.Item($_).LineStyle = 1 $dataRange.Borders.Item($_).Weight = 2} #Auto fit everything so it looks better $usedRange = $Sheet.UsedRange $usedRange.EntireColumn.AutoFit() | Out-Null $sheet = $excel.Worksheets.Item(1) $row++;$row++ $beginChartRow = $Row $Sheet.Cells.Item($row,$Column) = 'Critical'$Column++$Sheet.Cells.Item($row,$Column) = 'Warning'$Column++$Sheet.Cells.Item($row,$Column) = 'Low'$Column++$Sheet.Cells.Item($row,$Column) = 'Good'$Column = 1$row++#Critical formula$Sheet.Cells.Item($row,$Column)=$critical$Column++#Warning formula$Sheet.Cells.Item($row,$Column)=$warning$Column++#low formula$Sheet.Cells.Item($row,$Column)=$low$Column++#Good formula$Sheet.Cells.Item($row,$Column)= $good $endChartRow = $row $chartRange = $Sheet.Range(("A{0}" -f $beginChartRow),("d{0}" -f $endChartRow)) $chart = $sheet.Shapes.AddChart().Chart #Configure the chart##Use a 3D Pie Chart$chart.ChartType = 70$chart.Elevation = 40#Give it some color$sheet.Shapes.Item("Chart 1").Fill.ForeColor.TintAndShade = .34$sheet.Shapes.Item("Chart 1").Fill.ForeColor.ObjectThemeColor = 5$sheet.Shapes.Item("Chart 1").Fill.BackColor.TintAndShade = .765$sheet.Shapes.Item("Chart 1").Fill.ForeColor.ObjectThemeColor = 5 $sheet.Shapes.Item("Chart 1").Fill.TwoColorGradient(1,1) #Set the location of the chart$sheet.Shapes.Item("Chart 1").Placement = 3$sheet.Shapes.Item("Chart 1").Top = 30$sheet.Shapes.Item("Chart 1").Left = 600 $chart.SetSourceData($chartRange)$chart.HasTitle = $True $chart.ApplyLayout(6,69)$chart.ChartTitle.Text = "Disk Space Report"$chart.ChartStyle = 26$chart.PlotVisibleOnly = $False$chart.SeriesCollection(1).DataLabels().ShowValue = $True$chart.SeriesCollection(1).DataLabels().Separator = ("{0}" -f [char]10) $chart.SeriesCollection(1).DataLabels().Position = 2#Critical$chart.SeriesCollection(1).Points(1).Format.Fill.ForeColor.RGB = 255#Warning$chart.SeriesCollection(1).Points(2).Format.Fill.ForeColor.RGB = 65535#Low$chart.SeriesCollection(1).Points(2).Format.Fill.ForeColor.RGB = 265535#Good$chart.SeriesCollection(1).Points(3).Format.Fill.ForeColor.RGB = 5287936 #Hide the data#$chartRange.EntireRow.Hidden = $True $sheet.Name = 'DiskInformation' $filename = "$DirectoryToSaveTo$filename.xlsx"if (test-path $filename ) { rm $filename } #delete the file if it already exists$Sheet.UsedRange.EntireColumn.AutoFit()$Excel.SaveAs($filename, $xlOpenXMLWorkbook) #save as an XML Workbook (xslx)$Excel.Saved = $True$Excel.Close()Output
Conclusion
- CSV input – Easy to maintain and manage
- Customization can be done at the each drive level as the threshold value may vary on every server and most of the drive depending the size of each drive
- Graphical representation of Disk Space Usage Utilization report
- Simplest way to keep a cap on every drive to set threshold value
- Proactive monitoring and alerting respective teams may avoid unforeseen disk space issues
Note:- I would prefer to read the blog references entered under reference section for more in-depth information about charting with PoSH.
Technet
- Working with Passwords, Secure Strings and Credentials in Windows PowerShell
- Charting with Powershell


