

By David Postlethwaite
Introduction
Dynamic data masking is a really useful new tool in SQL Server 2016. Keeping data safe is one of the most important tasks that a company has; this goes further than just making sure that users can only see their own data and hackers can’t get access. One case that will be familiar to many is where a copy of production data is required by developers for testing or for production support issues. In this case it is often important that the data is obfuscated so that real personal data is protected. With large data sets running an obfuscation script can take a long time and hold up support or testing. What would be really useful is a way of masking the data without having to run these long obfuscation scripts. Introducing Dynamic Data Masking.
Microsoft has introduced a solution to this in SQL Server 2016 and Azure SQL database called Dynamic Data Masking. With DDM, whenever a SELECT statement is run a mask is placed over the data that is returned so that the original values are obfuscated from those who shouldn’t be allowed to see it.
DDM is very easy to configure using T-SQL or via the Azure portal. You can control which users and groups will be subject to the mask. Once enabled SQL will mask the data regardless of how it is viewed so you won’t get staff using SSMS as a backdoor to the real data.
The great advantage of DDM is that you can build it into your production database but not actually enable it. When you copy the database to Production Support or Testing then it is simply a case of enabling masking and the data is instantly obfuscated.
In SQL 2016 there are four masking functions available. There has been no mention of this being expanded in SQL 2017.
- Default: Replaces all characters with ‘XXXX’ and numbers with 0
- Email: Replaces the part before the @ with the first letter and XXXXand puts a ‘@XXXX.com’ at the end
- Random: Replaces numbers with random values
- Partial: Here you can define the number of characters to display at the beginning and end and the masking characters to use in the middle
In Azure, the portal also offers a mask called “Credit Card” which is a prefilled partial function of partial(0, "xxxx-xxxx-xxxx-", 4).
You can create a table with masking functions using T-SQL
CREATE TABLE [dbo].[Customers](
[CustomerID] [int] NOT NULL,
[FirstName] [dbo].[Name] NOT NULL,
[LastName] [dbo].[Name] MASKED WITH (FUNCTION='partial(2,"XXXX",2)') NOT NULL,
[EmailAddress] [nvarchar](50) MASKED WITH (FUNCTION = 'email()') NULL,
[PhoneNumber] [nvarchar](25) MASKED WITH (FUNCTION = 'default()') NULL,
[TerritoryID] [int] NULL
) ON [PRIMARY]
Or you can alter a table to add masking functions
ALTER TABLE [dbo].[Customers]
ALTER COLUMN EmailAddress ADD MASKED WITH (FUNCTION = 'email()')
GO
ALTER TABLE [dbo].[Customers]
ALTER COLUMN PhoneNumber ADD MASKED WITH (FUNCTION = 'default()')
GO
ALTER TABLE [dbo].[Customers]
ALTER COLUMN LastName ADD MASKED WITH (FUNCTION = 'partial(1, "XXXXX", 2)')
Let’s insert some data for our example
--insert some data
INSERT INTO [Customers] VALUES('19169','Arianna','Bryant','816-14-3866','77778052342171','arianna16@adventure-works.com','725-555-0131',1)
INSERT INTO [Customers] VALUES('17423','Arianna','Alexander','513-30-2965','77776580079386','arianna17@adventure-works.com','140-555-0167',1)
INSERT INTO [Customers] VALUES('17722','Jerome','Serrano','319-51-1661','55559881820491','jerome15@adventure-works.com','1 (11) 500 555-0136',8)
INSERT INTO [Customers] VALUES('22728','Arianna','Russell','239-35-4068','33338016910017','arianna18@adventure-works.com','179-555-0197',6)
INSERT INTO [Customers] VALUES('29187','Jerome','Ramos','918-75-6173','11115373226233','jerome16@adventure-works.com','1 (11) 500 555-0162',9)
INSERT INTO [Customers] VALUES('14902','Arianna','Diaz','162-76-6285','33331128313730','arianna19@adventure-works.com','142-555-0189',4)
INSERT INTO [Customers] VALUES('21817','Jerome','Carlson','833-14-5928','11113048024782','jerome17@adventure-works.com','1 (11) 500 555-0113',10)
INSERT INTO [Customers] VALUES('25991','Arianna','Hayes','302-26-4124','33336197015476','arianna20@adventure-works.com','582-555-0144',6)
A user with db_owner permissions can view the unmasked data but a user who isn’t a db_owner will see masked data so it is important that your database security has been properly designed. I know from experience that many developers simply give everyone db_owner permissions to ensure that all procedures and functions work correctly. This will need to be changed to use DDM effectively.
Let’s create a user for this demonstration.
-- create user and give data reader role
CREATE USER MaskUser WITHOUT LOGIN
GO
ALTER ROLE [db_datareader] ADD MEMBER [MaskUser]
GO
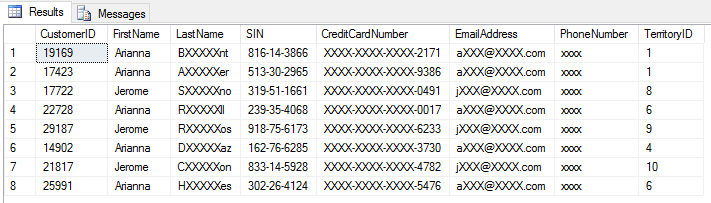
If the user tries to view the data it will be returned with the mask applied.
--run select as Maskuser - see the masked data
EXECUTE AS USER = 'MaskUser'
SELECT [CustomerID]
,[FirstName]
,[LastName]
,[SIN]
,[CreditCardNumber]
,[EmailAddress]
,[PhoneNumber]
,[TerritoryID]
FROM[dbo].[Customers]
REVERT
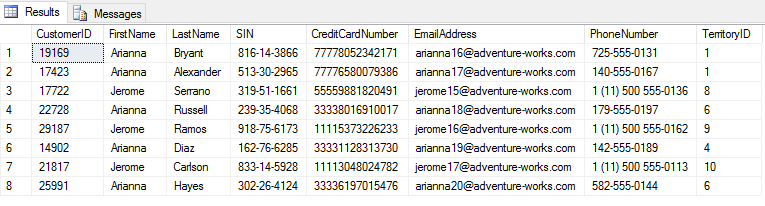
You can remove the mask from a user with the GRANT UNMASK command
-- Granting users or roles the UNMASK permission will enable them to see unmasked data:
GRANT UNMASK TO MaskUser
The select statement will now show the real data.
You can re-enable the mask with the REVOKE UNMASK
-- Revoking users or roles the UNMASK permission will force users to see masked data:
REVOKE UNMASK TO MaskUser
GO
Masking Data in SQL Server 2016 is that simple.
However, there are some drawbacks.
- The underlying data is still intact so if someone was able to take a copy of the database they would have access to all the personal data.
- DBAs with their higher privileges will almost certainly be able to see the unmasked data.
- As already mentioned, database security must be configured correctly to ensure DDM works for all users.
- The “WHERE” and “ORDER BY” clauses use the underlying data not the masked data so clever users who can run adhoc queries could use this weakness to work out what the masked data actually is. For instance, if there was a salary field they could use an order by clause to see who is the highest and lowest paid staff.
--clever users can work out the underlying data by using where clause
EXECUTE AS USER = 'MaskUser'
SELECT [CustomerID]
,[FirstName]
,[LastName]
,[SIN]
,[CreditCardNumber]
,[EmailAddress]
,[PhoneNumber]
,[TerritoryID]
FROM[dbo].[Customers]
WHERELastName = 'Bryant'
REVERT
In the above statement the user has guessed a last name and this has returned a row even though the data returned has a mask on it.

However, if you insert the masked data to write data to a new table hoping to see the unmasked data you will be out of luck. SQL copies the masked data to a new table; you will not see the underlying data.
--if you write data to a new table you still get the masked data
EXECUTE AS USER = 'MaskUser'
SELECT CustomerId,Lastname, EmailAddress, PhoneNumber INTO #temp_table
FROM [dbo].[Customers] -- Masked Email and Phone
SELECT CustomerId,Lastname, EmailAddress, PhoneNumber FROM #temp_table

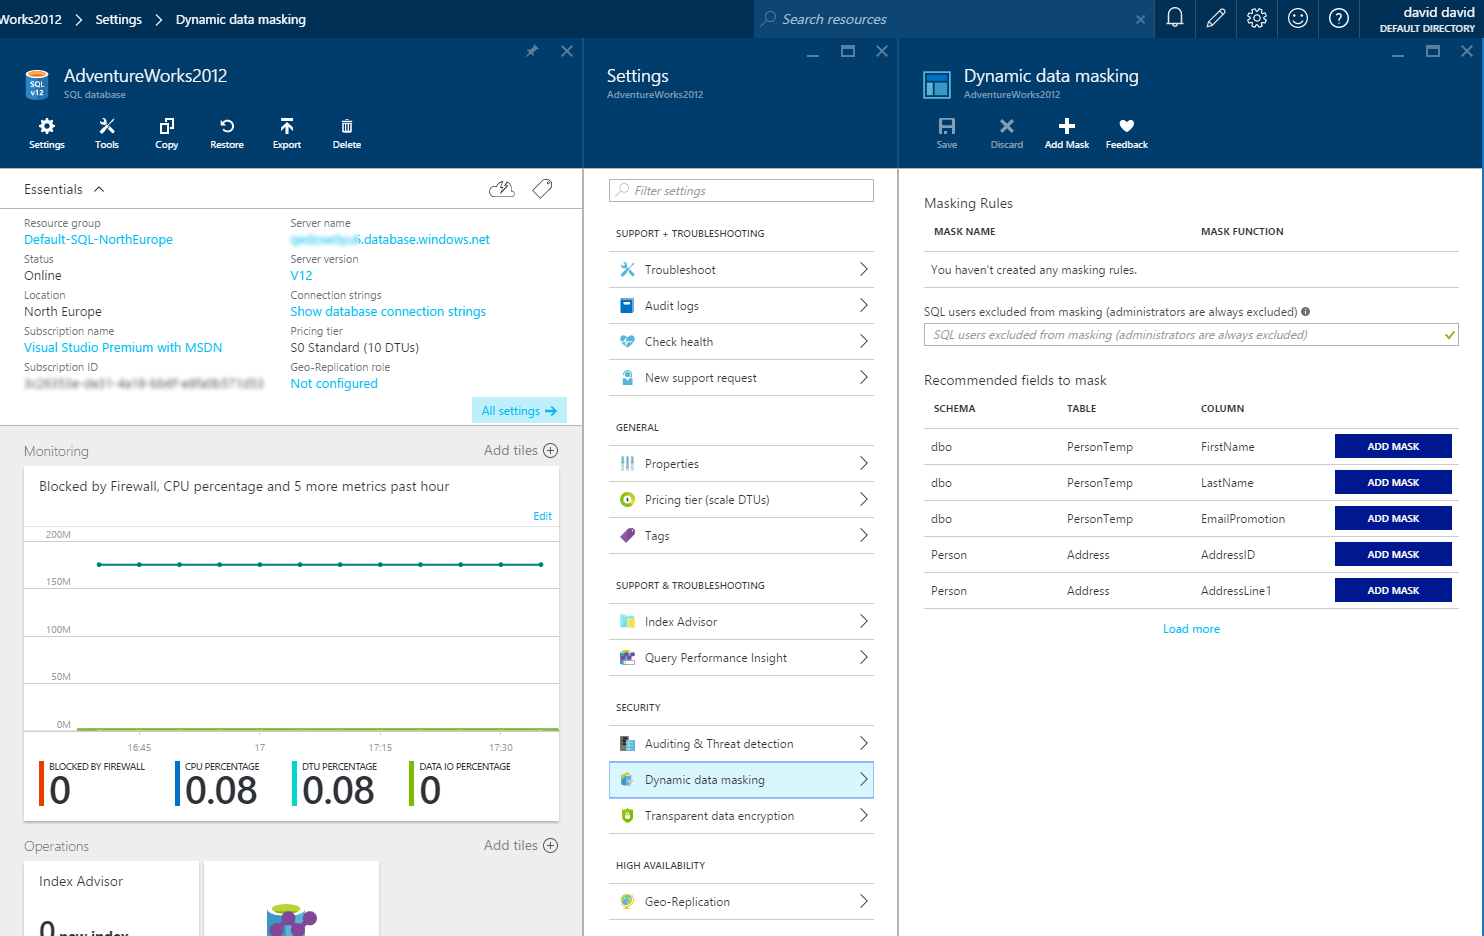
Azure SQL Database supports Dynamic Data Masking. You can configure it from the portal. In fact the portal will suggest columns for masking.
Dynamic Data Masking looks like a useful tool in the fight to protect your production data but you will have to use it wisely to ensure that users can’t use the limitations to get around it and access the underlying data.
I haven’t seen any improvements mentioned in SQL 2017 but I am sure it will be improved at some point.

![]()
