Introduction
I am a proponent of simplifying ETL processes as much as possible. I prefer that each package have one primary function, i.e. performs one small unit of work. This approach helps to keep development requirements tidy, simplifies unit testing, and promotes code re-use. In keeping with these ideas, I endorse splitting the responsibility of attaining data files from external sources apart from any program (or programs) needed to process those data files. Many developers follow this approach. The following is a common question I encounter from developers asking for help in designing an ETL process meant to process data files:
How can I setup an SSIS package that will process a data file as soon as it arrives in a specific directory? In addition, the filename will change from one day to the next and no one can guarantee if or when the file will arrive.
This is a fair question. If I am responsible for completing a task and it is important that this task be completed in the least amount of time possible, and I am dependent on someone to provide me with something before I can begin the task, then I want as little time as possible to pass between the time that information is available and the time the task is started.
A common option offered to people posting this scenario on the Internet is to schedule an SSIS package that runs every minute looking for an Excel file, and if one is found to begin processing it. If no file exists the SSIS package simply exits without doing any work. This technique is called polling and is a tried and true concept in the field of computer science.
In this article I will detail how to use the WMI Event Watcher Task in SSIS to poll for an Excel file, and then load that Excel file into a table. This technique produces far less system activity in terms of starting and stopping the SSIS package than the technique previously outlined. Using WMI to alert our package that it can begin processing significantly increases our chances of experiencing a very short amount of time between when the file becomes available and when processing begins.
Requirements
Here are some facts about the scenario we will be following in this article:
- A directory will be designated as the “drop directory”. This is the directory (i.e. Windows folder) where Excel files that need to be processed by our SSIS package will be delivered (i.e dropped) by business users, or by any automated process.
- Each Excel file will have a Worksheet (also known as a Tab) named “Products” containing a fixed set of columns. Each file may contain a different number of data rows, but the format will remain consistent.
- The name of the Excel file will change from day to day, however it will follow a pattern. For example, the name will follow the format BusinessData.YYYMMDD.xlsx where YYYYMMDD will change depending on the day it is delivered (e.g. BusinessData.20120506.xlsx).
- A minimum of zero files and a maximum of one file will be delivered for processing per business day.
- The data file needs to be processed as soon as it arrives.
- The SSIS package should wait indefinitely for a file to arrive. *
Here is a list of the primary technologies used to produce this demo:
- Windows 7
- SQL Server 2012 Evaluation Edition
- SQL Server 2012 Data Tools for SSIS development
- Excel 2007 for sample Excel file creation
* A note about allowing an SSIS package to run continuously: there is nothing inherently wrong with setting up an SSIS package to behave in this way. WMI offers us a very lightweight way (in terms of resources) to watch for new files being added to a directory.
Regarding CPU, WMI does not use much CPU (effectively zero) when a check for new files is done every few seconds. In between checking for new files the SSIS package will use absolutely zero CPU, i.e. it will be sleeping.
Regarding memory use, an SSIS package that runs continuously will stay loaded in memory while it is running and watching for files, just like any other running program would, however for discussion purposes it will occupy effectively the same amount of memory that a package built to run once per minute would occupy.
The purpose of running a package continuously is to alleviate the need to load and unload the package from memory each time we need to check if a file has arrived. The tradeoff here is between the constant memory use but overall low CPU use of a package that runs continuously vs. the CPU and memory allocation and deallocation overhead of loading and unloading a package many times in the course of a day.
Design
We stated our requirements above, decided to use SSIS 2012 to process our Excel files, and now need a high-level outline for how we will accomplish the task using the chosen technology. Generically this will be our processing logic:
- When a file arrives move it from the “drop directory” to a “processing directory” to reduce the chances of anything interfering with the file while it is being processed.
- Clear the database staging table where the Excel data will be loaded.
- Load the file from the “processing directory” into the staging table.
- Move the file from the “processing directory” to an “archive directory”.
In terms of SSIS the above outline translates into the following:
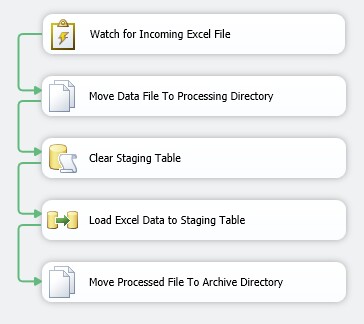
- Use the WMI Event Watcher Task to watch for new files in the “drop directory”.
- Use a Script Task in the WMI Event Watcher Task's Event Handler to determine when we can gain exclusive access to the file.
- Move the file from the “drop directory” into the “processing directory” using a File System Task.
- Clear the database staging table using an Execute SQL Task.
- Load the Excel file into the staging table from the “processing directory” using a Data Flow Task.
- Move the file from the “processing directory” to the “archive directory” using a File System Task.
- Exit.
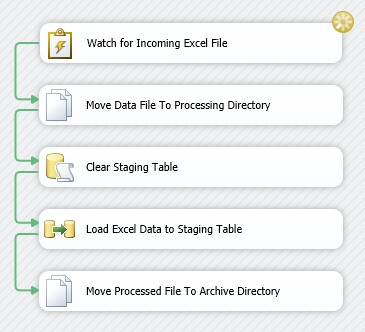
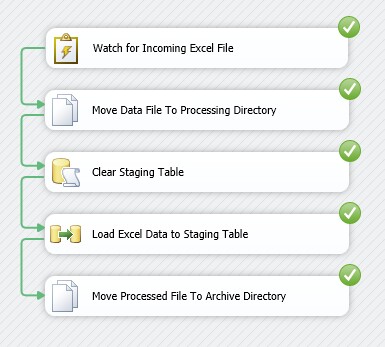
Here is a preview of the finished package:
Step-By-Step Development
In this section we will walk through the creation of the SSIS package, step-by-step.
1. Create a new directory named ExcelDrop. I used C:\@\ for this demo. Whichever location you choose, the location of ExcelDrop must be accessible from the SSIS package via a drive letter (e.g. C:\@\ExcelDrop\). The drive letter can refer to a network location (e.g. N:\ExcelDrop) however this demo does not provide information about processing Excel files from a UNC path using WMI. That may be a future article.
2. Under ExcelDrop create two directories, Processing and Archive. Your directory tree should look like this:

3. Stage file BusinessData.YYYMMDD.xlsx (available in the download attached to this article) in the Processing directory. During the development phase the SSIS Excel Connector will need the file to be present in order to generate the metadata necessary to define the file import within the SSIS package.
4. Create a new database and staging table in your SQL Server 2012 instance:
USE[master]GOCREATE DATABASE[Inventory]GOUSE[Inventory]GO SET ANSI_NULLS ON GO SET QUOTED_IDENTIFIER ON GO CREATE TABLEdbo.ProductStaging ( ProductStagingIdINT IDENTITY(1,1) NOT NULL, ProductNameNVARCHAR(255) NULL, PricePerUnitDECIMAL(12, 2) NULL,CONSTRAINTPK_ProductStagingPRIMARY KEY CLUSTERED(ProductStagingIdASC) )GO
5. Create a new SQL Server 2012 SSIS Package using SQL Server Data Tools (SSDT) and name it LoadExcelWorkbook. See the References section at the end of this article if you need assistance getting started with SSDT and SSIS 2012.
6. Add the following Variables to the SSIS package. Some of the expressions build on other variables so create all variables initially, then revisit the variables that require it to set their Expression values.
Name | Type | Value | Expression |
ArchiveFile | String | <derived from Expression> | @[User::ArchivePath] + @[User::FileName] |
ArchivePath | String | <derived from Expression> | @[User::Drive] + @[User::Path] + "Archive\\" |
Drive | String | C: | n/a |
DropFile | String | <derived from Expression> | @[User::DropPath] + @[User::FileName] |
DropPath | String | <derived from Expression> | @[User::Drive] + @[User::Path] |
FileExtension | String | xlsx | n/a |
FileMask | String | <derived from Expression> | @[User::FileNamePrefix] + "*." + @[User::FileExtension] |
FileName | String | BusinessData.YYYYMMDD.xlsx | n/a |
FileNamePrefix | String | BusinessData | n/a |
Path | String | \@\ExcelDrop\ | n/a |
ProcessingFile | String | <derived from Expression> | @[User::ProcessingPath] + @[User::FileName] |
ProcessingPath | String | <derived from Expression> | @[User::Drive] + @[User::Path] + "Processing\\" |
WqlQuerySource | String | <derived from Expression> | "SELECT * FROM __InstanceCreationEvent WITHIN 5 WHERE TargetInstance ISA 'CIM_DataFile' AND TargetInstance.Drive = 'C:' AND TargetInstance.Path = '"+ REPLACE( @[User::Path], "\\", "\\\\") +"' AND TargetInstance.FileName LIKE '"+ @[User::FileNamePrefix] +"%' AND TargetInstance.Extension = '"+ @[User::FileExtension] +"'" |
For additional information about SSIS Expressions see the References links at the end of this article.
7. Drag a new WMI Event Watcher Task from the Other Tasks section in the Toolbox onto the Control Flow design surface. SSIS will immediately flag a validation error on the WMI Event Watcher. Do not worry. We will resolve the validation error when we configure the connection in the next step.

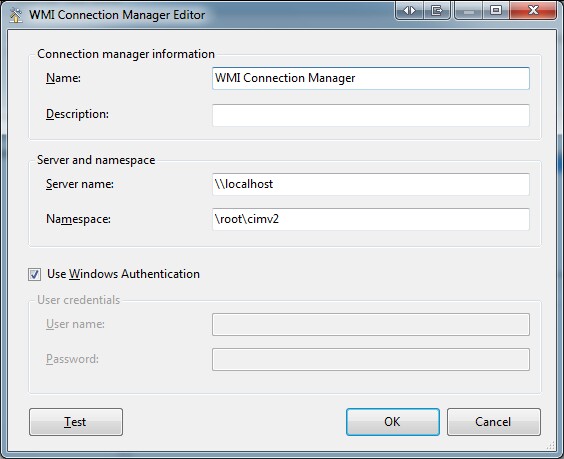
8. Double-click the task to open the Properties. On the General page rename the task to Watch For Incoming Excel File. On the WMI Options Page, select the WmiConnection drop-down and select New WMI Connection.

9. Select the Use Windows Authentication checkbox, click Test to ensure your login has access to the WMI subsystem and click OK. This instructs the task to authenticate to the WMI subsystem using the security context in which the package runs.
10. Modify the remaining options as follows:

Here are some items of note with the above properties:
- The ActionAtEvent is set to not only log the event, but also to fire the SSIS event. This is important because we will rely on this event being raised as you will see later in the development of the package.
- The WqlQuerySourceType is set to Variable. The WQL (WMI Query Language) statement we are providing to the WMI Event Watcher Task via the variable is based on the WMI Event Class __InstanceCreationEvent. I will not delve too deeply into WMI, as it is a huge area of study, however we can break down what this query will be doing for us. For additional information about WQL in general see the References section at the end of this article. Here is the complete query when interpreted using the variable values above:
SELECT*FROM__InstanceCreationEventWITHIN5WHERETargetInstanceISA'CIM_DataFile'ANDTargetInstance.Drive = 'C:'ANDTargetInstance.Path = '\\@\\ExcelDrop\\'ANDTargetInstance.FileNameLIKE'BusinessData%'ANDTargetInstance.Extension = 'xlsx'In plain terms, the WMI Event Watcher Task in our SSIS package is asking the WMI subsystem every 5 seconds if a new file has been created on drive C: in the \@\ExcelDrop\ sub folder with a name that starts with “BusinessData" and has an extension of “xlsx”. If a file has been created with those criteria the WMI task will raise an SSIS Event confirming a new file has been created. The importance of raising the SSIS Event will become clear later in this article.
- The WqlQuerySource value is supplied by the variable we created earlier named WqlQuerySource.
- Timeout is set to 0, meaning the task will wait indefinitely for a file to arrive. If you would like for the task to fail if a file does not arrive within a certain period of time you can change the value from 0 to a positive number while leaving the AfterTimeout action to Return with failure. The Timeout value is in terms of seconds.
11. So far we know that when our package is running, if a file that fits our criteria is added to our drop directory, our WMI Event Watcher Task will raise an SSIS Event. SSIS Events are an important and large area of study. SSIS is considered an event-driven programming environment. I cannot explore this area too deeply in the context of this article, however I encourage you to check the accompanying reference links at the end of the article if you would like to learn more.
As soon as the WMI Event Watcher Task raises an SSIS event, we need to respond to that event before any other tasks in our Control Flow try to operate on the file. The WMI subsystem alerts SSIS when a file has been created, however the event being raised does not signify that the file is done being written to. In other words it is quite common for the WMI subsystem to raise the event when the file is created but at that moment the file handle may still be open by the file supplier. It is easy to imagine that this may be the case when a large file is being copied to the drop directory however it can easily happen with very small files (< 1KB) as well. Knowing that SSIS may receive the file creation event prior to the data supplier finishing copying the file we need to provide for this case. There are several ways in which we can do this. I will show you how to do this using a Script Task within an SSIS Event Handler.
12. If you have been following the steps of this demo you are currently on the Control Flow tab containing one task, a WMI Event Watcher. Along the top of the design surface you'll notice multiple tabs. Click the Event Handlers tab:

13. In the Executables drop-down select the WMI Event Watcher Task named Watch For Incoming Excel File.
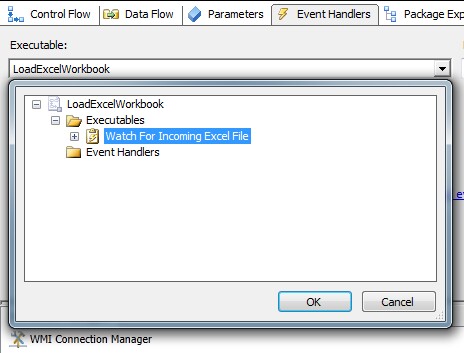
14. The WMI Event Watcher Task implements two Event Handlers: WMIEventWatcherEventOccurred and WMIEventWatcherTimeoutOccurred. Select WMIEventWatcherEventOccurred.

15. Click the link on the design surface to inform SSDT you want to implement an Event Handler for the chosen event:

It is important to note that Event Handlers are synchronous in terms of their execution order within the package. Event Handlers support all Toolbox items available on the Control Flow design surface. See the References section at the end of this article for more information about SSIS Event Handlers.
16. Drag a Script Task onto the Event Handler design surface and name it Check File Availability. Our Event Handler will consist of a single Script Task that will do the following:
- Check for files that fit our criteria in the drop directory. We can expect that one will exist since our WMI Event Watcher Task raised the WMIEventWatcherEventOccurred event.
- Check to see if we can gain exclusive access to the found file. If we can, we know the supplier has completed uploading the file. If we cannot, we must wait until the supplier has completed their upload. In the script task we will wait 5 seconds before checking again. Once the file can be accessed exclusively we will allow the rest of the package to continue processing the file.
Here is the Event Handler design surface containing only the Script Task:

Here are the properties of the Script Task. Notice we are mapping two read-only variables and one read-write variable into the script:

Here is the C# code contained the Script Task. See the References section at the end of the article for more information about the Script Task. Please read the inline comments for details:
// add to Namespaces regionusingSystem.IO;usingSystem.Threading;/// <summary> /// This method is called when this script task executes in the control flow. /// Before returning from this method, set the value of Dts.TaskResult to indicate success or failure. /// To open Help, press F1. /// </summary>public voidMain() {try{// store read-only variable values into local variables, eases readabilitystringdropPath = Dts.Variables["DropPath"].Value.ToString();stringfileMask = Dts.Variables["FileMask"].Value.ToString();// We know there is a new file that can be processed because // the WMI Event Watcher fired an event, however we do not know if the user or process // supplying the file has completed uploading it. We will loop over drop directory // looking for files that meet our criteria and once we find one we will make sure // the supplier has completed their upload process by checking to see if we can gain // exclusive access to the file. Once we can gain exclusive access to the file we will know // the upload is complete and we can allow the rest of the SSIS package to continue.foreach(stringdataFile inDirectory.GetFiles(dropPath, fileMask)) {// Loop indefinitely checking if we can access the data file.while(1 == 1) {try{// Attempt to gain access to the file.using(Streamstream =new FileStream(dataFile, FileMode.Open)) { }// If we made it here no exception was thrown meaning we // could access the file.// Store the file name for use later in the package.Dts.Variables["FileName"].Value =Path.GetFileName(dataFile);// We will break the loop and allow the rest of the package to // continue processing.break; }catch(IOException) {// We are not interested in ending the program when an IOException // occurs in this area. This type of exception means we could not // gain access to the file. // In general, programming algorithms that leverage exceptions for // control flow are frowned upon. However in the case of file access // it is an acceptable pattern.}// Wait 5 seconds before checking again whether the file can be used.Thread.Sleep(5000); }break; } Dts.TaskResult = (int)ScriptResults.Success; }catch{// Exception occurred that we did not expect.Dts.TaskResult = (int)ScriptResults.Failure;throw; } }
17. We have successfully configured a WMI Event Watcher to find a file in the ExcelDrop directory based on a file mask (BusinessData*.xlsx). Additionally we configured a Script Task within one of its Event Handlers to ensure the file is ready for processing before we allow the package to proceed. We are ready to code the logic to process the file. Referring to our processing logic in the Design section we have achieved Step 1, watch for incoming file, and Step 2, use script task to determine exclusive file access. Here are the steps we have yet to implement:
Step 3. When the file arrives, move it from the “drop directory” to a “processing directory” to reduce the chances of anything interfering with the file while it is being processed.
Step 4. Clear the database staging table where the Excel data will be loaded.
Step 5. Load the file from the “processing directory” into the staging table.
Step 6. Move the file from the “processing directory” to an “archive directory”.
18. We will move back to the Control Flow design surface to configure the remaining Tasks.
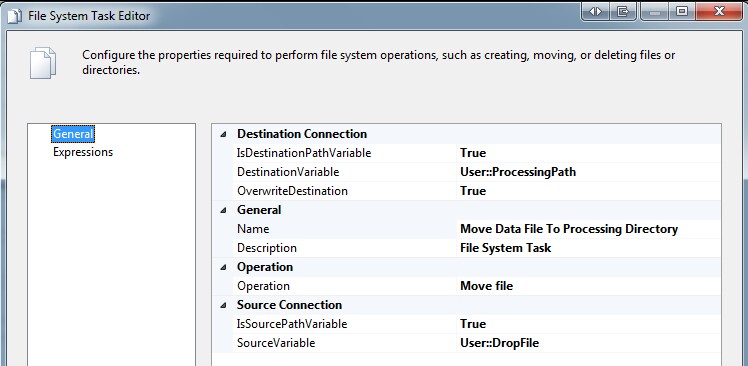
To move our data file from the drop directory to the processing directory we can use the File System Task. Drag one from the Toolbox onto the Control Flow surface, name it Move Data File To Processing Directory and connect the WMI Event Watcher task to it:
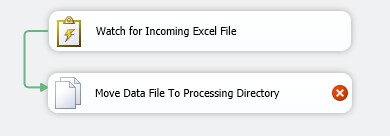
Do not be concerned that SSIS immediately flags the new File System Task with a validation error. The error will disappear when we set its Properties.
19. Double click the File System Task and set the properties as follows:
20. To clear the staging table, our Step 3, before we load data from the file we will execute a TRUNCATE TABLE command against the database. Drag an Execute SQL Task from the Toolbox onto the design surface and name it Clear Staging Table. Connect the output from the File System Task to it, and set it up as follows:
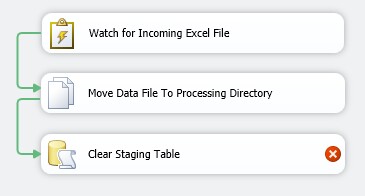
SSIS will immediately flag a validation error. Do not be concerned. We will resolve it in the next steps.
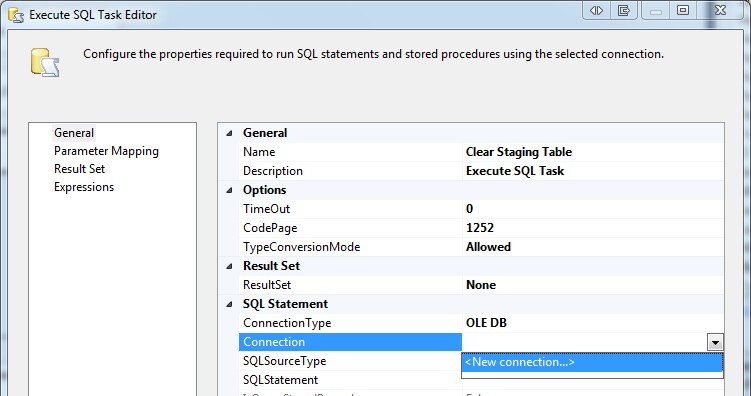
21. Double-click the Execute SQL Task to open the Task Editor. Under the SQL Statement section select <New Connection...> from the Connection properties drop-down:
Click New... to create a new database connection to the test Inventory database:
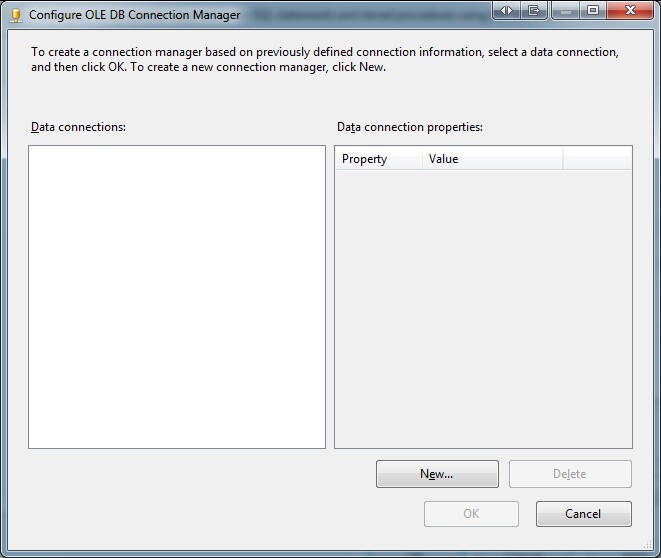
Complete the new connection info, changing the Server Name as needed for your test environment:

22. Configure the remaining properties of the Execute SQL Task as follows:
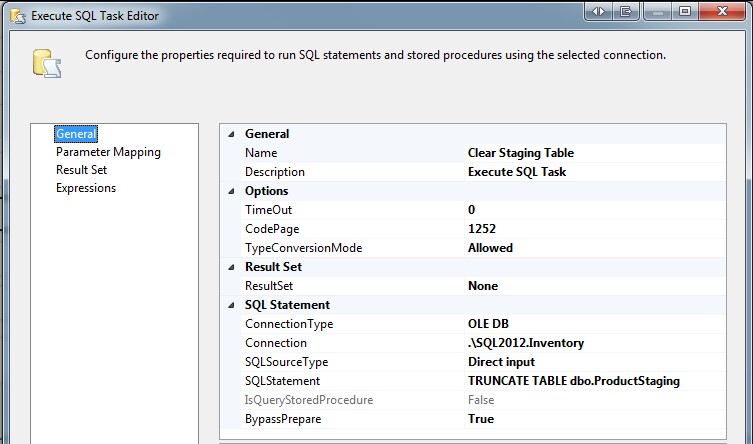
TRUNCATE TABLE dbo.ProductStagingNotice that SSIS created a new OLE DB Database connection to support the Execute SQL Task.
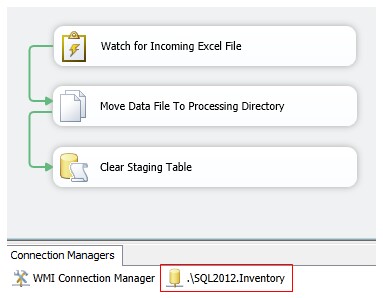
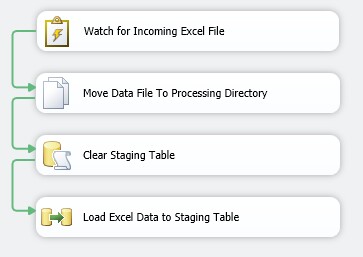
23. The next step from our processing logic is Step 5. Load the file from the “processing directory” into the staging table. This will require a Data Flow Task. Drag one from the Toolbox onto the design surface and name it Load Excel Data to Staging Table. Connect the output from the Clear Staging Table Execute SQL Task to it. In the Data Flow Task we only need to copy the data from the Products Worksheet (i.e. Tab) in the Workbook (i.e. Excel file) into the table we created in the Inventory database earlier (dbo.ProductStaging).
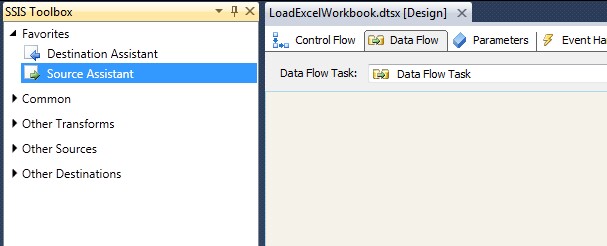
Double-click the Data Flow Task to open the Data Flow designer. We will need two objects in our Data Flow, an Excel Source and an OLE DB Database Destination. The SSIS Development Team added two handy Assistants to the Data Flow Designer in SQL Server 2012: the Source Assistant and the Destination Assistant. We will use them here.
Source 1. Drag a Source Assistant onto your Data Flow designer:
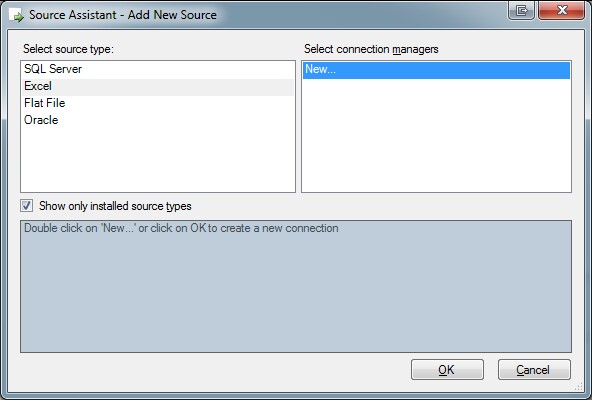
Source 2. The Add New Source dialog will appear. Select Excel, and New… and click OK:
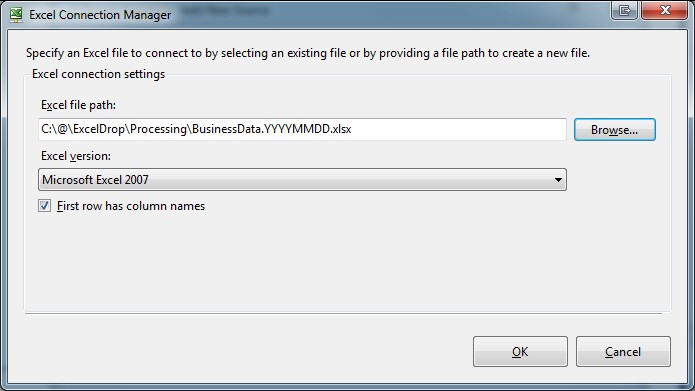
Source 3. Select the sample file in the Processing directory and Click OK:
The SSIS designer will create a new Excel Connection Manager and Excel Source Component for you, per what we did with the Source Assistant.
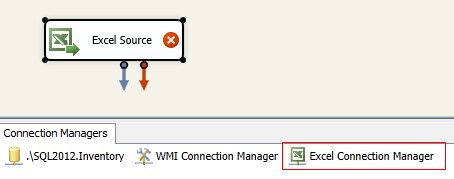
The validation error icon placed on the Source Component immediately after creation is normal. SSIS will show there is an error until we define the data source, i.e. provide the Worksheet name or Query that defines the data set it will process.
Source 4. Double-click the Excel Source to open the properties and set it to source data from the Products table (i.e. Worksheet) in the Excel Workbook.
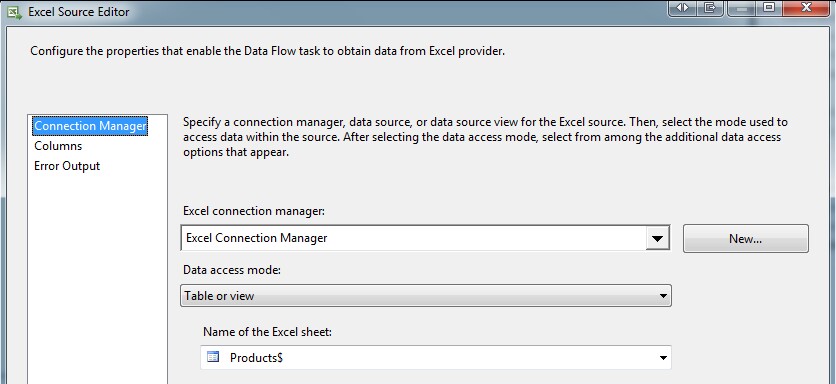
When finished setting the Source table, click OK and notice the validation error disappear from the component.
Source 5. Right-click the Excel Source Component and select Properties (or highlight and press F4). Set the ValidateExternalMetadata property to False:

This is important because in a production setting the Excel file will not exist in the processing directory when the the SSIS package begins to execute. Setting this property to False will let SSIS know it should bypass validating the metadata defined for the source component at runtime.
Source 6. Our Source object is now configured. Now we must configure our Excel Connection to be dynamic in terms of which file it will load, since the name of the file will change each day. Right-click Excel Connection Manager in the Connection Managers pane and select Properties (or highlight and Press F4).

In the Properties window click the ellipsis to open the Expressions Editor:

Set the ExcelFilePath to take its value from the ProcessingFile variable:
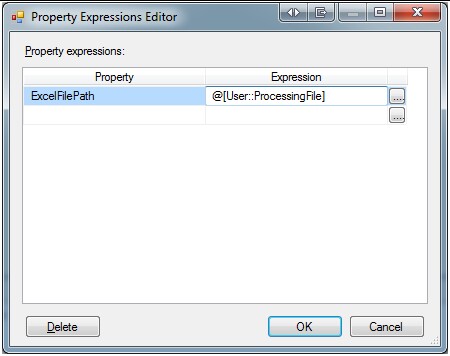
Our Source Component and Excel Connection is now configured. We will now configure the Destination Component.
Destination 1. Drag a Destination Assistant onto your Data Flow designer:
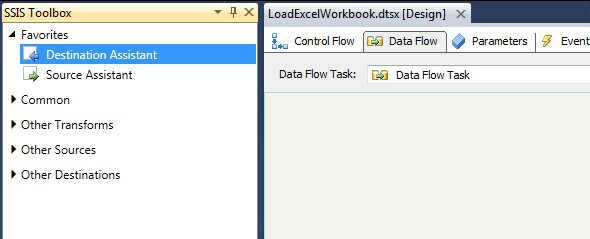
Destination 2. The Add New Destination dialog will appear:
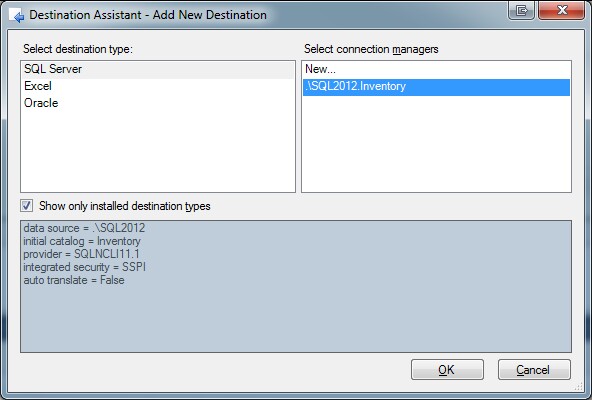
Select SQL Server, the Connection to the test Inventory database we setup earlier when configuring the Execute SQL Task, and click OK:
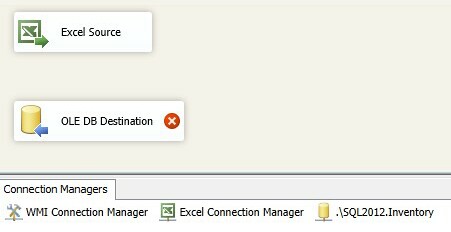
Do not be concerned with the validation error shown on the OLE DB Destination component. The error will disappear when we finish configuring the data flow.
Destination 4. Connect the two Components:
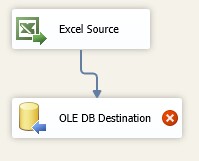
Destination 5. Double-click the OLE DB Destination to open the Properties. Set the Name of table or the view to dbo.ProductStaging to let SSIS know that is where you would like to store the incoming data:
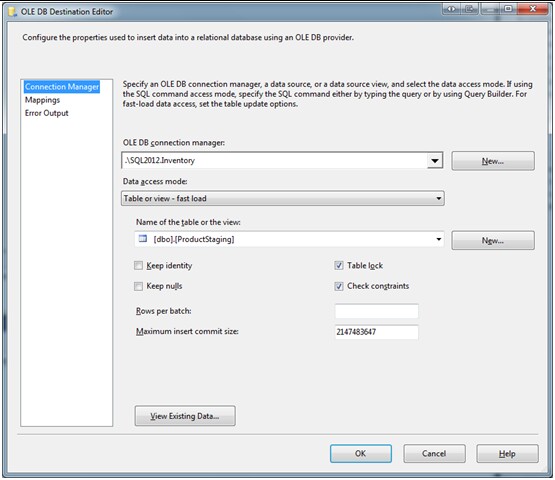
After selecting dbo.ProductStaging from the drop-down, because the columns in our Excel Worksheet match the columns in our staging table, SSIS will automatically map them to each other. This is nice for the purposes of this demo and a behavior that can be quite handy if you happen to control one or both of the source file format or destination database table definition when developing an ETL process:

Destination 6. Click OK. Our Data Flow Task is now complete:
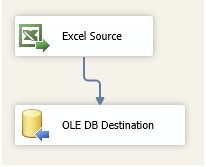
Our Data Flow Task is complete!
24. Referring to our processing logic we are now complete with the implementation for Step 5. Step 6 of our processing logic says to move the data file from the Processing Directory to the Archive Directory. For this step we can again use a File System Task. Move back to the Control Flow and drag a File System Task from the Toolbox onto the design surface, connect the Data Flow Task to it and configure it as follows:

After some renaming and rearranging of the objects your SSIS package should look similar to this, the finished product I previewed at the beginning of this article:

Testing
We have completed the process of creating and configuring our SSIS package to satisfy our requirements. It is now time to test it.
1. Start the SSIS package (press F5).
2. Your package should immediately move into a state where it is using the WMI Event Watcher task to poll for files entering the drop directory C:\@\ExcelDrop, as noted by the Gold Wheel spinning in the top right corner of the WMI task:
4. In order for the package to proceed we must add a data file to C:\@\ExcelDrop\ that satisfies the file mask BusinessData*.xlsx. Cut the sample file BusinessData.YYYYMMDD.xlsx in the Processing directory C:\@\ExcelDrop\Processing and Paste it into C:\@\ExcelDrop\.
5. Within 5 seconds of moving the file (i.e. creating a new file) BusinessData.YYYYMMDD.xlsx in C:\@\ExcelDrop\ the WMI Event Watcher will notice there is a qualifying file present which will cause the Event Handler we configured to execute. When the Script Task in the Event Handler can gain exclusive access to the file the rest of the package will be allowed to execute. Here is what you ought to see when the package completes:
6. We can now check dbo.ProductStaging in our test Inventory database and see that data was loaded.

Success!
Conclusion
Relative to some other methods the WMI Event Watcher Task can be leveraged to:
- Reduce the amount of time between when a file is delivered to a directory and when an SSIS package can begin processing that file.
- Reduce the number of times an SSIS package must be executed in order to process a single file.
In two future articles I will demonstrate additional techniques which I prefer over using the SSIS WMI Event Watcher Task to process files as soon as they arrive. In the next article I will demonstrate how to implement the File Watcher Task, a third-party component. In a third article I will demonstrate how to implement the same functionality offered by the File Watcher Task using an SSIS Script Task, which is ultimately my preferred method of the three.
References
- SQL Server Integration Services (SSIS) WMI Event Watcher Task
- SSIS Event Handlers
- SSIS Expressions
- Windows Management Instrumentation (WMI) Reference
- WMI Query Language (WQL) Reference
- WMI Troubleshooting and Tips
- Installing a New Instance of SQL Server 2012 Database Engine and SQL Server Data Tools (SSDT)
- Create a New SSIS Project in SSDT
- SSIS Script Task


