

Storing, retrieving, and modifying data are common tasks in many applications. In a cross-platform application, it is important to have a lightweight storage mechanism, as opposed to a heavy database software.
This article explores how to use SQLite in Flutter applications.
Overview of SQLite
SQL Server is an RDBMS in which data is stored in the form of tables. Any number of tables can be created and they can be related to each other. In a mobile application development technology such as Flutter, SQL Server can be used by adding the sql_conn plugin to the app. These days, though, when it comes to small Flutter applications, SQLite is chosen over SQL Server. SQLite is a free, self-contained, serverless, and lightweight RDBMS.
SQLite is often preferred over SQL Server for Flutter on account of these reasons:
- Embedded Database: SQLite is an embedded database that operates within the application itself. It doesn't require a separate server or installation, making it convenient for mobile development. In contrast, SQL Server is a client-server database system that requires network connectivity and a dedicated server, which may not be feasible or necessary for mobile apps.
- Lightweight and Efficient: SQLite is designed to be lightweight and efficient, optimized for mobile devices with limited resources such as processing power, memory, and storage. It is specifically built to work well on mobile platforms, offering fast and reliable performance. SQL Server, on the other hand, is a robust enterprise-level database system with a larger footprint and more features, making it better suited for server-based applications.
- Local Storage: SQLite allows developers to store data directly on the device, enabling offline capabilities and eliminating the need for constant network access. This is particularly beneficial for mobile apps that may frequently operate in environments with limited or unreliable internet connectivity. SQL Server, as a server-based solution, requires network access and may not be well-suited for offline scenarios.
- Seamless Integration: SQLite has native support in Flutter, meaning it can be easily integrated into Flutter projects without requiring additional third-party libraries or dependencies. The Flutter SDK provides APIs and packages specifically for working with SQLite databases, making it straightforward for developers to interact with the database. SQL Server, on the other hand, would require additional configuration and setup, and may require using third-party libraries or implementing custom solutions for integration with Flutter.
- Ease of use: SQLite is a relatively easy database to learn and use. It has a simple syntax that is similar to SQL, and it does not require any special configuration or server setup. This makes it a good choice for developers who are new to databases or who want to avoid the complexity of setting up a server.
- Portability: SQLite is a portable database that can be used on a variety of platforms, including Windows, Mac, Linux, and mobile devices. This makes it a good choice for Flutter developers who want to create apps that can be used on multiple platforms.
- Development Simplicity: SQLite provides a simple and familiar SQL-based interface for interacting with the database, making it easier for developers to work with data and perform operations such as querying, inserting, updating, and deleting records. SQL Server, while more powerful and feature-rich, often involves a steeper learning curve and may require more complex SQL queries and database management tasks.
- Performance: SQLite is a fast database that can handle a high volume of queries and transactions. This makes it a good choice for Flutter apps that need to access large amounts of data or that need to perform a lot of database operations.
- Security: SQLite is a secure database that uses encryption to protect data. This makes it a good choice for Flutter apps that need to store sensitive data, such as user login information or financial data.
Ultimately though, which among SQLite and SQL Server you choose depends on the specific requirements of your application. If you're building a mobile app with a small to medium-sized database and a need for local storage and offline capabilities, SQLite is generally a suitable and popular choice. However, for larger-scale applications with complex data needs, multi-user access, and centralized data management, SQL Server or other client-server databases may be more appropriate.
Here are some additional considerations when choosing between SQLite and SQL Server for Flutter development:
- App size: SQLite databases are typically smaller than SQL Server databases. This can be important for Flutter apps that need to be downloaded and installed on mobile devices.
- Data access: SQLite databases can be accessed using the sqflite plugin for Flutter. SQL Server databases can be accessed using the sql_conn SQL Server plugin for Flutter.
- Cost: SQLite is free to use. SQL Server has a variety of pricing options, depending on the edition of SQL Server and the number of users.
Using SQLite in Flutter
Consider a scenario of a mobile app to create, edit, delete, and view a list of movies. The movie instance will contain details such as ID, title, year, and language.
Flutter applications can be created with different code editors. The best way to do this is through Android Studio. Here are a few steps to follow.
Open Android Studio. Next, Create a Flutter Project. To do this, click File → New → New Flutter Project.
Specify a name, SQFliteDemo, for instance, configure the application settings such as desired module name and so on and then, click Create. Complete the Project creation.
Flutter has a sqflite plugin through which developers can use this database to store data locally in any Flutter applications.
It is essential to add a dependency for this plugin in order to use SQLite in Flutter.
Adding the Sqflite Dependency
In the pubspec.yaml file of the application, add the line sqflite: ^2.2.8+4.
To find the latest version of the package and more, check https://pub.dev/packages/sqflite. Also, run flutter pub get each time after updating dependencies in the pubspec.yaml:
flutter:
sdk: flutter
cupertino_icons: ^1.0.2
sqflite: ^2.2.8+4
uuid: ^3.0.6
Adding Path_Provider Dependency
path_provider is a Flutter plugin for finding commonly used locations on a file system so that developers can read/write to a local location on a device.
Add the following line to the dependencies in pubspec.yaml:
path_provider: ^2.0.15
Creating a Model Class to Represent the Table
Create a model class file to perform CRUD operations. We'll design the class to map for four fields: movie id, title, language, and year. Here is the code in our moviemodel.dart file.
class MovieModel {
  final String id;
  final String title;
  final String language;
  final int year;

  MovieModel({
    required this.id,
    required this.title,
    required this.language,
    required this.year,
  });

  factory MovieModel.fromJson(Map<String, dynamic> data) => MovieModel(
    id: data['id'],
    title: data['title'],
    language: data['language'],
    year: data['year'],
  );

  Map<String, dynamic> toMap() => {
  'id': id,
  'title': title,
  'language': language,
  'year': year
};
}
The fromJson() and toMap() functions are used to convert the data model to Map Object and vice versa.
Let's create database_service.dart as the file with a class DatabaseService, where all the database operations will be handled. A Singleton pattern will be used to create the service class.
Now, the database must be initialized before creating any tables or performing read/write operations. This is shown in below code from the database_service.dart file.
. . .
static Database? _database;
Future<Database> get database async {
  if (_database != null) return _database!;
  _database = await initDatabase();
  return _database!;
}
In the code, we check if the database is present, if not, we create it using initDatabase() function, which will be defined as shown here in a snippet from the database_service.dart file:
. . .
Future<Database> initDatabase() async {
  final getDirectory = await getApplicationDocumentsDirectory();
  String path = getDirectory.path + '/movies.db';
  log(path);
  return await openDatabase(path, onCreate: _onCreate, version: 1);
}
In this function, first, the path is declared for creating/accessing the database by making use of the path_provider package. The file is named as movies.db. Then, the openDatabase() function is called, which creates the database using _onCreate() function.
. . .
void _onCreate(Database db, int version) async {
  await db.execute(
  'CREATE TABLE Movies(id TEXT PRIMARY KEY, title TEXT, language TEXT, year INTEGER)');
  log('TABLE CREATED');
}
Executing SQLite Queries in Flutter
To execute SQL Queries in Flutter, sqflite package offers two approaches. One, using raw queries and other, using built-in SQL helper functions. Both offer the same features so it is up to the developer to select.
Executing Raw SQL Queries
Raw SQL queries are written in the form of a String. This approach is used when the developer possesses adequate knowledge of constructing SQL queries.
Here are a few examples of using Raw SQL Queries.
//create
db.execute(
       ‘CREATE TABLE Movies(id TEXT PRIMARY KEY, title TEXT, language TEXT, year INTEGER)’);
//rawInsert
db.rawInsert(
       ‘INSERT INTO Movies(id, title, language, year ) VALUES(?,?,?,?)’,
       [movie.id, movie.title, movie.language, movie.year]);

//rawUpdate
db.rawUpdate('UPDATE Movies SET title=?,language=?,year=? WHERE ID=?', [movie.title, movie.language, movie.year, movie.id]);

//rawQuery
db.rawQuery('SELECT * FROM Movies');
The below code shows several raw SQL query functions included in database_service.dart:
. . .
Future<List<MovieModel>> getMovies() async {
  final db = await _databaseService.database;
  var data = await db.rawQuery('SELECT * FROM Movies');
  List<MovieModel> movies =
  List.generate(data.length, (index) => MovieModel.fromJson(data[index]));
  print(movies.length);
  return movies;
}

Future<void> insertMovie(MovieModel movie) async {
  final db = await _databaseService.database;
  var data = await db.rawInsert(
      'INSERT INTO Movies(id, title, language, year ) VALUES(?,?,?,?)',
      [movie.id, movie.title, movie.language, movie.year]);
  log('inserted $data');
}

Future<void> editMovie(MovieModel movie) async {
  final db = await _databaseService.database;
  var data = await db.rawUpdate(
      'UPDATE Movies SET title=?,language=?,year=? WHERE ID=?',
      [movie.title, movie.language, movie.year, movie.id]);
  log('updated $data');
}
The complete code for databaseservice.dart is given here:
import 'dart:developer';
import 'package:path_provider/path_provider.dart';
import 'package:sqflite/sqflite.dart';
import 'moviemodel.dart';

class DatabaseService {
  static final DatabaseService _databaseService = DatabaseService._internal();
  factory DatabaseService() => _databaseService;
  DatabaseService._internal();
  static Database? _database;
  Future<Database> get database async {
    if (_database != null) return _database!;
    _database = await initDatabase();
    return _database!;
  }
  Future<Database> initDatabase() async {
    final getDirectory = await getApplicationDocumentsDirectory();
    String path = getDirectory.path + '/movies.db';
    log(path);
    return await openDatabase(path, onCreate: _onCreate, version: 1);
  }
  void _onCreate(Database db, int version) async {
    await db.execute(
    'CREATE TABLE Movies(id TEXT PRIMARY KEY, title TEXT, language TEXT, year INTEGER)');
    log('TABLE CREATED');
  }

  Future<List<MovieModel>> getMovies() async {
    final db = await _databaseService.database;
    var data = await db.rawQuery('SELECT * FROM Movies');
    List<MovieModel> movies =
    List.generate(data.length, (index) => MovieModel.fromJson(data[index]));
    print(movies.length);
    return movies;
  }

  Future<void> insertMovie(MovieModel movie) async {
    final db = await _databaseService.database;
    var data = await db.rawInsert(
        'INSERT INTO Movies(id, title, language, year ) VALUES(?,?,?,?)',
        [movie.id, movie.title, movie.language, movie.year]);
    log('inserted $data');
  }

  Future<void> editMovie(MovieModel movie) async {
    final db = await _databaseService.database;
    var data = await db.rawUpdate(
        'UPDATE Movies SET title=?,language=?,year=? WHERE ID=?',
        [movie.title, movie.language, movie.year, movie.id]);
    log('updated $data');
  }

  Future<void> deleteMovie(String id) async {
    final db = await _databaseService.database;
    var data = await db.rawDelete('DELETE from Movies WHERE id=?', [id]);
    log('deleted $data');
  }
}
Executing Queries Using SQL Helpers
SQL helper functions, on the other hand, make writing queries easier. Only the necessary arguments have to be passed to execute any query.
The following code shows an insert helper.
db.insert('Movies', movie.toMap());The table name and data object must be passed in the form of a Map<String, dynamic> as arguments. The return type will be a Future<int> which will be the inserted id from the table.
The following code shows an update helper.
db.update('Movies', movie.toMap(), where: 'id = ?', whereArgs: [movie.id]);Here, developers pass the table name, data to be updated, and conditions to be checked before inserting. If no conditions match, then the update will not take place.
The following code shows a query helper.
db.query('Movies');This is a simple query to return all the data from the table in the form of List<Map<String, dynamic>> where conditions can also be specified.
The following code shows a delete helper.
db.delete('Movies', where: 'id = ?', whereArgs: [id]);To delete a row from the table, this method is used along with the where condition.
Designing the UI
Developers can design a simple UI as shown here and call the functions defined in databaseservice.dart. This is code in sqlflite_example.dart.
import 'package:flutter/material.dart';
import 'databaseservice.dart';
import 'moviemodel.dart';
import 'package:uuid/uuid.dart';

class SqfliteExampleScreen extends StatefulWidget {
  const SqfliteExampleScreen({Key? key}) : super(key: key);

  @override
  State<SqfliteExampleScreen> createState() => _SqfliteExampleScreenState();
}

class _SqfliteExampleScreenState extends State<SqfliteExampleScreen> {
  final dbService = DatabaseService();
  final titleController = TextEditingController();
  final yearController = TextEditingController();
  final languageController = TextEditingController();

  void showBottomSheet(String functionTitle, Function()? onPressed) {
    showModalBottomSheet(
        context: context,
        elevation: 5,
        isScrollControlled: true,
        builder: (_) => Container(
          padding: EdgeInsets.only(
            top: 15,
            left: 15,
            right: 15,
            bottom: MediaQuery.of(context).viewInsets.bottom + 120,
          ),
          child: Column(
            mainAxisSize: MainAxisSize.min,
            crossAxisAlignment: CrossAxisAlignment.end,
            children: [
              TextField(
                controller: titleController,
                decoration: const InputDecoration(hintText: 'Title'),
              ),
              const SizedBox(
                height: 10,
              ),
              TextField(
                controller: languageController,
                //keyboardType: TextInputType.languageress,
                decoration: const InputDecoration(hintText: 'Language'),
              ),
              const SizedBox(
                height: 10,
              ),
              TextField(
                controller: yearController,
                keyboardType: TextInputType.number,
                decoration: const InputDecoration(hintText: 'Year'),
              ),
              const SizedBox(
                height: 20,
              ),
              ElevatedButton(
                onPressed: onPressed,
                child: Text(functionTitle),
              )
            ],
          ),
        ));
  }

  void addMovie() {
    showBottomSheet('Add Movie', () async {
      var movie = MovieModel(
          id: Uuid().v4(),
          title: titleController.text,
          language: languageController.text,
          year: int.parse(yearController.text));
      dbService.insertMovie(movie);
      setState(() {});
      titleController.clear();
      languageController.clear();
      yearController.clear();
      Navigator.of(context).pop();
    });
  }

  void editMovie(MovieModel movie) {
    titleController.text = movie.title;
    languageController.text = movie.language;
    yearController.text = movie.year.toString();
    showBottomSheet('Update Movie', () async {
      var updatedMovie = MovieModel(
          id: movie.id,
          title: titleController.text,
          language: languageController.text,
          year: int.parse(yearController.text));
      dbService.editMovie(updatedMovie);
      titleController.clear();
      languageController.clear();
      yearController.clear();
      setState(() {});
      Navigator.of(context).pop();
    });
  }

  void deleteMovie(String id) {
    dbService.deleteMovie(id);
    setState(() {});
  }

  @override
  Widget build(BuildContext context) {
    return Scaffold(
      appBar: AppBar(
        title: const Text('Sqflite Example'),
      ),
      body: FutureBuilder<List<MovieModel>>(
          future: dbService.getMovies(),
          builder: (context, snapshot) {
            if (snapshot.connectionState == ConnectionState.waiting) {
              return const Center(child: CircularProgressIndicator());
            }
            if (snapshot.hasData) {
              if (snapshot.data!.isEmpty) {
                return const Center(
                  child: Text('No Movies found'),
                );
              }
              return ListView.builder(
                itemCount: snapshot.data!.length,
                itemBuilder: (context, index) => Card(
                  color: Colors.yellow[200],
                  margin: const EdgeInsets.all(15),
                  child: ListTile(
                      title: Text(snapshot.data![index].title +
                          ' ' +
                          snapshot.data![index].year.toString()),
                      subtitle: Text(snapshot.data![index].language),
                      trailing: SizedBox(
                        width: 100,
                        child: Row(
                          children: [
                            IconButton(
                              icon: const Icon(Icons.edit),
                              onPressed: () => editMovie(snapshot.data![index]),
                            ),
                            IconButton(
                              icon: const Icon(Icons.delete),
                              onPressed: () =>
                                  deleteMovie(snapshot.data![index].id),
                            ),
                          ],
                        ),
                      )),
                ),
              );
            }
            return const Center(
              child: Text('No Movies found'),
            );
          }),
      floatingActionButton: FloatingActionButton(
        child: const Icon(Icons.add),
        onPressed: () => addMovie(),
      ),
    );
  }
}
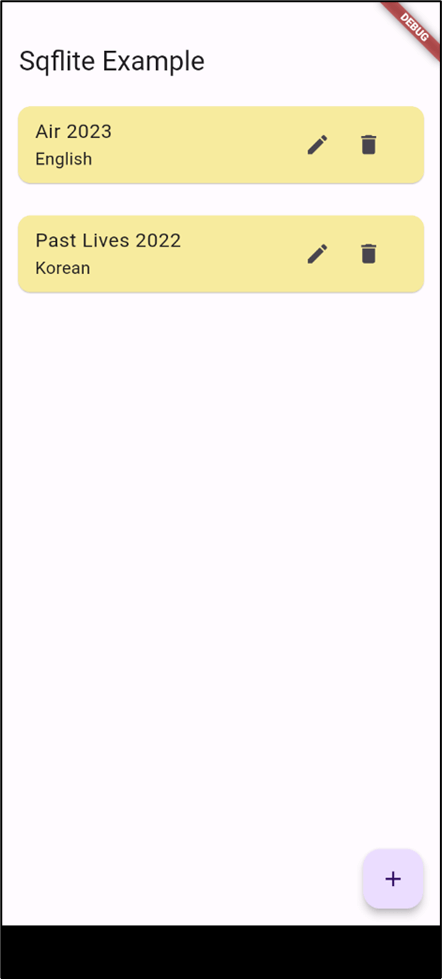
A list of movies, each having id, title, year, and language will be displayed as ListTile inside a ListView. The ListView has been wrapped inside a FutureBuilder since the list of movies will be fetched from the database. All the functions involving communication with the database are future functions.
The loading indicator and ‘no movie found’ text are displayed to enhance the UI. Floating action button is used which, on clicking, opens a bottom area containing three text fields. In this area, title, language, and year can be entered.
A package called uuid is used which will create a unique id for the movie. Individual functions have been written to perform CRUD operations and communicate with the DatabaseService class.
addMovie adds a movie to the database, refreshes the app using setState which will rebuild the UI and text fields will be cleared in the same way as other functions.
Note: Although setState is used here, it is not a good practice to use it. Proper state management has to be used wherever possible, to avoid unnecessary UI rebuilds.
For a detailed look at SQLite data types, check this.
The SqfliteExampleScreen class is then invoked from main as follows:
import 'package:flutter/material.dart';
import 'logic.dart';
void main() {
  runApp(const MyApp());
}

class MyApp extends StatelessWidget {
  const MyApp({super.key});

  // This widget is the root of your application.
  @override
  Widget build(BuildContext context) {
    return MaterialApp(
      title: 'Flutter Demo',
      theme: ThemeData(
        colorScheme: ColorScheme.fromSeed(seedColor: Colors.deepPurple),
        useMaterial3: true,
      ),
       home: const SqfliteExampleScreen(),
    );
  }
}

class MyHomePage extends StatefulWidget {
  const MyHomePage({super.key, required this.title});
  final String title;
  @override
  State<MyHomePage> createState() => _MyHomePageState();
}

class _MyHomePageState extends State<MyHomePage> {
  int _counter = 0;

  void _incrementCounter() {
    setState(() {
      _counter++;
    });
  }

  @override
  Widget build(BuildContext context) {
        return Scaffold(
      appBar: AppBar(
            backgroundColor: Theme.of(context).colorScheme.inversePrimary,
                title: Text(widget.title),
      ),
      body: Center(
          child: Column(
                    mainAxisAlignment: MainAxisAlignment.center,
          children: <Widget>[
            const Text(
       'You have pushed the button this many times:',
            ),
            Text(
              '$_counter',
              style: Theme.of(context).textTheme.headlineMedium,
            ),
          ],
        ),
      ),
      floatingActionButton: FloatingActionButton(
        onPressed: _incrementCounter,
        tooltip: 'Increment',
        child: const Icon(Icons.add),
      ),    );
  }
}
To run the application, a device should be connected. Either connect to a mobile phone or create an emulator using Android Studio. Once the device is connected, the application can be executed.
Click the Run button in Android Studio to view the application in the device. Initially, you'll see this screen, since there are no movies existing in the database.
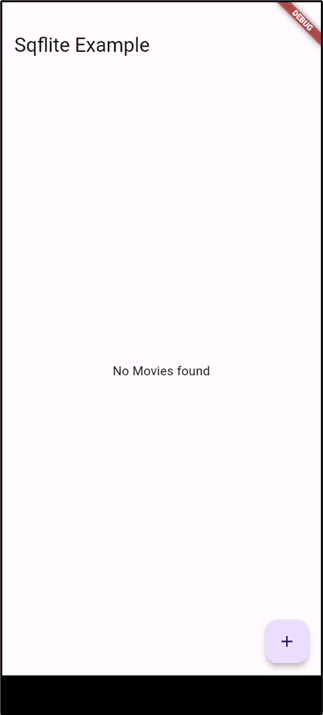
Click the + button to add a movie.
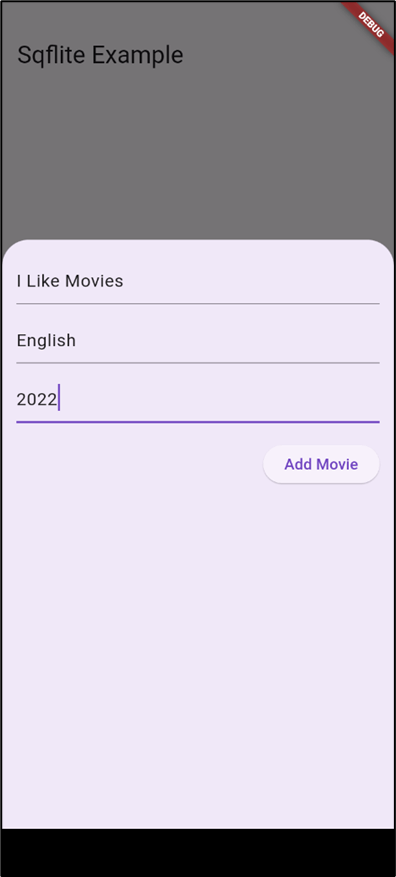
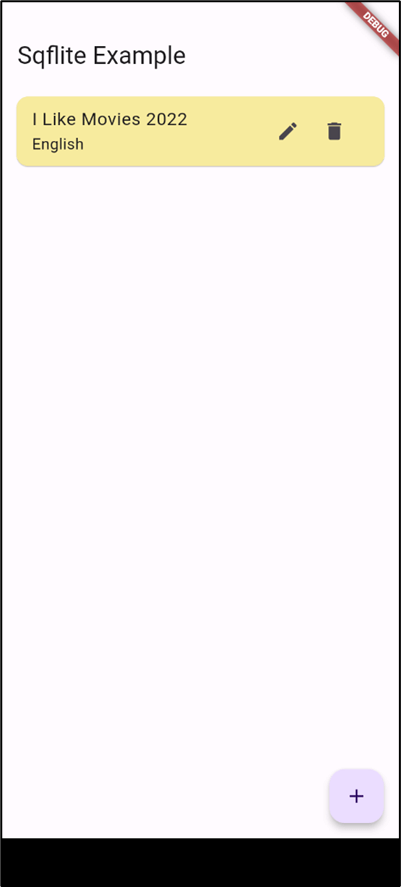
The movie will be added and displayed in the list view.
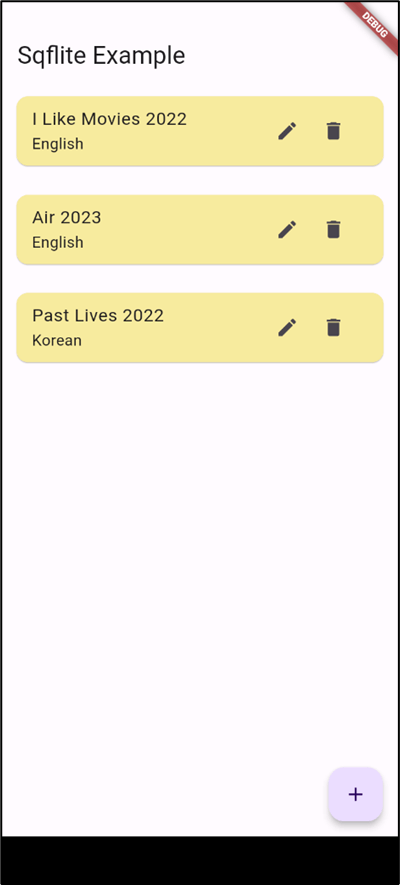
Add a few more records similarly.
Click the delete icon on the first record. It will be deleted from the table and the view will be updated.
Thus, you were able to use SQLite in a Flutter application.
To conclude, SQLite is a great option if you want to create simple small applications that must interact with databases. It's easy to work with and free.

