Mount points seem to be the subject of much confusion on various SQL Server forums recently. In light of this, the following article will seek to detail exactly how mount points are supposed to work and provide a demonstration on how to create mount points within Windows.
You should have already checked whether your planned SQL Server instance will support Mount Points as not all versions provide this. With that in mind, let's briefly look at this now
Validating SQL Server Compatibility
Check whether or not your chosen version of SQL Server will support mount points. Not all editions of SQL Server do support the use of mount points, therefore, before configuring mount points and attempting to install SQL Server you must refer to the following Microsoft KB article for further details: http://support.microsoft.com/kb/819546
In brief, SQL Server 2000 supports mount points for stand alone instances and not clustered instances. For stand alone instances the root drive should have a pre assigned drive letter otherwise setup attempts to assign the next free letter.
Versions of SQL Server 2005 and beyond fully support mount points for stand alone and clustered environments.
What are Mount Points?
Anybody who has ever used a Unix system would have come across the use of mount points before, they are common within this Network Operating System. Anything from a disk partition to a CD drive or floppy drive all require mounting before use, these file systems are usually mounted under a root partition folder.
Within the Windows operating system we have the ability to perform similar actions with multiple Windows disks. We have 26 drive letters initially available for assignment, subtract from this the reserved set of drives (A, B, C) and you are commonly left with 23. This doesn't leave much scope, especially if you plan to use many data locations per instance.You may have multiple SQL Server instances and require multiple disk sets to offload I\O, For each instance you may originally plan to use separate assignments for
- SQL Server data
- SQL Server logs
- SQL Server backups
- SQL Server tempdb
That's 4 drive letters for a single instance. Mount points enable you to use a single drive letter for all of the chosen locations but still implement separate physical drives for each of the individual data locations. How is this possible?
Mount points are simply file system locations under which a physical disk partition may be mounted\referenced. You start with a reference root known as the root disk. The root disk can, in fact should be, as small as possible. This will avoid multiple users creating data on the root disk and make administration easier. You must also bear in mind that all I\O destined for the Mount Point occurs on the mounted physical disk and not the root disk.
We'll go through actually creating mount points later in the article, for now let's look at a little theory. Our basic example is as follows
Root disk 1 M: (Windows disk 2)
Multiple mount points are employed in the following configuration for a single instance, remember each of these mount points is actually a separate physical drive from Windows disk management.
M:\SQLData (Windows disk 3)
M:\SQLLog (Windows disk 4)
M:\SQLTmp (Windows disk 5)
M:\SQLBak (Windows disk 6)
The instance may be installed using the paths below. To assign permissions we apply at the MSSQL level and they then propagate down to the child folders\files. Applying permissions at the root level M: would not affect the mount points and their file structures below.
M:\SQLData\MSSQL\Data
M:\SQLLog\MSSQL\Log
M:\SQLTmp\MSSQL\TempDB
M:\SQLBak\MSSQL\Bak
Going further in another example, you could employ multiple root disks and multiple instances of SQL Server in the following manner
Root disk 1 D: (Windows disk 2)
Root disk 2 E: (Windows disk 3)
Root disk 3 M: (Windows disk 4)
Root disk 4 N: (Windows disk 5)
You would have multiple mount points, each instance would have 4 separate physical disks mounted under
Instance1 D:\INST1, E:\INST1, M:\INST1, N:\INST1 (Windows disks 6 - 9)
Instance 2 D:\INST2, E:\INST2, M:\INST2, N:\INST2 (Windows disks 10 - 13)
Instance 3 D:\INST3, E:\INST3, M:\INST3, N:\INST3 (Windows disks 14 - 17)
The sql server instances would be created along the following paths
D:\INST1\MSSQL\Data, E:\INST1\MSSQL\Log, M:\INST1\MSSQL\TempDB, N:\INST1\MSSQL\Backups
D:\INST2\MSSQL\Data, E:\INST2\MSSQL\Log, M:\INST2\MSSQL\TempDB, N:\INST2\MSSQL\Backups
D:\INST3\MSSQL\Data, E:\INST3\MSSQL\Log, M:\INST3\MSSQL\TempDB, N:\INST3\MSSQL\Backups
It's easy to see how the management becomes more complex with multiple root disks and mounted volumes, it can't be stressed enough that documenting your setup as you go is more valuble than anything else. Concise documentation gives you and anyone who follows you a reference point for your system setup and can make troubleshooting easier too.
With Mount Points it's important to remember the following pointers
- Do not install software to the root of the mount point. Rather, create and install into a folder under the mount point to allow the correct propagation of permissions.
- Ideally, the root drive should not have any data created upon it, it is merely the root tree for the new volumes.
- Permissions applied to the root drive file system do not propagate to the mount point file systems, they are controlled separately.
- Mount points are not supported for all SQL Server 2000 configurations (in case you had a burning desire to use them). This is detailed in the relevant section above.
Windows requires online disks with formatted partitions before you are able to utilise mount points, let's look at those next as they form the basis for mounting any partition\volume.
Setting up the New Partitions
When initialising and before formatting your disks within Windows disk management, you should first decide on the disk type and partition type to be used.
In brief the 2 disk types possible are Basic and Dynamic. Basic disks are the default disk type used by the Windows Operating System. Dynamic disks are rarely used within Windows and are really only useful for creating spanned volumes or software RAID systems. In reality, the Windows disk you are formatting likely already has an underlying RAID system (such as a local controller) or it is a disk presented from a SAN or other network storage device. For this reason you should generally you should leave your disks as Basic type, especially for cluster support.
As well as the disk type, there are also 2 different partition types that may be used. The 2 types available are MBR (master boot record) or GPT (GUID partition type).
- MBR partition types only allow a maximum of 4 partitions per disk (3 primary and 1 extended).
- GPT partition types support very large disk types, a maximum of 128 partitions and are generally much more efficient and resistant to corruption.
However, I would suggest if your disk is under 500GB and has only 1 partition that you leave this as MBR.
The following Microsoft KB article provides further details on Basic and Dynamic disks and also MBR and GPT partition types. You should digest this before creating disk partitions: http://msdn.microsoft.com/en-us/library/aa363785(VS.85).aspx
To re cap, the items you will require to create your mount points are;
- A root disk (or disks) with a formatted partition and a drive letter assigned within Windows
- A defined set of mount point folders to be created upon the root disk.
- Disk devices available for use within Windows disk management (be they local or SAN\NAS attached).
Creating a Mount Point Demonstration.
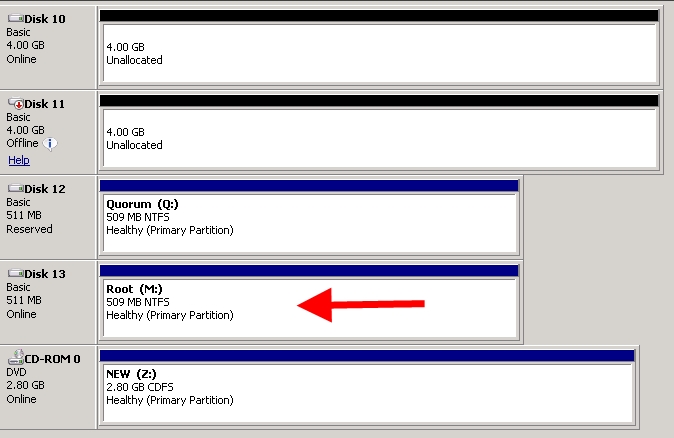
We will now work through a short demonstration showing how to create mount points within Windows. For the demonstration we need a small root disk, the smaller the better (mines 500MB but it could\should be as small as a few MB).
Note: Remember, the root disk is merely a file system place holder for the mounted drives, it will only contain empty folders which are then used to mount the NTFS volumes.
My partitioned and formatted root disk is shown below
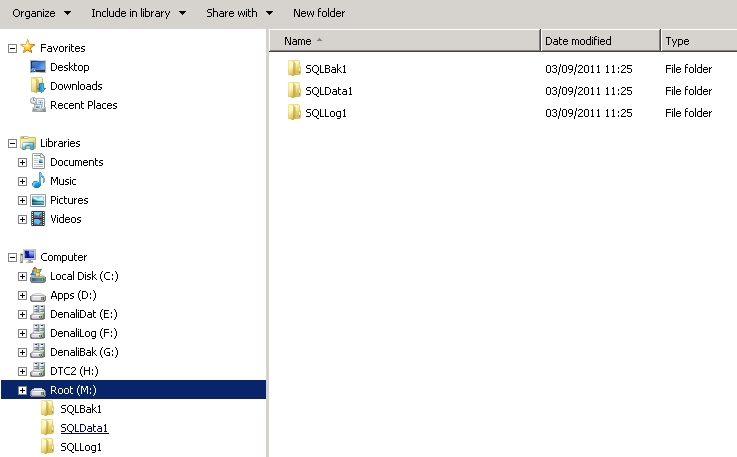
On the root drive (M:) I have created the following folders, these folders currently display the typical Windows folder icon.
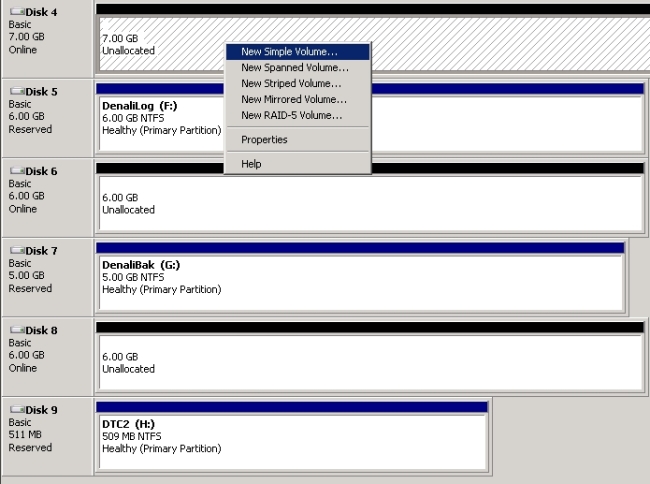
Open Windows Disk Management as we first need to create the new volumes. Create the first volume by right clicking an unallocated disk and selecting "New simple volume" as shown below.
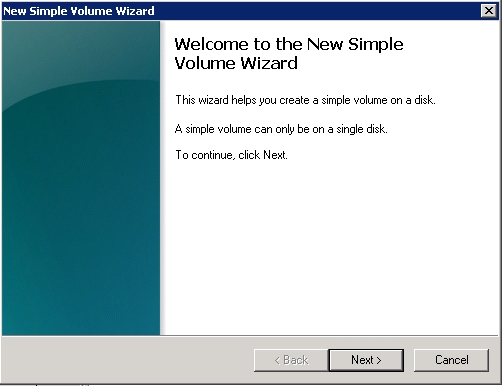
Click “Next” in the new volume wizard to continue.
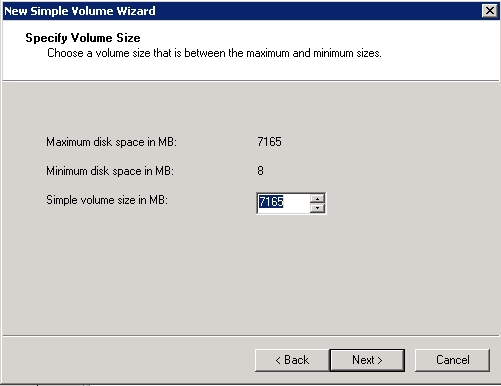
Specify the volume size and click “Next”.
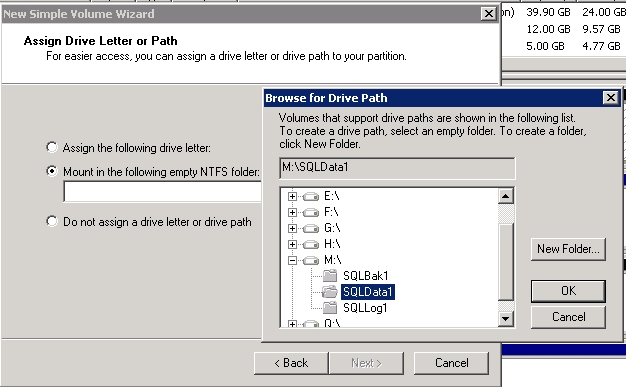
It's at this point we specify where we want to mount this new volume, we could have chosen a drive letter but we want to use a mount point. Select the option to “Mount in the following empty NTFS folder:”, browse to the path and click “OK”.
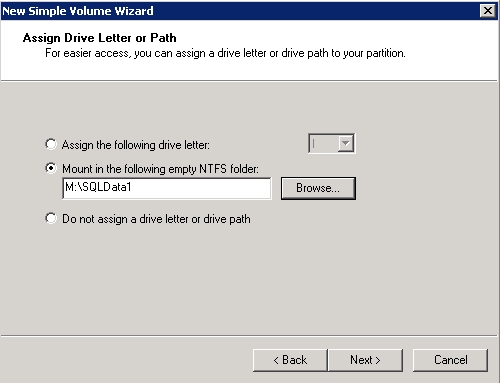
With the mount point specified, click “Next” to continue.
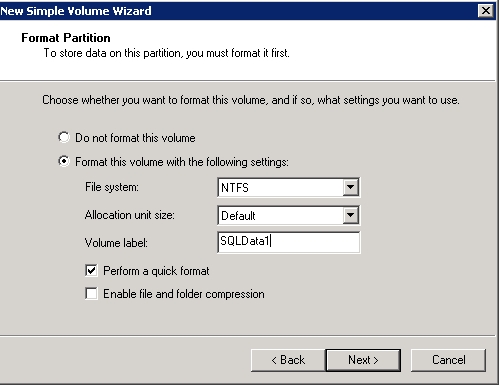
Specify the format options and click “Next” to continue.
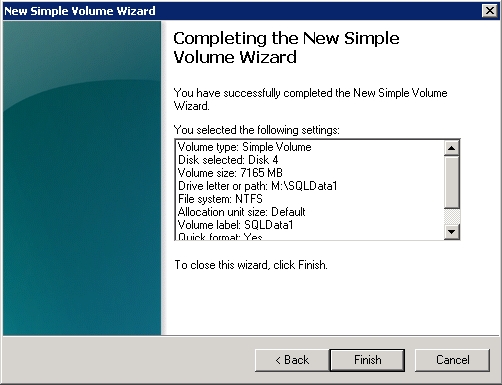
Click “Finish” to create the new volume. Repeat these steps for each volume to be created\mounted.
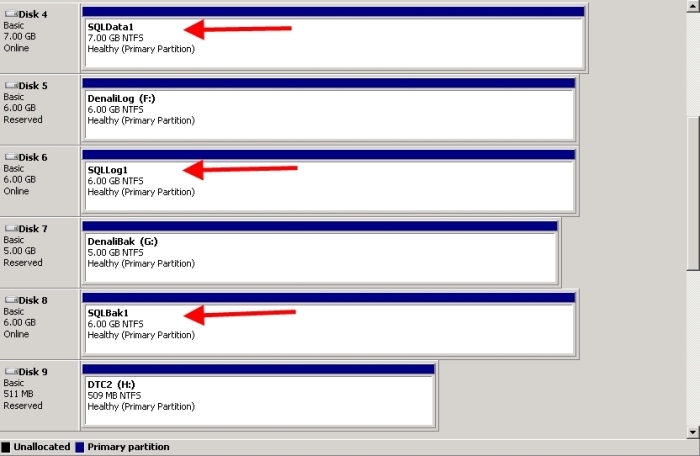
Once you have created the 3 volumes and mounted them to the specific folders, you will see the following in disk management. Your mount points are now ready to use for a stand alone SQL Server installation.
Mount Points for Clustered Instances
For clustered scenarios there are further checks to be made when utilising mount points for your clustered SQL Server instance drives. Those steps are detailed in the following Microsoft KB: http://support.microsoft.com/kb/280297
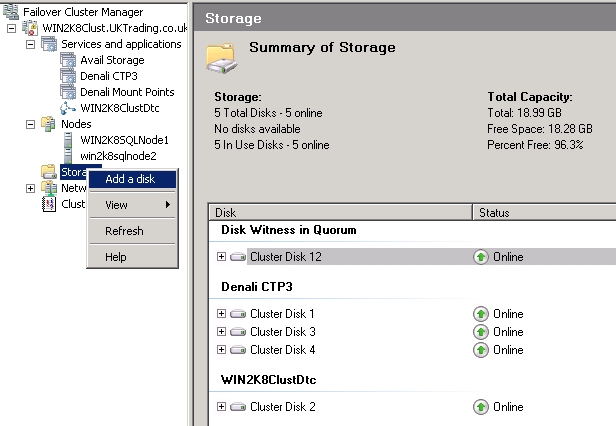
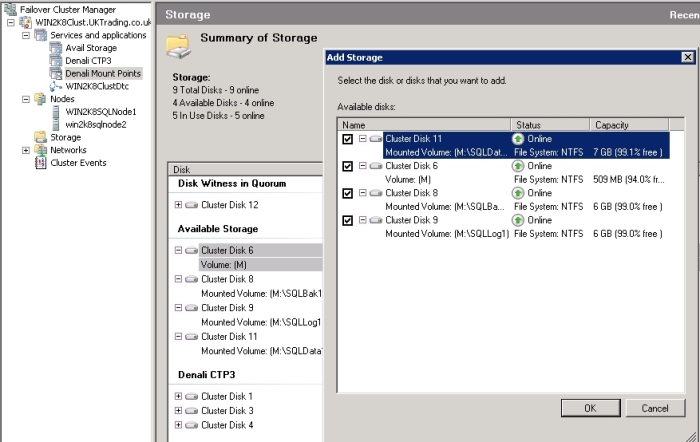
In brief, you now need to add this storage to the cluster via Failover Cluster Manager. Right click “Storage” and select “Add a disk” as shown below.
With the required disks selected, click “OK”.
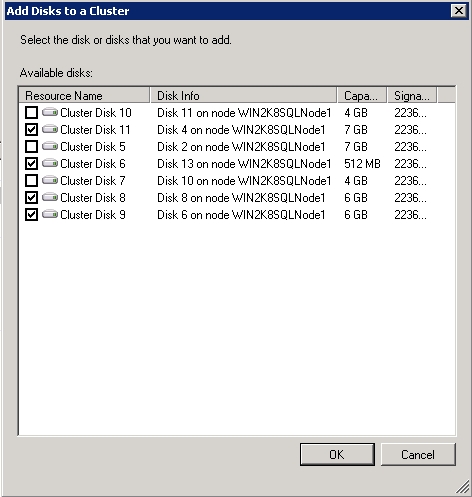
Cluster disks 6, 8, 9 and 11 added. Note cluster disk 6 is the Root drive (M:).
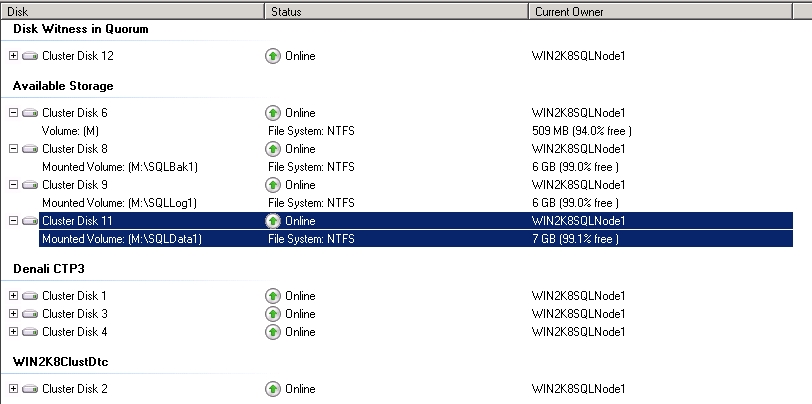
Now add the storage to our newly created service\application group. My exapmple uses a pre created application titled “Denali Mount Points”.
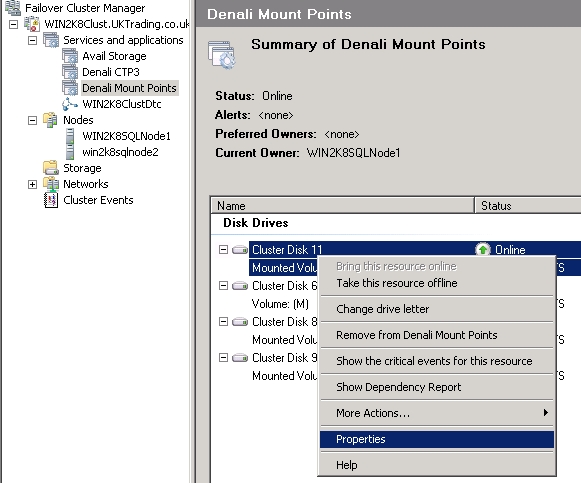
You must now set the dependencies between the root drive and the new volumes. Right click the first mounted volume and select “Properties” as shown below.
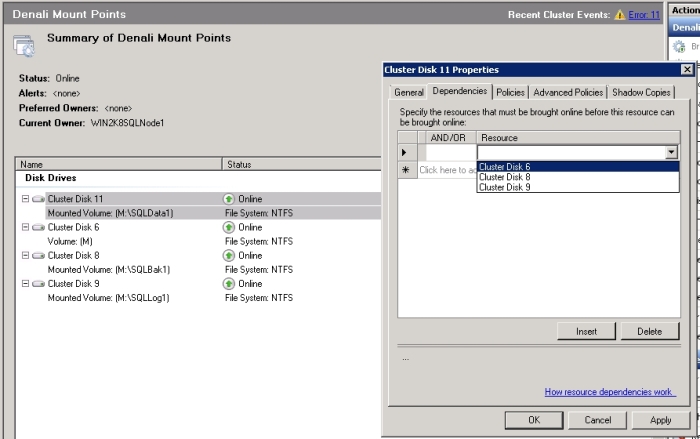
Note: the root drive must come online before the mounted voumes to ensure the full mount path and drive letter are available.
Set the root disk as the resource dependency, in this case cluster disk 6. Click “Apply” and “OK”. Do this for each of the 3 mounted volumes.
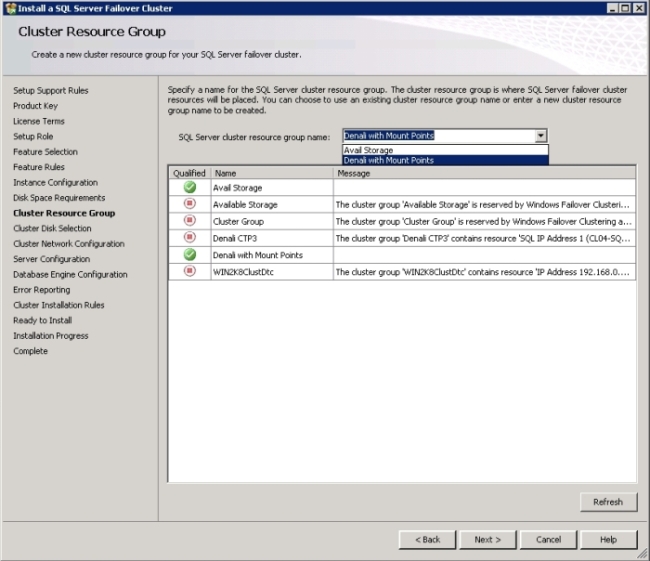
During the sql server instance installation, select the existing Denali service\application group shown with a green tick.
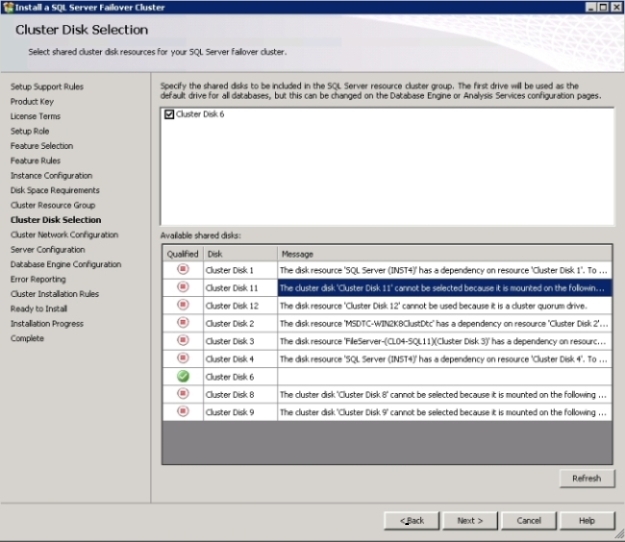
At the cluster disk selection you must select the root drive for installation. The mounted drives are not available, attempting to select one of the mounted volumes causes setup to direct you to select the root tree drive (in my case cluster Disk 6 M: ).
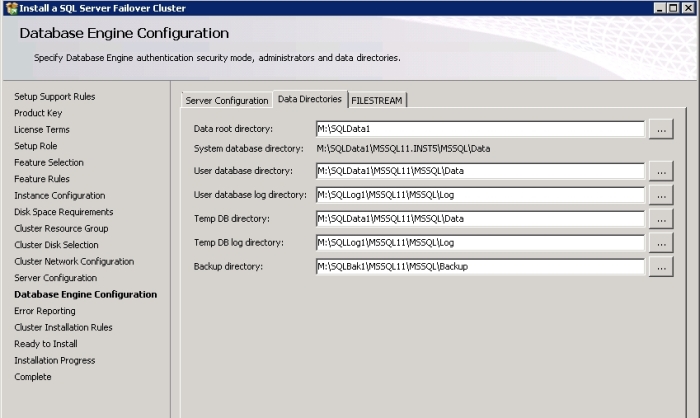
On the database engine "Data Directories" tab, set your paths for the requested disk locations.
Post installation, these are the new SQL server folders under the mount points when viewed through explorer. Notice that the mount points now have a different icon and not the standard Windows folder icon.
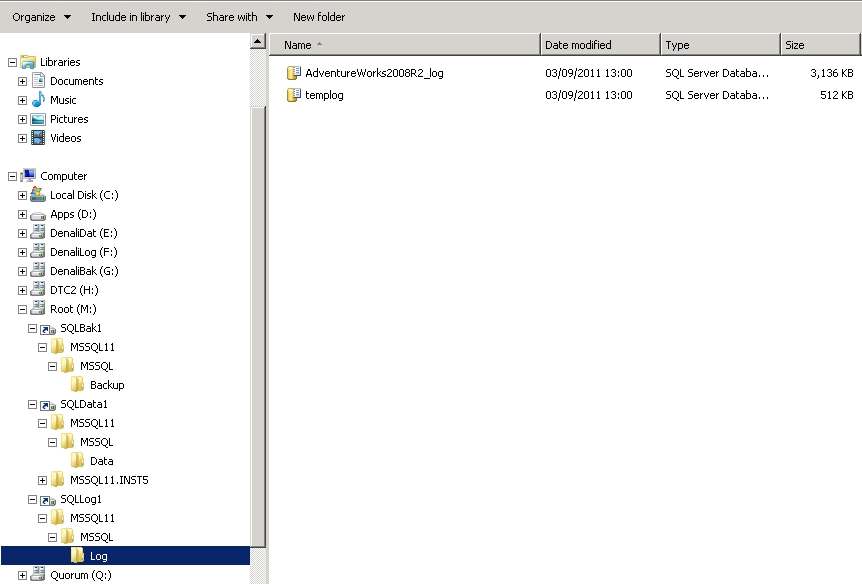
This should give you more of an understanding of mount points and how they are set up. They operate just the same as any other folder with the exception that permissions grants are handled by each individual mount point and not by the root directory. Granting permissions at the root drive and pushing child inheritance will not affect the mount points. Still, they are essentially NTFS folders and, as the screenshot above shows, look seem less to the Windows filesystem. As you can see they are also an excellent way to bypass the Windows 26 drive letter limitation.
As always, test this in an offline environment, virtual machines make a great test lab and are extremely easy to set up using my three part guide on this site. Have fun and of course, post back if you have any troubles.

