This article will provide the step by step process for installing SQL Server using unattended mode. With this we can standardize the SQL Server installation for an organization and minimize the efforts during the installation process. When we have to install more number of instances on different servers we can perform the task in parallel by opting unattended mode of installation which is detailed in the next steps.
Prerequisites
We need configurationfile.ini for unattended installation. In configurationfile.ini we can include the required server names when we are installing SQL on n no of servers in parallel.
Process
Capturing the Configurationfile.ini is a onetime activity. We can use this file as a template for all further new installations. In order to get the configurationfile.ini we need to run the installation wizard manually initially so that you can define the settings as per the org standards.
Note: Here during this process we should click on install button.
The below picture shows the path where the configuration file is located when we install SQL Server:

The location of file will be at C:\Program Files\Microsoft SQL Server\110\Setup Bootstrap\Log\Folder with date and time of installation and configuration file name is Configurationfile.ini

Using the Configurationfile.ini for Unattended Installation
In order to make use of this file for future installations, we need to tweak the file with the required specifications. The below setting ensures no UI is involved.

The below setting is used to make sure the installation will run at the background.

In this setting, we can specify the required features which needs to be part of SQL Installation like SQLEngine, Replication, BIDS, SSIS, SSRS, and SSAS etc.

We specify the Root directory for shared components at the following location:

The below setting is for the instance name selection, either default or a named instance. If it is the default instance, list it as MSSQLServer. If it is a named instance, include the instance name. Here in the below screen the instance name is set to ‘TRYINGUNATTEND’.

Mention the InstanceID. In general it will be same as instance name.

If we want to send the SQL Server feature usage data to Microsoft, we can opt it at the following location by giving a value of either ‘True’ or ‘False’.

For collecting Error reports and sending to Microsoft, the below setting will help us. We can select True or False depending on the need.

The above two settings give an option for Microsoft to debug when we encounter some issues with the SQL Server.
If we want to install in a specific directory, we can specify the same in the below setting.

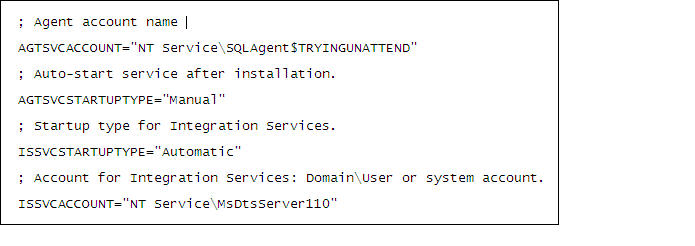
The below setting is to provide the service account information and start up type for the SQL Server Agent services and Integration services:

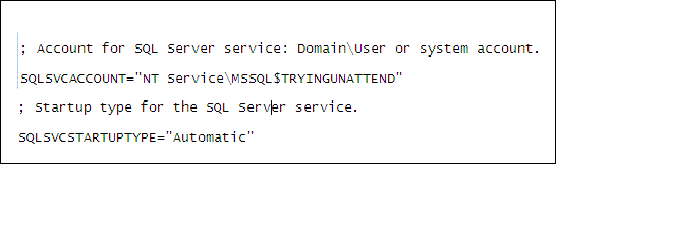
Provide the service account information and start up type for SQL Server services.

Select the Collation settings.

Provide the user, or group, name who needs sys admin privileges by default.

Select the Authentication mode (Windows / Mixed) with Windows or SQL.

The below settings are to change the system databases, user databases and tempdb directories, according to organizational standards:

Specify which type of protocol required for the instance:

Specify the start up type for SQL Browser services.

After modifying all the required information, save this file in the location where we have the SQL Server software dump. Run the below command to start the SQL server installation. In the command we need to mention the SA password if you have selected mixed mode authentication. Also we need to mention the service accounts password according to our feature selection as in the above screens.
C:\Users\abcd\Downloads\SQLFULL_x86_ENU>Setup.exe /ConfigurationFile="ConfigurationFile.ini" /IAcceptSQLServerLicenseTerms="TRUE" /SQLSVCPASSWORD="SQLServiceaccount Password” /AGTSVCPASSWORD="sql agent service account password" /ASSVCPASSWORD="Analysys service account password" /ISSVCPASSWORD="Intigration service account password" /RSSVCPASSWORD="Reporting Service account password" /sapwd="SA account password" /IAcceptSQLServerLicenseTerms="TRUE"
By running the above command, the SQL server installation will run in the background, and if any error is encountered, it will display on the screen. If there are no errors during the installation the process completes and give a completed message.

If we encounter any issues during the installation process, an error message will be displayed like the one below:

Once after installation screen will be shown like this:


