

In this fast-changing world of data, businesses are looking for more insights in their data to remain competitive. They want these insights delivered faster and faster, up to the point where real-time intelligence – through the use of streaming data - is becoming more popular and sometimes even the default choice. The world of batch data, where a big ETL load transfers and transforms all the data into an analytics platform during the night, is becoming more a thing of the past. Especially with the rise of IoT data, tools that enable us to deliver those real-time insights are becoming more common ground.
Microsoft Fabric, the centralized SaaS data analytics platform, also has built-in capabilities to deal with real-time data. In fact, at the recent Build conference many new features were announced that help us deal with streaming data. Examples are enhanced Eventstreams, the real-time hub, and real-time dashboards.
RabbitMQ is an open-source messaging and streaming broker, which can be used both on-premises and in the cloud. You can compare RabbitMQ with Azure Service Bus and perhaps on some levels with Azure Event Hubs.
In this article, we’ll take a look at how you can send messages through a RabbitMQ queue, and get those messages delivered to a Fabric Eventstream where they will ultimately be stored in a KQL database (which is similar to Azure Data Explorer). Inspiration for this article is drawn from the Microsoft blog post From RabbitMQ to PowerBI reports with Microsoft Fabric Real-Time Analytics. In that blog post, you can find a code snippet for sending messages to a RabbitMQ queue using C#. The blog post also explains how to use a shovel (which is a plugin for RabbitMQ) to send the data to a Fabric Eventstream. However, the blog post is quite short and assumes you already have a RabbitMQ instance running. This article aims to give a detailed walkthrough of how you can set everything up to get this scenario running.
How to Set up RabbitMQ
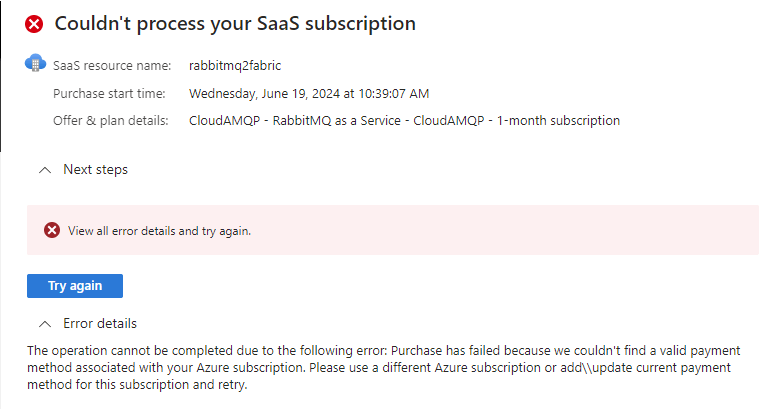
There are several methods to get a RabbitMQ instance. You can provision a managed RabbitMQ service through the CloudAMQP offering in the Azure Marketplace:

However, if your Azure account doesn’t have a credit card, like mine does because I’m using an Azure subscription that comes with a Visual Studio/MSDN subscription, this won’t work:
Another option is to go directly to the CloudAMQP website and provision your service there. You’ll need to provide a credit card, but the cheapest options is free:

However, the cheapest options are shared services which don’t provide the option to install plugins. We do need the shovel plugin though, which means we need a dedicated service which starts at $50/month. For more information, check out the CloudAMQP pricing page.
Which leaves us with the last (and cheaper) option: install RabbitMQ itself on our machine. RabbitMQ has the Erlang language as a prerequisite, which can be downloaded here. Make sure to install it as an administrator. You can find information on how to install RabbitMQ Windows here (other operating systems are supported as well). Install the software with the same user you installed Erlang with.
Once RabbitMQ is installed, we need to start the service (if it hasn’t already started itself). This can be done through the command line:
rabbitmq-service start
The commands (.bat files) for RabbitMQ can be found in the folder C:\Program Files\RabbitMQ Server\rabbitmq_server-3.13.3\sbin\.
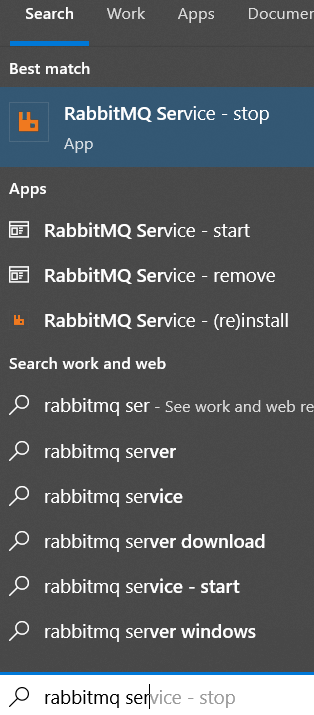
There are also start menu shortcuts added to help you manage the RabbitMQ service:
You can do pretty much everything through the command line, but we can enable a management user interface to make our lives a bit easier. This can be done by enabling the rabbitmq_management plugin:
rabbitmq-plugins enable rabbitmq_management
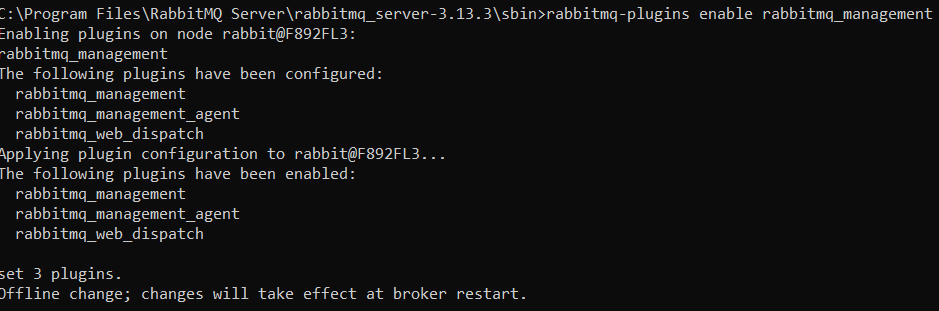
Once the plugin is installed, the service needs to restart. The management interface can be found at http://localhost:15672.
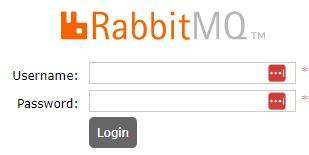
You can login using the default guest account, or you can create a new user.
rabbitmqctl add_user koen mypassword
rabbitmqctl set_user_tags koen administrator
rabbitmqctl set_permissions -p "/" "koen" ".*" ".*" ".*"
Information about assigning permissions can be found here and here. In our case, we didn’t create any virtual host, so the default “/” is used.
While we’re still in the command line, we can also enable the shovel plugin:
rabbitmq-plugins enable rabbitmq_shovel
rabbitmq-plugins enable rabbitmq_shovel_management
These plugins don’t require the service to restart.
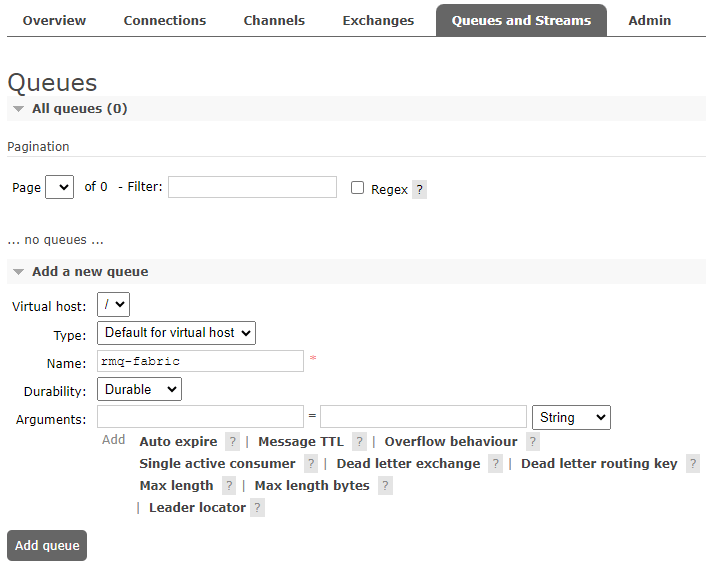
Log into the management UI and go to the queues tab. Create a new queue with the name “rqm-fabric” (this is the name used in the code snippet). Make the queue durable and leave everything else as the default.
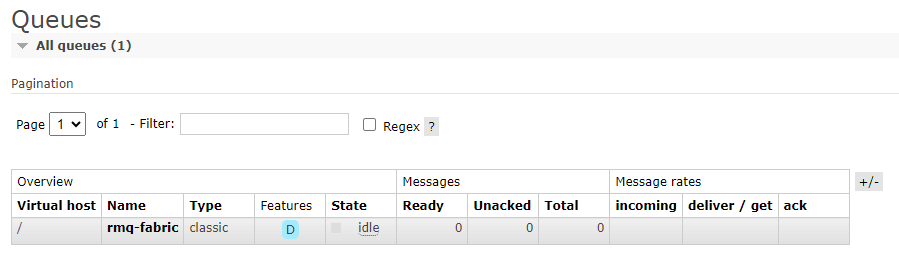
The queue will be created and will be in an idle state, since it isn’t processing any messages.
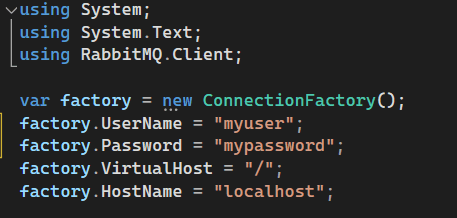
Now we can use the code snippet from the Microsoft blog post, in either Visual Studio or Visual Studio Code. I changed the first lines where the connection is defined, so it’s possible to enter more connection information:
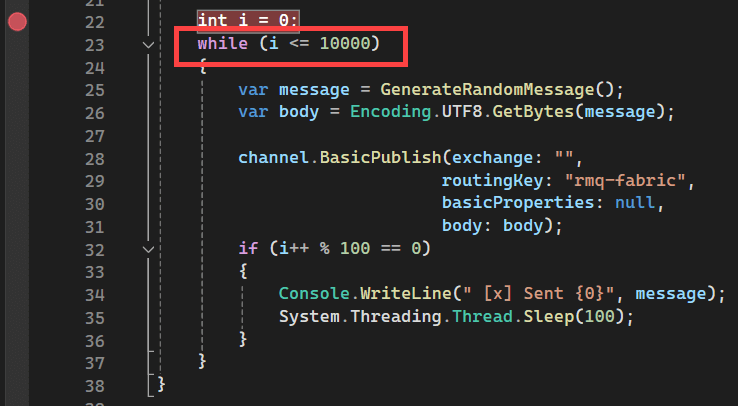
The code goes into an infinite loop where it sends a message in each iteration and prints out a message after each 100 iterations. I put a breakpoint in the code so I can run through the iterations with the debugger and control the first few messages that are sent. You can also change the while(true) in the code to a certain limit if you don’t want an infinite loop but rather a fixed number of messages:
After iterating thought the loop twice with the debugger, we can see the following in our RabbitMQ queue:
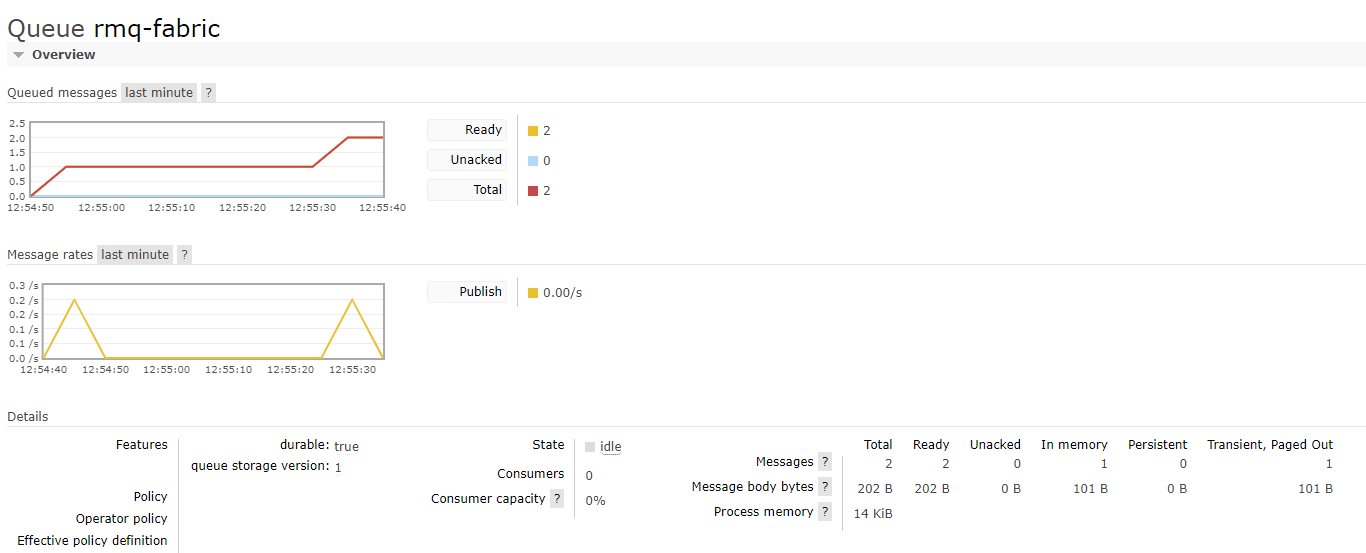
Two messages are inside the queue and waiting to be processed. Now we can turn our attention to Microsoft Fabric.
Configure a Fabric Eventstream
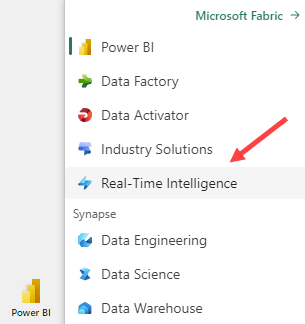
In Fabric, switch to the Real-time Intelligence workflow (bottom left corner).
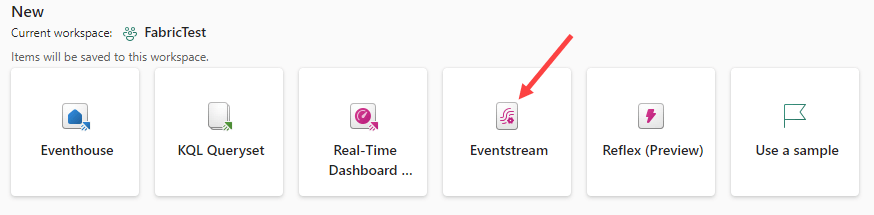
From the available objects, choose Eventstream.
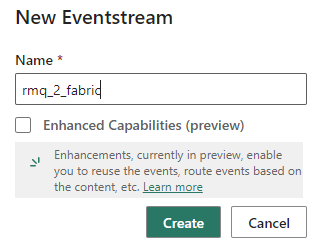
Name the Eventstream. There’s no need to enable the enhanced capabilities.
As the source, add the Custom App.
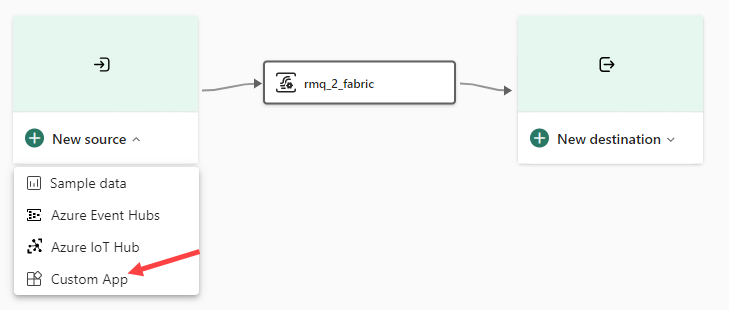
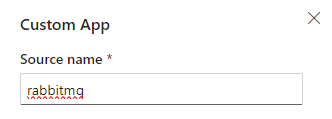
Give the source a name as well.
In the source detail, switch to AMQP and take note of the entity name and the primary key connection string.

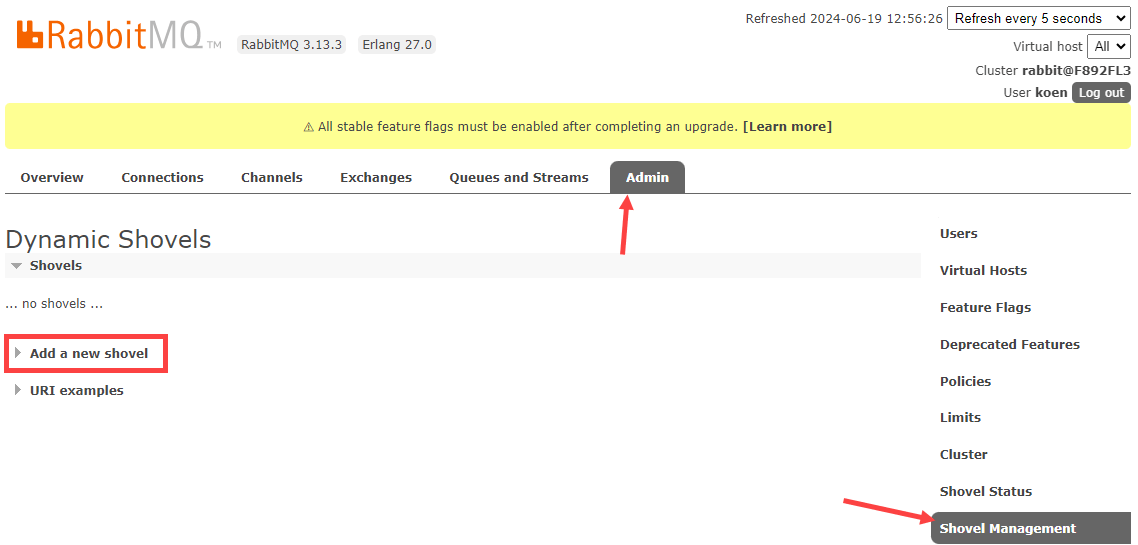
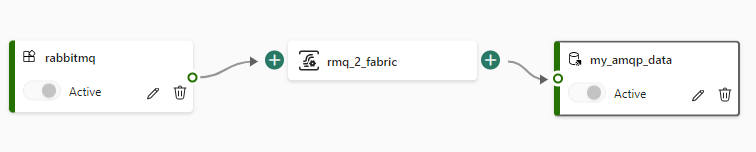
The event data is not magically going to appear in our Eventstream, so we need to go back to RabbitMQ to create a shovel. The shovel will be responsible for sending messages from the queue to the custom app endpoint in the Fabric Eventstream. In the RabbitMQ UI, go to Admin > Shovel Management > Add a new shovel.
Name the shover “to-fabric”, enter the name of the queue (rmq-fabric) and enter the entity name in the address field, and the connection string into the URI.
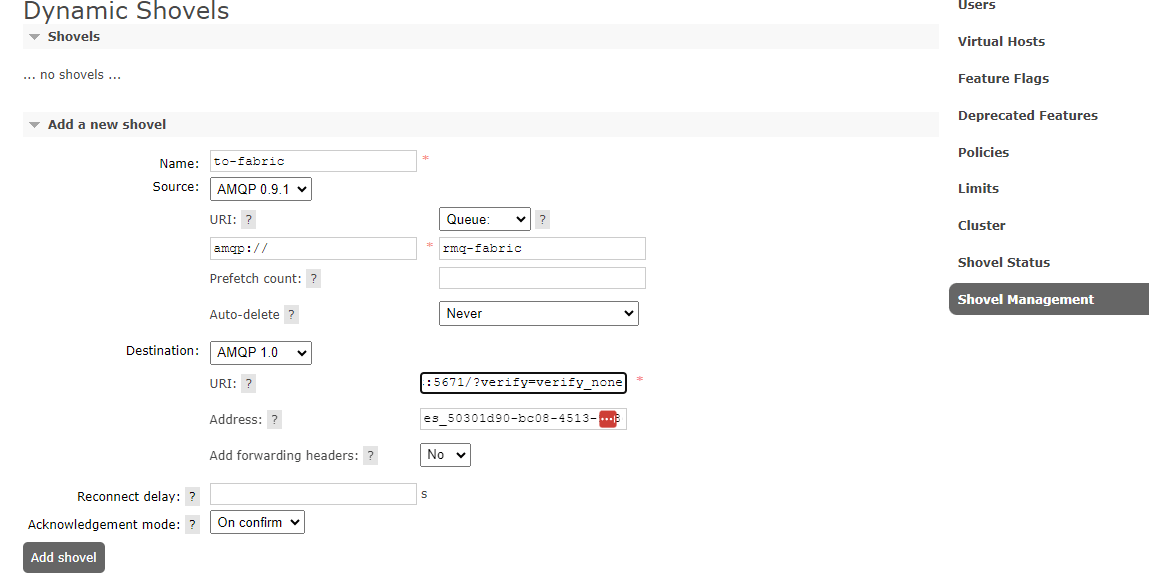
The blog post warns us that we should add the query parameter /?verify=verify_none to the end of the connection string, but as you can see from the screenshot the Eventstream has already added it to the connection string by default.
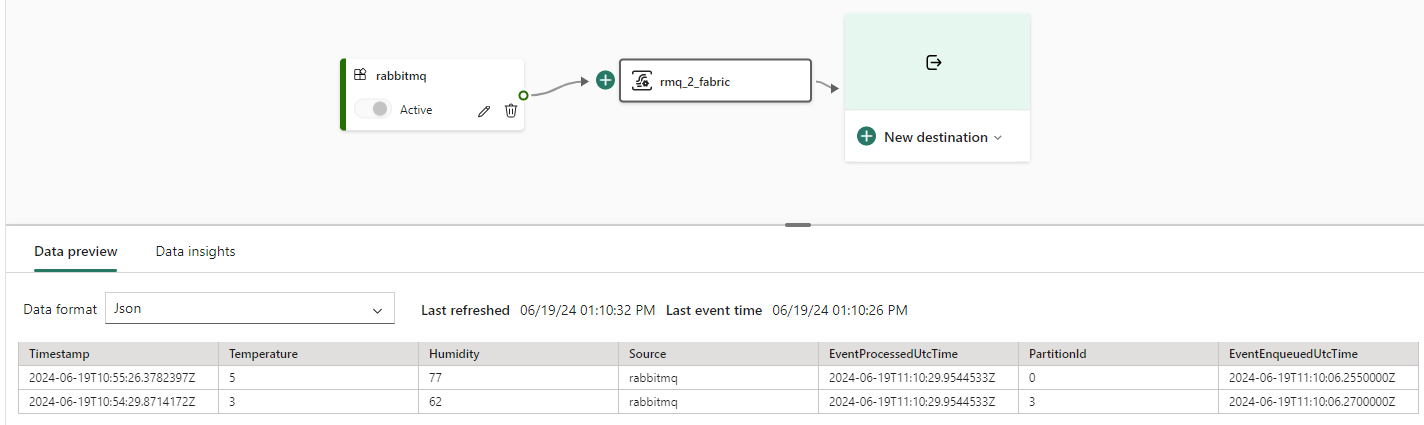
Once the shovel is created, we can see our two messages appear in the Eventstream:
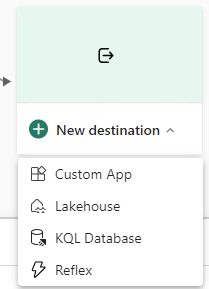
Now we can add the destination. I choose a KQL database, but you can opt for a delta table in a lakehouse as well.
When you add your destination, you’ll have the option to configure any event processing (such as filtering for example) to the stream:
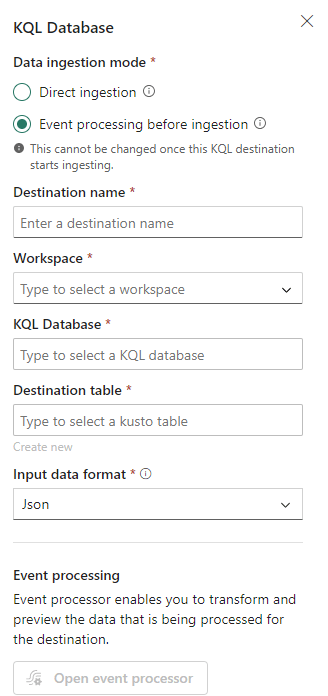
However, the messages don’t need to be processed, so we can switch to Direct ingestion. If you want an example of an event processing, check out this article.

You need to give your destination a name, and choose a workspace and a KQL database (which can also be an Eventhouse). I already had an Eventhouse created, but you can create a new one if necessary. Next, we need to configure the destination table.
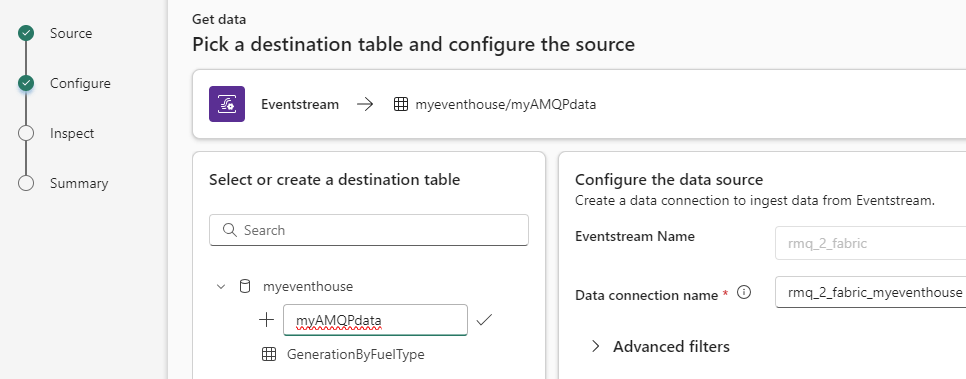
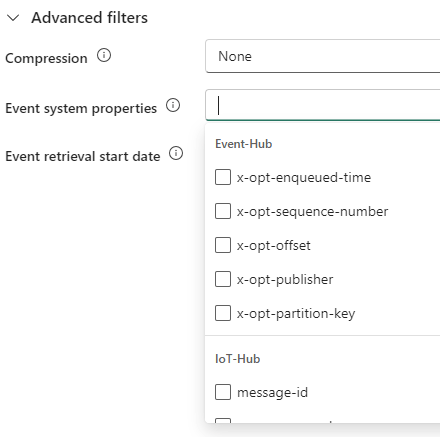
I choose to create a new table, with the name myAMQPdata. You have the option to add extra system properties to the table:
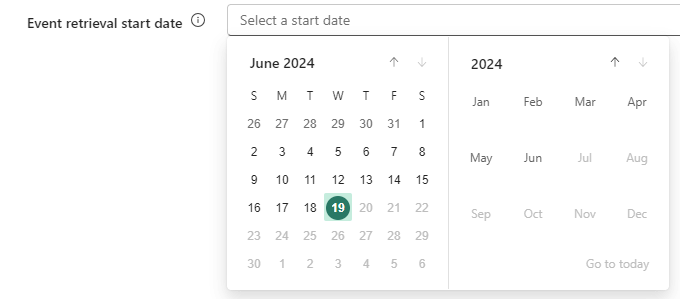
If you already have a queue with events for a long time, you can optionally configure a start date:
In the next screen, Fabric will parse the messages (don’t forget to put the format to JSON) and determine the columns and their data types.
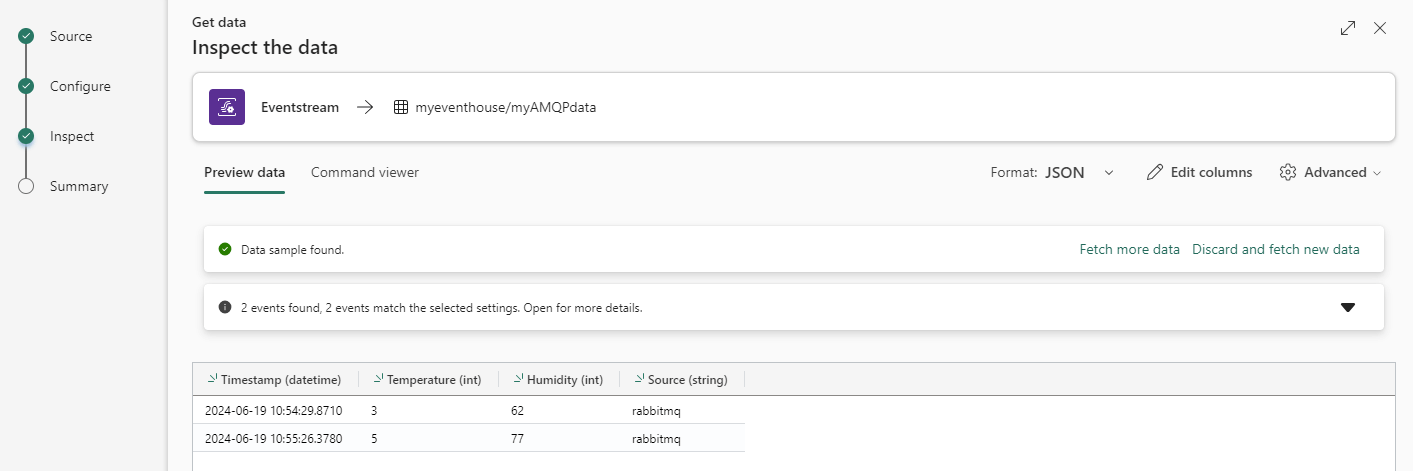
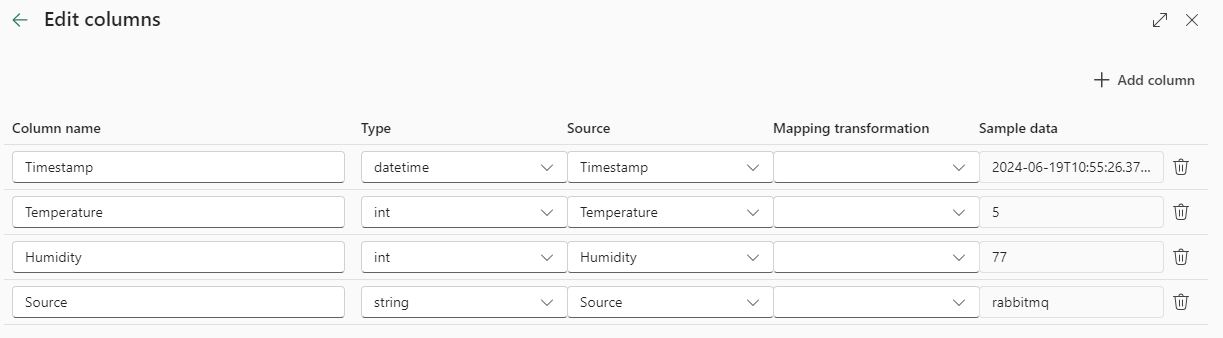
If necessary, you can still change this information:
Finally, you get a summary of the actions that will be taken (a new table will be created along with a mapping that defines how the JSON must be parsed).
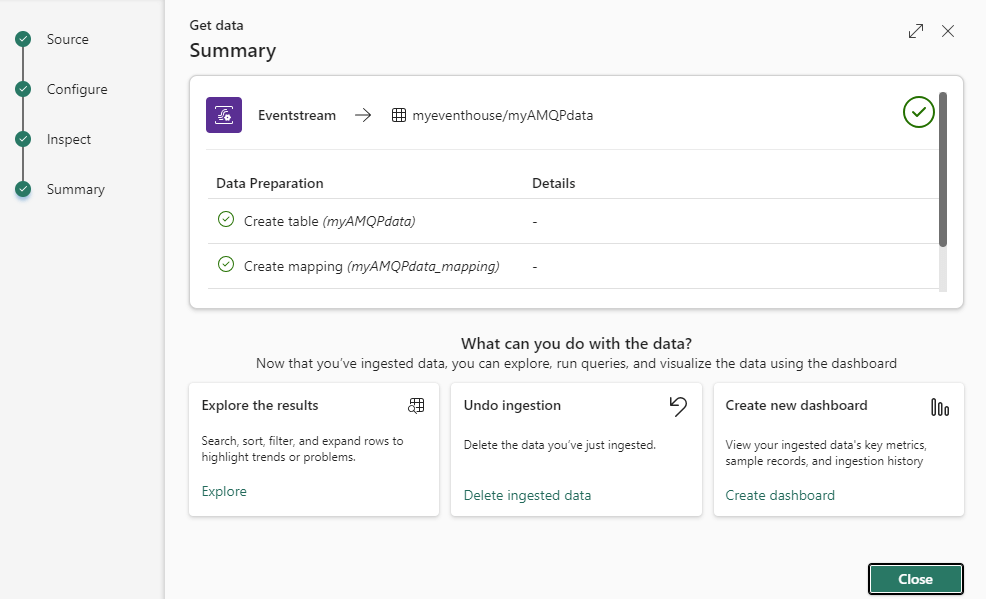
Hit Close to finish the wizard.
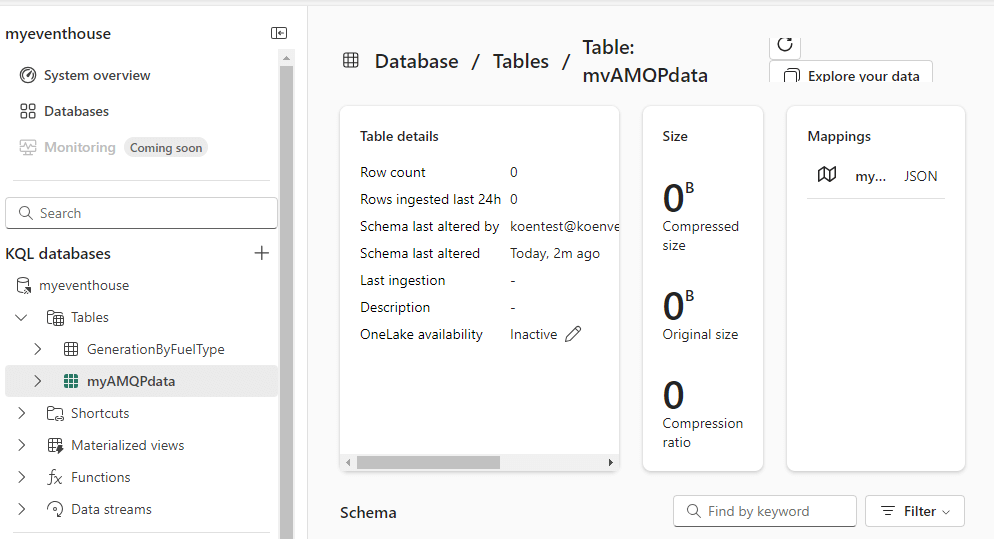
When you go to the Eventhouse, you can view the details of the table. The table will be empty; any messages that were in the Eventstream when the table was created will be lost.
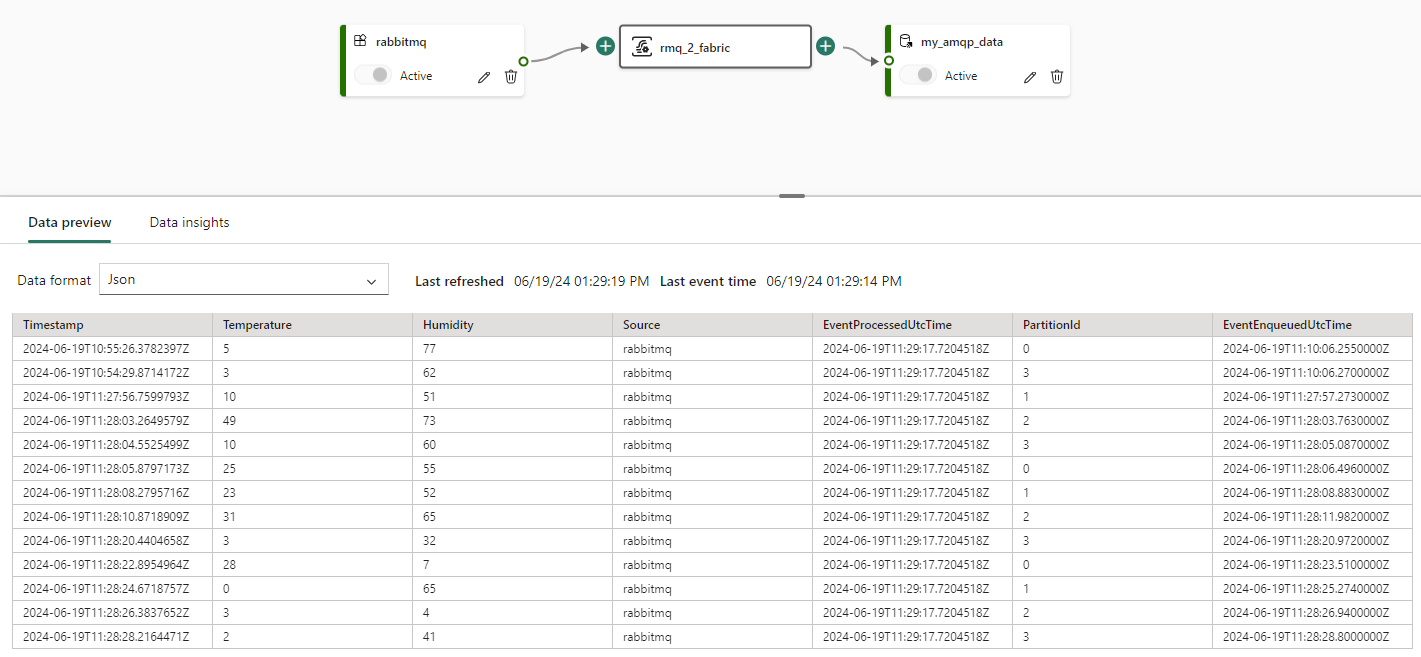
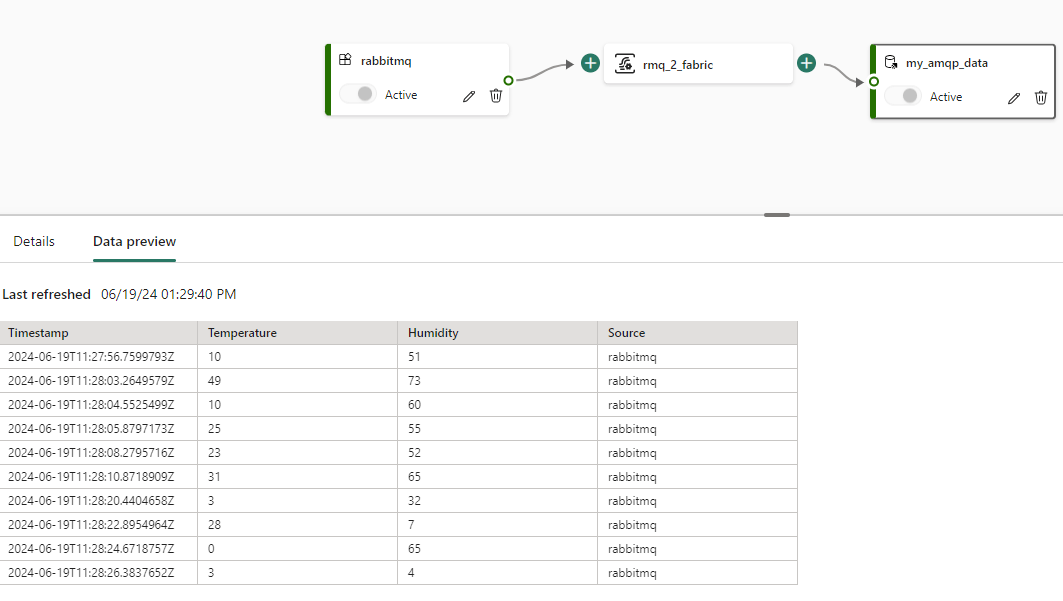
Let’s go back to Visual Studio and generate a bunch of messages (I stopped the loop after about 70,000 messages). You can view a snapshot of the messages in the Eventstream:
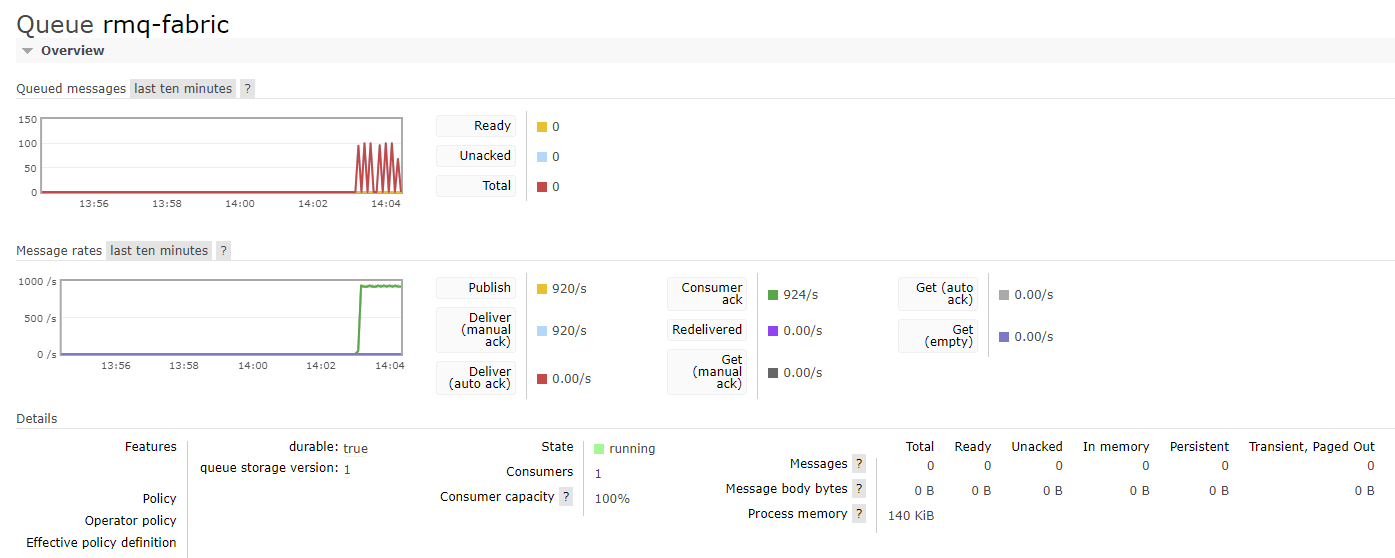
In RabbitMQ, we can monitor the state of the queue:
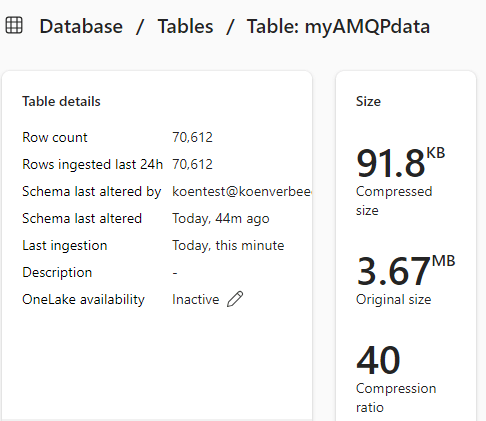
In the Eventhouse, we can see the data being added to the table:
What happens when we pause the Fabric capacity?
In an ideal world the Fabric capacity is a reserved capacity which is continuously active, similar to a Power BI Premium workspace. In reality however, the capacity running behind a Fabric workspace can be paused. This might be for various reasons, for example when you want to save costs and pause the capacity during the night. Or someone paused the capacity by accident.
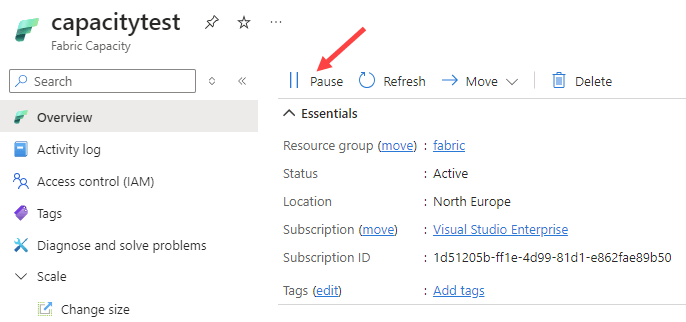
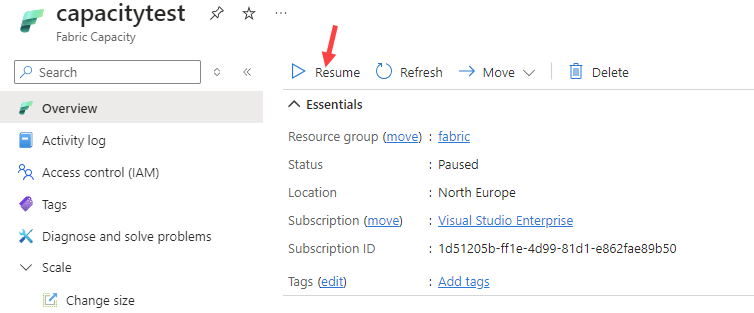
In any case, it’s worth figuring out what happens exactly when the capacity is paused and the Eventstream is no longer able to process events coming out of the RabbitMQ queue. Let’s pause the capacity to find out.
I configured the C# script to stop looping after the iterator i equals 10,000, and started sending messages to the queue. In the monitoring pane, we can see all the messages being held in the queue:
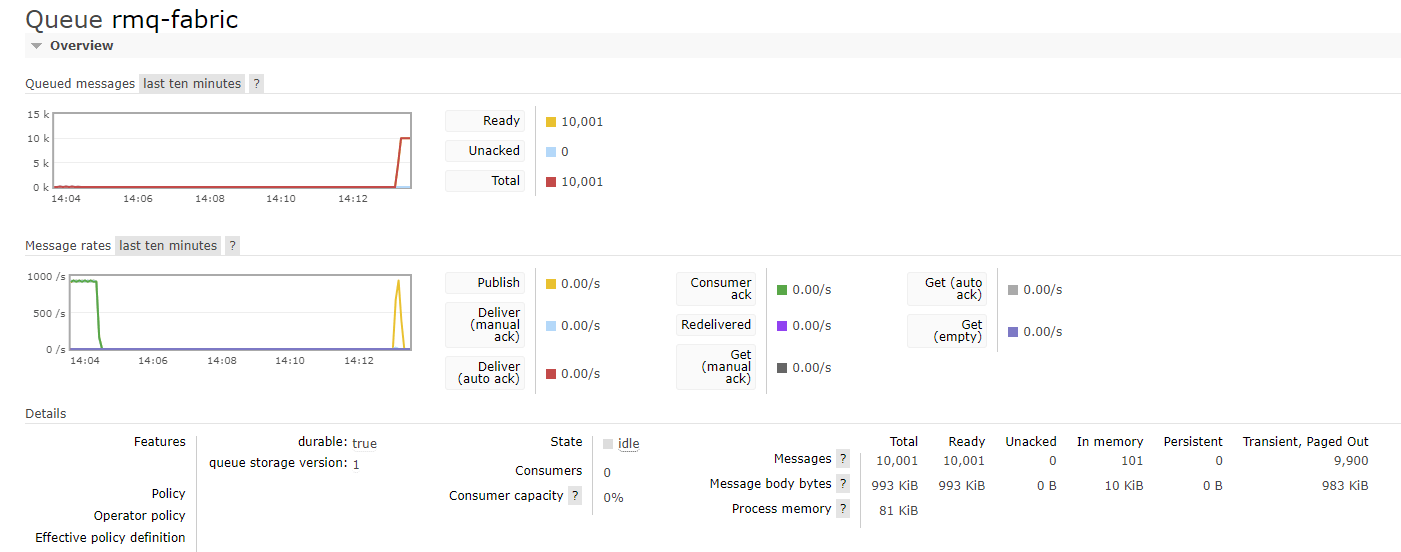
The shovel is not able to send them Fabric, but because our queue is durable the messages are not lost. The retention time of the messages depends on the configuration of the queue. Let’s resume the Fabric capacity, which should only take a couple of seconds.
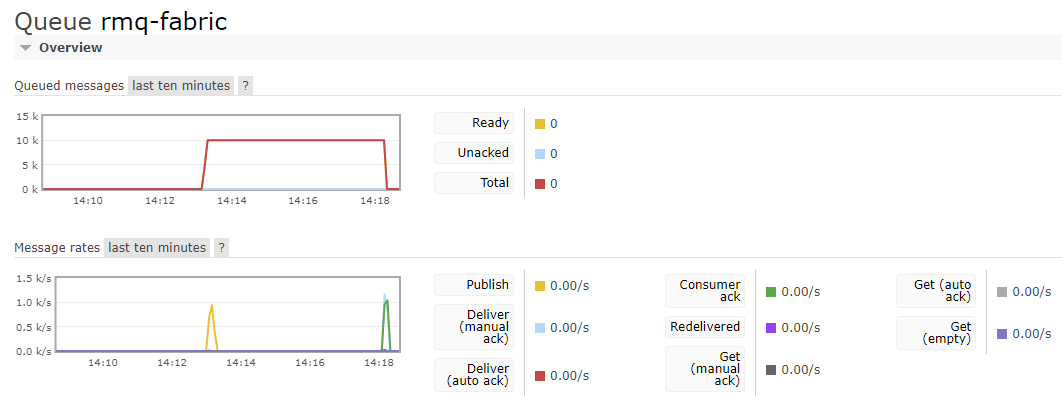
It might take some time, but eventually the messages will start arriving in the Eventstream again. It depends on how long it takes for the shovel to restart again.

In the monitoring pane, we can see it took a couple of minutes of latency before the messages were processed:
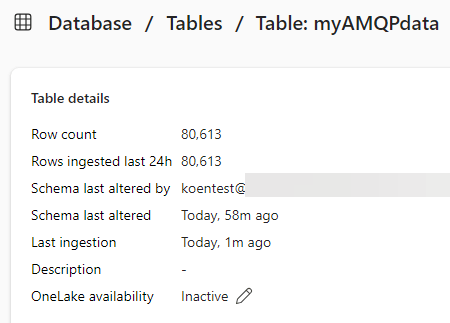
Finally, they will all end up in the KQL table:
Conclusion
In this article we went through the entire set up of a local RabbitMQ instance, the configuration of a queue and a shovel and the implementation of a Fabric Eventstream. The only code that needed to be written was the C# script that sends the event messages to the RabbitMQ queue (which was provided by the Microsoft blog post From RabbitMQ to PowerBI reports with Microsoft Fabric Real-Time Analytics).
We can conclude that ingesting real-time events from RabbitMQ into a KQL table in Fabric is quite straightforward. When the capacity is paused and resumed, the Eventstream recovers gracefully thanks to the durability of the RabbitMQ queue and the associated shovel.