Part 1 of SQL Server PowerShell Extensions (SQLPSX) demonstrated how to install the and use
the SQLPSX PowerShell functions. In this second article we will create a database to store the output of
the functions, load the data and look at
the SQL Server Reporting Services (SSRS) reports and queries provided with SQLPSX to analyze SQL Server security information.
Getting Started
- Complete the setup as described in Part 1
- Create an empty database for example SQLPSX
- Run SQLPSX.AllObject.sql included in the download of (SQLPSX) in the newly created database
- Modify SSRS Data Source file SQLPSX.rds to point to the newly created database. See SQLPSX Report Setup below
- Deploy the SSRS reports and Data Source files to a SSRS Server or run locally. In this article will run the SSRS reports locally
SQLPSX Report Setup
Launch SQL Server Business Intelligence Studio or Microsoft Visual Studio.
Select File, New Project, and then select Report Server Project and enter a name for the new Reporting Services
project i.e. SQLPSX as shown in the figure below and click OK

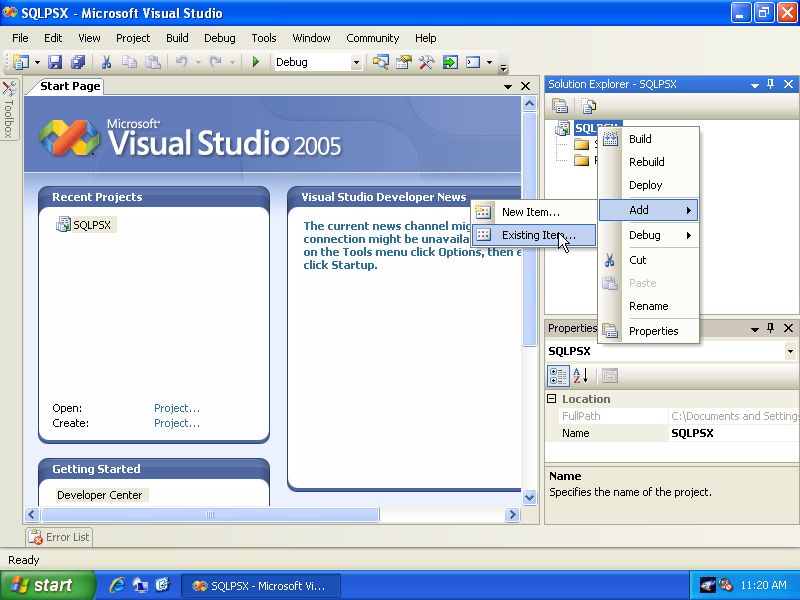
Right Click SQLPSX in Solution Explorer, then select Add, Existing Item as shown below

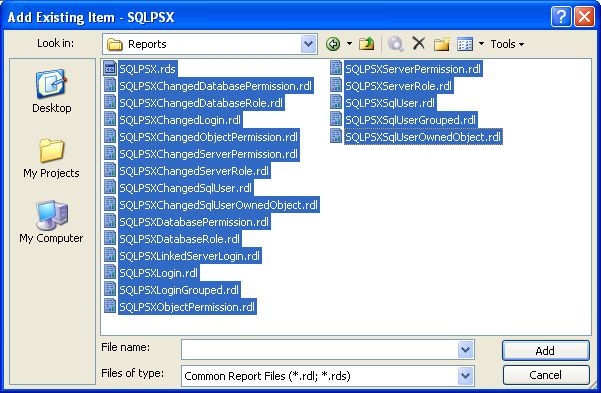
Next navigate to the Reports folder included in the SQLPSX download, select all rdl and the rds file types and
click Add as shown below:

The last step is to change the data source to point to the location where you've created the SQLPSX database. Double click the SQLPSX.rds under the Shared Data Sources folder in Solution Explorer and edit the connection sting as shown in the figure below:

Reports Description
The readme.txt file included in the releases section of SQLPSX contains the
list of reports referenced below along with the stored
procedure each reports executes:
| SQLPSXChangedDatabasePermission | usp_ChangedDatabasePermission |
| SQLPSXChangedDatabaseRole | usp_ChangedDatabaseRole |
| SQLPSXChangedLogin | usp_ChangedLogin |
| SQLPSXChangedObjectPermission | usp_ChangedObjectPermission |
| SQLPSXChangedServerPermission | usp_ChangedServerPermission |
| SQLPSXChangedServerRole | usp_ChangedServerRole |
| SQLPSXChangedSqlUser | usp_ChangedSqlUser |
| SQLPSXChangedSqlUserOwnedObject | usp_ChangedSqlUserOwnedObject |
| SQLPSXDatabasePermission | usp_DatabasePermission |
| SQLPSXDatabaseRole | usp_DatabaseRole |
| SQLPSXLinkedServerLogin | usp_LinkedServerLogin |
| SQLPSXLogin | usp_Login |
| SQLPSXLoginGrouped | usp_Login |
| SQLPSXObjectPermission | usp_ObjectPermission |
| SQLPSXServerPermission | usp_ServerPermission |
| SQLPSXServerRole | usp_ServerRole |
| SQLPSXSqlUser | usp_SqlUser |
| SQLPSXSqlUserGrouped | usp_SqlUser |
| SQLPSXSqlUserOwnedObject | usp_SqlUserOwnedObject |
The two Grouped reports, SQLPSXLoginGrouped and SQLPSXUserGrouped
use SSRS custom code functions to show a list of all the servers or
databases a user or login has access to as a single line
entry in the report.
The Changed reports SQLPSXChangedDatabasePermission, SQLPSXChangedDatabaseRole, SQLPSXChangedLogin, SQLPSXChangedObjectPermission, SQLPSXChangedServerPermission, SQLPSXChangedServerRole, SQLPSXChangedSqlUser, SQLPSXChangedSqlUserOwnedObject use
the T-SQL EXCEPT statement, CTE's and a UNION query to return the
differences between two queries. These reports compare two capture dates which
have been loaded into the SQLPSX database so we can see what has changed between
the two dates.
Loading the Data
Generating CSV files
Included with SQLPSX is a PowerShell script called Write-SmoToCsvFile.ps1 which
executes the security related SQLPSX functions
Get-SqlLogin, Get-SqlServerPermission, Get-SqlServerRole, Get-SqlLinkedServerLogin, Get-SqlUser Get-SqlDatabaseRole, Get-SqlDatabasePermission, Get-and SqlObjectPermission. The script selects specific properties for each function and produces a CSV file of the information using the PowerShell built-in cmdlet
Export-Csv. The output of Export-Csv can almost be imported
as-is into SQL Server using the T-SQL command BUIK INSERT, however a few minor
edits are needed. The script performs the modifications and removes the first line, removes double quotes around
strings and replaces Boolean values with their bit representation. The only thing you'll need to change is the variable $dir as follows:
- Open the script file Write-SmoToCsvFile.ps1 in Notepad
- Change the variable $dir to the directory where you want the CSV files sent to
$dir = "C:\usr\bin\SQLPSX\"
The script, Write-SmoToCsvFile.ps1, also implements functionality to exclude specified databases from data collection. This is useful if you want to extract security information from some but not all databases on the specified SQL Server instance. To exclude databases from analysis, create a text file named DBExclude.txt and make
an entry on a separate line with the SQL Server name comma database name for each database you'd like to exclude. For example the following entry will exclude the database pubs on the server Z002\SqlExpress:
Z002\SqlExpress,pubs
Now we're ready to execute the script, launch PowerShell, navigate to the directory were you installed the SQLPSX scripts and run the
following command (replace Z002\SqlExpress with the SQL Server name you want to report against):
. ./Write-SmoToCsvFile.ps1 'Z002\SqlExpress'
This process can take sometime to complete on SQL Servers with many
permission, however the process is not resource intensive on the collected server as the underlying scripts use SMO for the most part which ultimately translate into T-SQL calls for various SQL information.
The process can be intensive on the collection machine from which the script is executed, again depending on the amount of security information returned. To review the progress of the executing script open the log file which
is created in the directory specified in the variable $dir assignment.
Importing CSV files
Now that we've created CSV files of various SQL Server security information, we
can import the files into the database we created in our setup. The
script,Write-SmoCsvToDb.ps1 executes a BULK INSERT for each CSV file into the
specified database. After all files are imported an archive directory is
created, the files are moved to the archive directory and NTFS compressed using the
Windows command-line compact.exe command. There are three variables you'll need to change in the script
as follows:
- Open the script file Write-SmoCsvToDb.ps1 in Notepad
- Change the variable $CsvDir to the directory where the CSV files are located
$Csvdir = "C:\usr\bin\SQLPSX\" - Change the variable $arcDir to the location where you want the archive files moved to
$arcDir = "C:\usr\bin\SQLPSX\" - Change the variable $sqlserver to the database server where the SQLPSX information will be stored
$sqlserver = "Z002\SqlExpress" - Change the variable $db to the database where SQLPSX information will be stored
$db = "SQLPSX"
This scripts does not need to have any parameters passed to it. Run the script with the following command:
. ./Write-SmoCsvToDb.ps1
This should execute fairly quickly, review the log file, smocsvtodb.log to monitor progress.
Generating CSV files for Multiple Servers
The script file Run-SmoToCsvFile.ps1 included in SQLPSX is used to process all of the SQL Servers in the SqlServers table stored in the SQLPSX database. The script will also execute the script Test-Conn.ps1 to validate connectivity and implements a very basic threading
model by launching multiple PowerShell sessions executing the child script. we looked at earlier, Write-SmoToCsvFile.ps1. You'll need to make the following changes to four variables to run the script file
successfully
- Open the script file Run-SmoToCsvFile.ps1 in Notepad
- Change the variable $maxThread to your desired number of threads to launch
$maxThread = 2 - Change the variable $SQLPSXServer to the database server where SQLPSX information is stored
$SQLPSXServer = 'Z002\SqlExpress' - Change the variable $SQLPSXdb to the database where SQLPSX information is stored
$SQLPSXDb = 'SQLPSX' - Change the variable $SQLPSXDir to the location where you want the log file written
$SQLPSXDir = "C:\usr\bin\SQLPSX\
The script, Run-SmoToCsvFile.ps1 main purpose is to run multiple sessions of the script Write-SmoToCsvFile.ps1 in order to collect data in parallel rather
than serially processing through a list of SQL Servers. Keep in mind the more threads you launch
the more memory and CPU is consumed on the collection machine. In my testing in collecting data on over 500 databases on two dozen servers, I was able to collect and load the data in under 1.5 hours on a 4-way server with 4 GB of memory by launching four threads. If collecting the data in parallel is not important to you
can simply run the Write-SmoToCsvFile.ps1 script.
Viewing the Reports
Now that we've collected the security data and loaded the CSV files into our
database we can use the SSRS reports we configured earlier to view the data.
Screenshots of each report is available on the SQLPSX CodePlex site in the releases section. We can
also use the views and stored procedures directly. If you choose to query the
data keep in mind the base tables make use of an XML data type to store the
effective members of a user, login, or permission. A user defined function, ufn_GetMember, is
referenced in each view to return the XML data as a table.
Finishing Touches
In addition to the object creation SQL script, SQLPSX.AllObject.sql, included in SQLPSX, there is a
SQL script called SQLPSX.Job.sql for creating a SQL Agent job to schedule the collection, loading and purging of data.
You'll need to modify the job steps which execute the PowerShell scripts to the
path where you've installed the SQLPSX scripts and adjust the retention purge
job step. The purge job step deletes collections from the database by keeping
the last nth collections. By default the retention is set to the last three
collections, you can adjust by passing a parameter to the various usp_del* stored procedures.
Conclusion
This article has shown you how to setup and configure an automated process to collect, load and report against SQL Server security information. If you have problems with installation, usage or you have feedback on new features you would like to see, please post to the discussions forum on the SQLPSX CodePlex site.


