A recap on things so far
Hello again, and welcome to SCOME – Centralizing with ASP.Net, where
in part 4 we'll dive head first into the world of Microsoft's Visual Studio.
Are the primates still swinging on your SQL Servers and jumping on keyboards
where you are? Yeh, they are here too, but our suite of reports will allow us
to not only centralize *all* aspects of our monitoring, but also create web
applications that will help us manage our day to day DBA duties. In
part one we discussed the reasons for Centralizing, and how this can be achieved
using the SCOME technique. In part 2 we set up our linked servers and the initial
setup tables. In part 3 we started on our Failed Jobs report and discussed how
this report can be easily changed to reflect any SQL Server data held in it's
system tables and views. Today we finally get to do .Net things. I intended
on completing the Failed Jobs report today as it's not quite finished (the final
report will allow to extract keyworded entries in the log files), but some people
have been very keen to get on, so we’ll extend the Failed Jobs scripts
later after we’ve implemented it as an actual report in .Net.

What this article is about
This article is an introduction to Microsoft
Visual Studio, the .Net framework, how the web pages fit together and other
bits and pieces relevant to writing web applications. It is a straight-forward
no-nonsense, sweet and sassy guide where the idea is to get us up and running
as quickly as possible. Just a quick reminder that to make this suitable
for as many people as possible, I will assume you know nothing, so forgive me
if I iterate over something that may seem obvious or something you already know.
As there is so much to cover, I'll actually do very little explaining on how
some things are the way they are in .Net, or the technology behind them, but
feel free to google these as, needless to say, there are very good websites
that do this. The aim here however is to get you up and running, so that you
can systematically build your own .Net solutions in your own time, that will
in-turn aid your day to day DBA duties. You could use Reporting Services to
do much of this, but as you get whizzy at developing, you'll find that you may
want to use Microsoft .Net components and/or third party components not easily
available to the vanilla framework used by Reporting Services, whereas conversely,
you can build Reporting Services pages on top of your web app from within Visual
Studio. We'll do all this in VB.Net as it's more intuitive than C#.Net, but
if you'd rather not, there are lots of free online VB.Net to C# converters.
It's worth mentioning that there is nothing that can be done in C#.Net that
can't be done in VB.Net. They are both based on the same framework.
The Client Browser, the Web Server and the Database Server
So let's say we use the Payroll web application to look up an employee's details.
We punch in the Payroll number and back come the details. What's actually happening
is the browser on your PC puts in a request to a web server. The web server
holds the code (that we write in the form of web pages) that tells the browser
(a) what the page will look like and (b) what the web server needs to do to
retrieve the employee's details. Our code on the web server says (to the web
server), if the browser sends an employee number, go pass it as a parameter
to some stored procedure on this database server. SQL Server does it's thing
and passes the results back to the web server, that then passes it back to the
client browser. Incidentally, this web server may be somewhere across the world
(like the web server that these pages you are reading right now are on), it
may be a web server on your internal network, or it could even be the same client
PC you are actually browsing from. Likewise, the database server can be remote
or local.
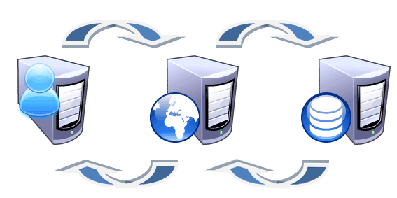
Figure 1 - PC Client to Web server to Database Server and back again
Visual Studio allows you to design the look of the web pages (written
in HTML and Cascading Style Sheets) as well as write the code that talks to
the database (VB.Net or C#.Net). The process may seem a bit much if you've not
been exposed to this before, but fortunately we don't have to write much of
the interacting components, as the .Net framework was developed for this purpose
alone. We just drag the components we want to use within Visual Studio to the
page and connect them together with snippets of code.
The .Net Framework
When I first got myself a PC, I didn't know know what the heck the ".Net
framework" was. Every time I downloaded a new app to install, the instructions
said you must first have the .Net framework installed. Meant nothing to me.
There was nothing in my Programs start menu that remotely indicated that I'd
have it installed, and when I discovered that it was, I couldn't actually find
it. There was no GUI to the framework, what was I supposed to do with it? The
reason for this is that you don't get to see it. The framework is just a load
of dll files that your application relies on to function. Once downloaded (from
Microsoft) and installed, it gets placed into the bowels of your operating system
and your application (if a windows form) then uses it. If your application is
a web one, such as what we are developing, then the framework must be installed
on the web server. In essence, all the .Net framework is, is a lazy mans way
of writing less code. You see the dialog box that you use to browse to a file?
Chances are that was a .Net component dragged and dropped on to the web page
or windows form from a Toolbox in Visual Studio. Just like the Toolbox in the
SSMS Maintenance Plan screen. See that drop down list? Also, a .Net component
dragged and dropped. See the radio buttons, or the data grid, the context menu
(the one that appears when you right click), the login screen, or the calendar
control? All .Net components that have been dragged and dropped. All we have
to do is tell the web server what we want doing with these by writing code that
connects the components together. And we do this using Visual Studio.
Visual Studio
Visual Studio is a an integrated development environment (IDE) from which you
can do anything. You can build windows apps, web apps, mobile apps and anything
in between using a zillion and one different languages. It's all there in one
contained space. It will compile your apps, package them, create dlls, create
install wizards. It allows you to use Microsoft components, third party components
and open source components. You can design your app via code or the inbuilt
graphical designer. It has a full blown debugger that will step through your
code one line at a time so you can see where your app goes wrong. Comparatively
speaking, it's a very friendly bit of kit. It's just on your side. Heck, I even
made a Beef Goulash last week using Visual Studio and that's no lie.
So let's get started. If you don't have a copy of Visual Studio, now is the
time to download it. Visual
Studio Web Developer 2008 Express Edition is a free cut down version of
Visual Studio Pro. I use the Pro edition, but to the best of my knowledge everything
we will cover can be done in the freebie one. When you come to install it, make
sure you choose Visual Basic as one of the languages you want to use.
Creating a New website
To create a new website, we go to File -> New website (in the future, when
you want to work further on your site, go to File -> Open Website, and browse
to the folder containing your website). You should be presented with the following
screen.
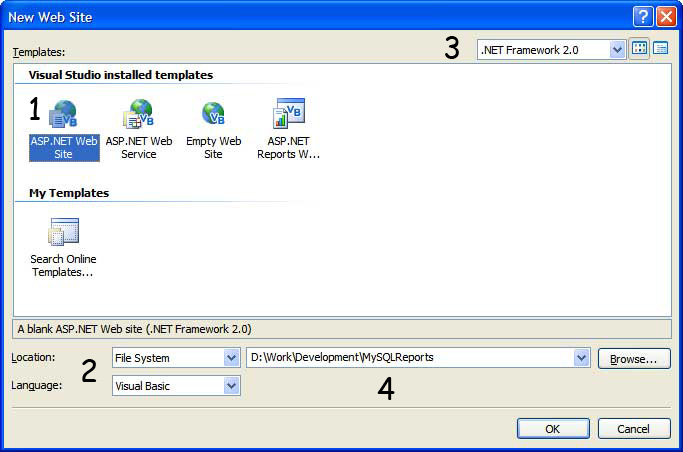
Figure 2 - Creating a new website
1. Select the ASP.Net website icon. This will setup the necessary files to
start a blank ASP.Net site.
2. Choose the type of location where you want the files
placed. You can choose between a virtual directory, an FTP site or in some folder.
We're going for some folder; so choose File System.
3. Microsoft adds new components to the framework every
now and again to make life a bit more easier for you and me. Every time they
do, they increment the versions. At the time of writing, the latest version
was 3.5. I first started my suite of reports when the latest version was 2.0.
Every time, I open my web site in Visual Studio, it asks me if I would like
to upgrade the website to use .Net 3.5. I always so no, because I've kind of
learnt not to bother with things unless I really need to. So here, by all mean's
select the latest version. If you want to be really safe though while following
along with me, select .Net Framework 2.0. Later, you can upgrade when you know
it's all working.
4. Select the path where the website will be kept
during development, and hit OK. You should now be presented with the Visual
Studio IDE.
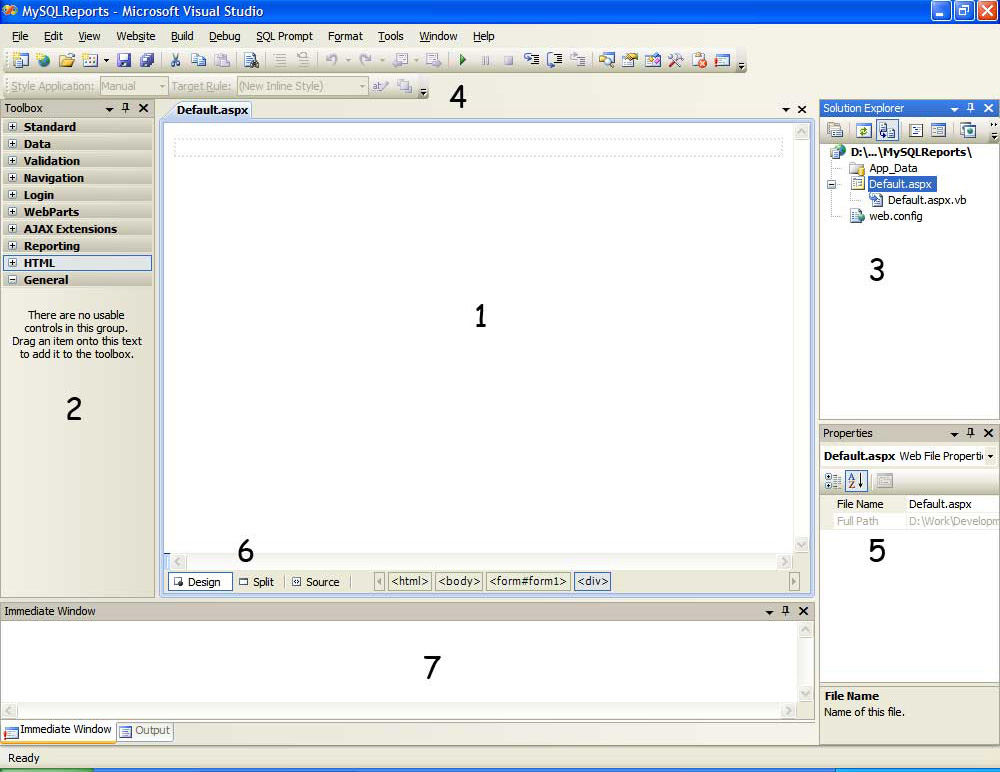
Figure 3 - The Visual Studio IDE
The IDE dissected
1. This is the main design area of the screen. This is where your web page
or windows form gets designed and the code gets written.
2. This is the Toolbox area, from which you drag and drop components onto your
design area. Components such as Dialog Boxes, Drop down lists, Combo Boxes etc.
These are grouped into, well groups.
3. The Solution Explorer displays all the files that make up your entire application
solution. All your reports will be listed here in the form of web pages.
4. That little Play symbol runs your app when you want to see how it will look
like in the real world.
5. The Properties pane. Every element, every page, anything you click has properties
and they can be viewed and changed here. Do you want the checkbox to default
to checked or unchecked, what colour do you want the page background to be and
so on.
6. These tabs at the bottom allow you to switch views from Source View, where
you get to see the code behind the design of the page, Design View where you
get to see how the page will physically look or Split View where the screen
is split and you get to see both (useful when there is lots of code and it gets
a bit confusing knowing what does what).
7. Finally, that bottom bit there, is by default the location of various information
panes such as what's happening when you are debugging, any errors or warnings
regarding your code, build progress etc.
If we take a closer look at the Solution Explorer, you'll find various elements
have been placed in the pane.
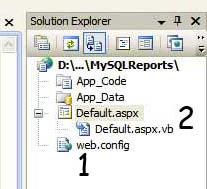
Figure 4 - Solution Explorer
Ignore the App_Code and App_Data folders, let's look at the others...
1. The web.config file is an xml file and is
the most important file you will have in your solution. Without it, your web
app won't run. It contains configuration items related to the site as a whole
such as connections strings, the security model to be used, the libraries to
be used, maximum and minimum limitations you may want to enforce (such as the
maximum size a file can be uploaded to your site, or the length of time before
a page times out etc). Like everything in Visual Studio, you can edit this file
manually, but once again the good people at Microsoft makes life easy for the
lazy man by providing all sorts of GUI windows to edit the Web.config file.
2. The Default.aspx and Default.aspx.vb files.
When your folder contains lots of web pages (or web forms as they're called
in ASP.Net), the web server will look for the Default.aspx and take that has
your home page. Unless otherwise specified, it is the first form that it will
load when someone visits you site.
The VB.Net code does not have to be in

the .aspx.vb page, it can actually go in the .aspx page as long as it is in
between <% and %>, but it's good to keep things separate.
For example www.MySQLReports.com/Default.aspx. The aspx extension
is typical for a .Net web form. Notice how Default.aspx.vb comes under the Default.aspx?
Every time you create a new .aspx web form in Visual Studio, a corresponding
.aspx.vb page will be created underneath it. In the .aspx page we write how
the page will look by using HTML, Stylesheets, and certain ASP.Net elements
(like textboxes, buttons and checkboxes etc). In the .vb page, we write what
we want those ASP.Net elements to do, using Visual Basic, such as sending data
to and from the database server. Now delete the Default.aspx page, so we can
cover how to create a new web form, as this is what we will do every time we
want to create a new form (a new report).
Creating a new web form
Go to Website -> Add New Item, you should be presented with
the following screen...
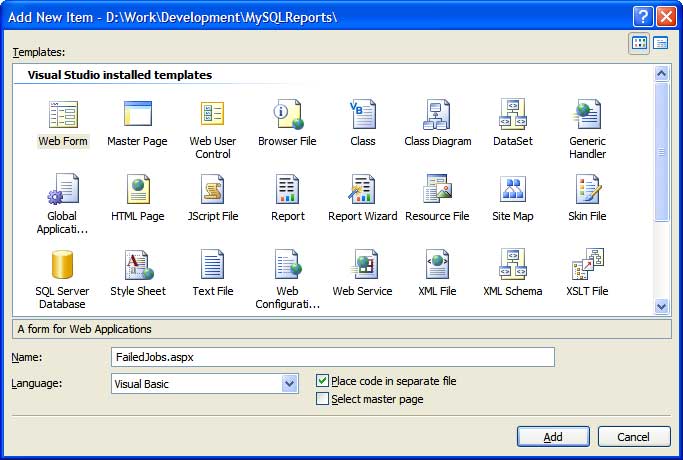
Figure 5 - Adding a new web form (page)
Look at all that! We could go to town with this (notice the Reporting Services
items in the middle there). Select Web Form, call it FailedJobs. Tick "Place
code in separate file", so that the .vb page is also created. We're not
actually going to be doing any coding in this particular report (so we won't
enter anything into the FailedJobs.aspx.vb file today), as I want to demonstrate
how simple it is to display data using the wizard. When we come to extend the
FailedJobs report in a future article, we will programme using VB.Net. Now double
click on FailedJobs.aspx that has been created in the Solution Explorer. Click
on the Source tab in the IDE (number 6 in figure 3 above). At the top of the
page, you should see code similar to this:
<%@ Page Language="VB"
  AutoEventWireup="false" CodeFile="FailedJobs.aspx.vb"
  Inherits="FailedJobs" %>
I just want to point out now that the CodeFile="FailedJobs.aspx.vb"
part must always be the name of the the corresponding .vb file where your code
will be. And the Inherits="FailedJobs" part must
always be the same as the name following "Partial Class" situated
at the top of the FailedJobs.aspx.vb page. If your pages get muddled up one
as you follow these articles and things aren't quite working, check that this
is still the case.
Enter SQL Server
Now lets finish off this report. As mentioned above, normally your programming
code would go in the aspx.vb file, including any lines that specify where your
database is (your Data Source). Lots of ASP.Net controls can have Data Sources
associated with them but when we use the Data Source wizard to setup your connection,
instead of placing it in the aspx.vb file, it actually places it in the .aspx
file. But that's fine. We just want to get a feel for how things work and the
options we have available to us. Go to the Toolbox, find the group called Data
and select GridView. Drag it to the middle of the window (1 in figure 3). The
component should render itself like this (see figure 6).
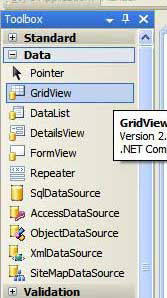
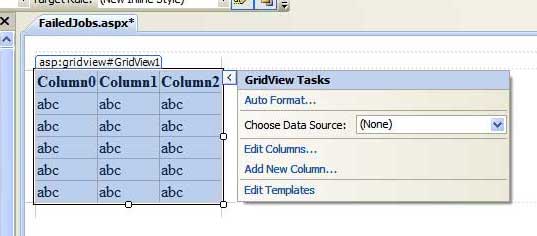
Figure 6 - The ASP.Net Grid View control
Click on Choose Data Source and create a New Data Source. You
should be presented with a "Data Source Configuration Wizard". In
the first step, select the database icon and replace "SqlDataSource1",
with FailedJobs_DataSource. This is the name we are going to give our connection
string. Click OK. The next step is to "Choose Your Data Connection"
i.e where is this server we want the string to point to? Click New Connection
and you'll be presented with a dialog window that allows you to specify your
server and database where the FailedJobs table is. This is your server with
all the linked servers set up on it. Once you've done this, click next and the
next screen will ask if you want to save this connection so that you can use
it in the future without having to specify where the server is again. Save it
as DBA_Admin_ConnectionString, click Next and configure the Select statement.
We are now telling the wizard what we want displaying in the data grid control.
Specify the Failed_Jobs table, select which columns you want returned (figure
7) and click Next. Test your Query and click Finish, the data grid should now
look like this (Figure 8).
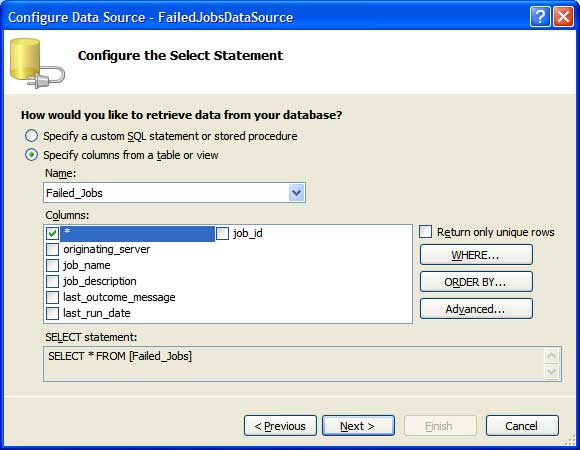
Figure 7 - Configure what you want the Data Grid to show
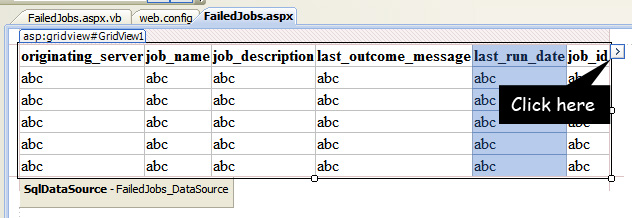
Figure 8 - The Data Grid configured (well almost).
Before we continue, I want to show you where that connection string was saved
to. It's in the daddy of all files, the Web.config file. Double click on it,
and you should be able to see your connection string.

Figure 9 - The connection string in the web.config file
Click on FailedJobs.aspx and click on the GridView so that the whole control
is selected. Then click on the Source tab (6 in figure 3). The code representing
the GridView should be highlighted. Familairise yourself with the different
elements; you could write that without the wizard. Do the same with the FailedJobs_DataSource.
Notice how it's calling the DBA_Admin_ConnectionString which is defined in the
web.config file.
We're now going to configure the columns on the Data Grid. Go back to Design
View and click on the tiny little tab hanging off the right hand side of the
Data Grid (see figure 8). You should get figure 10. Enable Paging if you want.
This means if you have too many failed jobs, it will display page numbers at
the bottom (you got a bigger problem if you got that many failed jobs!). Enable
Sorting allows you to sort via column name (such as by Server or Last_Run_Date).
Enable Selection allows you to select and copy. Click on Edit Columns to get
figure 11. Here you can configure how the columns will look in the Grid View.
First of all make sure Auto-generate fields is not ticked, as this will just
pull the data from the table without giving us the choice of formatting. On
the bottom left (of figure 11), select the field name you want to configure,
and on the right, it's properties are displayed. Play will all the available,
but the most important two is the HeaderText and the DataField. In the DataField
textbox we put the name of the corresponding table column. For example Job_Name.
The HeaderText is what the display name will be in GridView. For example "The
Job Name Field". If you leave this blank it will just reflect the name
of the column in the table (including any alias you may have given the table
column). You can completely remove or add fields all together and reorder them
by using the two panes on the left of the Fields window (figure 11).
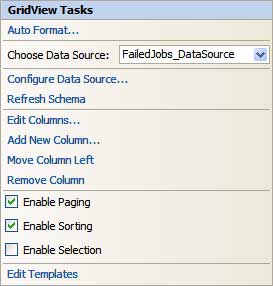
Figure 10- GridView Tasks
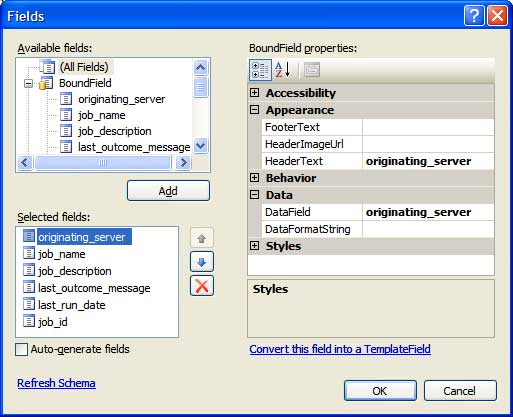
Figure 11 - Configuring the GridView fields
Viewing the report in the browser
When you are done configuring the fields of the GridView, hit F5 or click the
little play icon (number 4 in figure 3). If you get a message about enabling
debugging, click Yes. An internal web sever installed by Visual Studio will
chug away and fire up your report in Internet Explorer. Viola!

Figure 12 - Our Failed Jobs report
Looks a bit bland, huh? Every element on your page, including the page itself,
has configurable properties. And within those properties you can change the
way anything looks i.e colours, borders, padding, margins, alignment etc. All
you have to do is click on the item and play with the properties in the Properties
pane in Visual Studio. Particularly look for the word "Style", as
this will often lead to more styling options.
That's it. You've developed an ASP.Net web page displaying all the failed jobs
on all your servers. You can run your FailedJobs retrieval job on your central
server as often as you like, and check for failed jobs in your report. You can
follow this same procedure to display any data (whether a table, a query or
proc) using the same connection wizard. In the next article, (a shorter one
hopefully), I'll show how easy it is to change the FailedJobs report into any
other type of report that displays info on all your servers, simply by changing
what's retrieved from the SQL Server system tables and views in the usp_GetFailedJob
proc. We'll demonstrate this by creating an Un-Run jobs report. This will display
jobs (such as backup jobs) that haven't been run in the last so many minutes/hours/days.
With two reports in our pocket, we'll then setup Internet Information Services
(IIS) so that the report pages can be viewed from any PC.
See you then,
Drew


