SQL Azure Runbooks promise to be your “SQL Server Agent in the cloud”. They enable you to use PowerShell Scripts inside of SQL Azure in order to automate time consuming, repetitive tasks. In this article, I’ll explore how we used SQL Azure Runbooks to automate one of our business processes and save ourselves quite a bit of time.
The Problem
Recently we found ourselves spending a lot of time preparing copies of our SQL Azure databases for our Sales Department. While we use SQL Azure for our application’s data repository, the Sales team like to use a local copy of SQL Server to do their sales demos. This way they don’t have to worry about having an internet connection, and can customise their presentation to suit the customer. Our application is also still in a bit of a state of flux so each time we needed to give a new database to someone in Sales we were having to do the following:
- Make a copy of the database in SQL Azure
- Run a script to remove the client and order data
- Export the database to our Azure Storage Account
The whole process was taking quite a while and was very “high touch”. With this in mind, we chose to look at SQL Azure Runbooks in order to help streamline the process.
Setting Up the Azure Automation Environment
Before using SQL Azure Runbooks, a couple of things need to happen before you can begin. This first thing to be done is to enable Automation in SQL Azure by going to the Preview Features section in Windows Azure and click on the “try it now” button. Once you’ve clicked the button, you will see a new “Automation” tab on the left of the SQL Azure Management Portal.
The next step in setting up the Azure Automation Environment is to set up a means of authentication so that Azure Automation can authenticate with Windows Azure. While Microsoft used to advocate Certificate based authentication, this has now been superseded by Azure Active Directory (as of September 2014). This is a welcome change in direction because Azure Active Directory is much easier to set up. I am not going to go through the process of setting everything up because it is all spelled out very well in the article Azure Automation: Authenticating to Azure using Azure Active Directory.
After completing the steps in the link above, you will have an Azure Active Directory Authentication User. For the purpose of this article, the user will be automation@hebtech.onmicrosoft.com.
In order to complete our task, we will also need to interact with the SQL Azure database. We will need to do the following:
- Create a SQL Login
- Create a user for that login in the master database and add that user to the dbmanager role. This will allow the user to create databases on the server.
- Create a user for the login in the database that we are going to copy and add that user to the db_owner role. The user has to be a member of the db_owner role so that we copy the database to Azure Storage.
In order to accomplish the above steps, we will run the script shown in Figure 1.
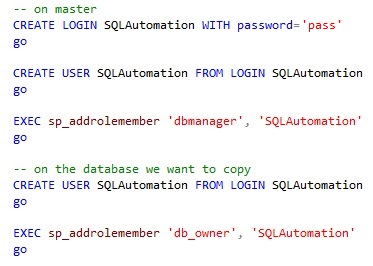
Figure 1 - Create SQL Login and User
Now that we’ve done this, we are ready to get started on our Runbook.
The CreateSalesDB Runbook
We are going to create a Runbook that is going to do the following:
- Accept an input parameter for the name of the new database
- Check to see if a database with that name exists
- Make a copy of our source database
- Run a SQL Script on the new database
- Export the new database to Azure Storage
First, we’ll click on the Automation tab on the left and go through the wizard to create a blank workbook and then click Author. These steps will give us our blank workbook as shown in Figure 2.

Figure 2 - Empty CreateSalesDB Workbook
Next we’ll add an input parameter and authenticate the workbook using the Azure Active Directory Authentication user that we set up earlier. We’ll also set the subscription that we are using as shown in Figure 3.
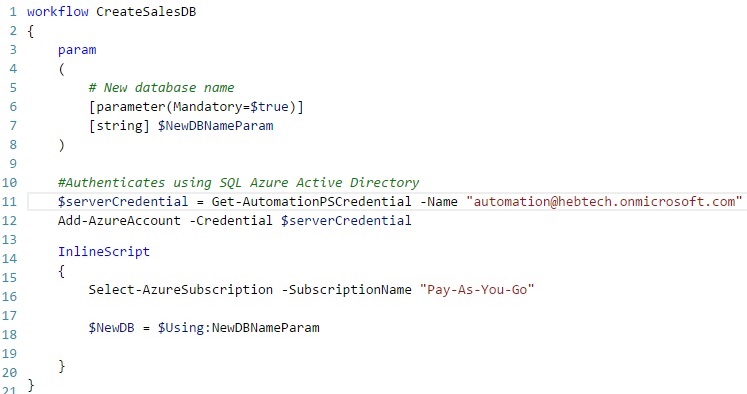
Figure 3 – Authentication Using SQL Azure Active Directory
As you can see, we are putting everything inside an InlineScript. We use this technique because we are going to use System.Data.SqlClient to execute SQL Commands, and to use .NET scripting, we must place the commands in an inline script.
For our next step, we are going to check to see if the database exists before making a copy of our source database. In this step, we are going to use the SQLAutomation SQL Server user that we created earlier. Here, we use PowerShell commands to execute a query against the master database to see if the database exists as shown in Figure 4. We will also employ PowerShell to execute SQL statements later in the script.
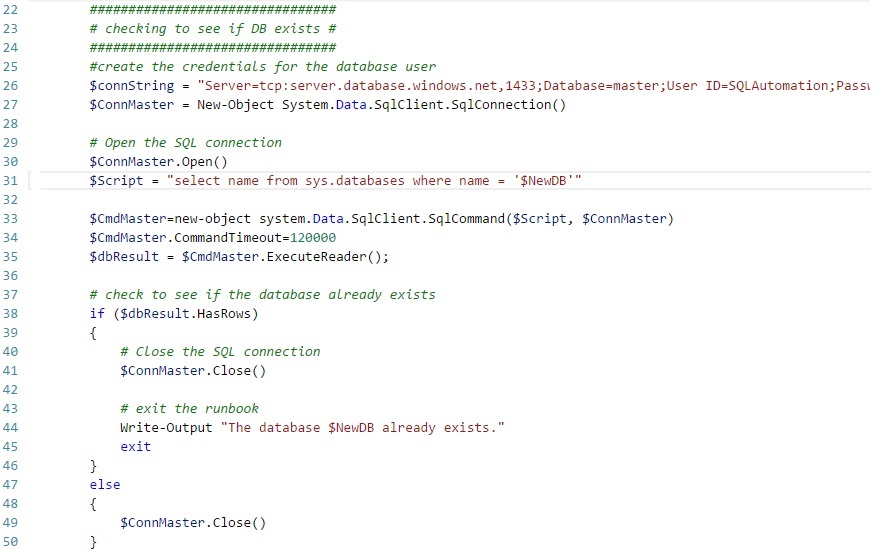
Figure 4 – Check that the Database Exists
Next, we will make a copy of the source database to the new database that we specified in the input parameter. In order to copy the database, we will use the Azure SQL Database PowerShell cmdlets Start-AzureSqlDatabaseCopy and Get-AzureSqlDatabaseCopy. The ability to use both Transact SQL and PowerShell is one of the strengths of Runbooks. A full list of the Azure SQL Database PowerShell cmdlets is available here.
Once we start the database copy using Start-AzureSqlDatabaseCopy, we check the status of the copy and then wait for 10 seconds before checking again. We will continue looping until the copy has been completed as shown in Figure 5.
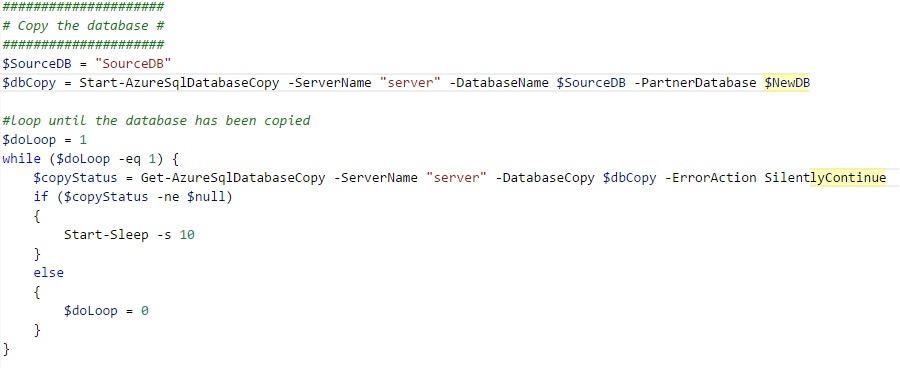
Figure 5 – Copy the database
Now that we’ve copied the database, we will run a script on the database to remove the client and order data. One thing that is interesting to note is the @” “@ around the script block. This notation allows PowerShell variables to span more than one line, which is very useful for keeping the readability of the SQL Script intact. For the purpose of this exercise, I’ve vastly simplified the script that we normally run as can be seen in Figure 6.
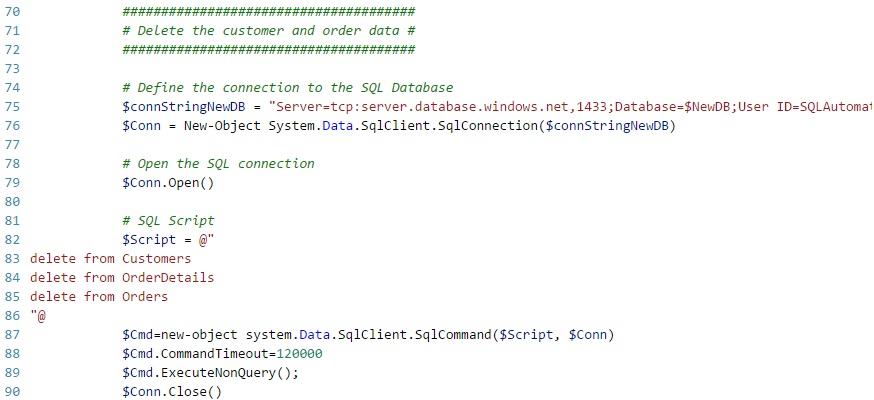
Figure 6 – Remove Customer and Order Data
Now that the database has been prepared, the last step is to export the database to Azure Storage where it can be downloaded by the Sales department. In order to export the database, we are again going to turn to Azure SQL Database PowerShell cmdlets. First, we have to authenticate to Azure Storage and get a reference to the container where we are going to export the database. To authenticate to Azure Storage, we will use the cmdlet New-AzureStorageContext.
In order to authenticate we need two pieces of information: the storage account name and the Storage Account Access Key. The Key can be found by going into the storage account and clicking “Manage Access Keys” at the bottom of the page. We will also need the name of the container. Armed with these pieces of information, we can use the code shown in Figure 7 to access the Azure Storage and the appropriate container.

Figure 7 – Authenticate to Azure Storage
Next we need to get a PowerShell context for the database that we are going to export. In order to make this happen, we will use the SQLAutomation user to create a PowerShell credential. We will then use that credential to get the context for the database using the cmdlet New-AzureSqlDatabaseServerContext as shown in Figure 8.

Figure 8 – Get Database Context
We do the export using the cmdlets Start-AzureSqlDatabaseExport and Get-AzureSqlDatabaseImportExportStatus. We employ the same looping construct that we used earlier when we copied initial the database as can be seen in Figure 9.

Figure 9 – Export the Database
And that’s everything. Using a combination of PowerShell and SQL Scripting we were able to automate a routine process in SQL Azure. I’ve included a the complete listing for the Runbook with this post.
References
http://azure.microsoft.com/en-us/documentation/scripts/


