

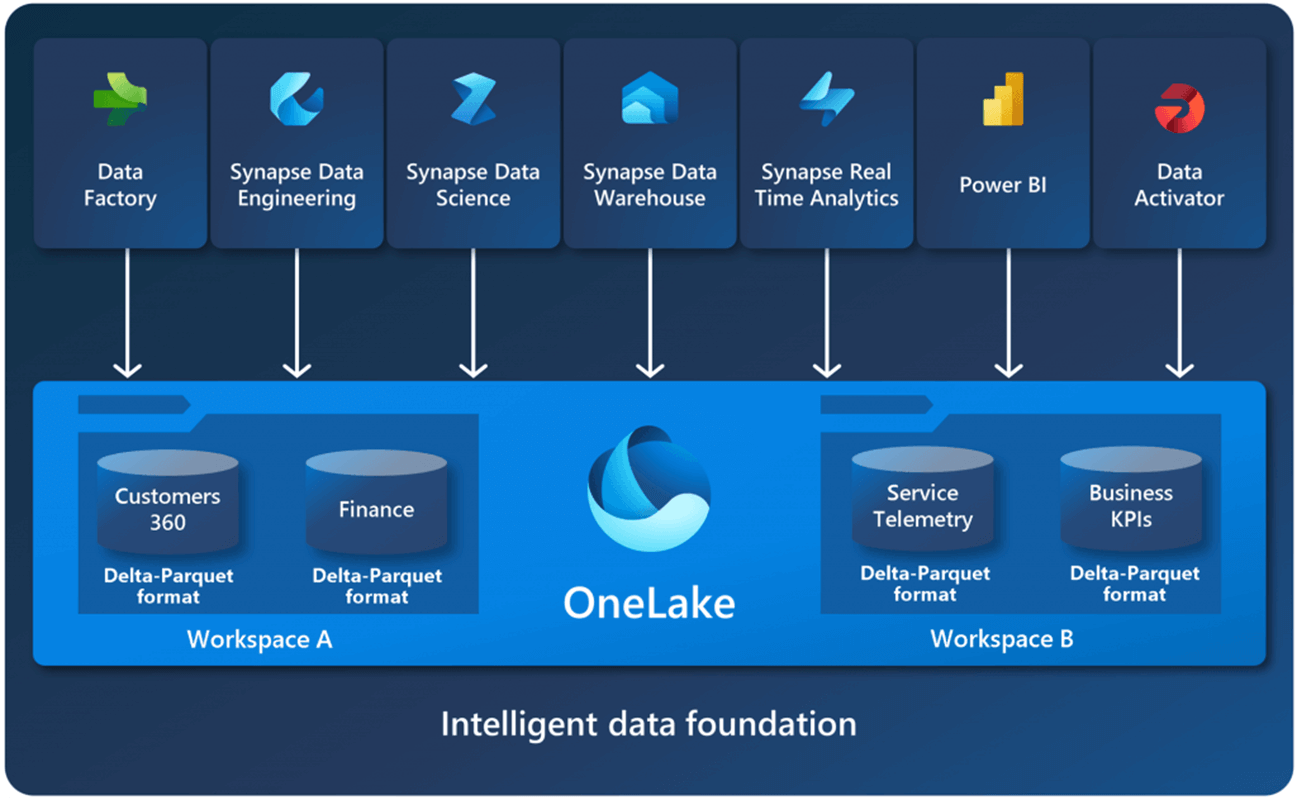
Microsoft Fabric has OneLake Storage at the center of all services. This storage is based upon existing Azure Data Lake Storage and can be accessed with familiar tools Previously, we talked about how Azure Storage Explorer and AzCopy both needed manual interaction to connect to the OneLake. Today, we are going to investigate how to manage files and folders using PowerShell.
Business Problem
Our manager at adventure works has a team of data engineers that already know how to use Power Shell cmdlets. How can we manage files in OneLake using this tool?
Technical Solution
The image below shows that the preferred format for files in the OneLake is the delta lake tables. However, the OneLake is just a storage account and storage container. Thus, any type of data file can be uploaded to the lake or downloaded from the OneLake using PowerShell.
Today, we are going to investigate how to use a service principle to automate the uploading and/or downloading of files from OneLake. The nice thing about PowerShell is the cross Operating System support.
The following topics will be reviewed by the author using PowerShell scripts with Microsoft Fabric.
- Re-use existing service principle.
- Create workspace and manage permissions
- Manual folder creation and file upload
- Login to azure
- List files and folders
- Rename files and folders
- Hard coded script for file downloads
- Delete files and folders
- Dynamic script for file uploads
- Improving first download script
- Logout of azure
Enabling Workspace Access
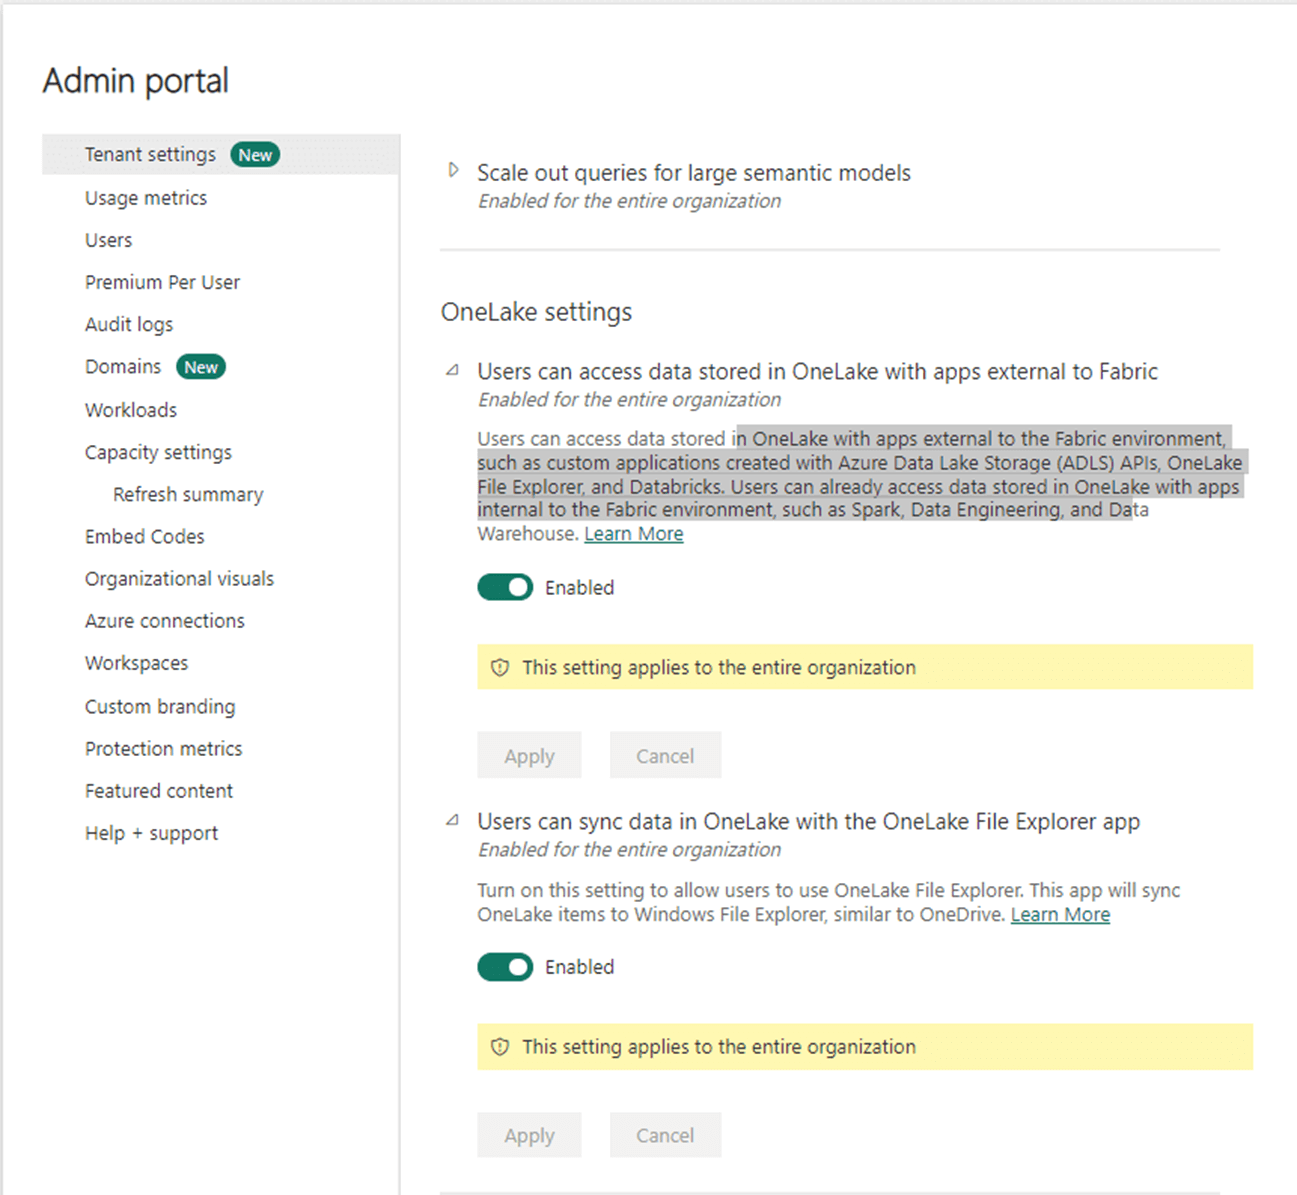
Microsoft Fabric allows the designer to segregate objects and business data by leveraging workspaces. Access to the OneLake via APIs can be turned on or off by the administrator. The setting can be found under the admin portal. See the image below for details.
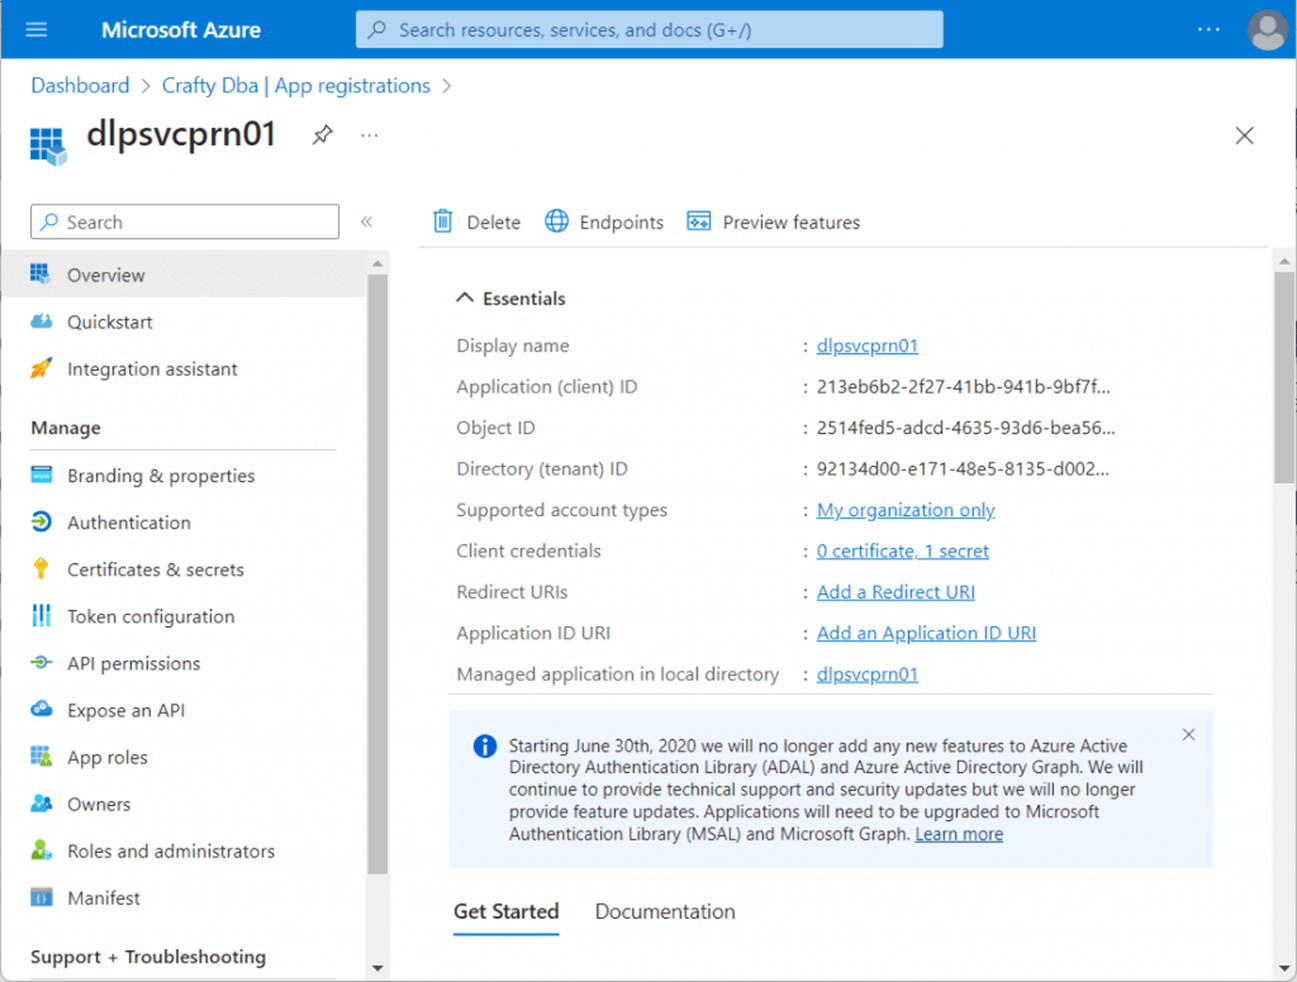
I have gone over how to create a service principle and password in the past. Please see my article for details. The dlpsvcprn01 account will be used to access Microsoft Fabric, OneLake Storage. When connecting to Azure, we will need the client id, the secret text, and the tenant id. The image below shows two of three required pieces of information to create a PowerShell credential are found on the App Registrations screen.
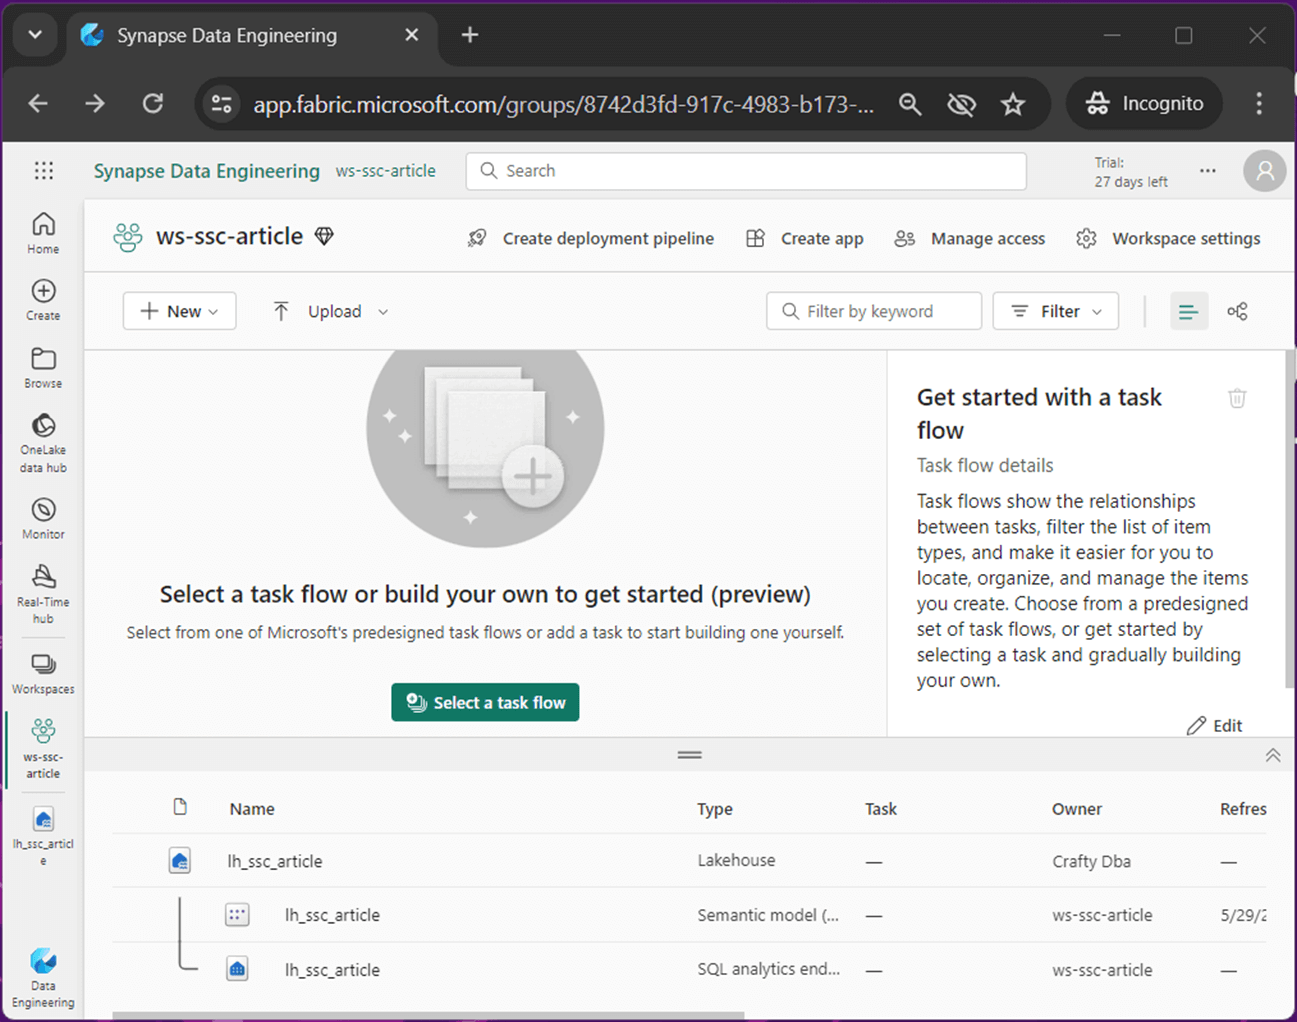
There is a mismatch in naming conventions. I have pointed it out to the Microsoft product team and hope there is a fix in the future. The lakehouse cannot have a dash in the name.
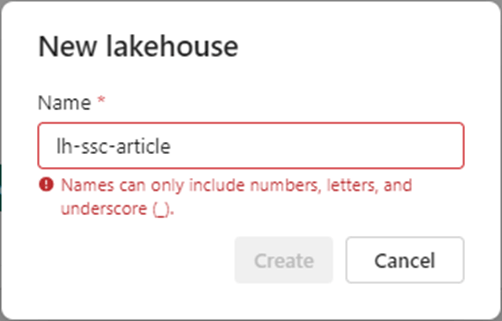
One the other hand, a storage container does not support an underscore.
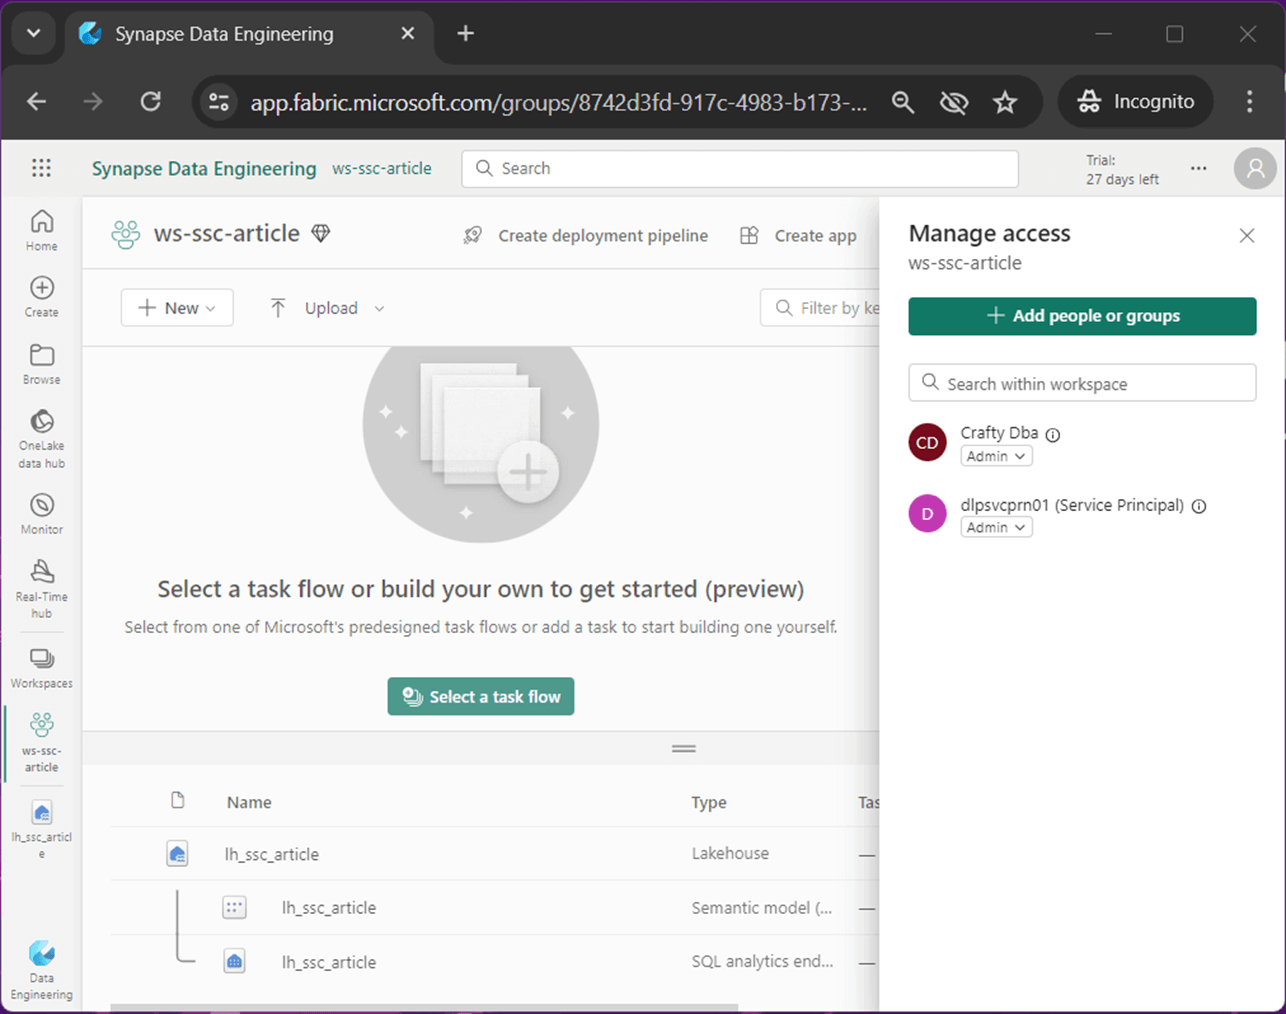
The image below shows a combination that seems to work. The workspace is named "ws-ssc-article" and the lakehouse is named "ls_ssc_article". Use the managed access button to add the service principle to the workspace.
The image below shows the service principle being assigned administrator rights to the workspace.
Connecting to Azure
There are several tools that can be used to develop PowerShell scripts. The Integrated Scripting Environment is already installed on most Windows operating systems. We can also configure Visual Code as an editor for PowerShell. It does not really matter what tool you use; we just need to download the correct code module. Please install the Az PowerShell module that will be used to manage Azure Data Lake Storage (OneLake).
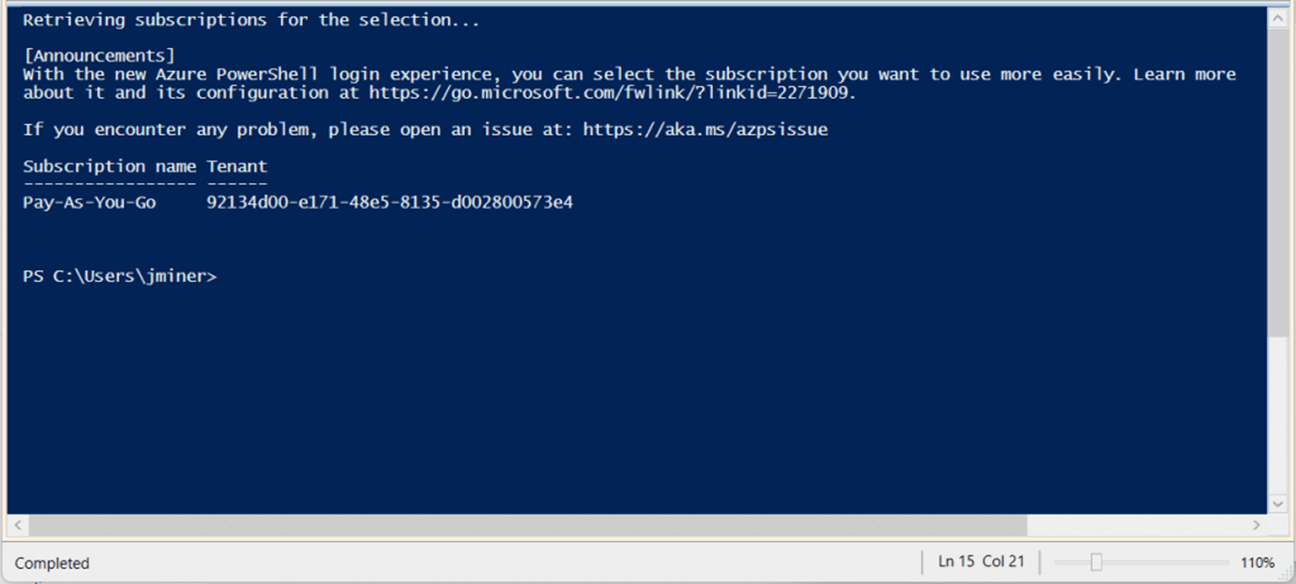
The above image shows a successful connection to Azure. The script below uses the client id and client secret to create a PowerShell credential. This credential object is used to log into Azure.
#
# Step 1 - Login to Azure
#

Clear-Host

$ClientId = "213eb6b2-2f27-41bb-941b-9bf7f143ce61"
$SecretTxt = "<my secret string> "
$TenantId = "92134d00-e171-48e5-8135-d002800573e4"

$PassWord = ConvertTo-SecureString $SecretTxt -AsPlainText -Force
$Credential = New-Object System.Management.Automation.PSCredential($ClientId, $PassWord)
Connect-AzAccount -ServicePrincipal -Credential $Credential -Tenant $TenantId
Now that we are connected, we can start working with OneLake.
Listing Lakehouse Files
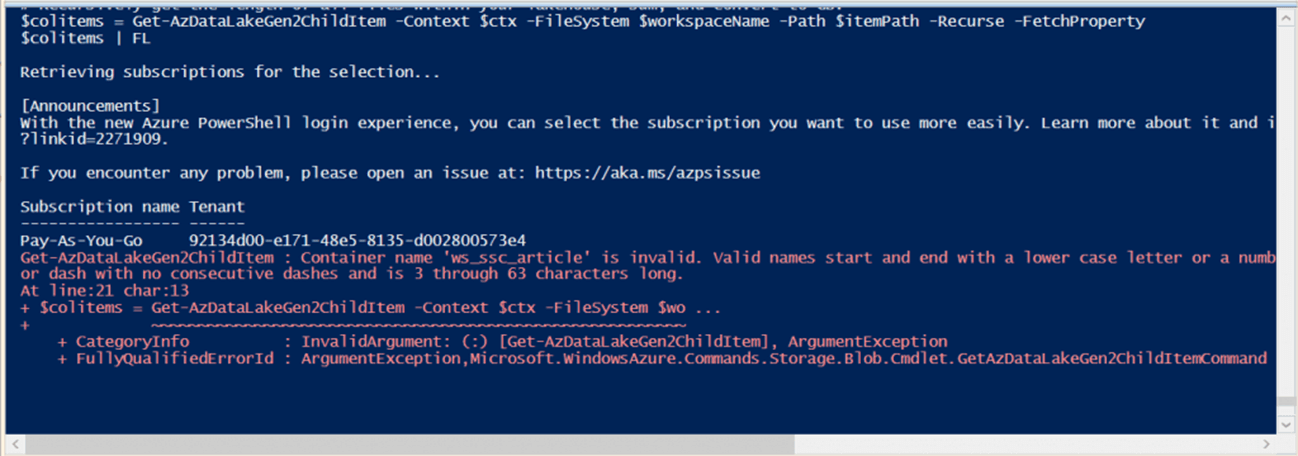
The Get-AzDataLakeGen2ChildItem cmdlet can be used to recursively fetch a directory listing. First, we need to get a storage context using the New-AzStorageContext cmdlet. The file system is the name of the workspace in Fabric and the item path includes the name of the lakehouse in Fabric. The $ItemList variable contains an array of objects.
#
# Step 2 - List folders + files
#
$StorageCtx = New-AzStorageContext -StorageAccountName 'onelake' -UseConnectedAccount -endpoint 'fabric.microsoft.com'
$WorkspaceNm = 'ws-ssc-article'
$ItemPath = 'lh_ssc_article.lakehouse/Files'
$ItemList = Get-AzDataLakeGen2ChildItem -Context $StorageCtx -FileSystem $WorkspaceNm -Path $ItemPath -Recurse -FetchProperty
# high level details
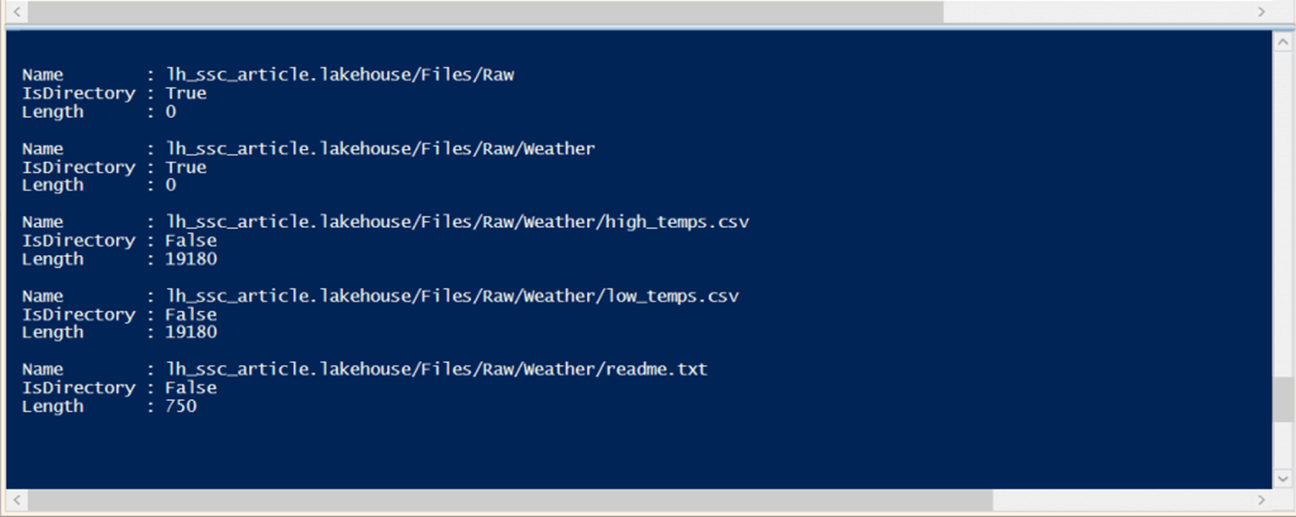
$ItemList | Select-Object Name, IsDirectory, Length | FL
# low level details
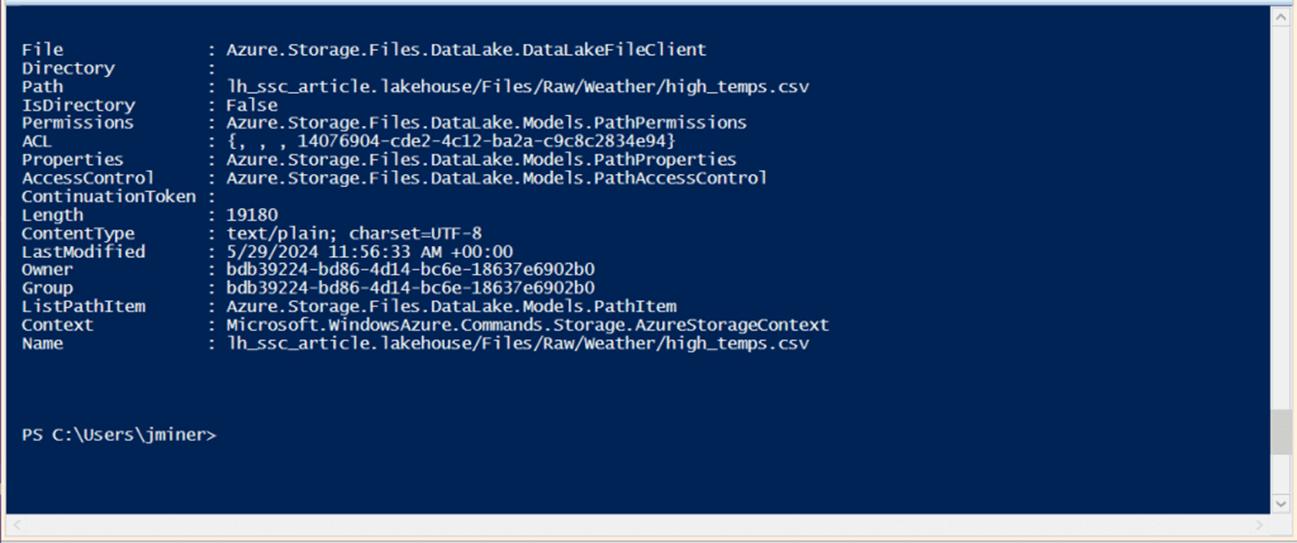
$ItemList | Where-Object { $_.Name -eq "lh_ssc_article.lakehouse/Files/Raw/Weather/high_temps.csv" } | FL
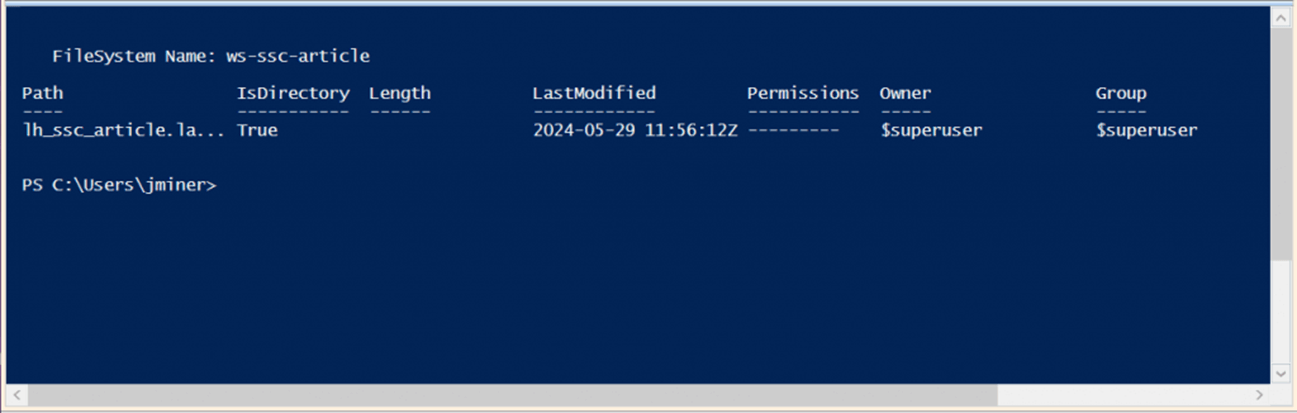
The Select-Object cmdlet allows us to filter the number of fields to just three: Name, Is Directory and Length. Please note, we have three files and two directories. The output is piped to the FL cmdlet which is an alias for Format-List.
The Where-Object cmdlet allows the developer to filter the array of objects. In this example, I want the details about the high_temps.csv file.
In real life, listing a data lake file structure with hundreds of files can take some time.
Rename Files and Folders
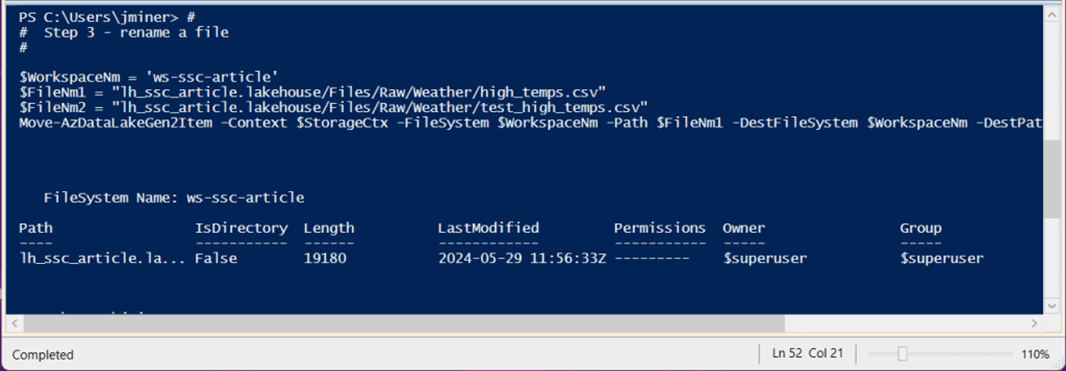
That storage context is used by most Data Lake cmdlets. The Move-AzDataLakeGen2Item cmdlet works with both files and folders. The code below renames the high temperature file by adding the word test as a prefix.
#
#  Step 3 - rename a file
#

$WorkspaceNm = 'ws-ssc-article'
$FileNm1 = "lh_ssc_article.lakehouse/Files/Raw/Weather/high_temps.csv"
$FileNm2 = "lh_ssc_article.lakehouse/Files/Raw/Weather/test_high_temps.csv"
Move-AzDataLakeGen2Item -Context $StorageCtx -FileSystem $WorkspaceNm -Path $FileNm1 -DestFileSystem $WorkspaceNm -DestPath $FileNm2
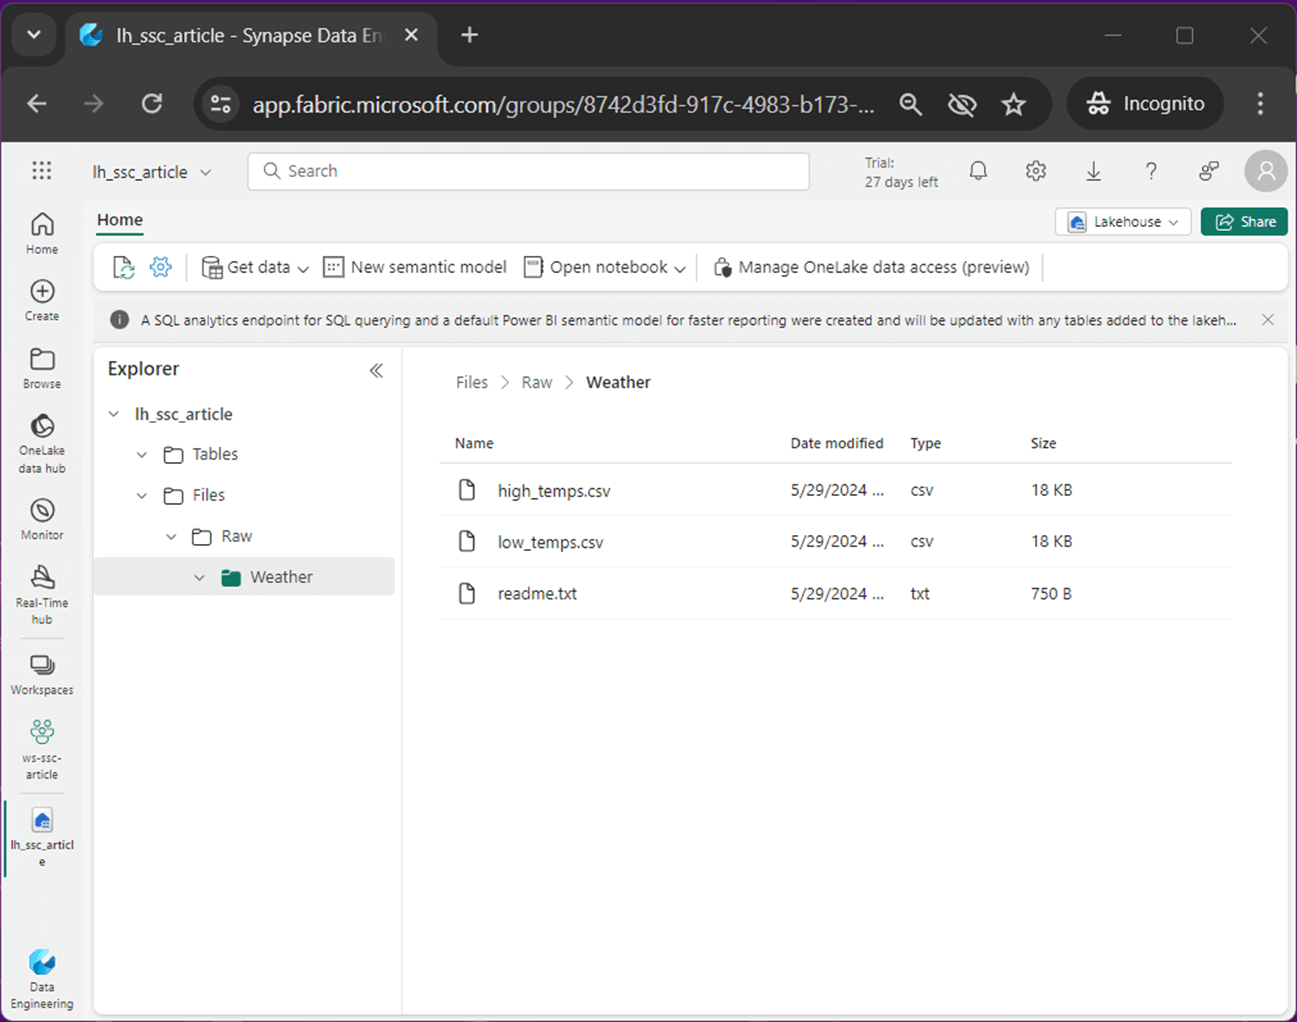
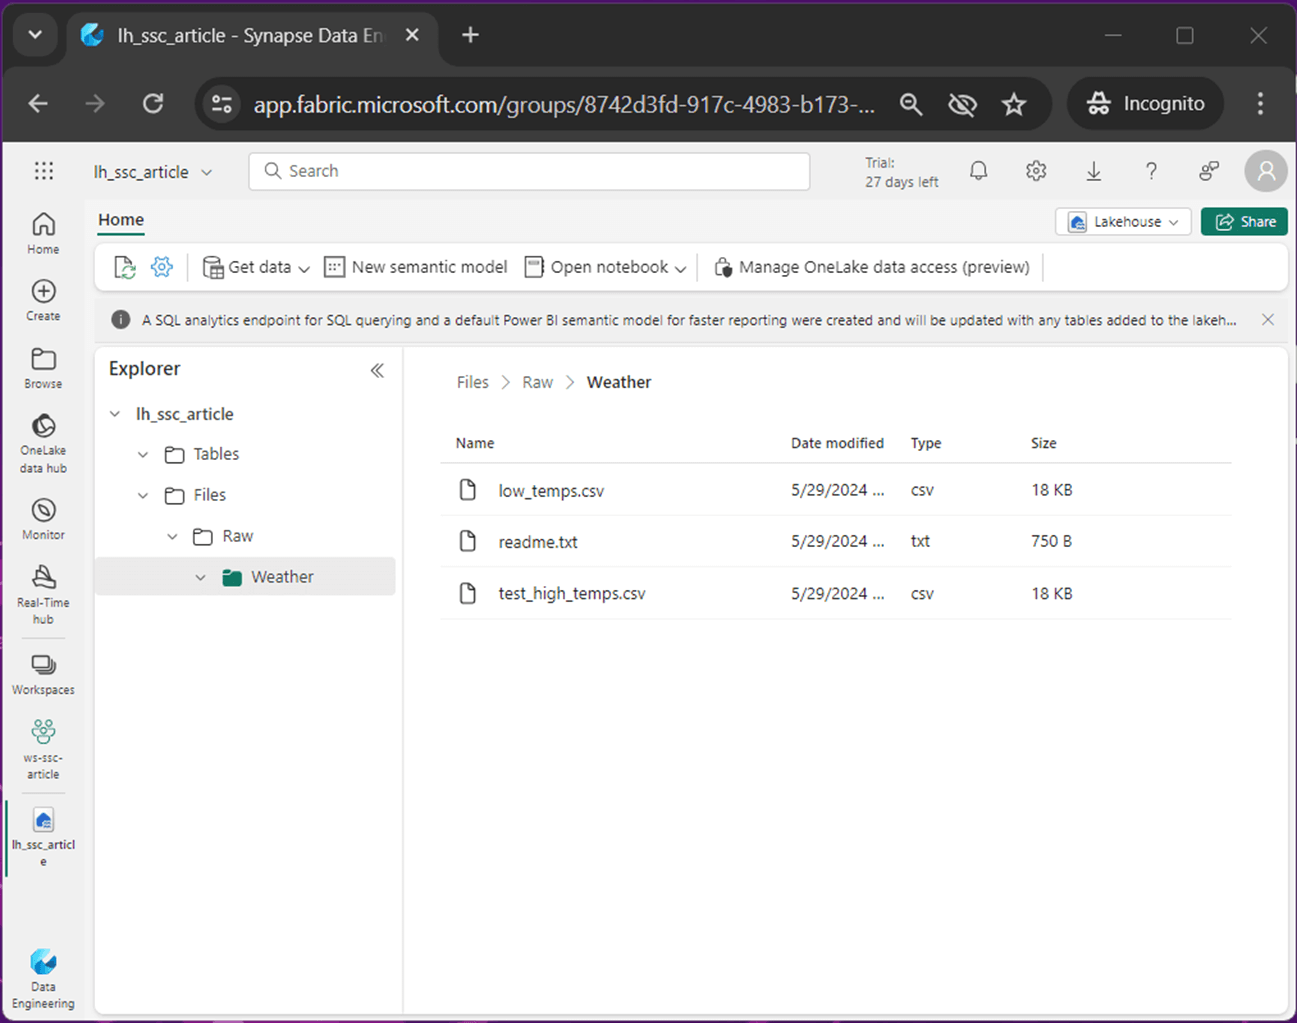
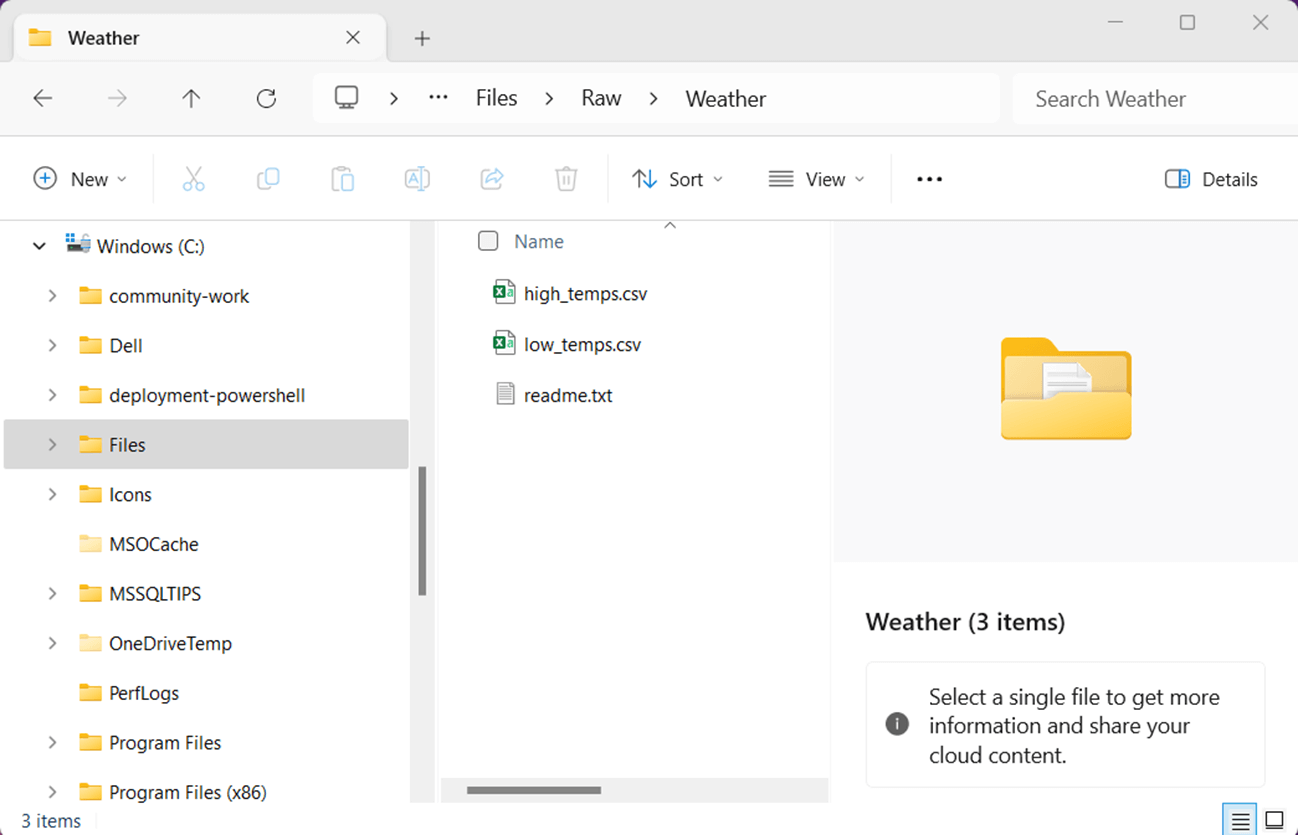
The image below shows the three files in the Weather directory before running the above script.
If you are curious, you can capture the Azure Storage Blob object that is returned by the cmdlet to see the new name.
The code below adds the word Test in front of the folder named Weather. The code below is very similar to script no 3.
#
#  Step 4 - rename a folder
#

$WorkspaceNm = 'ws-ssc-article'
$FileNm1 = "lh_ssc_article.lakehouse/Files/Raw/Weather"
$FileNm2 = "lh_ssc_article.lakehouse/Files/Raw/TestWeather"
Move-AzDataLakeGen2Item -Context $StorageCtx -FileSystem $WorkspaceNm -Path $FileNm1 -DestFileSystem $WorkspaceNm -DestPath $FileNm2
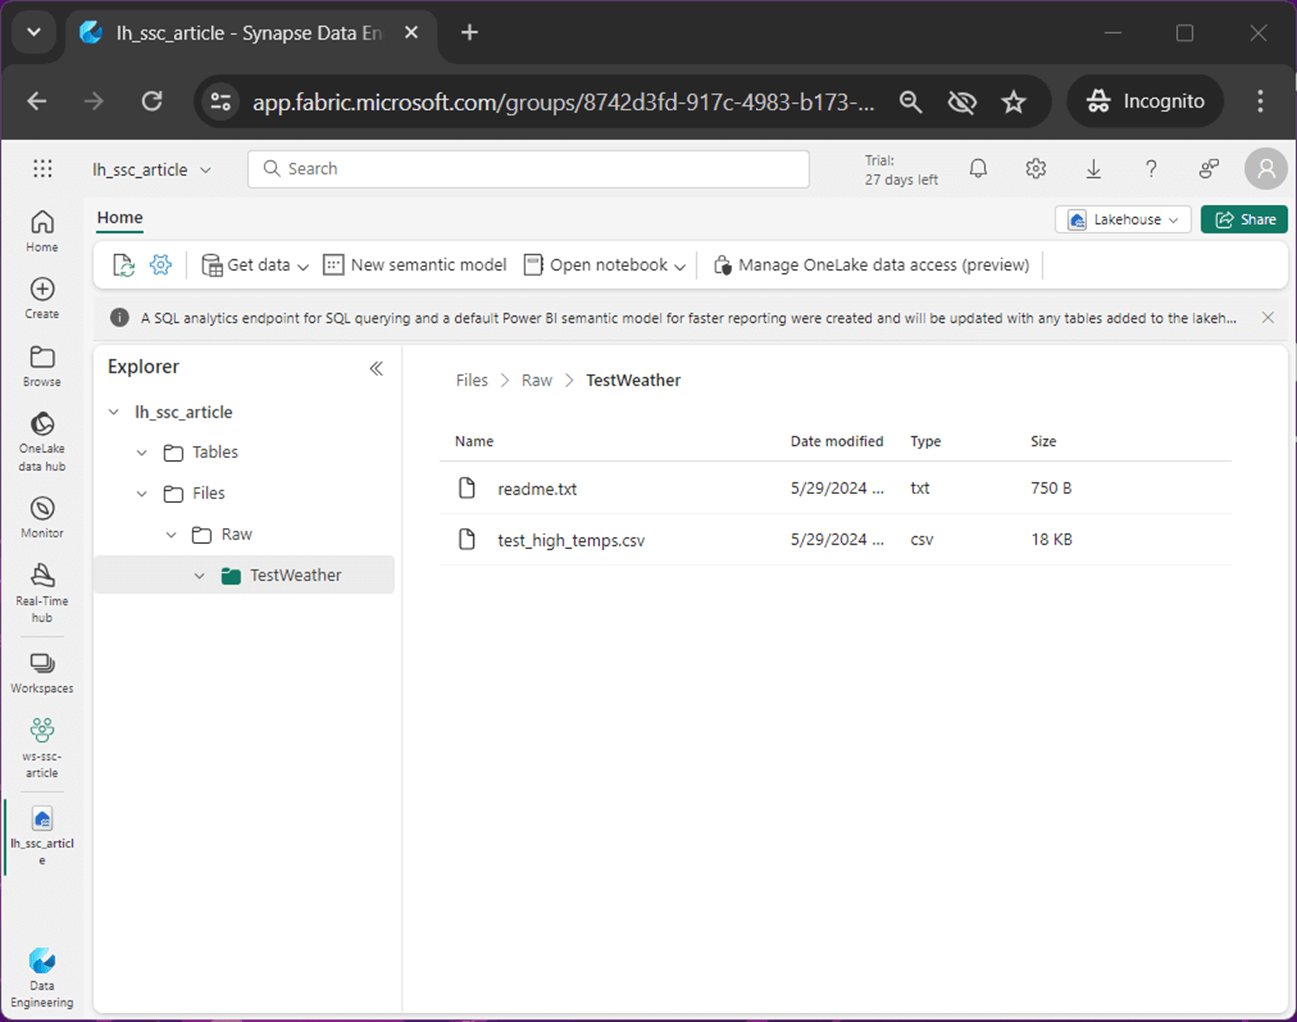
The image below was taken after script no 3 was executed.
Again, the output from the cmdlet is not that interesting. Unless there is an error, the return object can be ignored.
To recap, renaming folders and/or files can be done very easily. So far, we have been working with single files.
Download a Folder
The Get-AzDataLakeGen2ItemContent cmdlet can be used to download a file. However, the cmdlet will not create the local directory. The code below creates a Weather directory under the Temp Folder on the C drive.
#
# Step 5 - create download folder
#
$Path = 'c:\Temp\Weather'
if (Test-Path -LiteralPath $Path)
{
Remove-Item -LiteralPath $Path -Verbose -Recurse -WhatIf
}
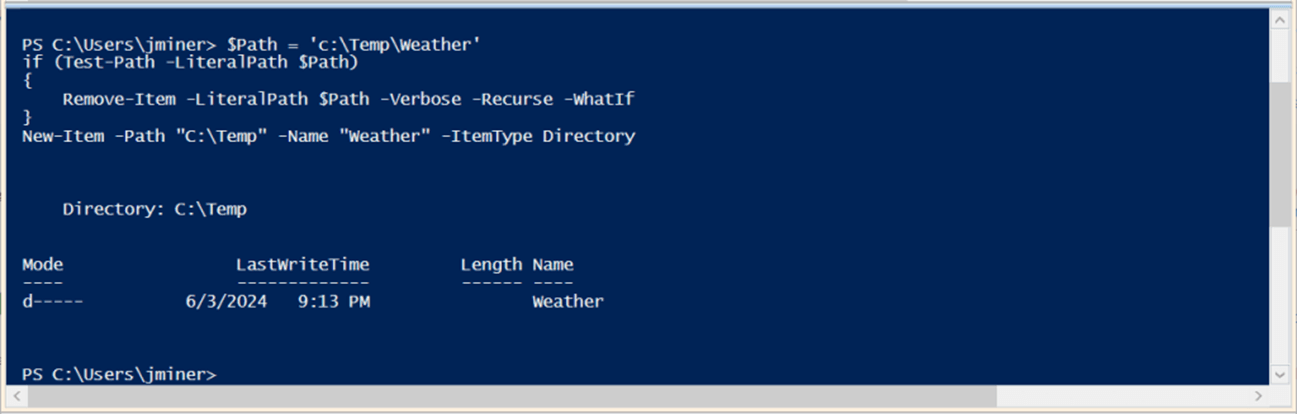
New-Item -Path "C:\Temp" -Name "Weather" -ItemType Directory
The image below shows the successful execution of script no 5.
The snippet below uses the list folder code introduced at the start of the article to get a list of fully qualified names into an array of objects. The ForEach-Object cmdlet traverses the array to perform the follow actions: collect source and destination paths, download the file, and optionally show the paths. To create the destination path, the string split function is used to obtain just the file name.
#
#  Step 6 - download all files
#

# get listing
$StorageCtx = New-AzStorageContext -StorageAccountName 'onelake' -UseConnectedAccount -endpoint 'fabric.microsoft.com'
$WorkspaceNm = 'ws-ssc-article'
$ItemPath = 'lh_ssc_article.lakehouse/Files/Raw/TestWeather'
$ItemList = Get-AzDataLakeGen2ChildItem -Context $StorageCtx -FileSystem $WorkspaceNm -Path $ItemPath -Recurse -FetchProperty

# select file names
$Files = $ItemList | Select-Object Path
$Files

# download files
$Files | ForEach-Object {

    $SrcPath = $_.Path
    $Name = $SrcPath.split("/")[-1]
    $DstPath = "c:\Temp\Weather\" + $Name

    Get-AzDataLakeGen2ItemContent -Context $StorageCtx -FileSystem $WorkspaceNm -Path $SrcPath -Destination $DstPath

    $debug = 0
    if ($debug) {
        Write-Host $SrcPath
        Write-Host $DstPath
        Write-Host ""
    }
}
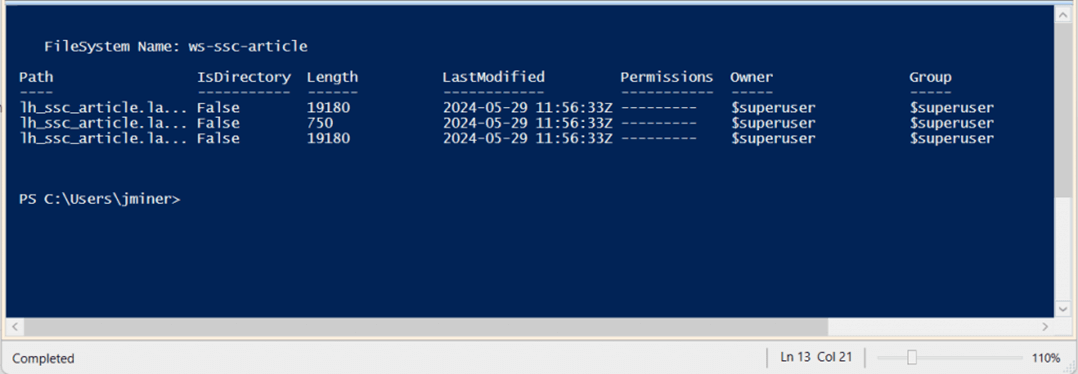
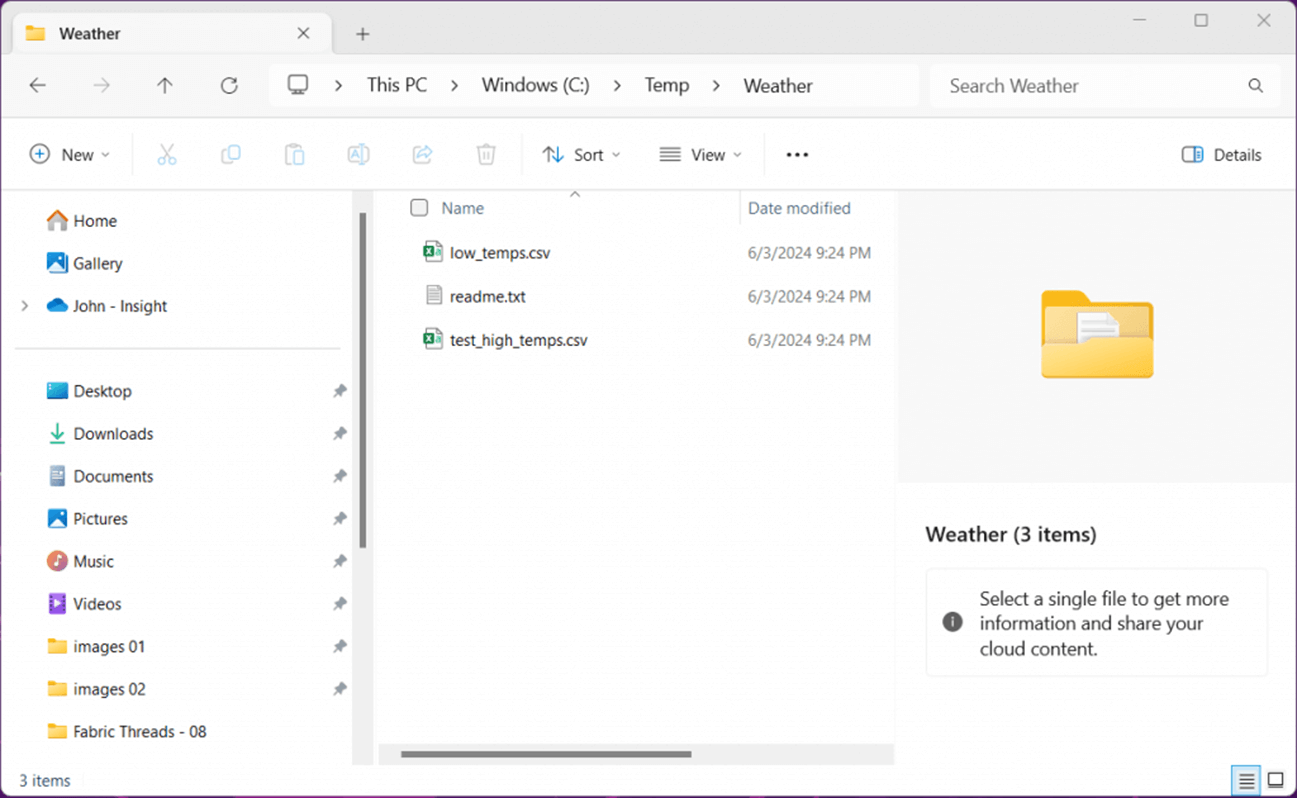
The image below shows three files that have been downloaded by the script.
The last step is to verify the download by using Windows File Explorer to examine the Weather folder.
While this code works, it is hard coded for just downloading the Weather folder. In the next section, we will learn about deleting files and folders.
Delete Files and Folders
The Remove-AzDataLakeGen2Item cmdlet can be used to remove either a file or folder. In the script below, the low temps file is removed during execution from the OneLake Storage folder.
#
# 7 - delete a file
#

$TrgFile = "lh_ssc_article.lakehouse/Files/Raw/TestWeather/low_temps.csv"
Remove-AzDataLakeGen2Item -Context $StorageCtx -FileSystem $WorkspaceNm -Path $TrgFile -Force
The image below shows the file that has been removed from the OneLake. The output from PowerShell is not interesting; therefore, I did not include it in this section.
The script below removes the folder named TestWeather from OneLake storage.
#
# 8 - delete a folder
#

$TrgDir = "lh_ssc_article.lakehouse/Files/Raw/TestWeather"
Remove-AzDataLakeGen2Item -Context $StorageCtx -FileSystem $WorkspaceNm -Path $TrgDir -Force
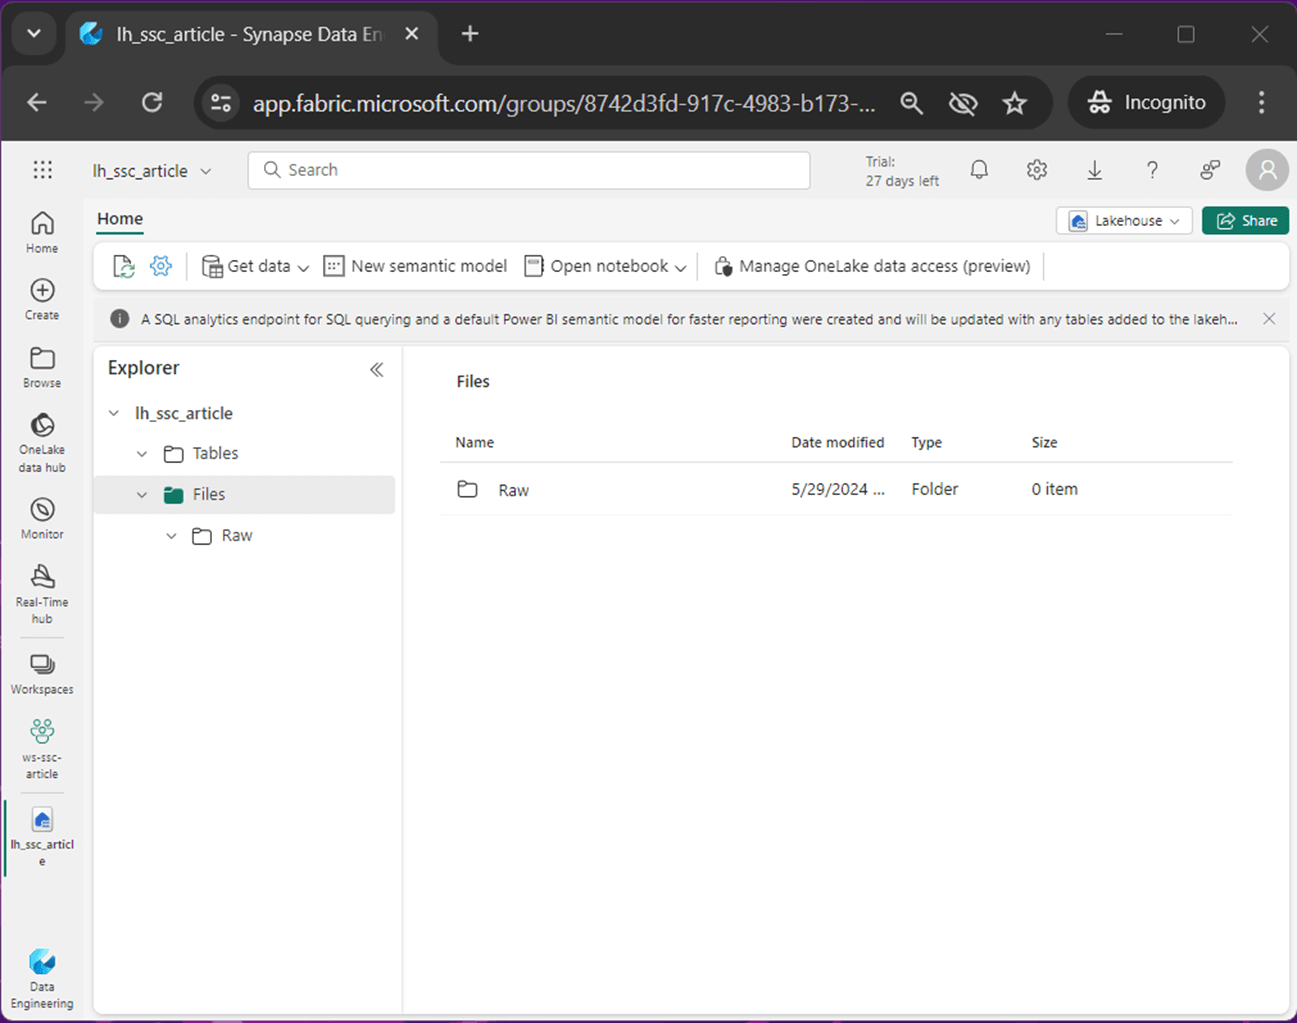
The image below shows only the Raw folder existing in the lakehouse.
What I did not demonstrate is the fact that a directory listing can be filtered to delete files or folders matching a certain pattern. For instance, I can delete all text files from a given directory. I leave this fun coding exercise for you to try.
Upload Folder
I want to talk about a dataset that I have been using for a while. The S&P500 are top companies in the United States. We can learn about the history of this index by looking at the details of Wikipedia.
Henry Varnum Poor formed Poor's Publishing in 1860 which published an investor's guide to the railroad industry. The Standard Statistics Company developed its first stock market weekly index in 1923 which contained 223 companies. These two companies merged in 1923 to form Standard & Poor's. As of January 2024, this index is the most followed equity indices containing 80 percent of the market capital of US public companies, with more than $43 trillion dollars in total assets.
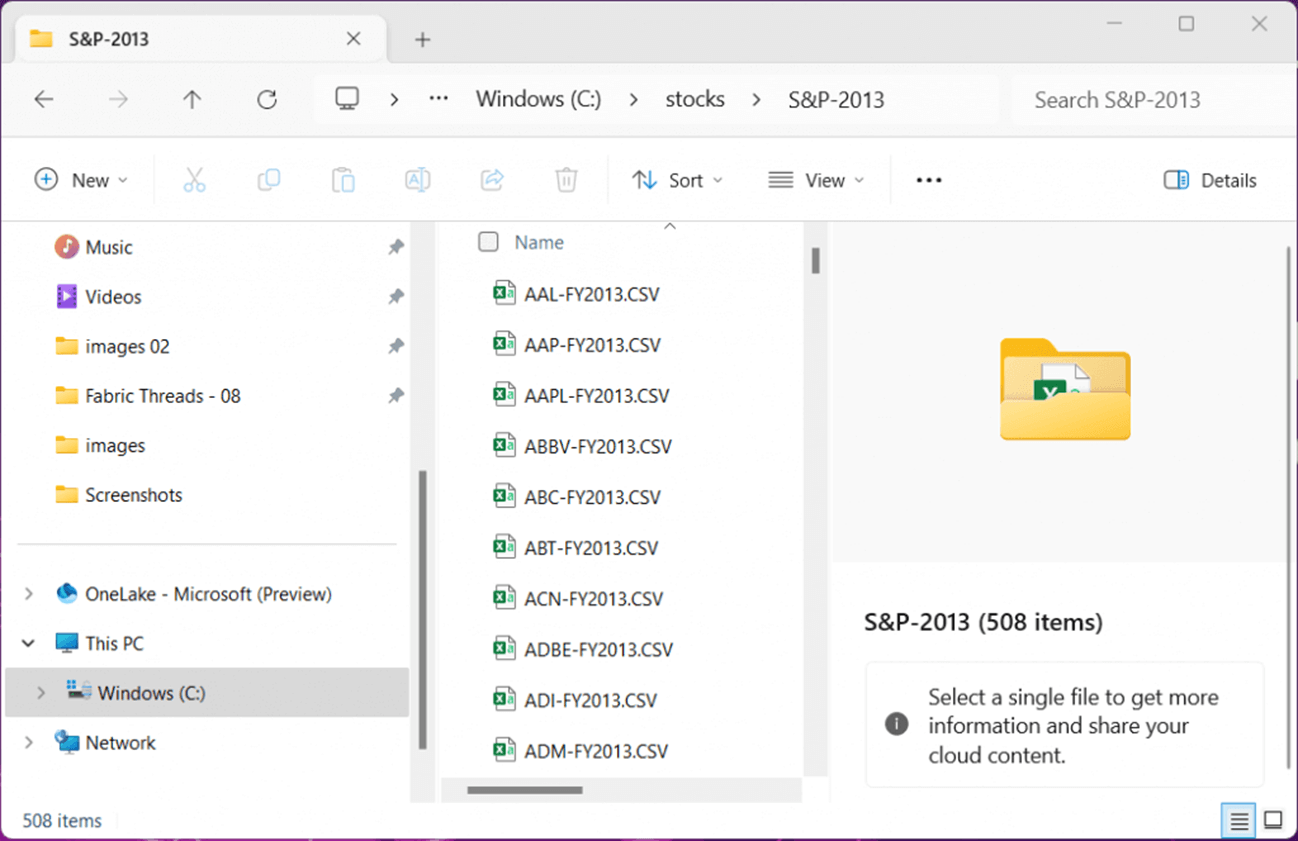
The image below shows 5 years of S&P 500 stock data.
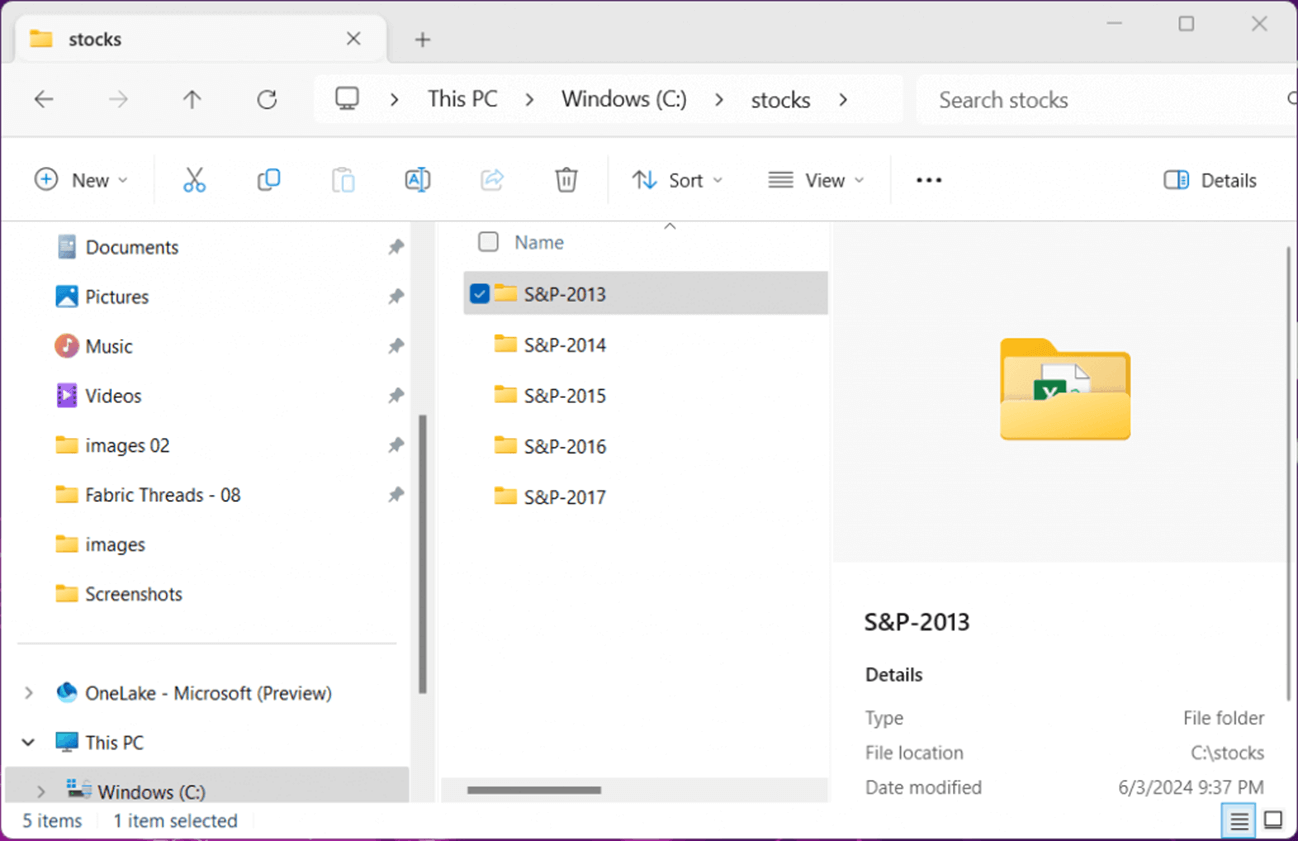
One would think that the index would contain five hundred companies. That is not true. Companies are added and deleted from the S&P 500 index according to total market capital. We can see the total companies on the index at one time in 2013 was 508.
This is a great dataset for evaluating the uploading and downloading of files to OneLake. The PowerShell script below dynamically uploads files/folder to my Lakehouse. I am going to point out PowerShell cmdlets and methods that you should be familiar with. The ForEach-Object allows the developers to traverse a collection of objects. The New-AzDataLakeGen2Item cmdlet can be used to create folders or upload files to Azure Data Lake Storage (OneLake). The replace method of the string data type allows us to transform the file path from Windows to Cloud.
#
# 9 - upload a directory
#
$cnt = 0
$DirList = Get-ChildItem -Path "C:\STOCKS" -Recurse
$DirList | ForEach-Object {

    # common properties
    $FullName = $_.FullName
    $Mode = $_.Mode

    # parent + child = full path
    $Parent = 'lh_ssc_article.lakehouse/Files/Raw'
    $Child = $FullName.replace('C:', '').replace('\', '/')
    $ItemPath = $Parent + $Child

    # create directory
    if ($Mode -eq 'd-----')
    {
      New-AzDataLakeGen2Item -Context $StorageCtx -FileSystem $WorkspaceNm -Path $ItemPath -Directory
    }

    # upload file
    else
    {
      New-AzDataLakeGen2Item -Context $StorageCtx -FileSystem $WorkspaceNm -Path $ItemPath -Source $FullName -Force
    }
    $cnt = $cnt + 1
    $msg = "upload action #{0}" -f $cnt
    Write-Host $msg
}
The PowerShell output below shows 2539 files were uploaded by the script to OneLake.

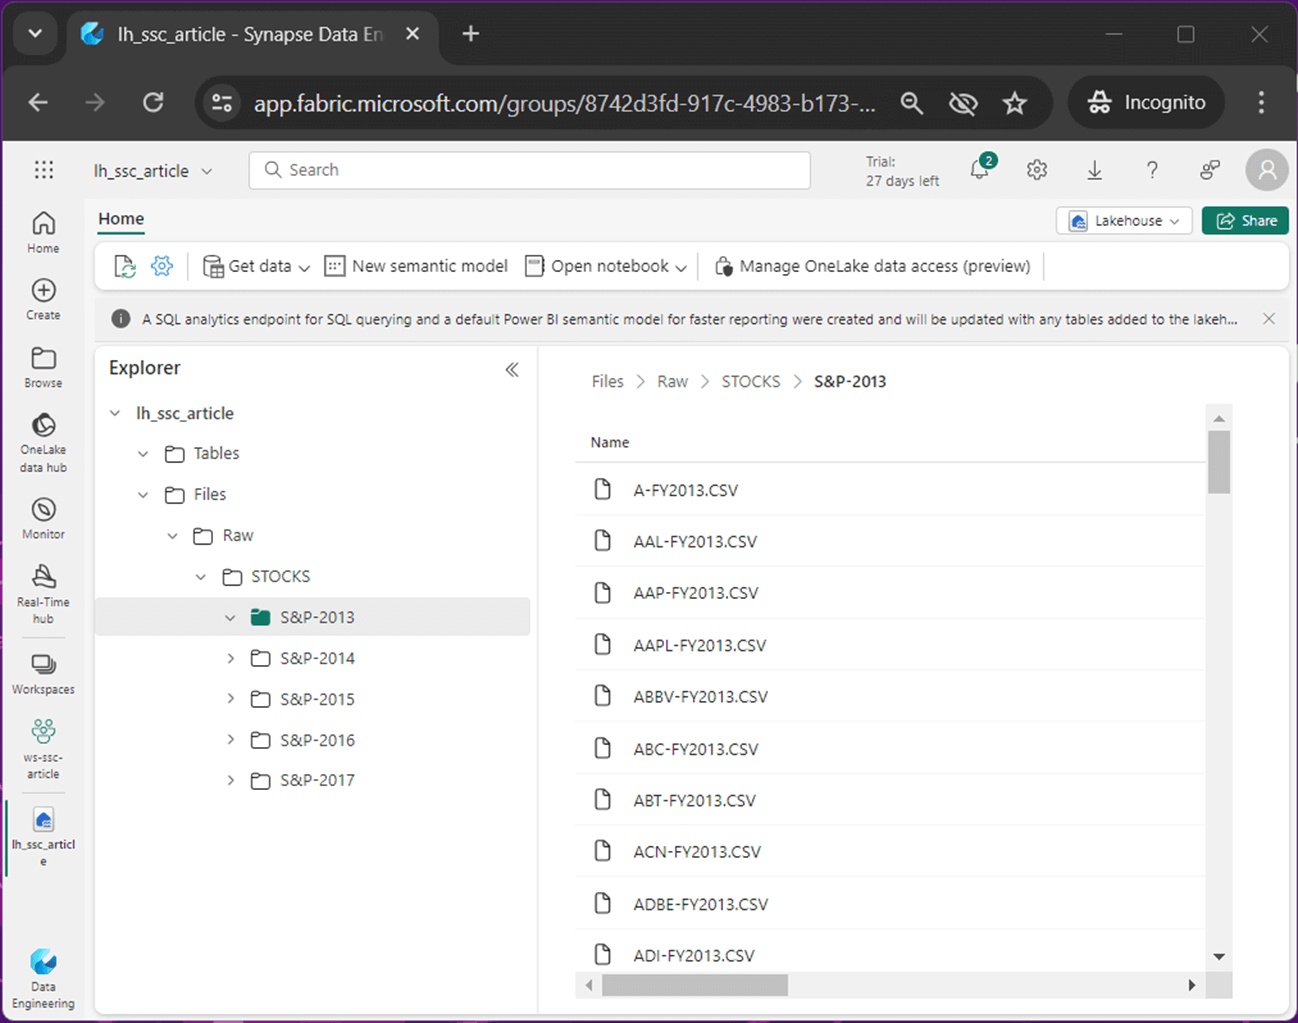
I spend more time documenting and testing than I do coding. You should also. Let us look at the folder for the 2013 stock files. At this point we could start our data engineering efforts in the Lakehouse.
Convert Static to Dynamic Code
I want to talk about the code used to download the weather data. Regardless of whether I am writing code or an article, there is a first draft. But this is not the final draft. Revisiting and refining the code or article produces a better product. Today, we are going to take a second look at the download code.
In the first draft, we had the following issues that I want to address: hard coded creation of the target directory and was not recursive in nature. The PowerShell code below uses the same snippet that lists all folders and files. Please see that section earlier in the article. The algorithm assumes the 'lh_ssc_article.lakehouse’ path will be rooted in the C drive.
There is a cool design pattern I want to cover. How can we grab the destination directory less the file name as a string. The string split method allows us to parse the string on a delimiter into an array. The Select-Object cmdlet has an option to skip the last element of the array. The join method combines the parts of the path into a fully qualified directory path.
The last interesting cmdlet to review is Test-Path. It allows us to determine if the path exists. If it does not, we can use the New-Item cmdlet to create a local folder. Please see the script below for the complete details.
#
#  Step 10 - download all files
#

# get listing
$StorageCtx = New-AzStorageContext -StorageAccountName 'onelake' -UseConnectedAccount -endpoint 'fabric.microsoft.com'
$WorkspaceNm = 'ws-ssc-article'
$ItemPath = 'lh_ssc_article.lakehouse/Files/Raw/Weather'
$ItemList = Get-AzDataLakeGen2ChildItem -Context $StorageCtx -FileSystem $WorkspaceNm -Path $ItemPath -Recurse -FetchProperty

# select file names
$Files = $ItemList | Select-Object Path

# download files
$cnt = 0
$Files | ForEach-Object {

    # get src + dst path
    $SrcPath = $_.Path
    $DstPath = $SrcPath.replace('lh_ssc_article.lakehouse', 'c:').replace('/', '\')
    $DstDir = ($DstPath.split('\') | Select -SkipLast 1) -join '\'

    # make directory?
    if (-Not (Test-Path -Path $DstDir)) {
      New-Item -ItemType Directory -Force -Path $DstDir
    }
    # download files
    Get-AzDataLakeGen2ItemContent -Context $StorageCtx -FileSystem $WorkspaceNm -Path $SrcPath -Destination $DstPath -Force

    # debug prints
    $debug = 0
    if ($debug) {
        Write-Host $SrcPath
        Write-Host $DstPath
        Write-Host $DstDir
        Write-Host ""
    }

    $cnt = $cnt + 1
    $msg = "download action #{0}" -f $cnt
    Write-Host $msg
}

#
# Step 11 - Logout from Azure
#

Disconnect-AzAccount
The image below was captured from Windows Explorer. We can see files from the Lakehouse storage were downloaded to a nested directory structure on the C drive.
I did not cover the Disconnect-AzAccount cmdlet. The cmdlet does not take any parameters and logs the service principle out of Azure. In short, it is boring but a required piece of code that should be included for completeness.
Can this PowerShell script be improved by the developer? Of course it can. PowerShell supports both functions and modules (a collection of functions). All the topics that we discussed today can be turned into methods (functions) inside of the module.
Summary
Previously, we explored how to use the Azure Storage Explore and AzCopy utility with Microsoft Fabric. Both tools required human interaction since Active Directory Accounts were used. Most organizations require these accounts to have Multi Factor Authentication enabled. To avoid this issue, we want to use a service principle to connect to Azure and call APIs via cmdlets.
Today, we learnt how to use PowerShell cmdlets with Microsoft Fabric since this service is built on top of Azure Data Lake Storage. There are many tools that can be used to create PowerShell scripts. My favorite is the Integrated Scripting Environment (ISE) which is installed automatically on every Windows computer. As long as you download and install the Az Module for PowerShell, you can manage OneLake Storage.
Microsoft Fabric segregates services and data by using workspaces. The service account will need to be given rights to the workspace by an administrator before file and/or folder management can be performed in an automated fashion. Additionally, there is a tenant setting that can be used to enable and disable the usage of Azure APIs for Microsoft Fabric. Make sure this setting is enabled.
The following tasks were explored in today’s article: connect to azure, list files and folders, rename files and folders, hard coded script for downloading files, deleting files and folders, and a dynamic script for uploading files and folders. The download script was re-designed by the author to be dynamic in nature.
Now that we have an automated way to upload or download files, how do we schedule the program? If you are using a windows operating system, please check out task scheduler. On the other hand, those Linux uses should look at cron jobs.