Introduction
One of the key features introduced in SQL Server 2005 is the new DTS platform. With the new release of SQL Server Beta 2, you must be eager to get your hands dirty on this new amazing platform. This product does bring in a new perspective and new thinking the way we used to work with DTS. Most of the DTS architecture has undergone dramatic changes. In this article I will walk through an step-by-step easy uploading of a given datafile into SQL Server. This new version of DTS does go beyond the ETL (Extract, Transform, Load) tools definition. You can orchestrate your code and create an workflow with the same. DTS in Yukon is more manageable, usable and more mature from its previous version.
Understanding BI Project
To start creating the project. Go to Start->All Programs->SQL Server 2005->Select Business Intelligent Development Studio. This will open up an environment that is very much familiar to all developers, VS Studio IDE. Press Crtl+Shift+N or Use File->New->New Project option. This will list all the business intelligent projects available. The BI "Workbench" doesn't require a direct connection to the SQL Server to design packages, nor does it require a connection to save work. Since this is an IDE that looks feels and does almost most of the VS Studio environment. It also allows us to integrate our DTS Projects with version control software like VSS.
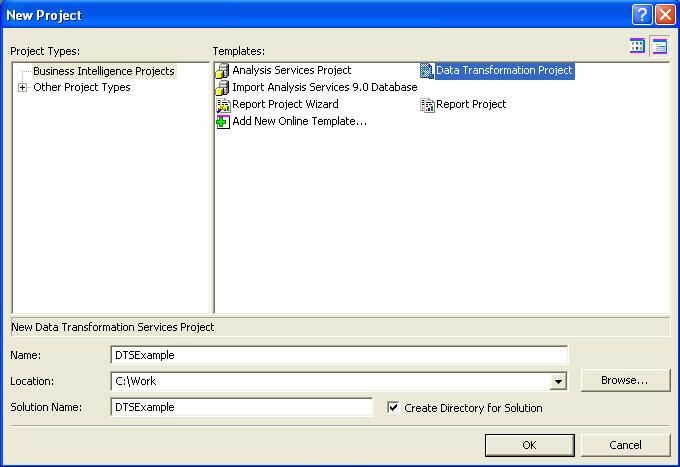
For our exercise we will select Data Transformation Project as selected in the diagram above. After setting our project directory and the project name properly click on OK. This will create the necessary directory structure and all the project related files. The Solution explorer will open up with a default DTS Package. We will change our package name to your custom needs.
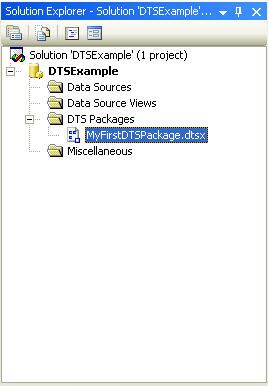
Most of the basic functionality and the explanation of various tasks can be found from my first DTS article at my website. Selecting the DTS Package we are presented in the main application frame. And looking at the Design view we find interesting tabs.
- Control Flow: Gives a logical window to look at tasks. The concept is same to what it used to look in the DTS 2000 world too. This window contains some interesting new tasks, constraints and looping operators like the FOR Loop, FOR EACH Loop, SEQUENCE etc. This is the main task window. All the related control flow tasks are presented in the next task frame. Some of the interesting events are:
- Looping Containers
- ActiveX Script Task
- Bulk Insert task
- Data flow task
- Execute DTS Package
- File System Task
- MSMQ Task
- Send Mail task
- Data Flow: The Data Flow designer manages all of the data movement and transformations between a source and target. In order to include data flow within your package, you must manually add a Data Flow task to the Control Flow designer or let DTS do it for you when you open the Data Flow designer window. Each projects can have multiple Data Flow tasks and each tasks can have a source and destination activities. There can be various transformations possible like the Aggregation, Derived Columns are possible. This can also be considered as a aggregation of logical tasks.
- Event Handlers: This is an interface through which the task raises events and exposes the opportunity for events to be handled. DTS events for every executable container task within the package's runtime environment, are exposed in the user interface with each event having the possibility of its own event handler design surface for implementing compound work flows. Some event handlers provided are: OnCustomEvent, OnError, OnExecStatusChanged, OnNMProgress, OnPostExecute, OnPostValidate, OnPreExecute, OnPreValidate, OnProgress. All the parameters available for the present package are displayed in this section.
- Package Explorer: This gives us an interface through which we can execute the package and view the health of the running Package. It gives you statistics of the various pipelines available, how they were executed and how they were synchronized. The total execution time is also monitored through this window.
Creating our project
In this demo our requirement is to upload windows an event viewer data into SQL Server tables. This might sound very simple. But let's see how we can make this requirement interesting. A simple visual check at the datafile we can see there are multiple types available. A typical datafile looks like:
Type,Date,Time,Source,Category,Event,User,Computer
Information,05-Aug-04,8:14:39 AM,DataTransformationServices90,None,12289,N/A,VINODKNET01
Success Audit,05-Aug-04,8:14:39 AM,MSSQLSERVER,Logon ,18453,vinodk,VINODKNET01
Error,05-Aug-04,8:13:29 AM,DataTransformationServices90,None,12291,N/A,VINODKNET01
Success Audit,05-Aug-04,8:13:28 AM,MSSQLSERVER,Logon ,18453,vinodk,VINODKNET01
Information,05-Aug-04,8:13:28 AM,DataTransformationServices90,None,12288,N/A,VINODKNET01
Information,05-Aug-04,6:15:00 AM,MSDTC,TM,4097,N/A,VINODKNET01
Error,05-Aug-04,6:15:00 AM,Userinit,None,1000,N/A,VINODKNET01
Error,05-Aug-04,6:15:00 AM,Userenv,None,1054,SYSTEM,VINODKNET01
Success Audit,05-Aug-04,1:27:31 AM,MSSQLSERVER,Logon ,18453,vinodk,VINODKNET01
Error,05-Aug-04,1:24:04 AM,DataTransformationServices90,None,12291,N/A,VINODKNET01
Warning,14-Jul-04,7:24:46 PM,WinMgmt,None,62,N/A,VINODKNET01
As said before we can find there are different types like Success, Information, Warnings, Error and so on. In this DTS Package we will try to upload each eventlog source type into respective tables of our choice. I've also added the sample datafile for your reference.
Having laid our foundation in understanding our datafile structure. Let's take a look at the tables these data would get into.
- Aggevnt- Get a distinct count of the source available in the datafile
- ErrorEvents-All error events are loaded into this table
- Evntlog-All information events are loaded into this table
- FailureEvents-All failure events are loaded into this table
- SuccessAuditEvents-All success events are loaded into this table
- WarningEvents-All warning events are loaded into this table
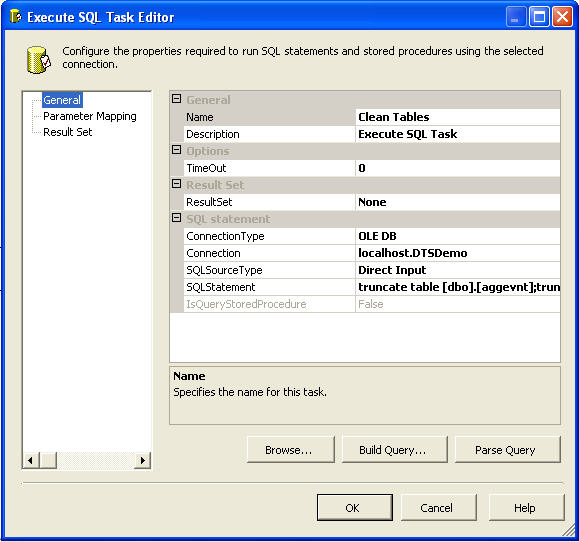
For the first step in our control flow window we will truncate all the above tables before the data is inserted into the table. Drag and drop "Execute SQL Task" into the orchestration frame. You will find a "red cross", this represents an unavailability of database connection to execute the database task. Select the Connection information or create one. And last but not the least we need to provide the SQL Statement. After specifying the configuration our final SQL Task window would look like:
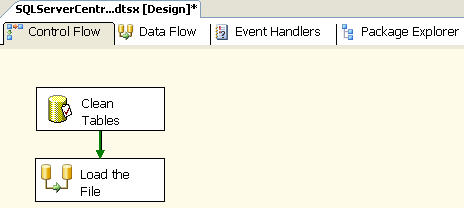
Next drag and drop a Data flow task onto the Control flow window. And then connect the output of the Execute task onto the Data flow task. Now the final Control flow task would look like:
Double click on the data flow task. You will be presented with the Data flow frame window. As said earlier this is the place where we would logically group tasks and perform units of work. And this is the window where we are going to perform the actual designing of our DTS Package. The first task is to get the input datafile into our DTS Package. So drag and drop the "Raw File Source" as the input. Double click on the package and give proper connection information to the flat file. The columns tab after the connection information would look like:
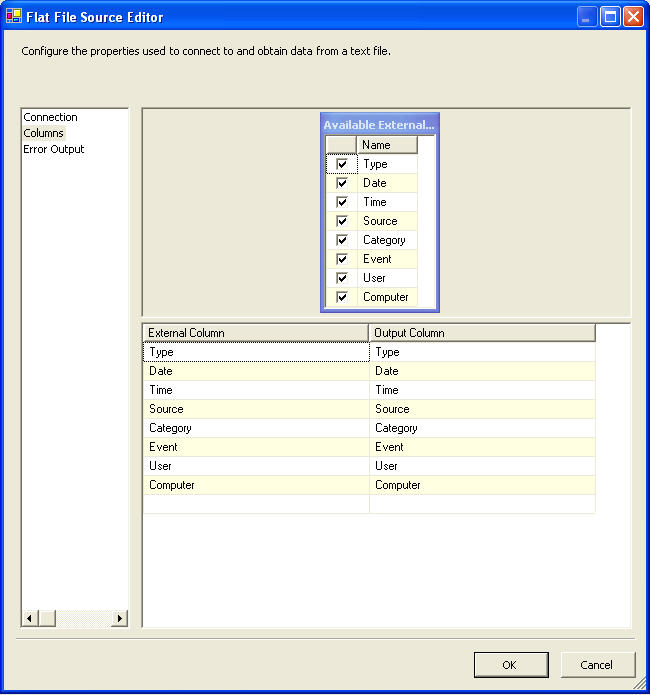
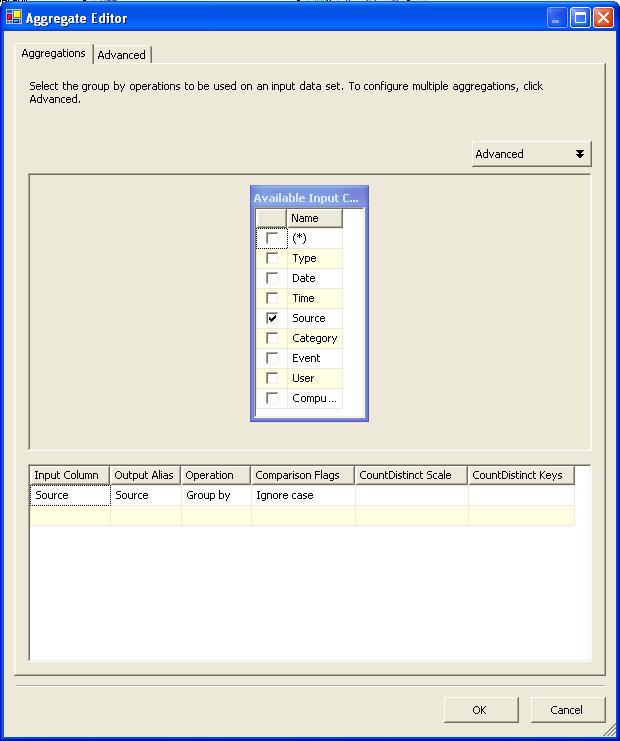
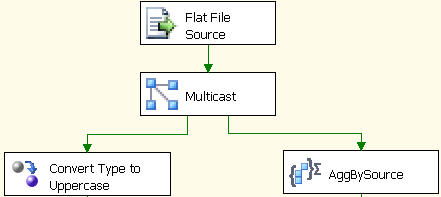
Taking a closer look at the requirement we can see that we have to get the distinct count of the Source and at the same time have to get the file data into our tables. For this task we need to use a Multicast task. The multicast transformation implements the functionality to distribute a single inbound dataset amongst several outputs. The benefits of the multicast are apparent when needing to push the identical dataset to two or more destinations. For our requirement we need to pipe it to a aggregate function and a character map function. The aggregate data flow transform allows for the aggregation of input data from a data stream to multiple aggregation outputs at varying aggregation grouping levels. A typical aggregate output can be as Sum, Count, Average, Maximum, Minimum etc. We can also group by input columns like:
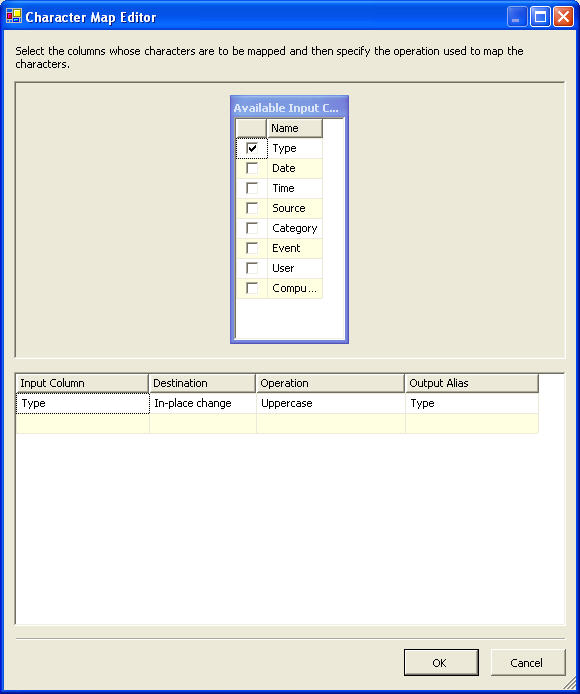
And the character mapping allows us to change the characters input and in-line activity or can form as a new column to the input stream. For this basic task, we will change the input type information to upper case. This will be used for our bifurcation process. Hence the character mapping data will look like:
Finishing our first stage, let us look how our Data flow looks. It surely looks cool !!! But I assure you the final output would look even more beautiful.
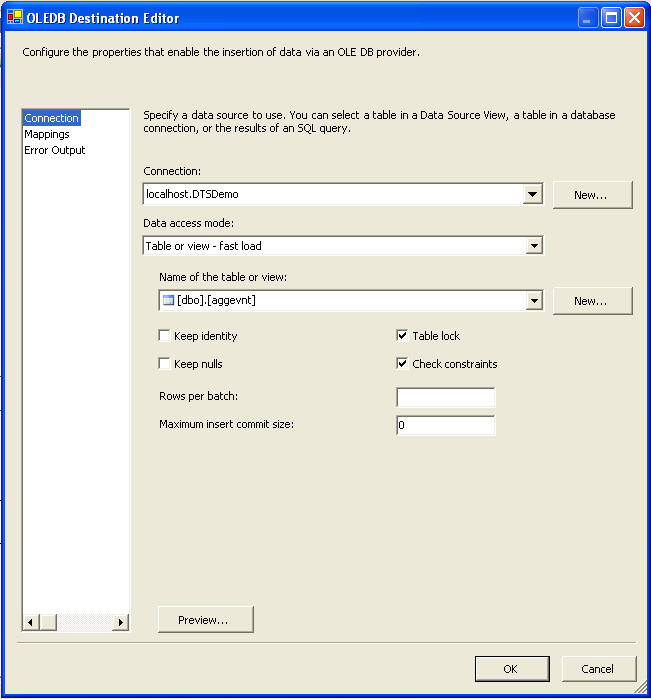
Our next step is to load all the data into SQL Server. For the same just drag and drop an OLE DB Destination. The OLE DB destination is one of the destination types found in the DTS data flow architecture. This destination allows for the connectivity with destinations that are OLE DB compliant. Since SQL Server is also OLE DB Compliant this task can be used effectively. Just connect the input flow and give the connection information. We are all set to play with the column mapping tab and finally the data gets into SQL Server. Typical OLE DB Destination connection information looks like:
Now we do have accomplished one half of our requirement. The other requirement is to insert data from the datafile into corresponding tables. For this we need to use an un-conditional split operation. The conditional split transformation handles the re-direction of data based upon conditions being met. These conditional expressions can be driven by columnar values or variables that are within scope for the data flow task and the transform. And for our requirement we can take a look at the conditional-split operation.
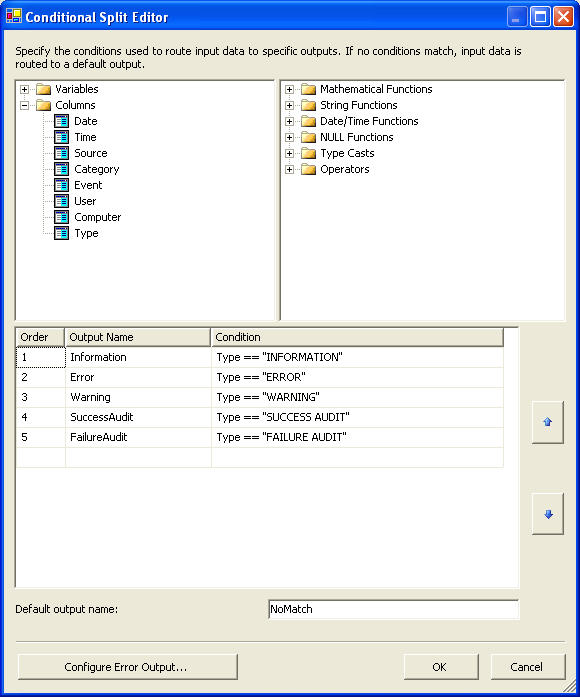
Hereafter we are on course to insert data into our corresponding tables using OLE DB Destination. The final finished product surely looks graceful and more elegant !!!
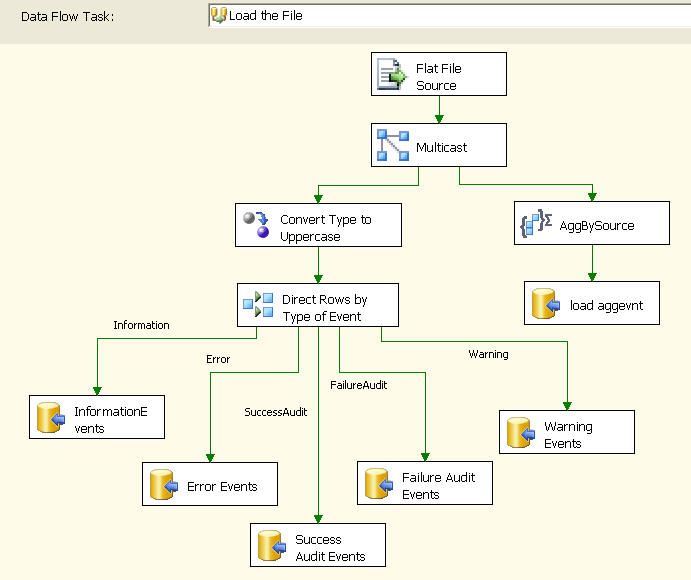
If you wish to execute a package, you can click on the play icon on the toolbar, press F5, or choose Debug -> Start from the menu. This puts the design environment into execution mode, opens several new windows, enables several new menu and toolbar items, and begins to execute the package. We can also optionally debug the package using the watch window. Just double click on the connecting arrows and set some watch variables and re-execute the package. Let's take a look at the number of rows loaded into the system.

With the minimum config and dry run on my personal laptop. I was able to run this package and load data into Yukon in less than 1.5 seconds. And I am amazed with the improvements DTS Pipelines have introduced.
Conclusions
I think in this article we have taken a sneak preview to what Yukon DTS is to offer us. I have been playing with this new DTS architecture for sometime now and I feel DTS has given a fresh look and feel to this ETL tool. I like DTS on its usability fronts and with a final word is Yukon rocks !!!
You can download the SQL code below in the Resources section.

