

Introduction
Visual Studio Code (VSCode) is a free code editor used by many programmers. In this article, we will show how to integrate VSCode with Jupyter Notebook. Also, we will learn how to use markdown code to comment on our code in VSCode.
What is Jupyter Notebook?
It is an application used to create and share documents. You can easily share your code on the web, and create pretty nice comments using images, bold text, bullets, and rich text in general.
Jupiter was created by Fernando Pérez in 2001 as part of a Python project. It is commonly used in GitHub.
Requirements
Install the Python and Jupyter extension
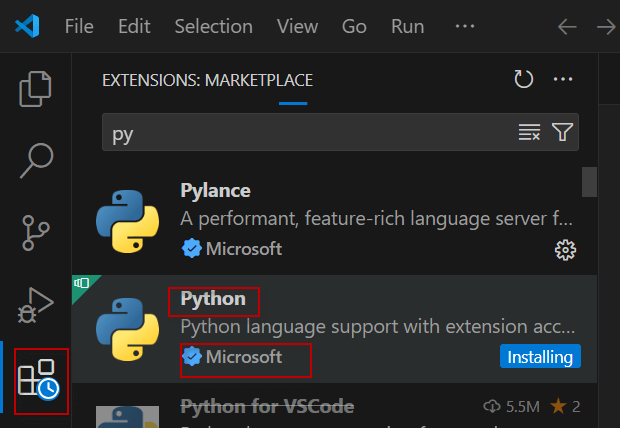
First, in VSCode, press the Extensions icon and Install the Python Extension from Microsoft.
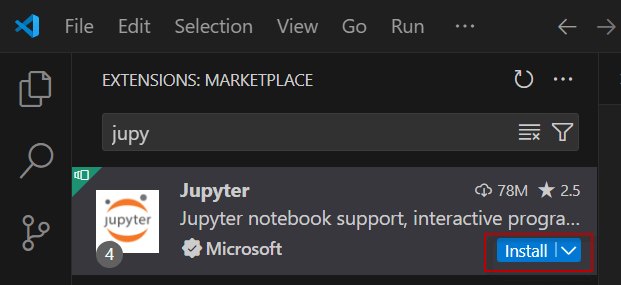
Secondly, install the Jupyter extension.
Thirdly, create a folder named Jupyter in the Windows Explorer:

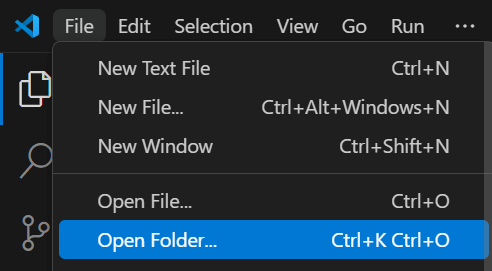
Also, in Visual Studio Code, open that folder:
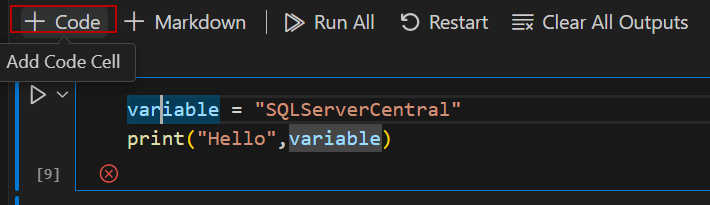
Testing the code
First, press the Explorer icon if necessary and press the New File option.

Secondly, write test.ipynb or any name of your preference. The .ipynb extension stands for Interactive Python Notebook which is the extension to program in Python using Jupyter Notebook.
Thirdly, press the Select Kernel option.
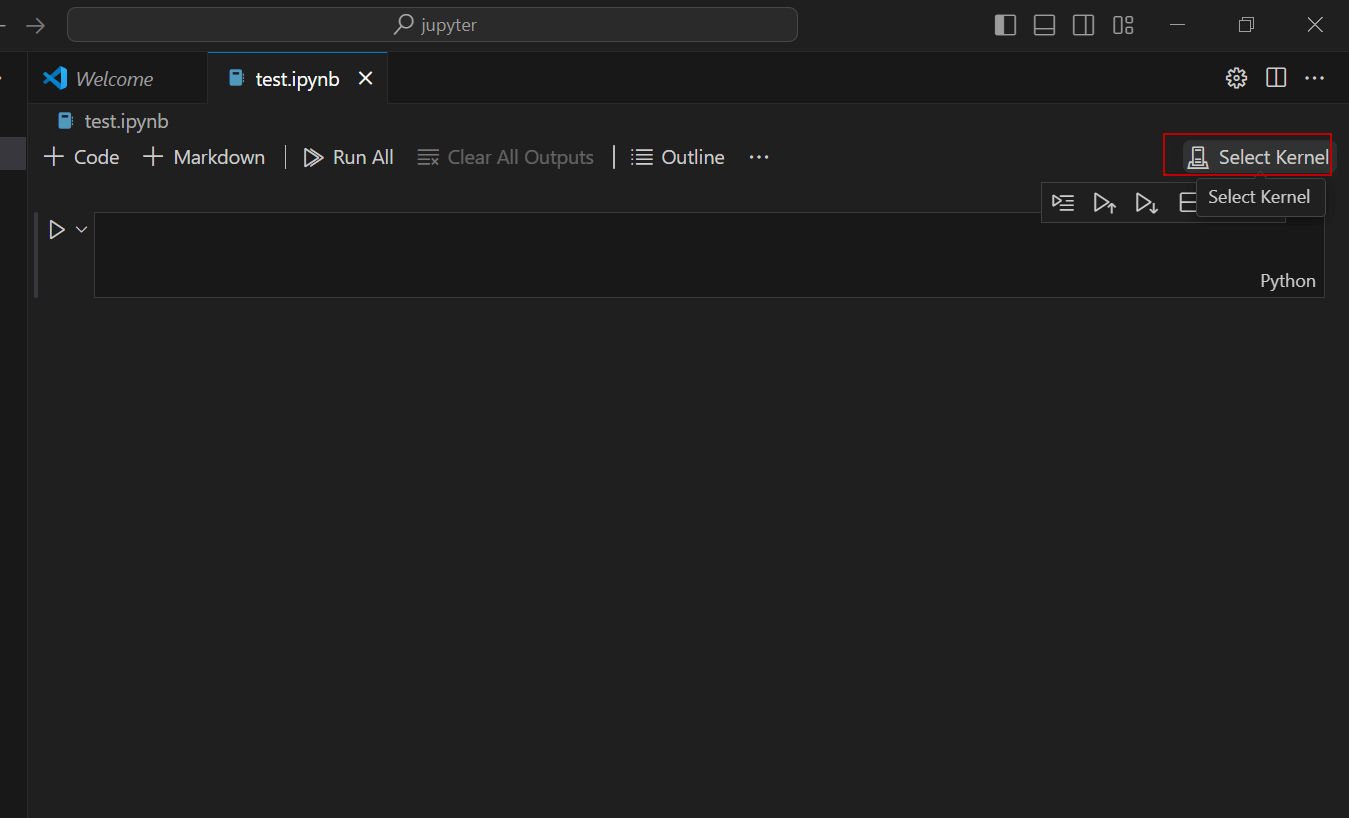
Also, select Python Environment.
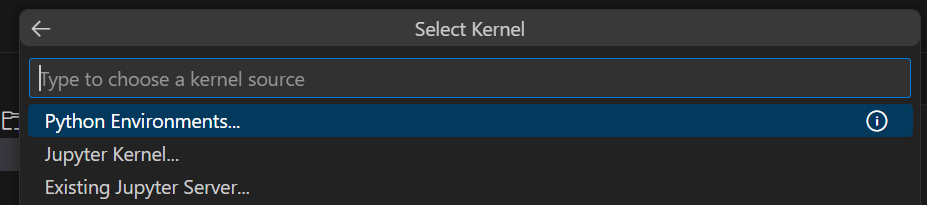
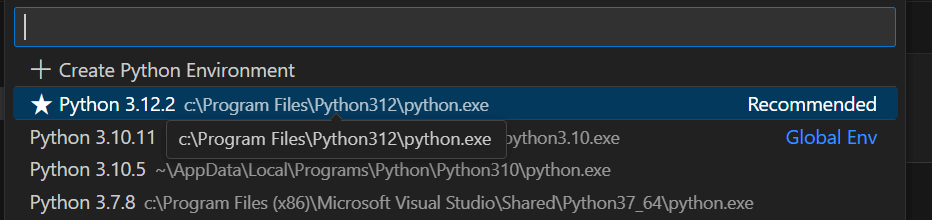
Finally, select a Python environment (usually the Recommended one).
Markdown in Jupyter
When you have a Jupyter Notebook, you can create Code (Python code) or Markdown. In this section, we will work with Markdown code.
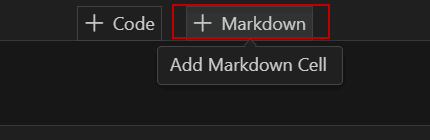
Add Markdown code by clicking the + Markdown button.
Markdown is a markup language. It is commonly used to comment code like Python. It is like HTML, but easier to read and write. It is easier and it can be easily converted to HTML. Let’s take a look at it:
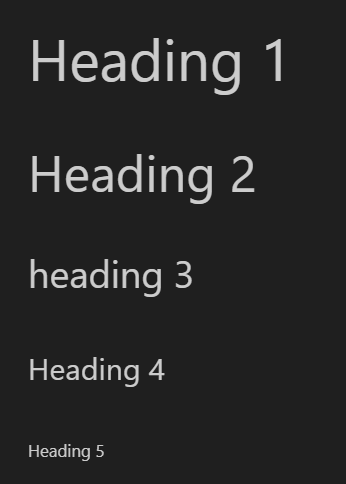
First, you have Heading 1, heading 2, and heading 3. Here is an example:
# Heading 1

## Heading 2

### heading 3

##### Heading 4

###### Heading 5
Secondly, press the Stop Editing icon to check the results:
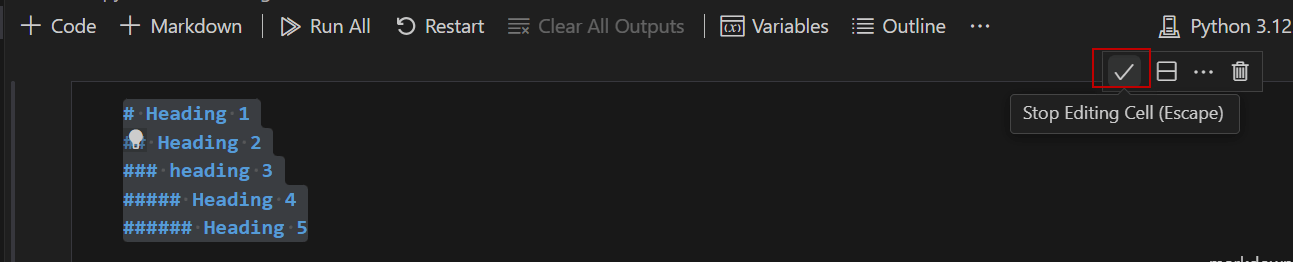
Now you know how to generate headings. As you can see, you only need to add the #s before the text.
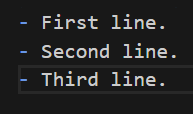
Also, you can generate bullets. The code is the following:
- First line.

- Second line.

- Third line.
The results are the following:
Finally, we will show how to create a numbered list.
1. First.

2. Second.

3. Last.

Using bold, italic, fonts in a Jupyter Notebook
Now, we will show some examples with the fonts. First, we will show how to use a bold font:
This is a **bold** example.

Secondly, we will show how to generate italic fonts:
This example shows how to use *italic* fonts.

Finally, we have the strikethrough option.
This example shows how to use the ~~strikethrough~~ option.

Working with tables, blockquotes, links, and code in VSCode using Jupiter Notebook
In this section, we will learn how to create tables, blockquotes, and code using Markdown in VSCode.
First, we have an example that shows how to create a blockquote.
> This is an example of a blockquote.

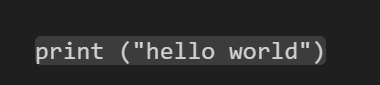
Secondly, we have a code example.
print ("hello world")You need to indent to create a block of code.
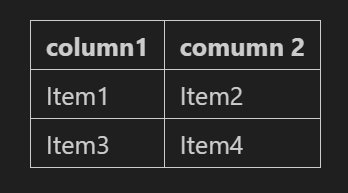
Finally, we will show an example of using a table using Markdown.
|column1 |comumn 2 |

|--|--|

|Item1 |Item2

|Item3 |Item4
As you can see, learning markdown is a straightforward process and it is 10 times easier than HTML. This is a markup language specialized in code.
Working with images and Links in Jupyter Notebook in VSCode
In this section, we will show how to work with links and images.
First, we have a link example.
Click the link below: [sqlservercentral](https://www.sqlservercentral.com/)

Finally, we will show how to add images.

The image will look like this one.

Working with code in Jupyter Notebook
Previously, we learned how to add Markdown language to comment on our code. Now, we will teach you some tools to work with our code.
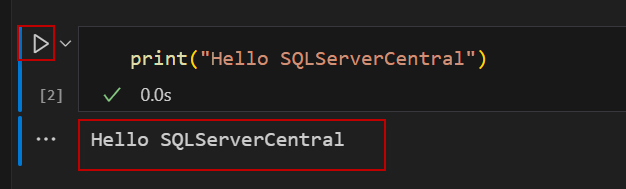
In Jupyter Notebook we can divide the code in cells. A cell is a block of code that you can have. In a single file, you can have multiple cells of code.
If you run the Execute Cell icon, the cell of the code will run.
Also, you have the option to debug the Cell, the Debug Cell option will help you to Debug your code and find errors. The VSCode will ask which debugger to use. Usually, we will select the Python Debugger.
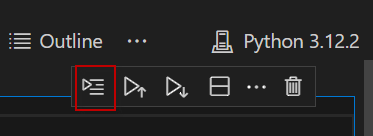
First, we have the Run by Line option that is used to debug line by line.
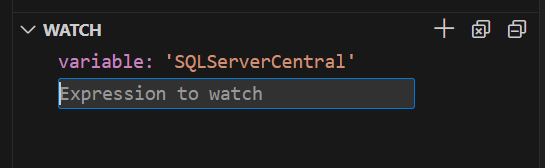
When you debug, you can see the variables used, the values of the variable.
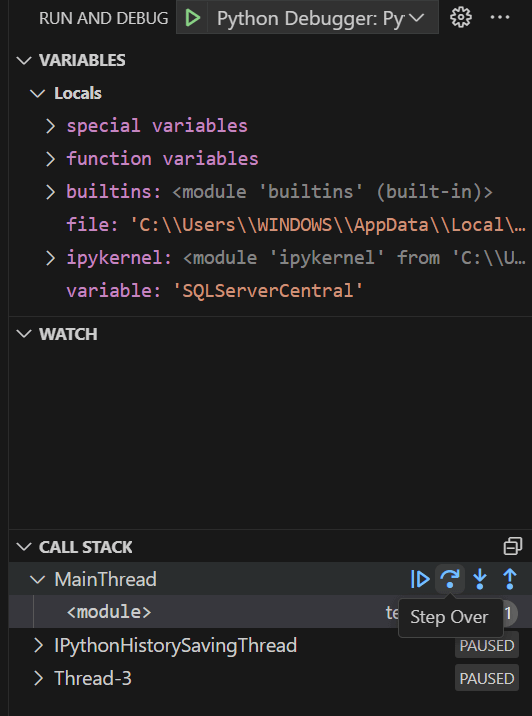
The watch section can help you to add expressions and watch the values.
Also, we have the CALL STACK. This section shows the order of the functions executed. It shows the stack of function calls made.
Other debugging functions in Jupyter Notebook and VSCode
We also have the following options:
First, we have Run by Line option to run one line at a time.
Secondly, we have the Execute Above Cells to execute the Cells that are above.
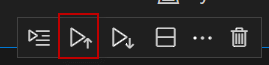
Thirdly, we have the Execute Cell and Below to execute the current cell and the next one.
Also, we have the option to Split a cell.
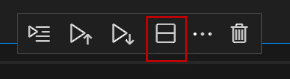
The browse button can help to copy, paste, change, merge, and cut cells. We can also add tags or show line numbers.

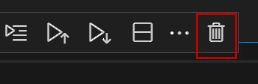
Finally, we have the option to delete the cell.
Bringing all together in Jupyter Notebook and VSCode
We will show you how to work with Jupyter Notebook using Python Code and some markdown notes. The code will insert images into the SQL Server using Python.
First, we will create some markdown notes:
The code will be the following. Paste this into the markdown cell.
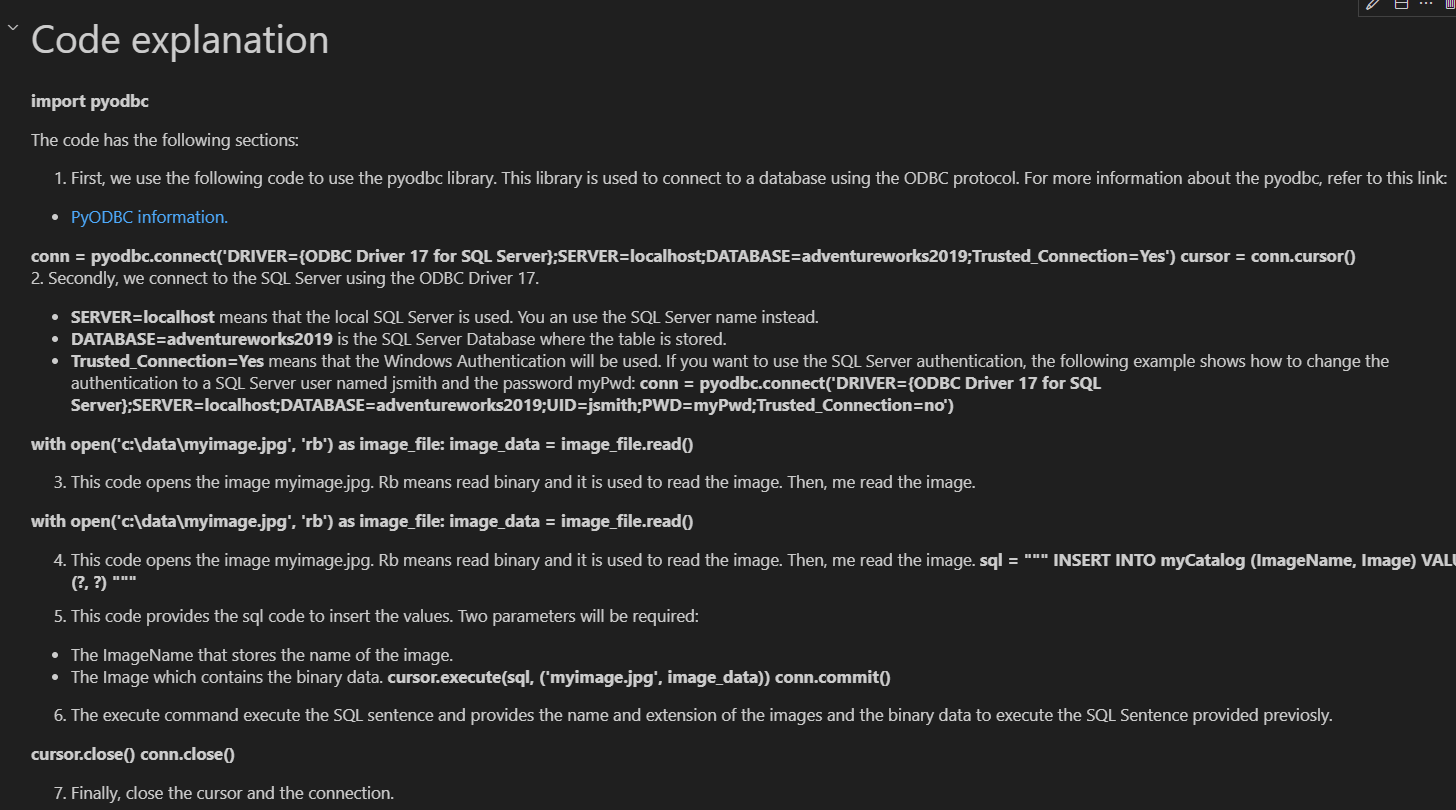
# Code explanation

 **import  pyodbc**

The code has the following sections:

1. First, we use the following code to use the pyodbc library. This library is used

to connect to a database using the ODBC protocol. For more information about the pyodbc, refer to this link:

 - [PyODBC information.](https://pypi.org/project/pyodbc/)

 **conn  =  pyodbc.connect('DRIVER={ODBC Driver 17 for SQL Server};SERVER=localhost;DATABASE=adventureworks2019;Trusted_Connection=Yes')**

 **cursor  =  conn.cursor()**

 2. Secondly, we connect to the SQL Server using the ODBC Driver 17.

- **SERVER=localhost** means that the local SQL Server is used. You an use the SQL Server name instead.

- **DATABASE=adventureworks2019** is the SQL Server Database where the table is stored.

- **Trusted_Connection=Yes** means that the Windows Authentication will be used. If you want to use the SQL Server authentication, the following example shows how to change the authentication to a SQL Server user named jsmith and the password myPwd:

**conn = pyodbc.connect('DRIVER={ODBC Driver 17 for SQL Server};SERVER=localhost;DATABASE=adventureworks2019;UID=jsmith;PWD=myPwd;Trusted_Connection=no')**

**with  open('c:\\data\\myimage.jpg', 'rb') as  image_file:

image_data  =  image_file.read()**

3. This code opens the image myimage.jpg. Rb means read binary and it is used to read the image. Then, me read the image.

**with open('c:\\data\\myimage.jpg', 'rb') as image_file:

    image_data = image_file.read()**

4. This code opens the image myimage.jpg. Rb means read binary and it is used to read the image. Then, me read the image.

**sql  =  """

INSERT INTO myCatalog (ImageName, Image)

VALUES (?, ?)

"""**

5. This code provides the sql code to insert the values. Two parameters will be required:

 - The ImageName that stores the name of the image.

 - The Image which contains the binary data.

**cursor.execute(sql, ('myimage.jpg', image_data))

conn.commit()**

6. The execute command execute the SQL sentence and provides the name and extension of the images and the binary data to execute the SQL Sentence provided previosly.

**cursor.close()

conn.close()**

7. Finally, close the cursor and the connection.
Secondly, we will look at the markdown generated. The markdown code includes links, bold documentation about the code.
Python code in Jupyter Notebook and VScode
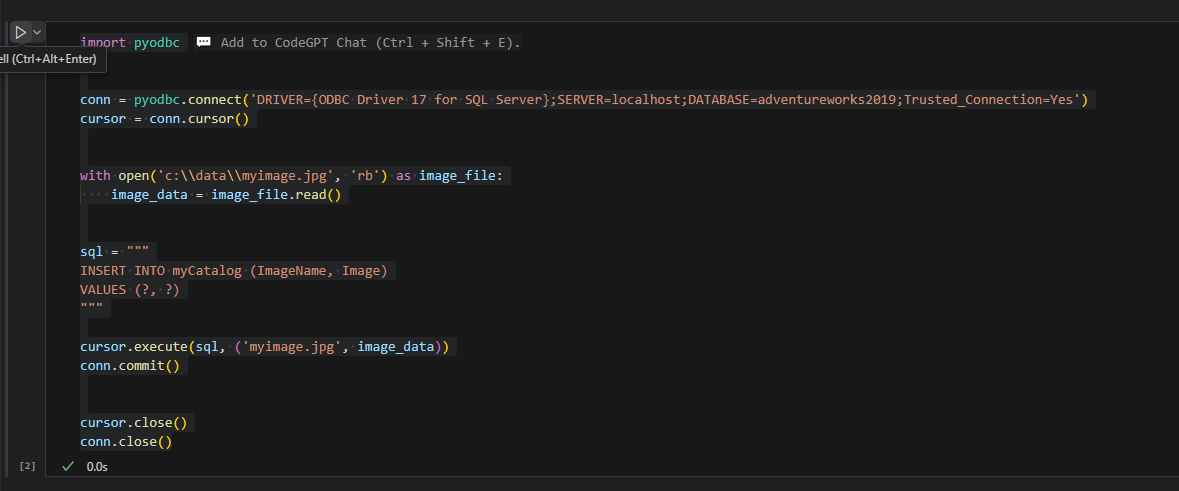
In this section, we will create some Python code. The code inserts images into SQL Server using Python. Let's take a look at the code:
import pyodbc

conn = pyodbc.connect('DRIVER={ODBC Driver 17 for SQL Server};SERVER=localhost;DATABASE=adventureworks2019;Trusted_Connection=Yes')

cursor = conn.cursor()

with open('c:\\data\\myimage.jpg', 'rb') as image_file:

    image_data = image_file.read()

sql = """

INSERT INTO myCatalog (ImageName, Image)

VALUES (?, ?)

"""

cursor.execute(sql, ('myimage.jpg', image_data))

conn.commit()

cursor.close()

conn.close()
The code will look like this:
Conclusion
As you can see, VSCode provides a pretty nice interface to create Python notebooks. You need to add the extension and then it is a straightforward process to add your comments using markdown code which provides rich text that can be easily shared in GitHub. Also, with Jupyter Notebook you can open the
We also learned some interesting options to debug the code using Jupyter Notebook. We can divide the code into cells and add rich text using markdown.