Introductory warnings!
If you're one of those that heap scorn on Enterprise Manager (EM) and the people that use it, please note that this article has been written exclusively with the newbie in mind. One of the members of this site - Erik Little - once said something so remarkably enthusiastic that I was immediately struck by how much all of us can benefit by adopting such a novel and refreshing outlook towards being a rookie! Erik said - "Man, it's great being a newbie, feels like Christmas every day!" - I'm sure all of you agree that this can't be topped for a positive attitude. EM and "newbieness" are tied together in that this tool can teach a lot to someone just starting out with SQL Server and who has some basic knowledge of T-Sql syntax. So while there are still people on SQL Server 2000 and before the Yukon gold rush knocks this great tool off the map, let's proceed to make good use of some EM basics with some Query Analyzer (QA) magic. Before we start, I must redeem myself with the disclaimer that all the database objects in this article have been created for demonstration purposes only and even the slightest similarity to any real world database is completely unintentional!
Let's learn how to create tables, views and stored procedures using both EM and QA to our advantage:
- Expand Databases, right click on Tables and select New Table...
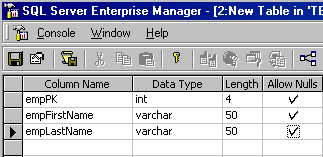
- In the grid provided for Column Name, Data Type, Length and Allow Nulls, type in 3 column names and select their datatypes as you see below (leave the SQL Server defaults for varchar lengths and Allow Nulls as is):

- Select the empPK column and in the Column details box provided at the bottom of the screen select Identity and yes.

- Save this table as EmpDetails.
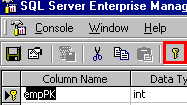
- Right click on the EmpDetails table and select Design Table. With empPK selected, click on the Set primary key icon on the menu bar and Save.

- The exercise behind setting the primary key after the table creation is to enable us to view the alter table script.
Right click on EmpDetails again and select All Tasks - Generate SQL Script... In the Options tab, under Table Scripting Options, check the two boxes that say Script indexes and Script PRIMARY keys, FOREIGN keys, defaults, and check constraints. Go back to the General tab and click on the Preview button on the top right of screen. Click on the Copy button of your preview window.
Open Query Analzyer and paste the SQL script and there you have it….the script for both the Create table as well as the Alter Table where we set the primary key constraint on the empPK column.
if exists (select * from dbo.sysobjects where id = object_id(N'[dbo].[EmpDetails]') and OBJECTPROPERTY(id, N'IsUserTable') = 1)
drop table [dbo].[EmpDetails]
GO

CREATE TABLE [dbo].[EmpDetails] (
[empPK] [int] IDENTITY (1, 1) NOT NULL ,
[empFirstName] [varchar] (50) COLLATE SQL_Latin1_General_CP1_CI_AS NULL ,
[empLastName] [varchar] (50) COLLATE SQL_Latin1_General_CP1_CI_AS NULL
) ON [PRIMARY]
GO

ALTER TABLE [dbo].[EmpDetails] WITH NOCHECK ADD
CONSTRAINT [PK_EmpDetails] PRIMARY KEY  CLUSTERED
(
[empPK]
)  ON [PRIMARY]
GO
- Delete the ALTER TABLE section and modify the remaining script to create a new table called EmpAccounts:
if exists (select * from dbo.sysobjects where id = object_id(N'[dbo].[EmpAccounts]') and OBJECTPROPERTY(id, N'IsUserTable') = 1)
drop table [dbo].[EmpAccounts]
GO

CREATE TABLE [dbo].[EmpAccounts] (
[empFK] [int] NOT NULL ,
[empAccountNumber] [int] NULL ,
[empBankName] [varchar] (50) NULL
) ON [PRIMARY]
GO
- Run the script by clicking on the Execute Query Play button or F5 on your keyboard and you have just created a new table and learnt a little of T-SQL syntax along the way. Go back to EM and you will see the new table that you have just created.
Now let's insert data into the two tables using EM for one and the QA for the other:
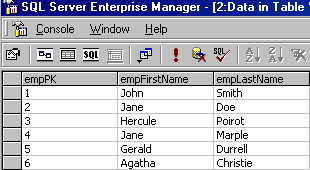
- Right click on EmpDetails table, Open Table, Return all rows and insert 6 sample rows - you do not have to insert any values in the empPK column as it is an identity column and SQL Server will generate this automatically for you. These are the rows that I created for demonstration purposes:

Before we insert rows into the EmpAccounts table using QA we will create a view - the reasons for creating one will become apparent as we go along - but essentially we need this view to tell us what empAccountNumber and empBankName to enter against a given empFK.
Now for views:
- Right click on Views in EM and select New View.... Right click on the upper pane and select Add Table - from the list of tables, double click and open EmpDetails first and then the EmpAccounts table - click Close. So far the two tables are not linked by any relationships and you will see that the T-Sql generated in the bottom pane reads:
SELECT
FROM         dbo.EmpDetails CROSS JOIN
                      dbo.EmpAccounts
Select the empPK column and keeping your mouse pressed, select the empFK column from the second table. Notice how the T-Sql immediately changes to:
SELECT
FROM         dbo.EmpDetails INNER JOIN
                      dbo.EmpAccounts ON dbo.EmpDetails.empPK = dbo.EmpAccounts.empFK
Note also that a link has been created between the two tables represented iconically by the diamond shaped inner join.
For now let's select all the columns in the order they appear in the two tables, so the first column selected is empPK and the last one is empBankName and the T-Sql generated is:
SELECT     dbo.EmpDetails.empPK, dbo.EmpDetails.empFirstName, dbo.EmpDetails.empLastName, dbo.EmpAccounts.empFK,
                      dbo.EmpAccounts.empAccountNumber, dbo.EmpAccounts.empBankName
FROM         dbo.EmpDetails INNER JOIN
                      dbo.EmpAccounts ON dbo.EmpDetails.empPK = dbo.EmpAccounts.empFK
The first change we're going to make is to concatenate the first name and last name into one column for readability. Your T-Sql will look like this after concatenation:
SELECT     dbo.EmpDetails.empPK, dbo.EmpDetails.empFirstName + ' ' + dbo.EmpDetails.empLastName AS empName, dbo.EmpAccounts.empFK,
                      dbo.EmpAccounts.empAccountNumber, dbo.EmpAccounts.empBankName
FROM         dbo.EmpDetails INNER JOIN
                      dbo.EmpAccounts ON dbo.EmpDetails.empPK = dbo.EmpAccounts.empFK
If you click on run represented by the exclamation mark on the menu bar, you will not get any rows back. The two tables are joined by an inner join - simply put - the inner join will return only those rows where for each empPK in EmpDetails you have corresponding empFK rows in EmpAccounts. Since EmpAccounts does not have any data, you will not see any rows. To ensure that you get the resultset from both tables, let's change the inner join. Right click on the link icon between the two tables and select Select All Rows from EmpDetails. Notice how the T-Sql immediately changes to:
SELECT     dbo.EmpDetails.empPK, dbo.EmpDetails.empFirstName + ' ' + dbo.EmpDetails.empLastName AS empName, dbo.EmpAccounts.empFK,
                      dbo.EmpAccounts.empAccountNumber, dbo.EmpAccounts.empBankName
FROM         dbo.EmpDetails LEFT OUTER JOIN
                      dbo.EmpAccounts ON dbo.EmpDetails.empPK = dbo.EmpAccounts.empFK
Now if you click on Run, you will see all the rows from EmpDetails with null values in the EmpAccounts table.
Note also that the diamond shaped inner join icon now changes to represent a left outer join one.
- Save this view as vwEmpInfo and let's move back to QA to enter values into the EmpAccounts table using the newly created view to help us.
- In QA, type SELECT * FROM vwEmpInfo and run the query.
Using the resultset in the bottom pane, you can now start inserting the values for the EmpAccounts table since you can now see the employee details against which you can enter corresponding account data.
These are the values I inserted into my EmpAccounts table using Insert into:
INSERT INTO EmpAccounts (empFK, empAccountNumber, empBankName) VALUES(1, 1000, 'Wachovia')
INSERT INTO EmpAccounts (empFK, empAccountNumber, empBankName) VALUES(2, 1001, 'Sun Trust')
INSERT INTO EmpAccounts (empFK, empAccountNumber, empBankName) VALUES(3, 1002, 'Amro Bank')
INSERT INTO EmpAccounts (empFK, empAccountNumber, empBankName) VALUES(4, 1003, 'Credite Suisse')
INSERT INTO EmpAccounts (empFK, empAccountNumber, empBankName) VALUES(5, 1004, 'Central Fidelity')
INSERT INTO EmpAccounts (empFK, empAccountNumber, empBankName) VALUES(6, 1005, 'Wachovia')
- Now back to our view in EM where we will uncheck the empPK and empFK columns since these were checked only so we could use the empPK as reference to enter values into the EmpAccounts table. Change the link back to an INNER JOIN either by using the icon - properties or by directly typing it in the T-Sql pane. Save the view again with the new changes.
Now for the very last object - stored procedure:
- A stored procedure is (simply explained) one or more T-Sql statements stored in Sql Server. Right click Stored Procedure and New Stored Procedure.... I usually use a comments template at the beginning of each of my procedures which is infinitely more detailed than what is shown here. Please substitute with your own customised version. Here's the procedure I created:
/************************************************************************************
Name:procEmpInfo

Details:View employee name, account number and bank info from
EmpDetails & EmpAccounts tables.

Date            Who             Comments
History:     08/10/2005      Sushila          Created initial.
************************************************************************************/CREATE PROCEDURE procEmpInfo
AS

SELECT * FROM vwEmpInfo
GO
- When creating and saving a new stored procedure, EM offers us the opportunity to also Save as Template. Once it is saved as a template, it is presented to you everytime you want to write a new procedure - you only have to modify the existing template and thus save on typing, editing etc. As indicated by the Create syntax, save this procedure as procEmpInfo.
- Now for the very last step - using QA, run your new procedure - EXEC procEmpInfo to view the results and you should see all the employee names with the corresponding account numbers and bank names.
Summary
Now let's review everything that we've accomplished with the exercises listed above:
- Created table EmpDetails using EM.
- Set primary key on EmpDetails after saving it so that we could get the Alter Table syntax.
- Generated script for EmpDetails using EM - modifying this script in QA to create new table EmpAccounts.
- Inserted values into EmpDetails table via EM.
- Created view in EM - initial T-Sql was Cross Join when there was no relationship between the two tables. Created relationship using the Design interface and stepped through the process of Inner Join and Left Outer Join learning a lot of useful join syntax along the way.
Concatenated empFirstName and empLastName to get empName.
- Used view in QA to insert values into EmpAccounts.
- Modified view in EM and changed the join back to INNER and selected only the three columns that were required.
- Created stored procedure in EM (along with template for future use) - using the view.
- Executed stored procedure in QA.
Conclusions
All the exercises listed were primarily to demonstrate that both EM and QA are closely interwoven; We can always use EM for its' ease of use and the fact that it is a great learning tool to get acquainted with T-Sql syntax - to a point where with enough practice, we can comfortably start leaving the EM wizards behind to command some T-Sql wizardry of our own.
In the next article in the newbie series, we'll look at yet another way to create tables using EM and also have some fun with learning how to create a computed column and a trigger.


