Microsoft has introduced an impressive new feature in SQL Server 2016 called Dynamic Data Masking (DDM). Dynamic Data Masking allows a developer or administrator to decide how much of the sensitive data to reveal with minimal impact on the application layer. This feature also helps to simplify the design and coding of security in your application by making the data at the database level.
Dynamic Data Masking does not modify or change the actual data stored in a table; it applies the masking functions on the table’s column at the time of returning a data as the result of a query. Dynamic Data Masking supports four data masking functions, as listed below, using which you can mask the data at the database level:
- Default
- Random
- Custom String
Note: There are two ways using which you can apply the DDM functions. You can apply this at the time you create the table or you can apply this function in the existing table that contains data using an ALTER statement.
Default
The default function of Dynamic Data Masking masks data on the basis of the column's data type.
- If the data type is date and time, then it shows the data in 1900-01-01 00:00:00.000 formats.
- If the data type is numeric then it shows a 0.
- If data type is string, then it displays data by adding Xs in the string. This function can add maximum 4 X’s in string data, if string contains less than 4 characters, then it will show X for fewer characters only.
An example of the Default Dynamic Data Masking function is shown below.
In this whole article, we will use the same table, so let's create this table. The below script will create a table named DDM_Student_Sample. While creating the table, we will apply the default DDM function on the Student_DOB column. The actual data of the Student_DOB column will not be visible to the user who has read permission. Instead of the actual data, SQL Server will return data in the 1900-01-01 00.00.00.000 format
--Create a table DDM_Student_Sample & apply default function on Student_DOB column
Create table DDM_Student_Sample
(
Student_ID int,
Student_DOB datetime masked with (function = 'default()'),
Student_Name varchar(100),
Student_Email_Id nvarchar(100)
)
After table creation, we need to insert some data into table to check how the Default DDM function works. So we will use below query to insert four rows into the table.
-- Insert some values into DDM_Student_Sample table

insert into DDM_Student_Sample values (1234,'05/17/1989','Stuart Little Joe','StuartJoe@DDM.com')
insert into DDM_Student_Sample values (2134,'03/01/1990','Alexa sentmov','AlexaSt@DDM.com')
insert into DDM_Student_Sample values (1324,'06/21/1992','SentLaw Rents','SentLawR@DDM.com')
insert into DDM_Student_Sample values (1254,'10/29/1987','pitterpie Laafte','PetterpieL@DDM.com')
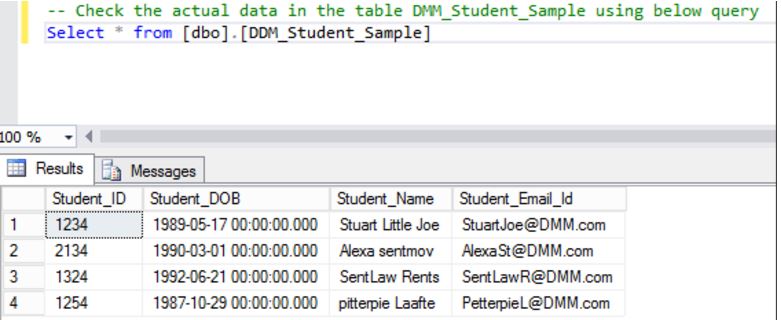
After inserting the data we will use the below script to check an actual data stored in the table- DDM_Student_Sample. ( here we are using the user credentials who is having full access or adequate permission which require to check an actual data of the table and those users only will be able to see the sensitive information like as shown in above figure.)
-- Check the actual data in the table DDM_Student_Sample using the below query
Select * from [dbo].[DDM_Student_Sample]
Now we will create a user and grant read permission on DDM_Student_Sample table using below script:
--Create DDM_Read user & Grant select (read) permision on table DDM_Student_Sample
CREATE USER DDM_Read WITHOUT LOGIN
As we have applied Default DDM function on column Student_DOB, so lets check how the data will appear when user having read permission on a table using below script.
-- Check the data using user DDM_Read who is having select permission on DDM_Student_Sample table
EXECUTE AS USER = 'DDM_Read'
SELECT * FROM [dbo].[DDM_Student_Sample]
REVERT
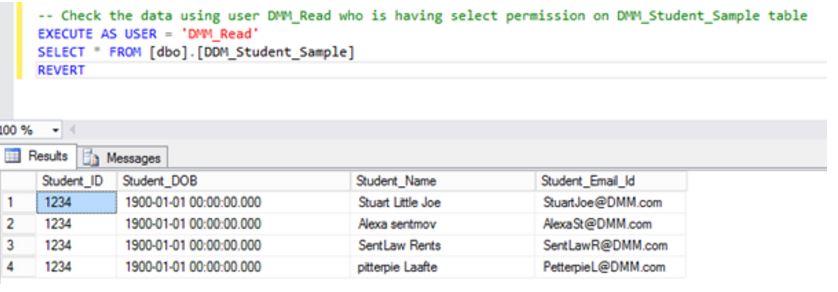
On above output we can see that user DDM_Read is not able to see the actual data for the Student_DOB column because we have applied the Default Dynamic Data Masking function on this column. Hence, data of column Student_DOB showing in the 1900-01-01 00.00.00.000 format.
If you want to allow a few users who have less privileges, like the user, DDM_Read, then grant the UNMASK permission for this set of users:
-- Grant UNMASK permission to user
Grant UNMASK to DDM_Read
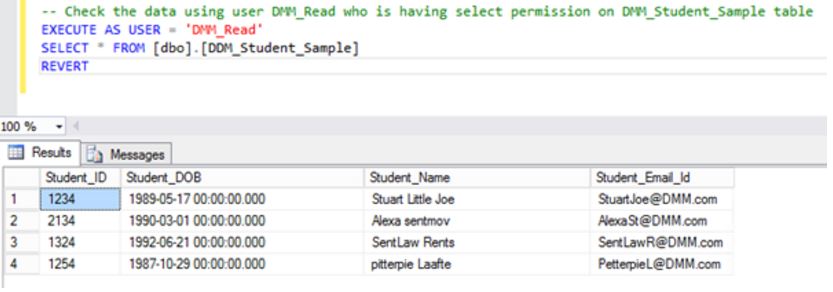
After granting UNMASK permission to the user, DDM_Read, they will be able to see the actual data, like shown in the below figure.
Use the below script to revoke the UNMASK permission of user, DDM_Read.
-- Revoke the Unmask permission of user
Revoke UNMASK to DDM_Read
Random
This DDM function is applied on numeric data types only. It displays a random value for the specified range. In the below example we will apply the Random function on the Student_ID column.
-- apply Random DDM function on Student_ID column
Alter Table[dbo].[DDM_Student_Sample] Alter Column Student_ID Add masked with (function='Random(1,4)')
After applying the Random function, when we try to check the data of table using the DDM_Read user (user with read permission only), the data of the table will look like shown in below figure:
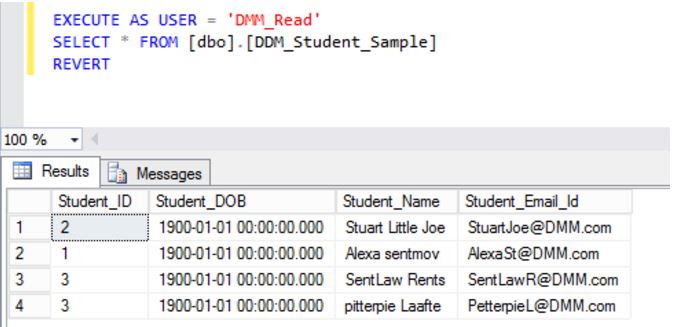
In the above figure, we can see that actual values for Student_ID are replaced with some random numeric values. Again, if you want to allow less privileged user to check the actual data of the table, then grant the UNMASK permission.
Custom String
This DDM function uses the below syntax to mask the data:
Syntax : Partial(prefix,[padding],suffix)
- Prefix – Starting numbers of character to be displayed.
- Suffix – Last number of characters to be displayed from specified column value
- Padding –Custom padding string for masking.
We will apply the Custom String DDM function on Student_Name column with the below values :
- Prefix = 3 -- It will displayed first three characters of Student_Name column values.
- Suffix= 9 -- It will display last 9 characters of Student_Name column values.
- Padding = &&**& -- It will start masking from 4th character and display this Padding string.
Use the below script to apply Custom String function on a Student_Name column of table DDM_Student_Sample.
-- apply Partial DDM function on Student_Name column
Alter Table[dbo].[DDM_Student_Sample] Alter Column Student_Name Add masked with (function='Partial(3,"&&**&",9)')
And then check the data using DDM_Read user.
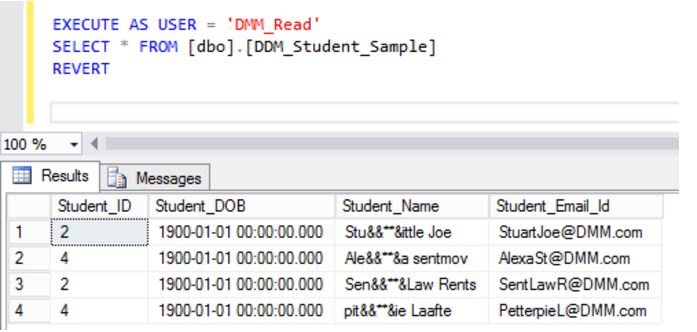
The data in the column, Student_Name, will look like it does above for the user, DDM_Read, due to the Custom String DDM function.
The Email Function
This DDM function will displays the first character of an email address, masking the rest of the characters with XXX@XXXX until the suffix “.com”. For example, if we apply the email DDM function for an email address like abc@ddm.com, then this email address will appear as "aXXX@XXXX.com".
Using the below script, we will apply the email DDM function on the Student_Email_Id column of the table, DDM_Student_Sample, and check how the data will appear to the user, DDM_Read user.
-- apply Email DDM function on Student_Email_Id column
Alter Table[dbo].[DDM_Student_Sample] Alter Column Student_Email_Id Add masked with (function='Email()')
And the values of Student_Email_ID appear in the below format to the user, DDM_Read:
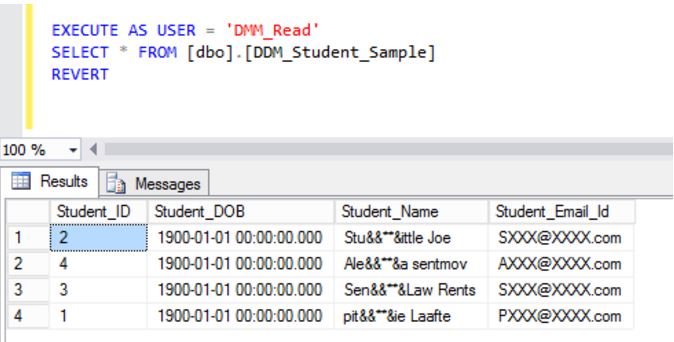
So, in the above image we can see that how data will look after applying the Default, Random, Custom String, and Email Dynamic Data Masking functions to the user who is having less (read only) permission on the table.
We can use below script to remove all the Dynamic Data masking functions on the table :
-- remove the DDM function
Alter Table[dbo].[DDM_Student_Sample] Alter Column Student_Email_Id Drop Masked
Alter Table[dbo].[DDM_Student_Sample] Alter Column Student_Name Drop Masked
Alter Table[dbo].[DDM_Student_Sample] Alter Column Student_DOB Drop Masked
Alter Table[dbo].[DDM_Student_Sample] Alter Column Student_ID Drop Masked
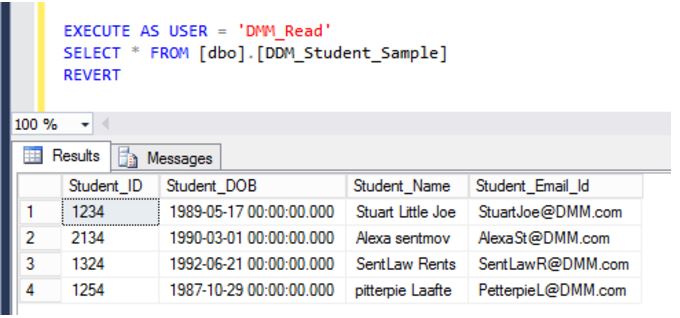
After removal of all Dynamic Data Masking function a sensitive data will be visible to the user DDM_Read as shown in below figure.
Conclusion
Dynamic Data Masking Feature in SQL Server 2016 allows user to mask the data at database level without altering or obfuscating the actual stored data in a table. We can say this feature adds an advantage for the DBA, allowing them to hide the sensitive data from set of user who are having less privileges. This feature saves the extra effort of obfuscating or masking data when a vendor visits your company to fix some issue related to data in a database.


