There seems to be an increasing number of questions regarding the installation of a clustered SQL Server instance under SQL Server 2008\2008R2.The installation process has changed from the process used in SQL Server 2005. Under SQL Server 2005 the installation was executed from the intended active node and would install to all selected nodes in one setup operation. The new installation method requires the installer to be executed separately on each node as we will see below.
For our scenario we will assume the following;
We have 3 computer nodes named NodeA, NodeB, and NodeC with the following IPs. These are the node IP addresses which were assigned during OS deployment.
- NodeA - IP Address 10.10.10.10
- NodeB - IP Address 10.10.10.11
- NodeC - IP Address 10.10.10.12.
All three nodes are members of the Windows cluster SQLFAILSET01 - virtual IP Address 10.10.10.20. This virtual network name and IP Address are used for the base Windows cluster platform which needs to be installed and configured before installing a cluster aware application. All 3 nodes have identical hardware (processor, memory, NIC, etc) and software (operating systems).
We will be installing 2 new clustered instances of SQL Server using unique virtual network names and SQL Server instance names. These virtual network names and their virtual IP addresses are:
- SQLCLUST01 - Virtual IP Address 10.10.10.21
- SQLCLUST02 - Virtual IP Address 10.10.10.22.
The instance names are;
- INST1 (SQLCLUST01)
- INST2 (SQLCLUST02)
For the purposes of this document the following apply,
- Virtual Network Name: a virtual network name is much the same as a computer name in your Windows domain. It must be unique and would follow the usual naming restrictions regarding length in characters and use of special characters
- Virtual IP Address: this is exactly the same as any normal IP Address and would be assigned from the client\public network. This is the shared address the nodes use to accept communication to the given SQL Server instance.
- Shared Drives: These use shared storage and are typically a LUN attached over Fibre Channel or iSCSI. The LUNs are exposed to all cluster nodes and assigned a unique logical drive letter. Not to be confused with local drives which would generally consist of physical disks attached directly to the server.
- NIC: Network Interface Card.
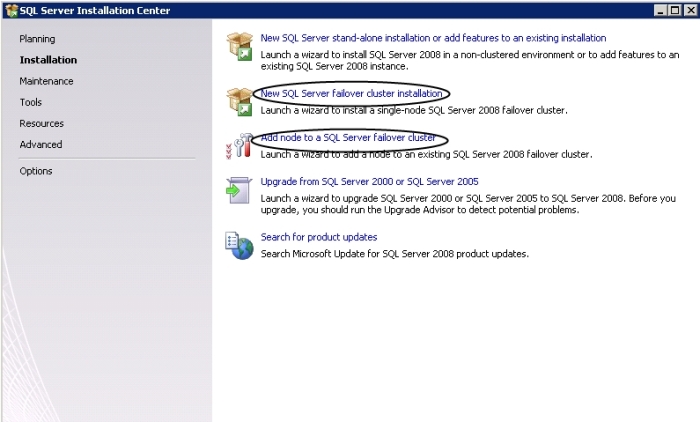
If you have not done so already you will need to failover the clustered disk resources R, S and T to NodeA as we will be installing software components and databases to these drives. We start by launching the SQL Server 2008 installer on NodeA and select the option "New SQL Server failover cluster installation". After the setup program has completed basic checks and the licence key has been provided, you will come to the section of the installer where the instance configuration starts.
Select from the features list, the items you wish to install. The next screen is where you provide the instance configuration, consisting of the instance name and virtual network name. For NodeA we will be using
network name - SQLCLUST01
instance name - INST1
The next screens detail the cluster resource group and the shared disk resources you wish to assign to your new instance. For NodeA we are using
SQL Server data - R:
SQL Server logs - S:
SQL Server backups - T:
Once these details have been provided you will be prompted for the network configuration which will use the previously chosen Virtual IP Address. The remaining sections of the installer detail the cluster security policy, service configuration (service account details) and database engine configuration (consisting of account provisioning, filestream settings and data directories). On the data directories tab supply your chosen drive\directory structure using the drive letters previously supplied. Continue through the installer and providing installation has been successful you should now have your first clustered instance installed to NodeA.
If you have not done so already you will need to failover the cluster disk resources L, M and N to NodeB ready for the installation.
Now launch the SQL Server 2008 installer on NodeB and again select the option "New SQL Server failover cluster installation". Following the steps above, substitute the network name for SQLCLUST02, the instance name for INST2 and logical disk drives for L (data), M (logs), N (backup).
At this point, we now have 2 new failover instances deployed to nodes A and B. Both instances utilise totally different disk devices and drive letters, different Windows 2008 application groups and unique virtual network names, instance names and virtual IP addressees. The active node details are
- SQLCLUST01\INST1 active on NodeA.
- SQLCLUST02\INST2 active on NodeB.
However, at present no failover partner is available for each instance; this needs to be addressed now. To enlist NodeC as the passive node for each instance you need to launch the SQL Server installer multiple times on NodeC.
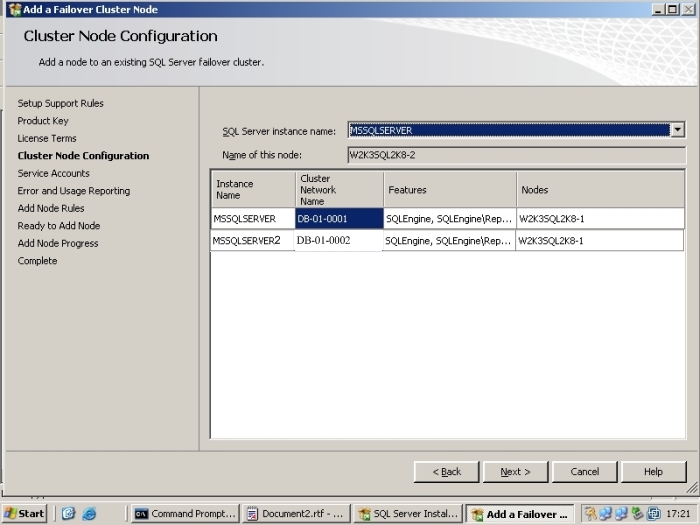
Launch the SQL Server 2008 installer once on NodeC and select "Add node to a SQL Server failover cluster". The setup program will complete various checks and prompt for licence key details. After supplying the licence key details, setup will prompt for the Cluster Node Configuration. This is where you select the SQL Server instance you wish to join (SQLCLUST01\INST1). Continue through the install process and when the installer finishes NodeC has now been added as a failover partner for SQL Server instance SQLCLUST01\INST1.
Now launch the SQL Server 2008 installer a second time on NodeC, selecting the option "Add node to a SQL Server failover cluster". Again, the setup program will complete various checks and request a valid licence key. Again, Setup will prompt for the Cluster Node Configuration. Select the clustered instance name you wish to join (SQLCLUST02\INST2) and follow the setup process to completion, NodeC has now been added as a failover partner for SQL Server instance SQLCLUST02\INST2.
Below is a screenshot of the SQL Server Installation center showing the cluster install options,

The following screenshot shows the section of the installer where you define the instance to join

So as you can see, the installer has changed radically. I think the changes are for the better, installation is now a lot more manageable. If you're smart you'll make use of the new slipstream features and integrate the Service Pack and\or Cumulative Update to decrease the time taken to deploy your new SQL Server instance(s).
This concludes the article, as always I would urge you test and sanitise this process in an offline environment. This can be easily accomplished via the use of VMWare Server 2.0.x or if you have it available, VMWare ESX Server. A complete tutorial for the VMWare Server\SQL Server 2008 install is available on request (too large to post online).


