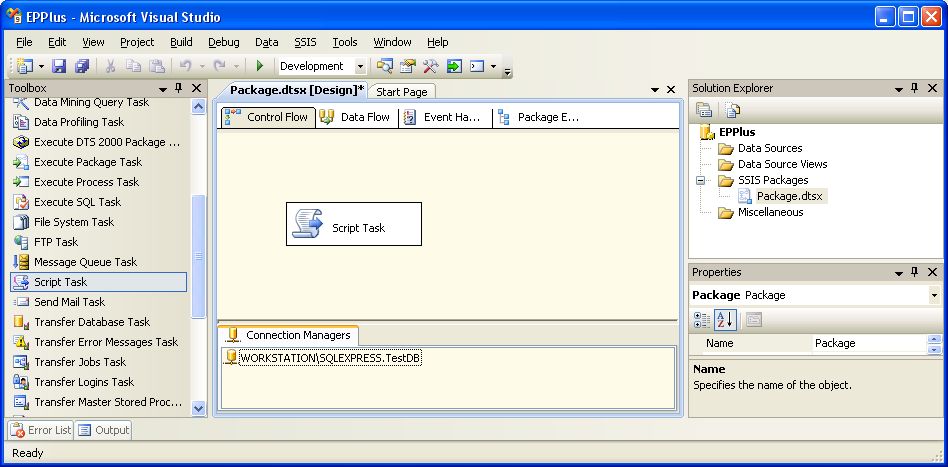
In this article we will develop an SSIS package that uses the EPPlus.dll assembly to create an Excel file and write to it while looping through the result set of a SQL Server query.
1. Download and extract EPPlus.zip
Download the EPPlus zip file from http://epplus.codeplex.com/.
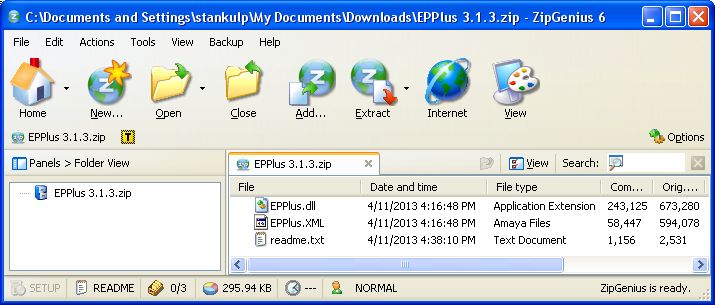
Extract the contents of the EPPlus zip file to a folder.

IMPORTANT ADDENDUM 01/21/2016 - Add the EPPlus.dll assembly to the Global Assembly Cache (GAC)
The EPPlus.dll assembly is not available to your code until you add it to the GAC using one of the following methods.
- Add an assembly to the GAC with gacutil.exe: https://emendezrivas.wordpress.com/2011/03/19/add-an-assembly-to-the-gac/
- Add an assembly to the GAC with GAC Manager: https://gacmanager.codeplex.com/
- Add an assembly to the GAC with WinGAC: https://wingac.codeplex.com/
2. Create an SSIS package with a C# script task and configure it for EPPlus
EPPlus can also be used with VB.NET. See the appendix for notes on how to do it. ***
Create a new SSIS package and add a 'Script Task' to the 'Control Flow' panel, then double-click on the 'Script Task' component to bring up the 'Script Task Editor' dialog box.

Click the 'Edit Script' button of the 'Script Task Editor' dialog box to bring up the C# script task code editor..

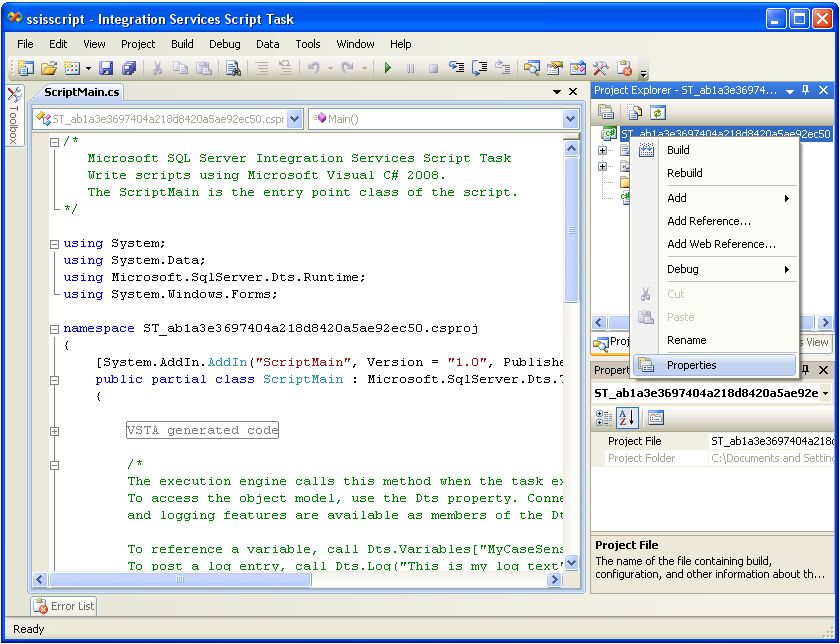
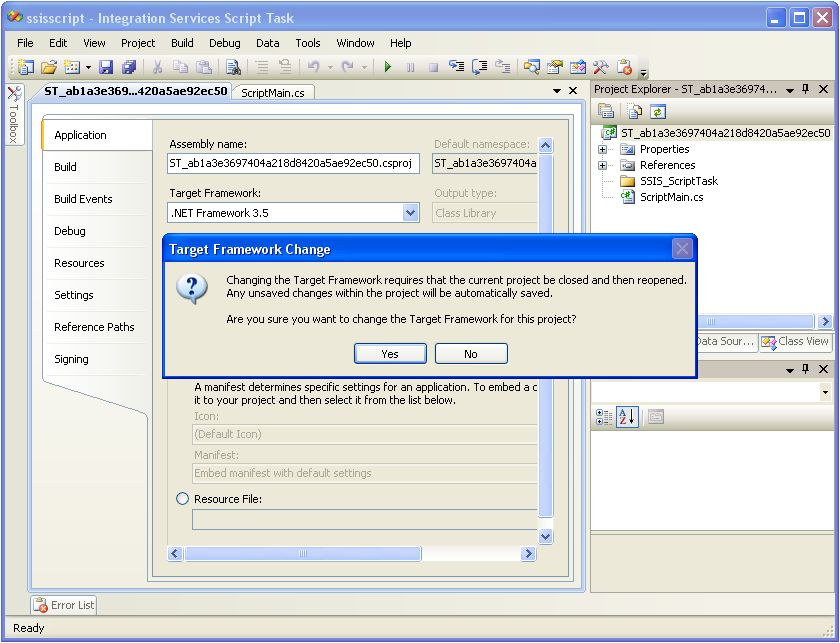
Right-click the top node of the 'Project Explorer' window of the script task code editor and select the 'Properties' menu item.
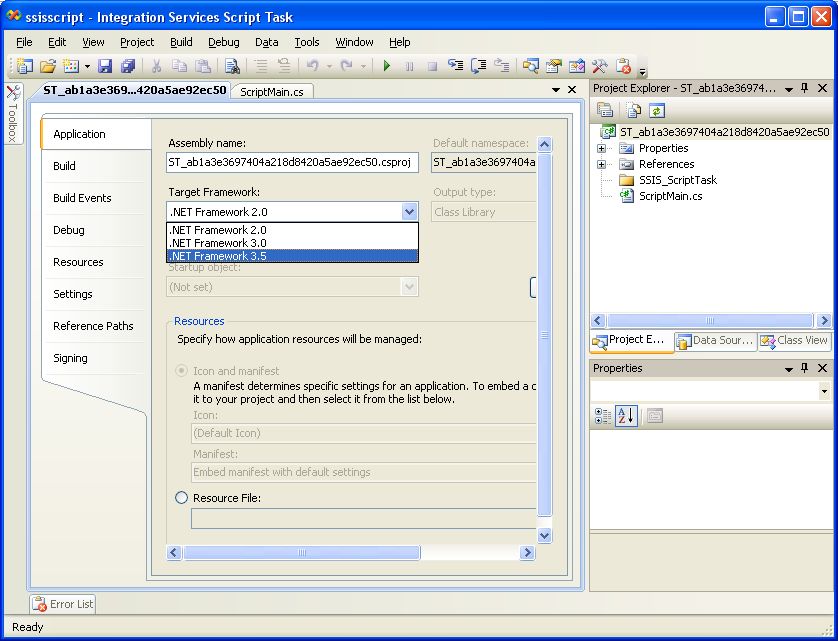
Selecct '.NET Framework 3.5' from the 'Target Framework' drop-down menu.
Click the 'Yes' button of the 'Target Framework Change' dialog box.
Close the script task code editor window.
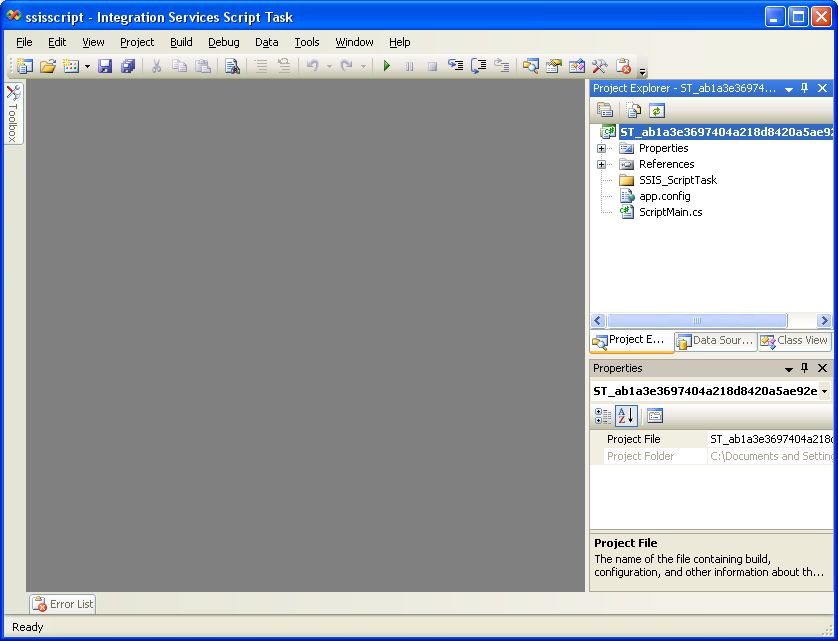
Reopen the script task code editor by again clicking the 'Edit Script' button of the 'Script Task Editor' dialog box.

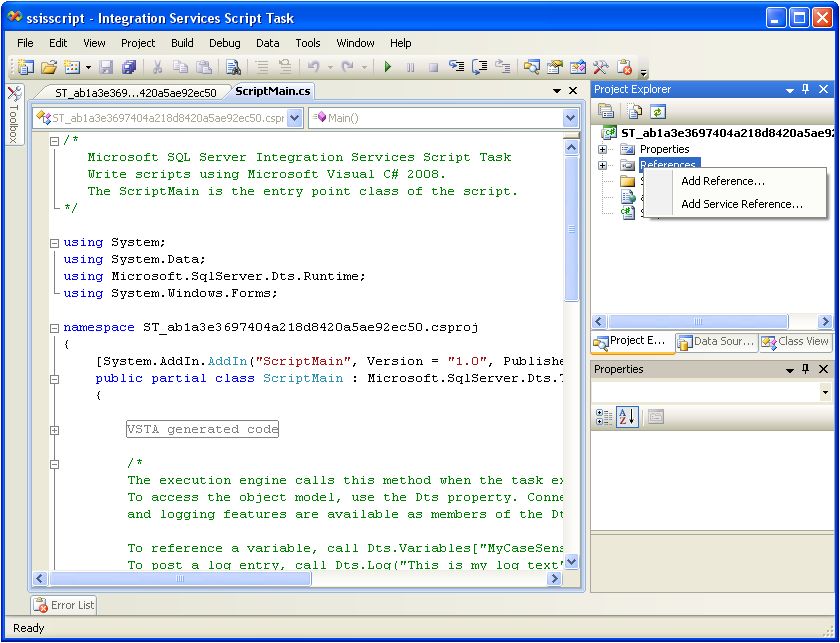
Right-click the 'References' folder of the 'Project Explorer' and select the 'Add Reference' menu item.
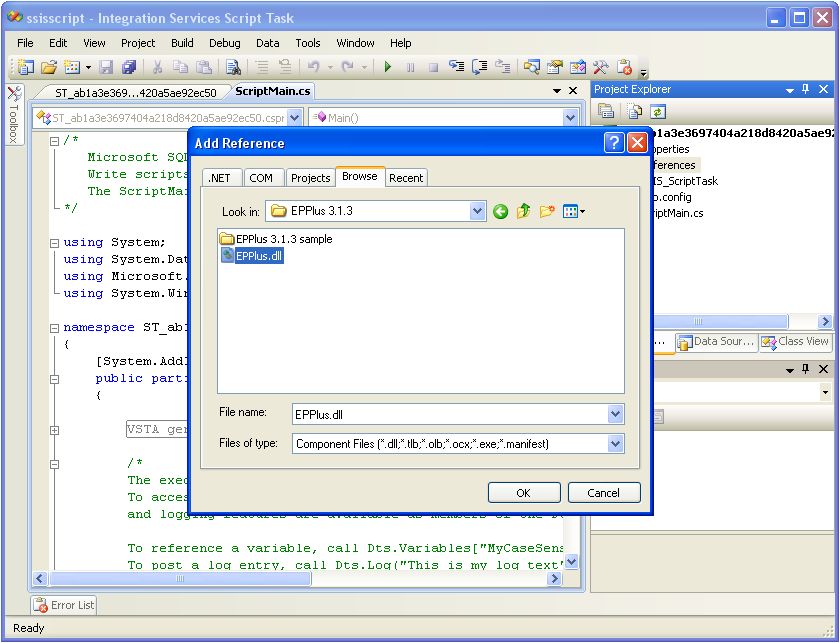
Browse to and select the EPPlus.dll assembly that we previously extracted from the downloaded EPPlus zip file, then click the 'OK' button.
Note the addition of the 'EPPlus' item in the 'References' folder.
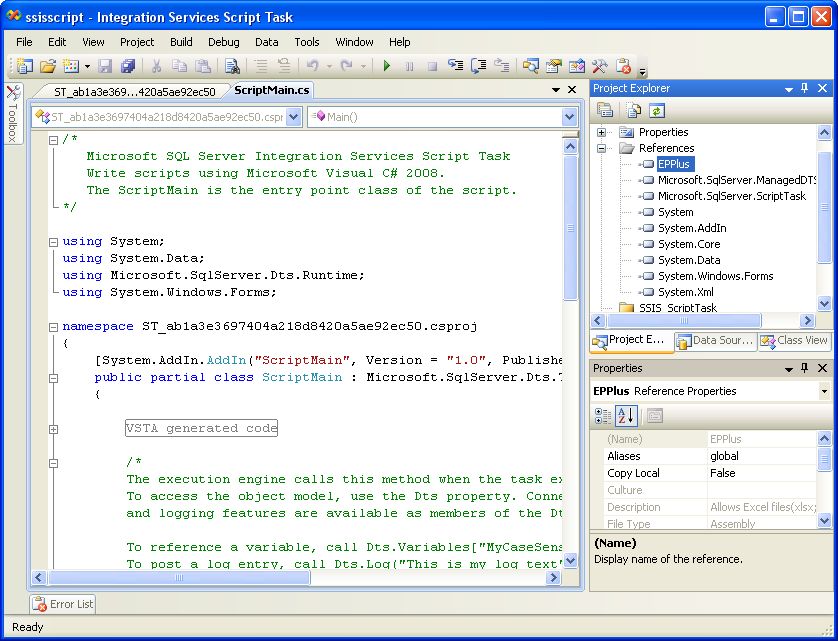
Add 'using OfficeOpenXml' and 'using OfficeOpenXml.Style' statements to the namespace list.
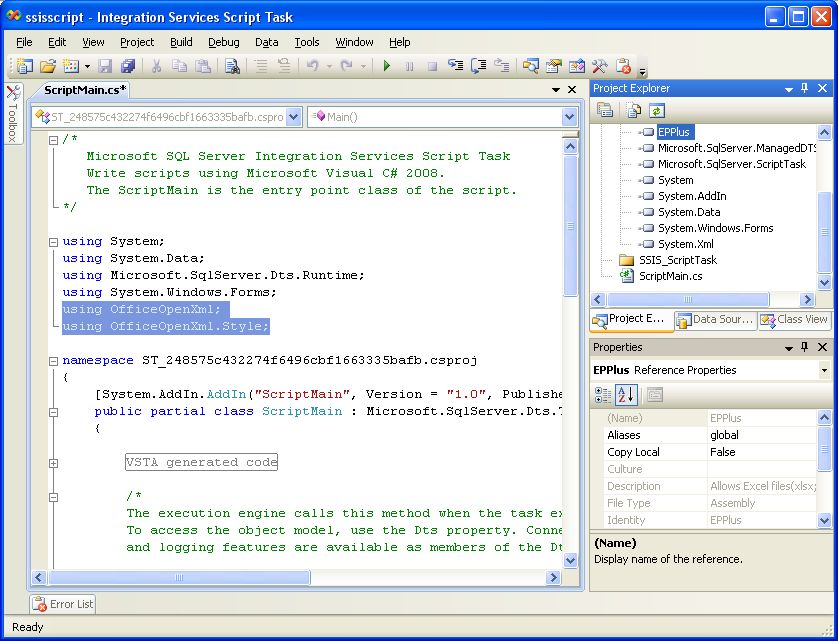
At this point the script task is configured to use EPPlus for reading and writing Excel files.
3. Create a table containing test data
Open SQL Server Management Studio and paste the following code...
USE [TestDB]
GO
BEGIN TRY
    DROP TABLE [TestDB].[dbo].[Market]
END TRY
BEGIN CATCH
END CATCH
GO
CREATE TABLE [TestDB].[dbo].[Market](
    [Symbol] [nvarchar](4),
    [Company] [nvarchar](50),
    [Price] [decimal] (18,2),
    [Change] [decimal] (18,2),
    [PcntChange] AS CAST([Change]/[Price] AS [numeric] (12,6))
) ON [PRIMARY]
GO
INSERT INTO [TestDB].[dbo].[Market]
(Symbol,Company,Price,Change)
VALUES
('INTC','Intel Corporation',25.85,-0.69),
('GE','General Electric Company',26.58,-0.62),
('BAC','Bank of America Corporation',17.01,-0.07),
('BBY','Best Buy Co., Inc.',24.43,-2.40),
('SIRI','Sirius XM Holdings, Inc.',3.7150,+0.0450),
('AA','Alcoa, Inc.',11.36,+0.32),
('MU','Micron Technology, Inc.',22.38,-0.75),
('MSFT','Microsoft Corporation',36.38,-0.51),
('AMD','Advanced Micro Devices',4.18,-0.20),
('CSCO','Cisco Systems, Inc.',22.74,-0.04)
GO
SELECT * FROM [TestDB].[dbo].[Market]
GO
...into a new query editor window.
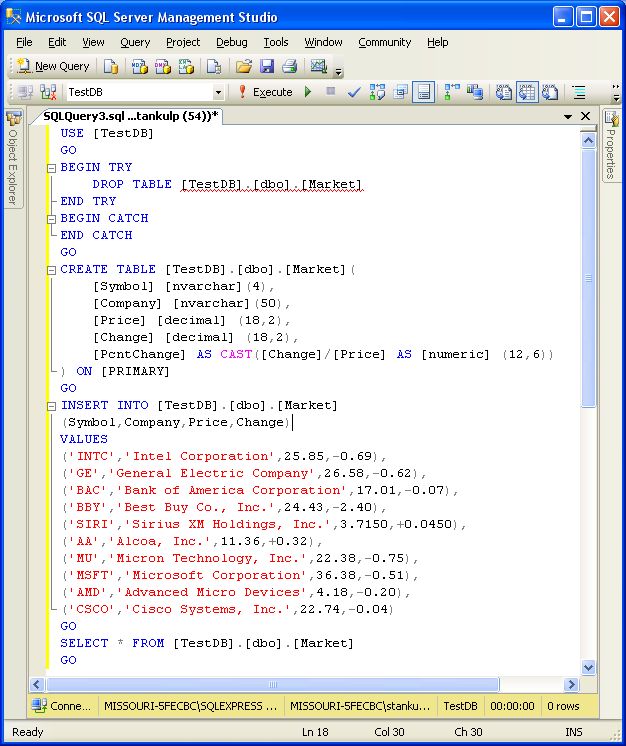
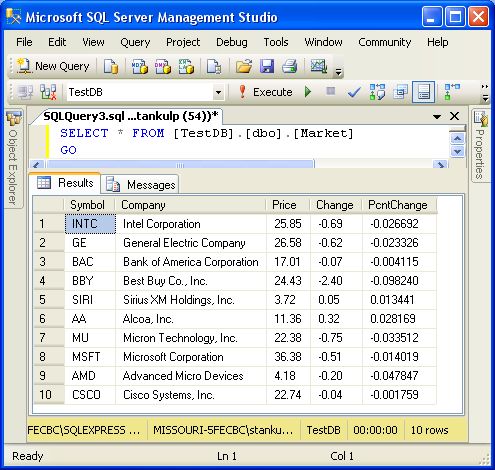
Execute the query to display the contents of the newly created [Market] table.
4. Add an ADO.NET connection to the SSIS package pointing to the database where the test table was created
Right-click on the 'Connection Managers' panel and select 'New ADO.NET Connection' from the menu list.
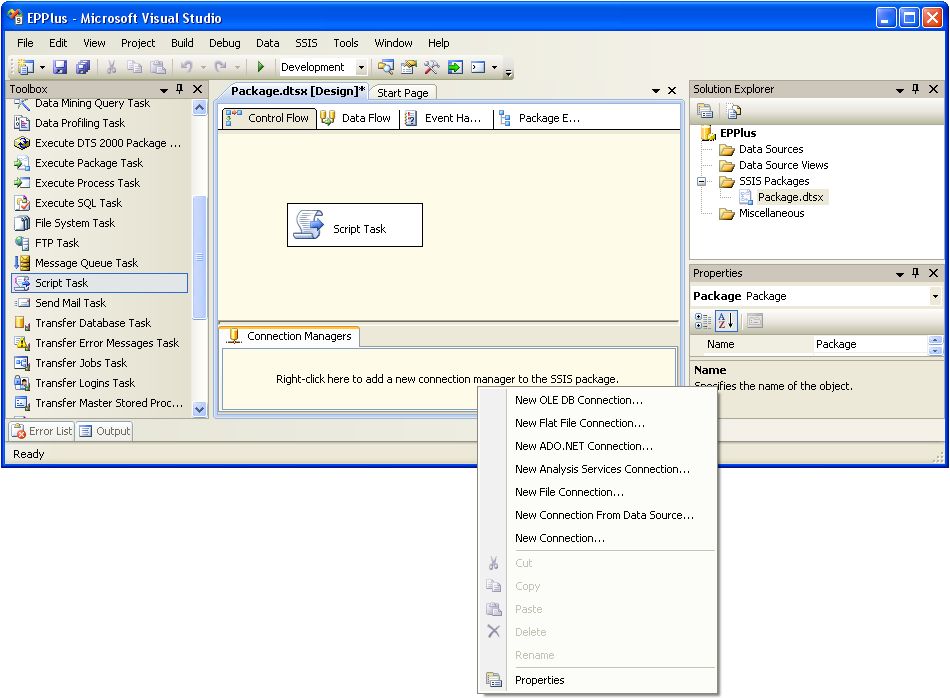
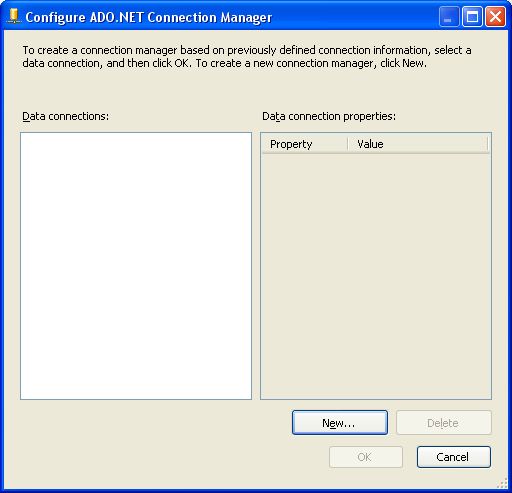
Click the 'New' button of the 'Configure ADO.NET Connection Manager' dialog box.
Select the server and database where the [Market] table was created, then click the 'OK' button.
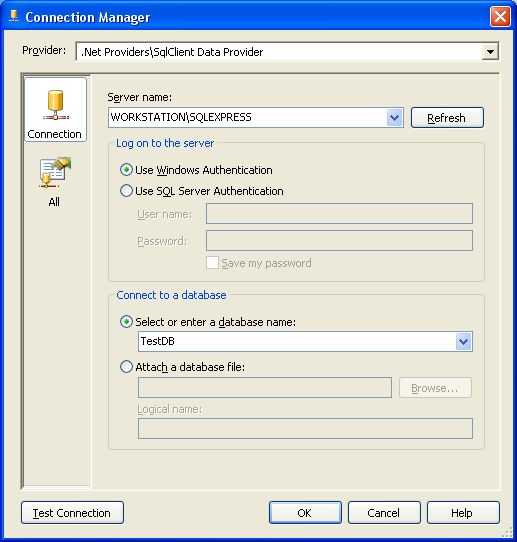
The database connection has been added to the SSIS package.
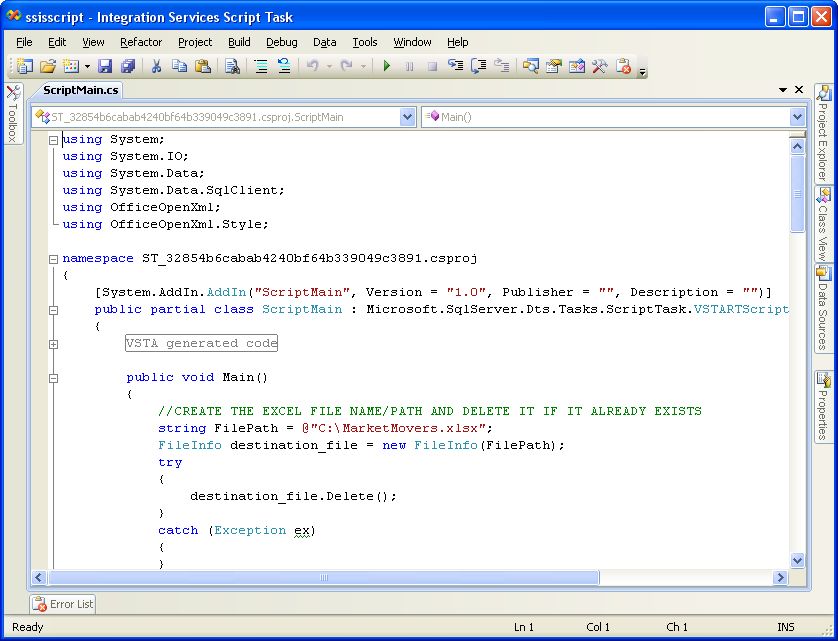
5. Paste code that creates and writes to an Excel spreadsheet into the C# script code editor
Reopen the script task code editor and paste the following code over the existing code.
using System;
using System.IO;
using System.Data;
using System.Data.SqlClient;
using OfficeOpenXml;
using OfficeOpenXml.Style;

namespace ST_32854b6cabab4240bf64b339049c3891.csproj
{
    [System.AddIn.AddIn("ScriptMain", Version = "1.0", Publisher = "", Description = "")]
    public partial class ScriptMain : Microsoft.SqlServer.Dts.Tasks.ScriptTask.VSTARTScriptObjectModelBase
    {
        #region VSTA generated code
        enum ScriptResults
        {
            Success = Microsoft.SqlServer.Dts.Runtime.DTSExecResult.Success,
            Failure = Microsoft.SqlServer.Dts.Runtime.DTSExecResult.Failure
        };
        #endregion

        public void Main()
        {
            //CREATE THE EXCEL FILE NAME/PATH AND DELETE IT IF IT ALREADY EXISTS
            string FilePath = @"C:\MarketMovers.xlsx";
            FileInfo destination_file = new FileInfo(FilePath);
            try
            {
                destination_file.Delete();
            }
            catch (Exception ex)
            {
            }

            //CREATE THE EXCEL SPREADSHEET FILE
            FileInfo newFile = new FileInfo(FilePath);
            ExcelPackage p = new ExcelPackage(newFile);

            //ADD AND NAME A WORKHEET TO THE EXCEL SPREADSHEET
            ExcelWorksheet worksheet = p.Workbook.Worksheets.Add("MarketMovers");

            //DEFINE THE DEFAULT FONT TYPE AND SIZE FOR THE WORKSHEET
            worksheet.Cells.Style.Font.Size = 11; //Default font size for whole sheet
            worksheet.Cells.Style.Font.Name = "Calibri"; //Default Font name for whole sheet

            //DEFINE THE WIDTHS OF COLUMNS IN THE WORKSHEET
            worksheet.Column(1).Width = 10;
            worksheet.Column(2).Width = 30;
            worksheet.Column(3).Width = 10;
            worksheet.Column(4).Width = 10;
            worksheet.Column(5).Width = 12;

            //DEFINE THE ALIGNMENT FOR COLUMNS IN THE WORKSHEET
            worksheet.Column(3).Style.HorizontalAlignment = ExcelHorizontalAlignment.Right;
            worksheet.Column(4).Style.HorizontalAlignment = ExcelHorizontalAlignment.Right;
            worksheet.Column(5).Style.HorizontalAlignment = ExcelHorizontalAlignment.Right;

            //DEFINE THE FORMAT OF NUMERIC COLUMNS IN THE WORKSHEET
            worksheet.Column(4).Style.Numberformat.Format = "###,###,##0.00;[RED](-###,###,##0.00)";
            worksheet.Column(5).Style.Numberformat.Format = "###,###,##0.00%;[RED](-###,###,##0.00%)";

            //ADD SOME LABELS TO CELLS IN THE WORKSHEET
            worksheet.Cells[1, 1].Value = "MARKET MOVERS";
            worksheet.Cells[3, 1].Value = "SYMBOL";
            worksheet.Cells[3, 2].Value = "COMPANY";
            worksheet.Cells[3, 3].Value = "PRICE";
            worksheet.Cells[3, 4].Value = "CHANGE";
            worksheet.Cells[3, 5].Value = "% CHANGE";

            //CHANGE THE LABEL FONT TO BOLD
            worksheet.Cells[1, 1].Style.Font.Bold = true;
            worksheet.Cells[3, 1].Style.Font.Bold = true;
            worksheet.Cells[3, 2].Style.Font.Bold = true;
            worksheet.Cells[3, 3].Style.Font.Bold = true;
            worksheet.Cells[3, 4].Style.Font.Bold = true;
            worksheet.Cells[3, 5].Style.Font.Bold = true;

            //QUERY THE TEST TABLE
            string mySqlStatement = "SELECT Symbol,Company,Price,Change,PcntChange FROM [TestDB].[dbo].[Market]";
            System.Data.SqlClient.SqlConnection myADONETConnection = new SqlConnection();
            myADONETConnection = (SqlConnection)(Dts.Connections["WORKSTATION\\SQLEXPRESS.TestDB"].AcquireConnection(Dts.Transaction) as SqlConnection);
            System.Data.SqlClient.SqlCommand myCommand = new System.Data.SqlClient.SqlCommand(mySqlStatement, myADONETConnection);
            SqlDataReader reader = myCommand.ExecuteReader(CommandBehavior.CloseConnection);

            //SET THE FIRST ROW TO BE WRITTEN TO THE WORKSHEET FROM THE QUERY TO ROW 4
            int row_index = 4;

            //LOOP THROUGH THE QUERY RESULT SET AND WRITE THE FIELD VALUES TO CELLS IN THE WORKSHEET
            while (reader.Read())
            {
                worksheet.Cells[row_index, 1].Value = reader["Symbol"].ToString();
                worksheet.Cells[row_index, 2].Value = reader["Company"].ToString();
                worksheet.Cells[row_index, 3].Value = System.Convert.ToDecimal(reader["Price"].ToString());
                worksheet.Cells[row_index, 4].Value = System.Convert.ToDecimal(reader["Change"].ToString());
                worksheet.Cells[row_index, 5].Value = System.Convert.ToDecimal(reader["PcntChange"].ToString());

                //INCREMENT WRITING TO THE NEXT ROW IN THE WORKSHEET FOR THE NEXT RECORD IN THE RESULT SET
                row_index += 1;
            }

            //CLOSE THE READER AND QUERY CONNECTION
            reader.Close();
            myADONETConnection.Close();

            //SAVE AND CLOSE THE EXCEL SPREADSHEET
            p.Save();

            Dts.TaskResult = (int)ScriptResults.Success;
        }
    }
}
The code contains comments that describe how EPPlus is being used.
Execute the SSIS package by clicking the  ('Start Debugging') button.
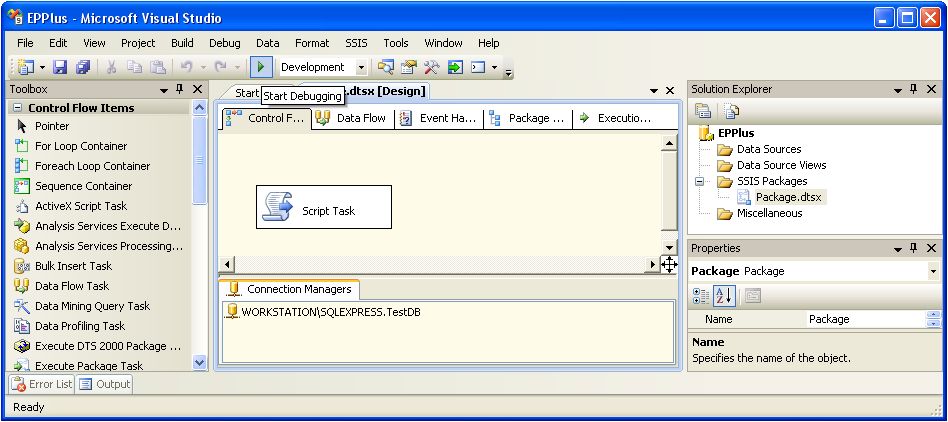
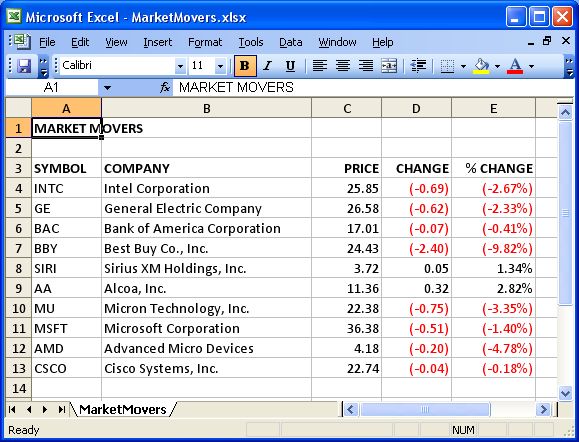
The package generates the 'C:\MarketMovers.xslx' file.

Open the 'MarketMovers.xlsx' file to confirm that it conatins the test data.
6. Sample EPPlus C# code
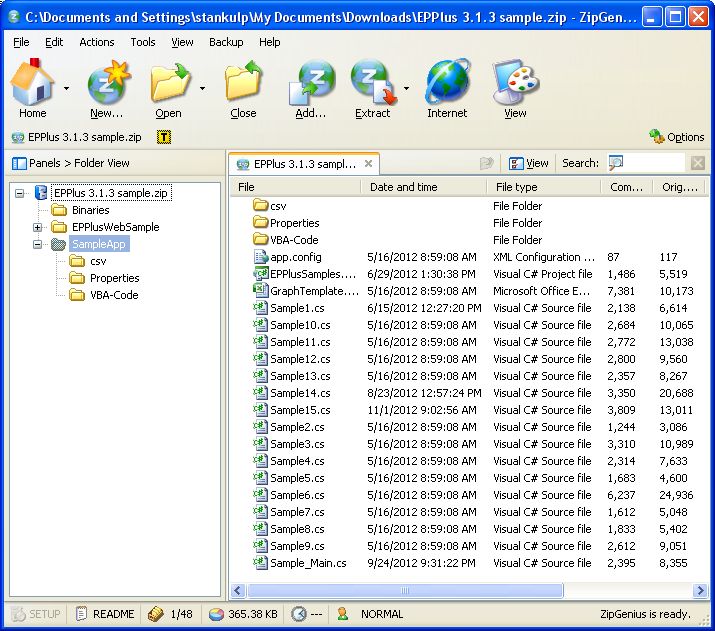
Download the 'EPPlus 3.1.3 Samples Including Binary' zip file from http://epplus.codeplex.com/releases/view/89923. The file contains a number of sample files that can be used to learn to create more elaborate Excel spreadsheets.
Appendix: How to use EPPlus with VB.NET
The following VB.NET code is analogous to the C# code.
Imports System
Imports System.Collections.Generic
Imports System.IO
Imports System.Data
Imports System.Data.SqlClient
Imports OfficeOpenXml
Imports OfficeOpenXml.Style

<System.AddIn.AddIn("ScriptMain", Version:="1.0", Publisher:="", Description:="")> _
<System.CLSCompliantAttribute(False)> _
Partial Public Class ScriptMain
    Inherits Microsoft.SqlServer.Dts.Tasks.ScriptTask.VSTARTScriptObjectModelBase

    Enum ScriptResults
        Success = Microsoft.SqlServer.Dts.Runtime.DTSExecResult.Success
        Failure = Microsoft.SqlServer.Dts.Runtime.DTSExecResult.Failure
    End Enum

    Public Sub Main()
        'CREATE THE EXCEL FILE NAME/PATH AND DELETE IT IF IT ALREADY EXISTS
        Dim FilePath As String = "C:\MarketMovers.xlsx"
        Dim destination_file As New FileInfo(FilePath)
        Try
            destination_file.Delete()
        Catch ex As Exception
        End Try

        'CREATE THE EXCEL SPREADSHEET FILE
        Dim newFile As New FileInfo(FilePath)
        Dim p As New ExcelPackage(newFile)

        'ADD AND NAME A WORKHEET TO THE EXCEL SPREADSHEET
        Dim worksheet As ExcelWorksheet = p.Workbook.Worksheets.Add("MarketMovers")

        'DEFINE THE DEFAULT FONT TYPE AND SIZE FOR THE WORKSHEET
        worksheet.Cells.Style.Font.Size = 11
        worksheet.Cells.Style.Font.Name = "Calibri"

        'DEFINE THE WIDTHS OF COLUMNS IN THE WORKSHEET
        worksheet.Column(1).Width = 10
        worksheet.Column(2).Width = 30
        worksheet.Column(3).Width = 10
        worksheet.Column(4).Width = 10
        worksheet.Column(5).Width = 12

        'DEFINE THE ALIGNMENT FOR COLUMNS IN THE WORKSHEET
        worksheet.Column(3).Style.HorizontalAlignment = ExcelHorizontalAlignment.Right
        worksheet.Column(4).Style.HorizontalAlignment = ExcelHorizontalAlignment.Right
        worksheet.Column(5).Style.HorizontalAlignment = ExcelHorizontalAlignment.Right

        'DEFINE THE FORMAT OF NUMERIC COLUMNS IN THE WORKSHEET
        worksheet.Column(4).Style.Numberformat.Format = "###,###,##0.00;[RED](-###,###,##0.00)"
        worksheet.Column(5).Style.Numberformat.Format = "###,###,##0.00%;[RED](-###,###,##0.00%)"

        'ADD SOME LABELS TO CELLS IN THE WORKSHEET
        worksheet.Cells(1, 1).Value = "MARKET MOVERS"
        worksheet.Cells(3, 1).Value = "SYMBOL"
        worksheet.Cells(3, 2).Value = "COMPANY"
        worksheet.Cells(3, 3).Value = "PRICE"
        worksheet.Cells(3, 4).Value = "CHANGE"
        worksheet.Cells(3, 5).Value = "% CHANGE"

        'CHANGE THE LABEL FONT TO BOLD
        worksheet.Cells(1, 1).Style.Font.Bold = True
        worksheet.Cells(3, 1).Style.Font.Bold = True
        worksheet.Cells(3, 2).Style.Font.Bold = True
        worksheet.Cells(3, 3).Style.Font.Bold = True
        worksheet.Cells(3, 4).Style.Font.Bold = True
        worksheet.Cells(3, 5).Style.Font.Bold = True

        'QUERY THE TEST TABLE
        Dim mySqlStatement As String = "SELECT Symbol,Company,Price,Change,PcntChange FROM [TestDB].[dbo].[Market]"
        Dim myADONETConnection As System.Data.SqlClient.SqlConnection = New SqlConnection()
        myADONETConnection = DirectCast(TryCast(Dts.Connections("WORKSTATION\SQLEXPRESS.TestDB").AcquireConnection(Dts.Transaction), SqlConnection), SqlConnection)
        Dim myCommand As New System.Data.SqlClient.SqlCommand(mySqlStatement, myADONETConnection)
        Dim reader As SqlDataReader = myCommand.ExecuteReader(CommandBehavior.CloseConnection)

        'SET THE FIRST ROW TO BE WRITTEN TO THE WORKSHEET FROM THE QUERY TO ROW 4
        Dim row_index As Integer = 4

        'LOOP THROUGH THE QUERY RESULT SET AND WRITE THE FIELD VALUES TO CELLS IN THE WORKSHEET
        While reader.Read()
            worksheet.Cells(row_index, 1).Value = reader("Symbol").ToString()
            worksheet.Cells(row_index, 2).Value = reader("Company").ToString()
            worksheet.Cells(row_index, 3).Value = System.Convert.ToDecimal(reader("Price").ToString())
            worksheet.Cells(row_index, 4).Value = System.Convert.ToDecimal(reader("Change").ToString())
            worksheet.Cells(row_index, 5).Value = System.Convert.ToDecimal(reader("PcntChange").ToString())

            'INCREMENT WRITING TO THE NEXT ROW IN THE WORKSHEET FOR THE NEXT RECORD IN THE RESULT SET
            row_index += 1
        End While

        'CLOSE THE READER AND QUERY CONNECTION
        reader.Close()
        myADONETConnection.Close()

        'SAVE AND CLOSE THE EXCEL SPREADSHEET
        p.Save()

        Dts.TaskResult = ScriptResults.Success
    End Sub

End Class
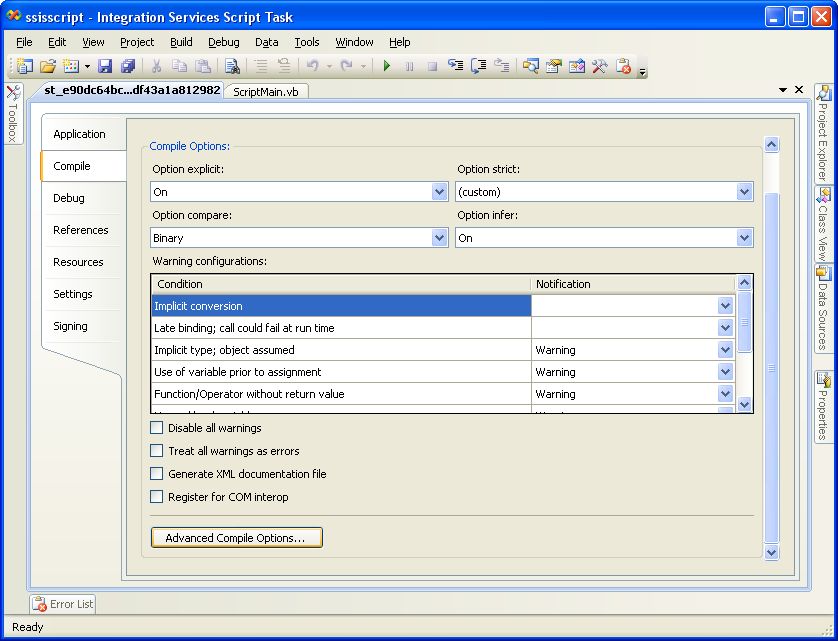
To change the .NET framework for the VB.NET script, click on the 'Project-Properties' menu item in the VB editor window.
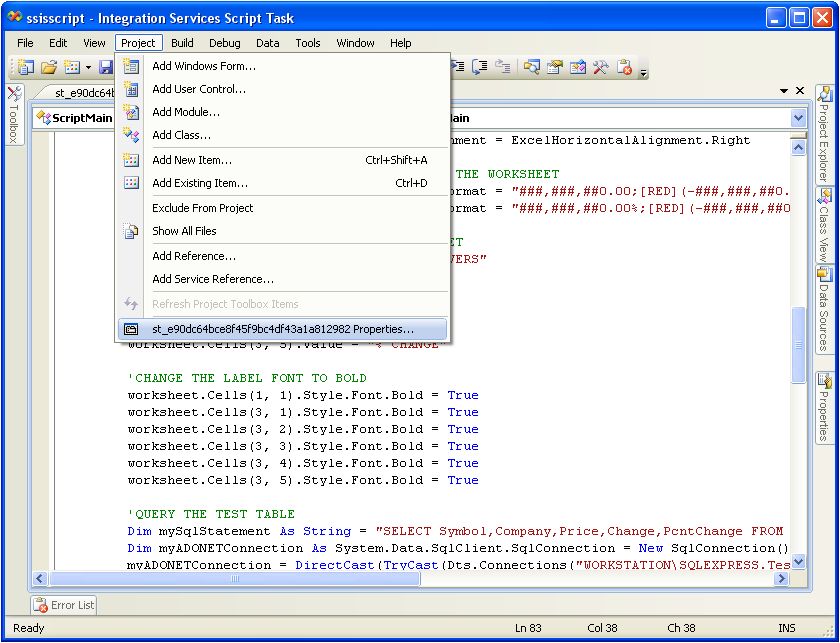
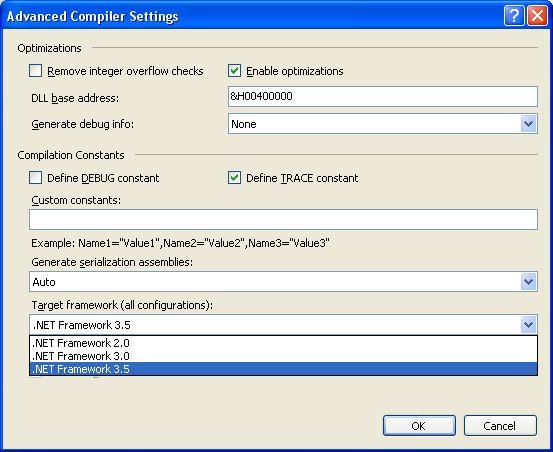
Then click the 'Compile' tab, followed by the 'Advanced Compile Options' button.
Then select '.NET Framework 3.5' from the 'Target framework' dropdown list.
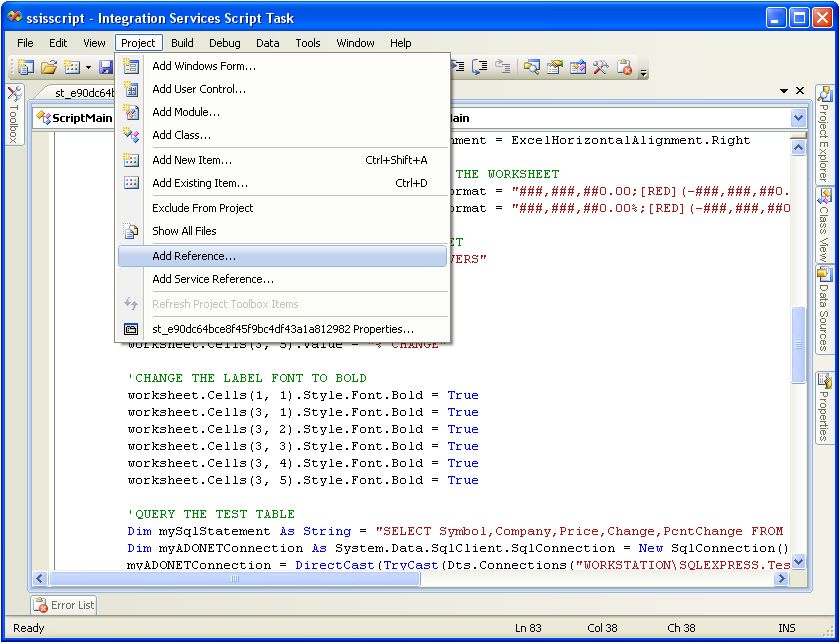
Add the reference for the EPPlus.dll assembly the same way as for the C# code.
The VB.NET code already contains the 'Imports OfficeOpenXml' and 'Imports OfficeOpenXml.Style' statements.


