This
free utility lets you build multiple DSN's (system, user, or file) quickly. It's not a tool you'll use everyday, but when do use need it, it's a real
timesaver. Let's walk through how to use it and how it works.

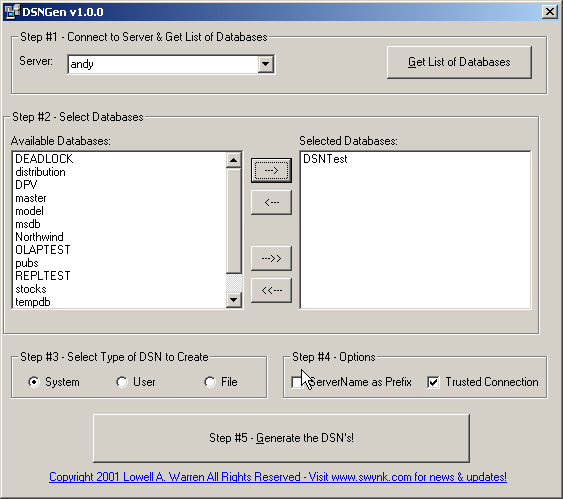
Step#1 - Connect to Server and Get List of Databases
Here
I'm using SQL-DMO to retrieve a list of SQL Servers that are active on your
network. See my article More DMO for more information about how this works.
Once you
select a server, click the 'Get List of Databases' button to populate the
Available Databases list box. This step also uses DMO to retrieve the list of
databases.
It requires that you be able to establish a trusted connection to the server. I
opted not to support SQL logins for two reasons; one is that I think most DBA's
will be using a trusted connection anyway, and two, I'm not big on entering the
sa password into free utilities I've downloaded - bet you aren't either!

Step#2 - Select Databases
Now
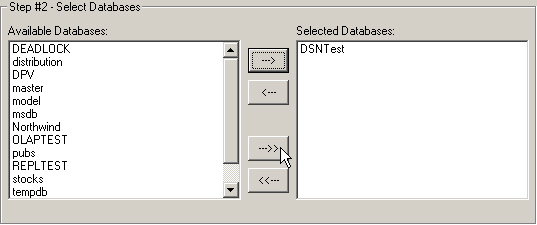
that you've got your list of databases, you can select the ones for which you
need DSN's. You can select multiple databases at once, using
shift-click or control-click. The four buttons in the middle let you move either
the selected items or all items from one list to the other.

Select
#3 - Select Type of DSN to Create
The
default setting is to create a system DSN, the one most commonly used in my
experience. Both system and user DSN's are registry based, while a File DSN is
stored in the file system. Take a look at my article DSN's -
What are they? for details about how
DSN's work and the differences between them.
![]()
Step#4 - Options
There
are two options here. The first is 'ServerName as Prefix'. Check this to give
your DSN's more descriptive names. If the server name is SQLTest and the
database name is Pubs, checking this box will create a DSN called SQLTest_Pubs.
This is very handy if you have databases on different servers with the same
names. It also makes picking the DSN easier later on as all the DSN's from each
server will be grouped together.
The second option, 'Trusted Connection', is checked by default and indicates
that the DSN will use NT security to connect. Uncheck this box if your users (or
your application) uses SQL logins.
![]()
Step#5 - Generate the DSN's!
If
you selected System or User as the DSN type, a file called DSN.REG will be
created in the folder where DSNGen.exe is installed. It is NOT entered into the
registry yet. If you chose to create a File DSN, then you will one *.DSN file
per database in the DSNGen folder. Again, these are not copied to your default
File DSN folder at this time. This allows you to review them before deploying,
reducing concerns about changes made to your machine. Another good read for this
is that in many cases you may be creating them on your machine for use n a
different machine.
![]()
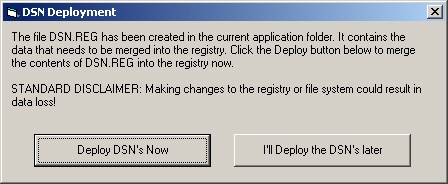
Step#6 - Deploy the DSN's
If
you don't want to deploy the DSN's on your machine, just click
'I'll Deploy the DSN's Later'. You can then review the files before deploying.
If
you selected System or User as the DSN type, clicking on 'Deploy DSN's Now' will use RegEdit to merge the
DSN.REG file into the registry. If you created
file DSN's, they will be copied to your system DSN folder (which is usually C:\Program Files\Common Files\ODBC\Data Sources).

Licensing
None
required. I retain the copyright.
Downloadit!
Current Version | 1.0.2 |
Date Released | Feb 12, 2001
|
here to download just the DSNGen.exe (17kb)
here to download a complete setup package (2.6M)
RevisionHistory
| Version | Release Date | Comment |
| 1.0.2 | Feb 14, 2001 | Fixed a bug reported by Chadi Kassan. The DSN.REG file that is created by the program has the header "Windows Registry Editor Version 5.00" which will not work on NT4 systems. I've added a check for that and if the program is run on NT4, it will use the correct "REGEDIT4" header. Thanks for the feedback Chadi! |
| 1.0.1 | Feb 8, 2001 | Fixed a bug reported by Allan Mitchell. While creating a file DSN, if the server name was "(local)" and the user selected the ServerName as Prefix option, the resulting DSN would not show up in the ODBC applet (the DSN would be created as (LOCAL)_dbname.DSN). |

