We all know the importance of taking regular backups of our databases. Hopefully, we all know the importance of performing housekeeping on our SQL Servers too. This article will look at how you can setup a maintenance plan to first backup your database and then cleanup the older backup files.
I like to take a full database backup to a local disk on my server and then copy that backup file either to tape or to a disk on some other server. Preferably storing the backup files off site in another location if possible. In the event that I lose the server I have my database backups stored in another location and they can be used for recovery if necessary. I usually retain the 'off server' backups for a longer period than the backups taken to disk on my local server or what I call my 'on server' backups. My 'on server' backups are usually retained for two or three days before they are removed so new backups can replace them.
In this article I will demonstrate how to create a maintenance plan and include a 'Backup Database Task' that takes a backup of all databases on the local instance. When the full backup completes successfully we will then run a 'maintenance cleanup task' to delete backup files older than a certain age, in our case three days. When the Maintenance cleanup task completes we will run 'History Cleanup task' to purge older backup history data stored in the MSDB database to stop the MSDB system database growing out of control.
Setting up the Maintenance Plan
in SSMS (Management Studio) expand the 'Management' folder and right click on the 'Maintenance Plans' folder and select 'New Maintenance Plan...'
Give your new maintenance plan a name of 'BackupCleanupDemo' or something more meaningful if you wish, click 'OK' and this will open a New Maintenance plan design window.
Double click on the 'subplan_1' in the Subplan pane at the top of the page
![]()
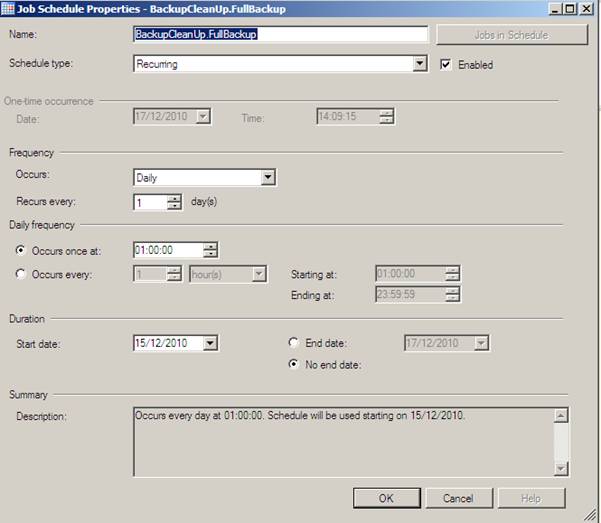
Give the subplan a name e.g. 'FullBackup' and a description e.g.'Full Backup'. Click on the schedule button to the right, (it looks like a calendar), and set a schedule for your full daily backup. I setup the schedule on my subplan to run on a recurring daily basis at 0100. Once you have setup the schedule as you want it, click OK and then OK again to close the subplan pain. It should look similar to this:
Configuring the Database Backups
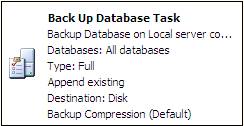
Next we need to configure a 'Backup Database Task' to take full backups of our databases. From the Maintenance Plan Tasks toolbox on the right hand side drag a 'Backup Up Database Task' from the 'Maintenance Plan Tasks' toolbox on the right hand side. The task will look like the following:
On the design screen double click the 'Back Up Database Task' this will open a 'Back Up Database Task' window (as shown below). This is how I have configured my "Backup Database Task":
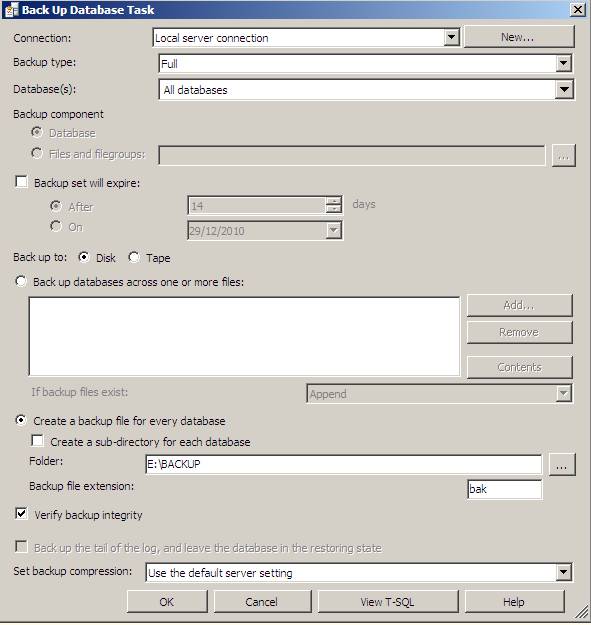
Here is the configuration I have used:
- Connection: is a local server connection
- Backup type: Full
- Databases: Full
- Create a backup file for every database is selected. Note I have left the 'Create a sub-directory for every database' check box unchecked. If you select this option the task will create each databases back in a sub-directory that matches the database name under E:\backup
- Folder: E:\Backup - set this to the location that you want to store your backups
- Backup File Extension: BAK (Your backup file can have any extension you chose, but BAK is conventionally used for backup files)
- Verify backup integrity check box selected. - By selecting this option you are asking SQL Server to perform a RESTORE VERIFYONLY when the backup completes. According to BOL RESTORE VERIFYONLY checks that the backup set is complete and all volumes are readable. It doesn't mean that you can actually restore from it, you will only know that by actually restoring the file. Running a Verify on your back up will give you a little more confidence that the backup is good.
When you have finished configuring your backup task, click OK.
Deleting older backups
When you have finished setting up the 'Back Up Database Task' We then need to setup a task to delete backups when they reach a certain age. This will manage disk space and prevent our older backup file filling the disk on our backup drive.
Assuming that you want to keep the backups for three days and you only want to delete the old backups if your backup job is successful in creating new backup files you will need a green arrow (On success) coming out of the "Backup Database Task" and pointing to the "Maintenance Cleanup Task "
Drag a 'Maintenance Clean up Task' from the 'Maintenance Plan Tasks' toolbox on the left hand side of the screen. Place the new task under the 'Back up Database Task' and drag the green arrow coming out of the 'Back up Database Task' and connect it to the 'Maintenance Cleanup Task' (as shown in the diagram below)
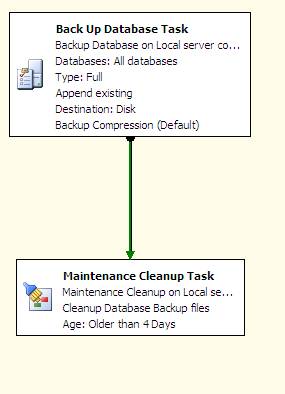
The green arrow means that the maintenance cleanup task will only run if the "Backup Database Task" completes successfully.
Next we need to Configure the Maintenance cleanup task to delete our backup files that are older than three days. Double click the "Maintenance Cleanup Task" to configure it. You will be faced with a screen that looks like the following:
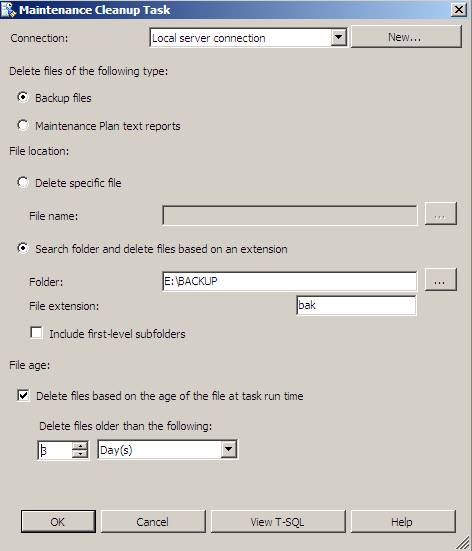
I configured my 'Maintenance Cleanup Task' with the following settings:
- Connection: Local Server connection (I'm running my maintenance plan locally on said server, if I wanted to specify a different server I would need to configure a different connection)
- Delete Files of the following type: Backup Files should be selected
- Search folder and delete files based on an extension
- Folder: E;\Backup -- Change this to your backup location
- Note that if I had checked the 'Create a sub-directory for every database' option in the 'Back up database task, I would need to check the 'Include first-level subfolders' option here to delete old files in the sub-directories of E:\Backup.
- File Extension: bak -- note the lack of a [.] if you include the [.] the cleanup task will not work.
- File Age:
- Delete files backed on the age of the file at task run time: Checked
- Delete files older than the following: 3 Days
When you have finished configuring your 'Maintenance Cleanup Task' click <OK>
We now have a task to backup the database nightly and a task to delete backups files that are older than 3 days.
Deleting Backup History
The final task will be to clean up using the 'History Clean up task'.
Drag the 'History Cleanup Task' from the 'Maintenance Plan Tasks' toolbox on the left hand side of the screen. Drag the green (on success) arrow coming out of the (Maintenance Cleanup Task) and connect it to the 'History Cleanup Task'. This will ensure that the History Cleanup will only run after the 'Maintenance Cleanup Task' has run:
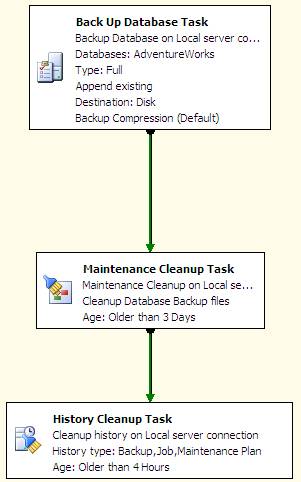
Double Click the 'History Cleanup Task'. This will take you to the following screen:
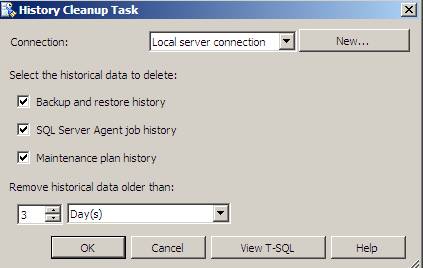
I configured the following settings
Connection: Local server connection (My maintenance plan is being executed locally on my server.)
Ensure that the 'Backup and restore history', 'SQL Server Agent job history' and 'Maintenance plan history' are all selected. If you fail to set this, over time your MSDB and the backup history data it stores will grow and grow. Purging out the old data can improve the time it takes your backups run. This is a result of there being less data stored in MSDB that needs to be update on each backup. If you fail to purge this data you may find that your back times take longer and longer over time.
Then set the 'Remove historical data older than:' is set to 3 day(s).
Press OK to save your settings.
Once the job has run for several days you will get a build up of full backups. A screen shot of my backup folder can be seen below:
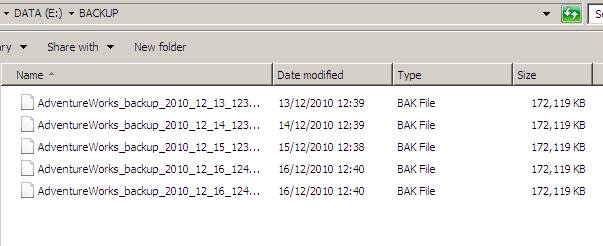
When the folder contains files older than 3 days, the job will start to delete those files after the backup has completed. Here is the same folder a day later.

Conclusion
This article has looked at how you can use a maintenance plan to backup your databases regularly and then perform housekeeping to ensure the backups you take are current and your backup drive only contains the most recent backups of your databases. I state again that I also like to keep a copy of my database backups off server, preferably offsite, alongside my on server backups. As with most things with SQL Server there is more than one way to achieve the same task and this could just as easily be setup using TSQL scripts.


