Period.
End of Sentence.
Yes, I’m serious. See for yourself.
Get-SqlDatabase -ServerInstance localhost | Where { $_.Name -ne 'tempdb' } | Backup-SqlDatabaseWith that short command I can backup every database on my SQL Server (to the default backup path). Of course, that’s just one instance of SQL Server. If I wanted to wanted to backup every single database on every single instance of SQL Server in my Registered Servers list (or Central Management Server), I would have to add an entire line of code and these two curly brackets {} to be able to do that.
foreach $RegisteredSQLs IN dir -recurse SQLSERVER:\SQLRegistration\'Database Engine Server Group'\Host\ | where {$_.Mode -ne 'd'} ) { Get-SqlDatabase -ServerInstance $RegisteredSQLs.Name | Where { $_.Name -ne 'tempdb' } | Backup-SqlDatabase }Yes, it’s that easy. Now, I’m not telling you this so that you’ll go and completely replace your database backup process with PowerShell, at least not yet; I’m telling you this so that you know it for the one-off occasions when you have to backup some databases manually. For regular backups of your databases, you may not even have to worry about that; those backups might be taken care of by sysadmins or your magical SAN. If it is your job to worry about backing up your SQL Server databases, it’s probably best if you use Ola Hallengren's Maintenance Solution scripts, which, BTW, you can deploy to all your servers using PowerShell. Watch SQL Server MVP Andre Kamman demonstrate that for you in this video: https://youtu.be/4GaMnamvEJk
Probably the Most Important PowerShell Trick Ever
Ok, now back to those one-off occasions when you need to backup your databases. Most times when I need to do that, I don’t need to backup all of my databases, so it would be great to thin down the list of databases being backed up. Thankfully PowerShell has a wonderful cmdlet called Out-GridView which has a -PassThru parameter to allow you to do just that. Just use the command at the top of this article and swap out the WHERE clause on it with Out-GridView -PassThru, but be sure to leave the “|” on the end of the line.
Get-SqlDatabase -ServerInstance localhost | Out-GridView -PassThru | Backup-SqlDatabase
To me the -PassThru parameter on the Out-GridView cmdlet is the “killer app” of the PowerShell world. With that one short command and the pipe character, you can modify a process that you have already written and make it do the same thing but just do it only to the “things” that you choose.
‘Things’ in this case could mean Databases if that was what you were working with, but it could also mean Tables, SQL Server Agent Jobs, SSRS Reports and/or DataSets, CSV files, or heck even entire instances of SQL Server.
Quick Tutorial of Out-GridView
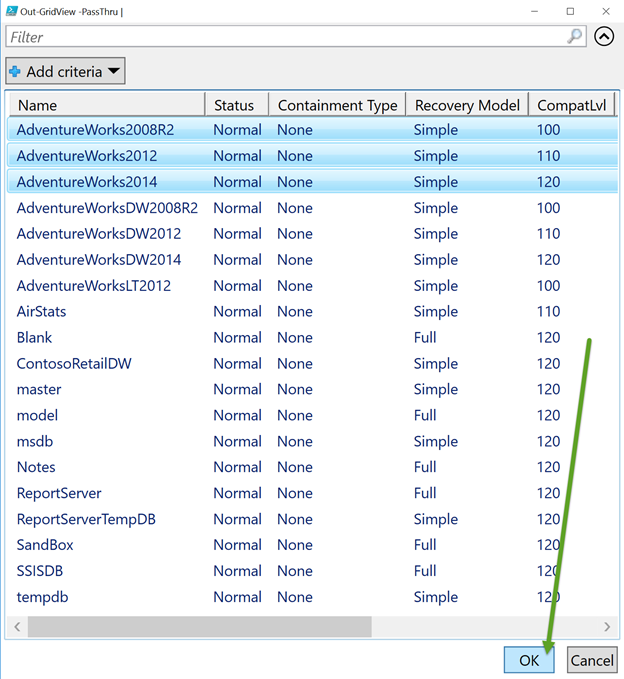
Here is an example of what using the Out-GridView cmdlet will look like in this scenario. In this example I have selected three databases and when I click the “OK” button in the bottom-right the command will proceed and only those databases will be backed up.
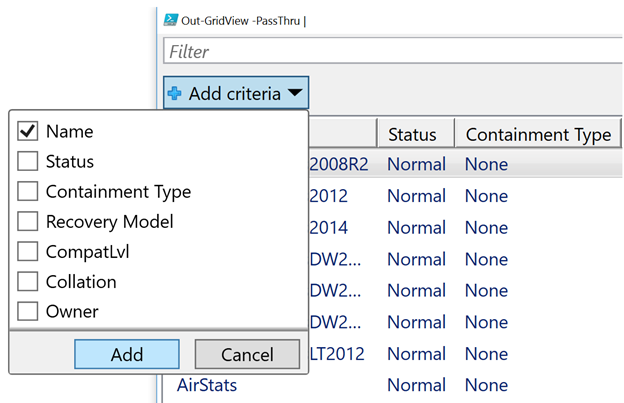
Another wonderful feature of the Out-GridView cmdlet is its Filter capabilities. If I use the Filter bar at the top it will search every field displayed for whatever text I type in there. Instead of using that, I will go ahead click “Add Criteria” and choose Name so that I can ensure that I’m only filtering down my list of databases by their name and not some other field.
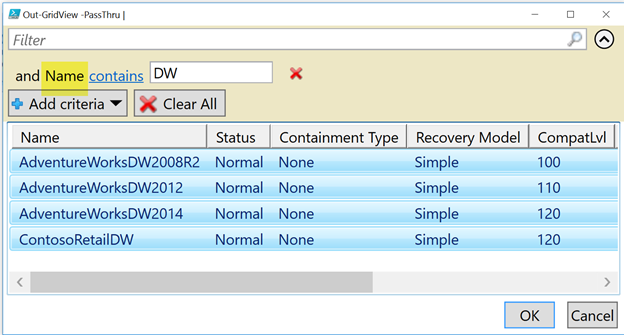
Next I will add the letters “DW” which will give me back a list of only databases which have the letters DW somewhere in their name. Be sure that all rows are highlighted (selected).
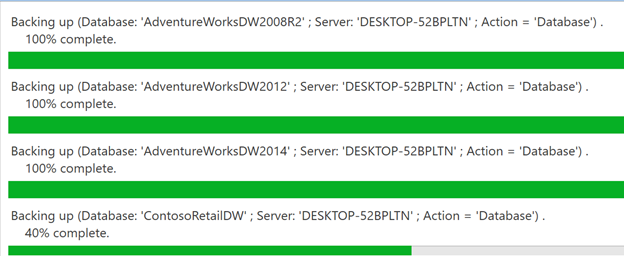
Once I click on the “OK” above, I will see that only the 4 databases I selected are being backed up.
PowerShell Gets Even Easier
If you weren’t already convinced that PowerShell is easier for backing up SQL Server databases, at least for ad-hoc backups, let’s throw in some backup options. Going back once again to the simple example at the top, just after the Backup-SqlDatabase cmdlet let’s add the -CompressionOption parameter now hit the space bar and you should be presented with a list of available options like this:

Note: I am working in the PowerShell ISE, other editors may have different mechanisms for triggering the Parameter Set, hitting Ctrl + Space Bar might trigger this for you in the PowerShell console.
Get-SqlDatabase -ServerInstance localhost | Out-GridView -PassThru | Backup-SqlDatabase -CompressionOption On
Now you’ve very easily turned on backup compression and won’t take up as much space on disk as you play around with these commands.
-Script Parameter for Fun & Practice
Before we go much further, it’s probably best that I point out the -Script parameter to you. Adding the -Script parameter to the end of your Backup-SqlDatabase command will allow you to output the command that is being generated without actually running it. This will allow you to play along as I go through these scripts without having to wait for backups to complete or take up a ton of space.
For those of you who are curious about what’s going on behind the scenes: Whenever you run this Powershell cmdlet against SQL Server, all that is run on the server is T-SQL. That’s' it.

More Backup Parameters
Let’s look at some other optional parameters for this cmdlet. If you want to be able to poke around yourself while reading through this article use the Get-Help cmdlet, get the ‘full’ help and you will find the parameters listed out right out at the top.
Get-Help -Full Backup-SqlDatabase
You may also find the -ShowWindow option handy. This will pop up that Help file in a separate window so that you don’t have to keep scrolling back up or re-running the command. The “Find” search box at the top can be very helpful here since this particular cmdlet has a rather long Help file.
Get-Help -ShowWindow Backup-SqlDatabase
-BackupAction
Using the -BackupAction parameter you can choose to do a Database backup, File backup, or Log backup. (By default, PowerShell assumes you want to do a full database backup, so if you don’t specify otherwise, that’s what it will do.) If you’d like to do a Differential backup, throw the -Incremental parameter (I have no idea what they didn’t just call that parameter -Differential or make it an option on the -BackupAction parameter.

(Note that Differential is not in this list because it is handled by the separate -Incremental parameter.)
-DatabaseFile & -DatabaseFileGroup
The Backup-SqlDatabase cmdlet can also backup just a single data file or file group for you. If you choose Files as the option for your -BackupAction parameter, you will need to add either the -DatabaseFile or the -DatabaseFileGroup parameter, followed by the name of the data file or file group that you want to backup.
-BackupFile
Now that you’ve chosen which type of backup you want to do it’s probably good to give the backup a file name. If you don’t, the Backup-SqlDatabase cmdlet will just backup to a file with the name of the database and the .bak extension. This is an append backup so if you’re playing around running the command at the top a bunch of times without deleting the files, you might run into a space issue soon J These backup files will be placed in your default backup directory unless you use the -BackupFile parameter to tell it the full path of another location, which can also include a URL – Yes you can backup straight to Azure storage (or other web API endpoints).
Side Note: If you need to find out or just want to verify the Default Backup Directory of an instance, you can just run a simple command like this to find that out.
(Get-Item sqlserver:\sql\localhost\default\).BackupDirectory
For the backup file name I’m assuming that you’ll probably want to include the date in the file name. To do that we can essentially run a ‘sub-query’ to the Get-Date cmdlet as we’re cycling through all the databases we’re backing up. This can be done like this
Get-Date -UFormat %Y%m%d%H%M
At this point though, we’ll need to add a foreach loop around the Backup-SqlDatabase cmdlet so that we can pluck the database name out of the pipeline. To do this we add “foreach{ ” just after the pipe following our WHERE clause, and then place a closing “}” just before our semicolon that terminates the command. Inside this forach loop we will also specify the -DatabaseObject parameter, and pass the pipeline object $_ to that parameter.
<# Backup All Databases and give them all a file name which
    includes the name of the database & datetime stamp. *> Get-SqlDatabase -ServerInstance localhost | Where { $_.Name -ne 'tempdb' } | foreach{ Backup-SqlDatabase -DatabaseObject $_ -CompressionOption On -BackupFile "$($_.NAME)_db_$(Get-Date -UFormat %Y%m%d%H%M).bak" -Script}
Note: The reason we have to do the foreach loop is because of the way the automatic pipeline variable $_ behaves when it’s not inside a script block “{ }”. To make a long story short, in this case, we want the behavior that happens when inside { } so that we can extract $_.Name out of the pipeline.
-ServerInstance & -Database
We haven’t needed to supply the -ServerInstance & -Database parameters yet because in these examples the Get-SqlDatabase cmdlet has been passing an Array which contains Database objects down the pipeline, by way of $_ , which has that information in the form of properties and the Backup-SqlDatabase cmdlet has been using the -DatabaseObject parameter by default to ingest it.
If you want to backup just one database these parameters are a great option so that you don’t have to include the call to Get-SqlDatabase.
Backup-SqlDatabase -ServerInstance localhost -Database msdb
-PassThru
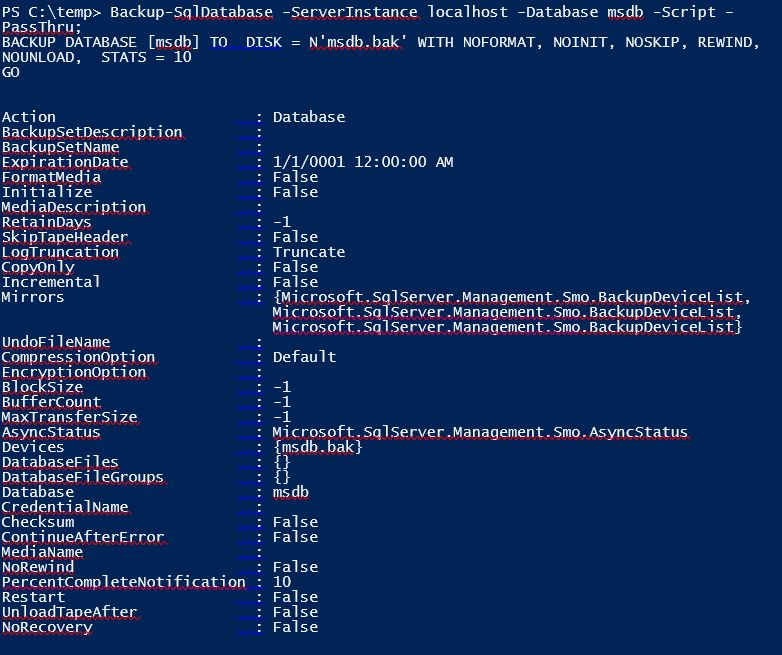
Speaking of the pipeline, whether you’re experienced at PowerShell and want to debug your process, or you’re new to PowerShell and want to see what this backup object looks like, you can add the -PassThru parameter and see it. This also gives you an opportunity to see what the cmdlet is setting for the optional parameters you have omitted.
Backup-SqlDatabase -ServerInstance localhost -Database msdb -Script -PassThru;
-Credential
The -Credential parameter is a common one to see in PowerShell cmdlets and I don’t make it a habit to call this one out, but you might need to know this if you need to use the credentials of a different account (either SQL Server or Windows) that has the permission to backup the databases on a different instance.
SQL Provider
One final option to leave you with is that you can also run these commands in the SQL Server PowerShell Provider. You can get to SQL Provider by opening the PowerShell ISE and running Import-Module SqlServer or by right-clicking on the Databases node of a SQL instance in Object Explorer of SSMS.

Once here you can backup a single database by typing Backup-SqlDatabase and then the name of the database you want to backup. This option might be beneficial to know about if you need to kick off some other task after the backup completes. Or use something like the code sample below for backing up all of the databases on this instance.
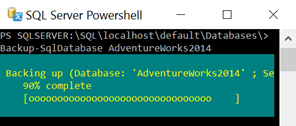
If you choose to use the ISE, VS Code (or another rich PowerShell editor) to get to the SQL Provider you will want to start out like this:
Import-Module SqlServer; CD SQLSERVER:\SQL\localhost\default\Databases\
From here you can connect to any SQL Server that you have permissions to get to, just like in SSMS, by swapping out localhost & default. In fact, I mention this method because with the SQL Provider you are basically accessing Object Explorer of SSMS at the command line. After that, you will be able to use the Get-ChildItem cmdlet of PowerShell to get your list of databases just like you were using Get-SqlDatabase to do. The Dir command is mapped as an alias to the Get-ChildItem cmdlet, and since it’s shorter and results in the same thing, you’ll usually see me doing that in my code.
This is brilliant when working on the command line but please think of the next guy or gal and use Dir or LS; the next person may not know what the complete command name means. Using the full command names in scripts or functions that others will use is what the grammar-police of the PowerShell world will tell you to do, this is your call, not their decision.
DIR | Where { $_.Name -ne 'tempdb' } | Backup-SqlDatabase
Wrap Up
I hope this has given you a useful tour versatility of the Backup-SqlDatabase cmdlet of SQL PowerShell and shown you how it can be much quicker and easier to use than T-SQL. Heck you can even use it to output T-SQL!
All code displayed in this article was done with the SqlServer PowerShell module which comes with SSMS 2016 (16.5+) and my machine was running version 5.1 of PowerShell.To the best of my knowledge (check the comments to so if my knowledge has been expanded), all of this code should run just fine on a machine with SSMS 2012, using the old SQLPS PowerShell module, and running version 3.0 of PowerShell.
Again, I personally wouldn’t use PowerShell as a replacement for how my database maintenance is done by SQL Agent just yet; however as the SQL Tools team continues improve SQL PowerShell I expect to have to come back and revise this statement in the not too distant future.
Big thanks to Rob Sewell, Matteo Taveggia, Chrissy LeMaire, & Steve Jones for reviewing and helping improve this article!


