This is the eighth article in a series entitled Stairway to Integration Services. Previous articles in the series include:
- What is SSIS? Level 1 of the Stairway to Integration Services
- The SSIS Data Pump - Level 2 of the Stairway to Integration Services
- Adding Rows in Incremental Loads – Level 3 of the Stairway to Integration Services
- Updating Rows in Incremental Loads – Level 4 of the Stairway to Integration Services
- Deleting Rows in Incremental Loads – Level 5 of the Stairway to Integration Services
- Basic SSIS Workflow Management – Level 6 of the Stairway to Integration Services
- Intermediate SSIS Workflow Management – Level 7 of the Stairway to Integration Services
Introduction
In the previous two installments, we built a new SSIS package, took a first look at scripting and precedence constraints in SQL Server Integration Services, and examined the MaxConcurrentExecutables package property. We examined, demonstrated, and tested “On Success”, “On Completion”, and “On Failure” functionality of precedence constraints.
In this article, we go deep with SSIS workflow management – learning about SSIS variables and the complexities of precedence constraints with Expressions.
About Variables
Open the Precedence.dtsx package if it’s not already open. Click the SSIS dropdown menu at the top of the BIDS environment and select Variables as shown in Figure 1:
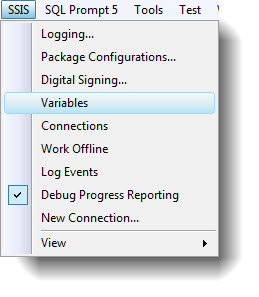
Figure 1
The Variables window displays as shown in Figure 2:

Figure 2
At the top of the Variables window, we find a toolbar for working with SSIS variables. These buttons are:
The Add Variable button - 
The Delete Variable button - 
It is disabled at this time because we have no SSIS variables configured for the Precedence.dtsx package.
The third button - 
is the “Show System Variables” button and displays System variables (variables in the System namespace). Many System variables are properties of the SSIS package. Other System variables are properties of components and objects that make up the SSIS package.
The fourth button - 
is the “Show All Variables” button. Clicking this button displays all variables in the SSIS package, regardless of scope.
The fifth button - 
is the “Choose Variable Columns” button. As shown in Figure 3, click this button to set the visibility of the columns visible in the Variables window grid:
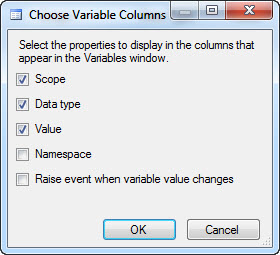
Figure 3
Variable Name, Scope, Data Type, and Value are displayed by default. You cannot deselect the Variable Name column, but you can decide to view Scope, Data Type, and Value. You can also view Namespace and “Raise event when variable value changes”.
Variables and Namespaces
There are two default namespaces in an SSIS package: System and User. You cannot add to the System variables, but you can add to the User variables and you can create new namespaces. Variable names must be unique with respect to Scope and Namespace. This means you can have a variable named “MyVariable” in the “User” namespace, which, when fully qualified is named “User::MyVariable” (<Namespace>::<VariableName>). In this case, User::MyVariable is scoped to the Precedence.dtsx package. We could have another variable named “MyVariable” in the “User2” namespace, “User2::MyVariable”, also scoped to the Precedence.dtsx package. To create the User2 namespace you need to display the namespace column and edit the text from “User” to “User2”. When you access variables at the same scope having the same name but having different namespaces, you need to fully-qualify the variable name or you will receive an error similar to:
The variable name is ambiguous because multiple variables with this name exist in different namespaces. Specify namespace-qualified name to prevent ambiguity.
Add a Variable
To demonstrate expressions and SSIS precedence constraints, let’s add an SSIS variable to the Precedence.dtsx package. Click the “Add Variable” button on the Variables window. A new Int32 data-type variable named “Variable” is created as shown in Figure 4:

Figure 4
Rename this variable “MyBool” and change its data type to Boolean, as shown in Figure 5:

Figure 5
Now we can use this variable in a precedence constraint expression.
Expressions and Precedence Constraints
Right-click the precedence constraint between Script Task 1 and Script Task 2, and click “Edit …” to open the Precedence Constraint Editor shown in Figure 6:
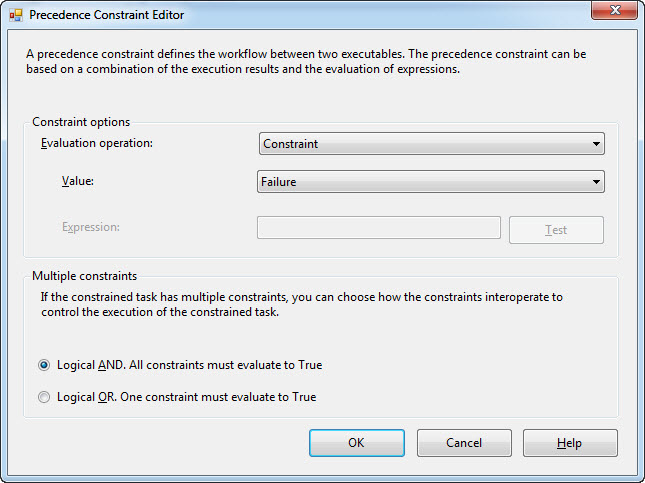
Figure 6
There are two groupbox controls on the Precedence Constraint Editor. They are labeled “Constraint options” and “Multiple constraints”. When I build SSIS packages, I physically orient Control Flow tasks to execute in the order top-to-bottom. One positive side-effect of positioning tasks so execution flows from top-to-bottom: The arrangement of the groupboxes on the Precedence Constraint Editor align somewhat with the physical layout of the Precedence Constraint on the Control Flow. The “Constraint options” groupbox sets Precedence Constraint properties related to the preceding task or “startpoint” of the precedence constraint. The “Multiple constraints” groupbox sets properties for the following task or Precedence Constraint “endpoint” as shown in Figure 7:
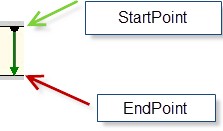
Figure 7
On the Precedence Constraint Editor, click the “Evaluation operation” dropdown and examine the options listed in Figure 8:

Figure 8
The default option is Constraint, which is the option we used in the preceding articles in this series. Selecting “Constraint” allows us to configure when (or if) the next task executes – based solely upon the execution result of the previous task. The Value dropdown contains options for Constraint evaluation: Success, Failure, and Completion as shown in Figure 9:

Figure 9
Change the “Evaluation operation” dropdown to “Expression” and enter “@MyBool” in the Expression textbox as shown in Figure 10:

Figure 10
Click the Test button to validate the expression in the Expression textbox. The results should appear as shown in Figure 11:

Figure 11
Remember, the value of the SSIS Variable named MyBool is a Boolean data type and is set to a default value of False. The expression entered in the Expression textbox must evaluate to True or False (a Boolean value). Because the SSIS variable MyBool is of the Boolean data type, it is perfectly suited for the task at hand. I could edit the Expression to read “@MyBool == True”. The expressions “@MyBool” and “@MyBool == True” are said to be logically equivalent because they produce the same results.
Once configured, close the Precedence Constraint Editor. Your Control Flow should appear as shown in Figure 12:
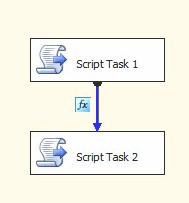
Figure 12
Execute the Precedence.dtsx package in the BIDS debugger by pressing the F5 key or clicking the VCR-style (or iPod-style) “Play” button. You should be prompted to succeed or fail Script Task 1 as shown in Figure 13:
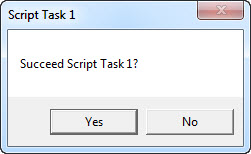
Figure 13
It no longer matters which option you select because the precedence constraint evaluation is based solely on the value of the SSIS Boolean Variable named @MyBool. @MyBool is False by default, so Script Task 2 will never execute because the precedence constraint will never evaluate to True.
To create a more useful test, open the Script Task 1 Editor and click the ellipsis in the ReadWriteVariables property. This displays the Select Variables window. Select the User::MyBool variable as shown in Figure 14:
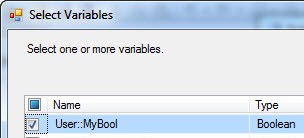
Figure 14
Click the OK button to close the Select Variables window. Your Script Task Editor should now include the SSIS Variable User::MyBool in the ReadWriteVariables property as shown in Figure 15:

Figure 15
Click the Edit Script button to display the Script Editor window. Edit the code in the Public Sub Main subroutine to as shown in Listing 1 (changes highlighted):
      Public Sub Main()
        Dim sTaskName As String = Dts.Variables("TaskName").Value.ToString
        Dim iResponse As Integer = _
MsgBox("Set MyBool to True?", MsgBoxStyle.YesNo, sTaskName)
        If iResponse = MsgBoxResult.Yes Then
            Dts.Variables("User::MyBool").Value = True
        Else
            Dts.Variables("User::MyBool").Value = False
        End If

        Dts.TaskResult = ScriptResults.Success
    End Sub
Listing 1
Close the Script Editor and click the OK button to close the Script Task Editor. Execute the Precedence.dtsx package in the BIDS debugger. You will now be prompted as shown in Figure 16:
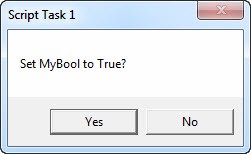
Figure 16
If you respond by clicking the Yes button, you should see a message box indicating Script Task 2 has executed as shown in Figure 17:

Figure 17
If you respond to the Script Task 1 message box by clicking the No button, execution should complete without executing Script Task 2 as shown in Figure 18:
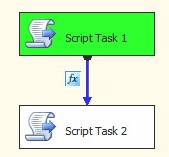
Figure 18
Let’s build out this demonstration a bit. Right-click Script Task 2 and then click Copy. Then right-click in the empty space of the Control Flow and click Paste. “Script Task 2 1” should appear as shown in Figure 19:
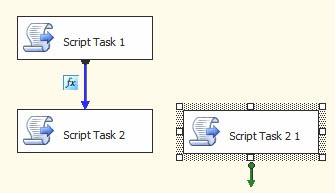
Figure 19
Rename Script Task 2 1 to “Script Task 3”. Connect a new precedence constraint from Script Task 1 as shown in Figure 20:
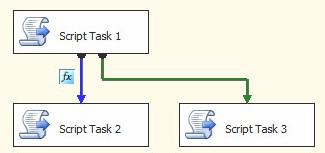
Figure 20
If you execute the package in the BIDS debugger right now, Script Task 1 will succeed regardless of the way you answer the prompt about the MyBool variable. When it succeeds, the precedence constraint connecting Script Task 1 and Script Task 3 will evaluate True, and the message box declaring “Script Task 3 completed” will display as shown in Figure 21:
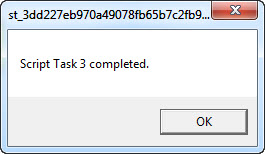
Figure 21
Let’s edit the precedence constraint between Script Task 1 and Script Task 3. Double-click the precedence constraint to open the Precedence Constraint Editor and change the Evaluation Operation to Expression. In the Expression textbox, enter “!@MyBool” (without the double-quotes) as shown in Figure 22:

Figure 22
The expression “!@MyBool” can be read “Not MyBool” – and evaluates to True if the value of the SSIS Variable User::MyBool is False. Click the OK button to close the Precedence Constraint Editor. Your Control Flow should appear similar to that shown in Figure 23:
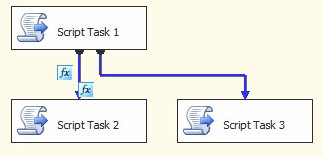
Figure 23
I don’t know about you, but to me this looks messy. The function icons are in the way some. I can adjust where they appear by moving the precedence constraints. When I do that my Control Flow appears as shown in Figure 24:
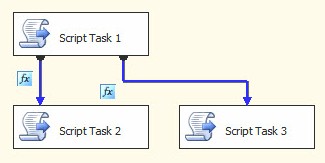
Figure 24
I like this better.
Execute the package in the BIDS debugger. If you click the Yes button when Script Task 1 prompts, Script Task 2 will execute as shown in Figure 25:

Figure 25
If you click the No button when Script Task 1 prompts, Script Task 3 will execute as shown in Figure 26:

Figure 26
Precedence constraints provide great visual feedback. Blue indicates a constraint evaluation operation set to Complete, for example. But our evaluation operation ignores the constraint altogether – what gives? Let’s think about this for a minute. Constraint evaluations are Success, Failure, and Completion. Success means the preceding task succeeded; failure means the preceding task failed. Both Success and Failure imply Completion, do they not? They do. Completion is a state that indicates the preceding task is done executing whether it succeeded or failed. Completion ignores the result of the preceding task’s execution; whether it was success or failure.
When I set the Precedence Constraint Evaluation Operation to Expression I am also ignoring the result of the preceding task’s execution. I am only concerned with whether the task completed. I find the Blue line here appropriate and a good indication of the logical operation.
Copying and Disabling to Preserve Existing Work
Before we move forward, let’s preserve the work we’ve already done. From the toolbox, drag a Sequence Container onto the Control Flow as shown in Figure 27:
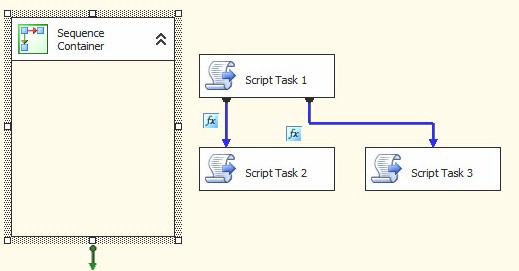
Figure 27
If you click in the empty space of the Control Flow and “draw” a box around the three script tasks, you can drag them – as a group – into the Sequence Container as shown in Figure 28:
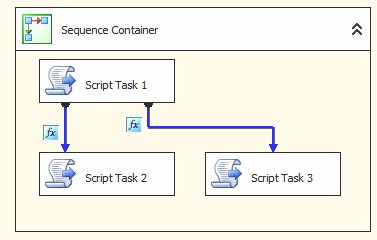
Figure 28
When you do this, the sequence container will automatically resize to surround the items dragged into it – most of the time. If it doesn’t, manually resize it so it won’t be visually confusing.
Right-click the Sequence Container and click Copy. Right-click in the empty space of the Control Flow and click Paste. Your Control Flow should appear as shown in Figure 29:
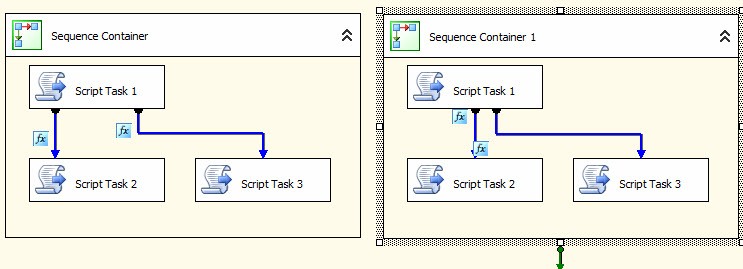
Figure 29
Now, right-click Sequence Container 1 – the original one – and click Disable. The sequence container and its contents should appear disabled (grayed-out) as shown in Figure 30:
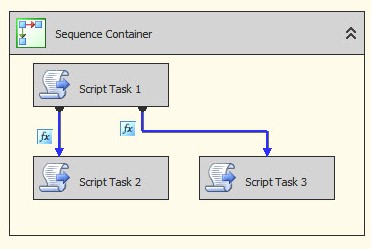
Figure 30
Now we can preserve the work already did while moving forward with new work. Cool.
Multiple Constraints
In Sequence Container 1, delete Script Task 1. This will also delete the precedence constraint between Script Task 1 and Script Task 2. Copy Script Task 2 and paste it into Sequence Container 1, then rename the new script task “Script Task 4”. Move Script Task 2 so that it is parallel to Script Task 4, and then connect a precedence constraint between Script Task 2 and Script Task 3. Connect a new precedence constraint between Script Task 4 and Script Task 3 as shown in Figure 31:

Figure 31
Now, let me ask you: What has to happen in order for Script Task 3 to execute?
- Nothing. Script Task 3 will execute when the other tasks execute.
- Script Task 3 will execute after either Script Task 4 or Script Task 2 executes and succeeds.
- Script Task 3 will execute after either Script Task 4 and Script Task 2 executes and succeeds.
- Script Task 3 will never execute.
The answer can be found by examining either of the precedence constraint editors, focusing on the Multiple Constraints groupbox as shown in Figure 32:

Figure 32
Remember, the Multiple Constraints groupbox defines how precedence constraints work at the EndPoint (the end of the precedence constraint with the arrow). When there is only one precedence constraint landing on a task at the endpoint, these options are moot (they behave the same way). But when there is more than one constraint landing at an endpoint task – as here – these options are vital.
The “Logical AND” option is selected by default. This means all precedence constraints landing at this endpoint task must evaluate before this task will execute. In this case, it means Script Task 4 and Script Task 2 must complete and succeed before Script Task 3 will fire. Let’s execute the package in the BIDS debugger to validate – as shown in Figure 33:
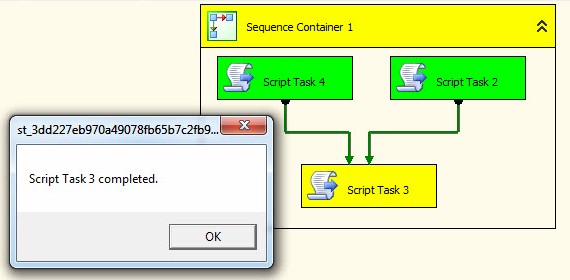
Figure 33
Script Task 3 could not start executing until after Script Task 4 and Script Task 2 completed execution with success. (The correct answer above was 3.) This is how Logical And Multiple Constraints works. Let’s test Logical Or next. Stop the BIDS debugger and double-click either enabled precedence constraint to open the editor. Change the Multiple Constraints setting from Logical AND to Logical OR as shown in Figure 34:

Figure 34
Click the OK button to close the Precedence Constraint Editor. You will probably notice a change in the appearance of both precedence constraints connected to Script Task 3. The precedence constraints are now both denoted by dashed lines as shown in Figure 35:
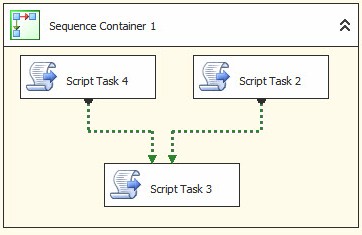
Figure 35
Because multiple constraint configurations deal with endpoint tasks, changes made to one are applied to all precedence constraints connected to the endpoint task.
Before, when we had multiple constraints configured to Logical AND, both preceding precedence constraints had to evaluate before the task that followed executed. We are now configured for Logical OR. What will need to happen before Script Task 3 will execute?
- Nothing. Script Task 3 will execute when the other tasks execute.
- Script Task 3 will execute after either Script Task 4 or Script Task 2 executes and succeeds.
- Script Task 3 will execute after either Script Task 4 and Script Task 2 executes and succeeds.
- Script Task 3 will never execute.
Let’s test it and see! Execute the package in the BIDS debugger. At some point, your Control Flow should appear similar to that shown in Figure 36:
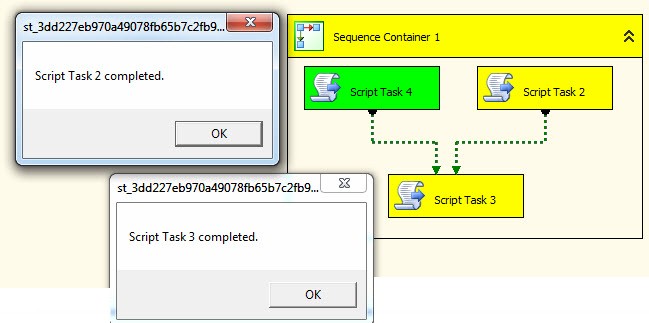
Figure 36
The answer to the question above is 2: Script Task 3 will execute after either Script Task 4 or Script Task 2 executes and succeeds.
Is your head hurting yet? I hope not, because there’s more! Let’s next look at mixing constraints and expressions.
Mixing Constraint and Expression Evaluation Operations
Stop the BIDS debugger if it is still running. Double-click the precedence constraint between Script Task 4 and Script Task 3 to open the Precedence Constraint Editor. Change the multiple constraints option to Logical AND. Set the Evaluation Operation to “Expression and Constraint”. Make sure the Value is set to Success and the Expression is set to @MyBool as shown in Figure 37:
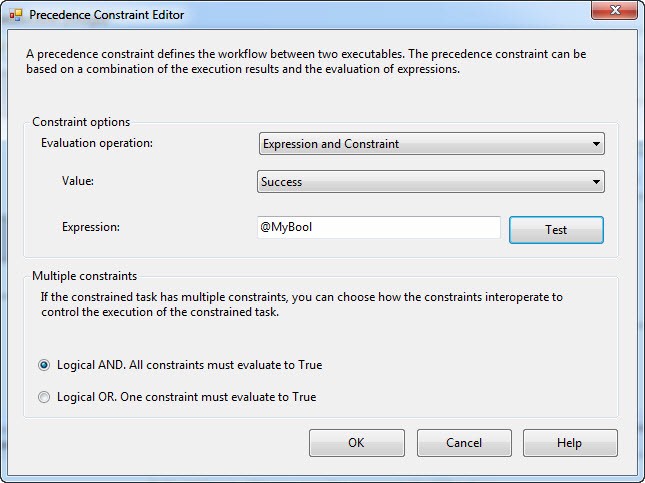
Figure 37
In order for this precedence constraint to evaluate, the preceding task must execute and succeed, and the value of the SSIS variable User::MyBool must be True. Let’s look at the Variables (click the SSIS dropdown menu from the top of the BIDS window and click Variables). According to Figure 38, MyBool is set to False:

Figure 38
Will this precedence constraint ever evaluate to True? No. Why not? Because the Constraint (Success) must evaluate to True and then Expression (MyBool) must also evaluate to True. But MyBool is False. So it doesn’t matter if Script Task 4 succeeds or fails, MyBool being False will prevent this precedence constraint from ever evaluating.
Try it. Execute the package in the BIDS debugger and observe the results. You will never see the package thus configured execute Script Task 3. It will always appear as shown in Figure 39:
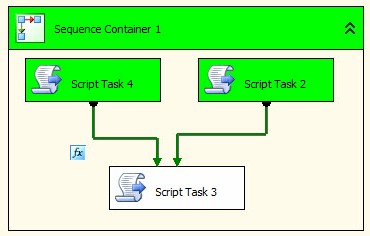
Figure 39
Stop the BIDS debugger. Let’s again open the Precedence Constraint Editor for the precedence constraint connecting Script Task 4 to Script Task 3. This time, let’s change the Evaluation Operation to “Expression or Constraint” as shown in Figure 40:

Figure 40
Close the Precedence Constraint Editor and execute the package in the BIDS debugger. This time, Script Task 3 executes as shown in Figure 41:
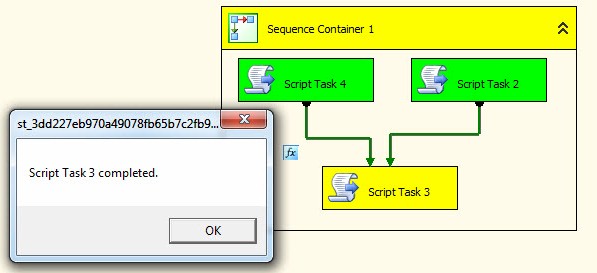
Figure 41
Script Task 3 executes because both precedence constraints connected to it evaluated True. It’s easy to understand how the precedence constraint between Script Task 2 and Script Task 3 evaluated. But how did the precedence constraint between Script Task 4 and Script Task 3 evaluate? The evaluation operation is set to “Expression or Constraint” which means that either the expression or the constraint must evaluate to True. If both evaluate to True, the precedence constraint will also evaluate to True. But the OR condition requires at least one – either the expression or the constraint – to evaluate True. The expression, MyBool, does not evaluate to True because the variable value is set to False. The constraint – Successful execution of the preceding task – evaluates to True. That’s why Script Task 3 is allowed to execute.
Precedence Constraint Annotation
One thing you may have noticed: When we made the last change in the Evaluation Operation – from “Expression and Constraint” to “Expression or Constraint” – there was no visual change in the graphical representation on the Control Flow. This bugs me. How can I tell the difference? There is a way: Click on the precedence constraint to select it and then press the F4 key to display Properties. The very first property is ShowAnnotation which can be set to “ConstraintOptions” as shown in Figure 42:
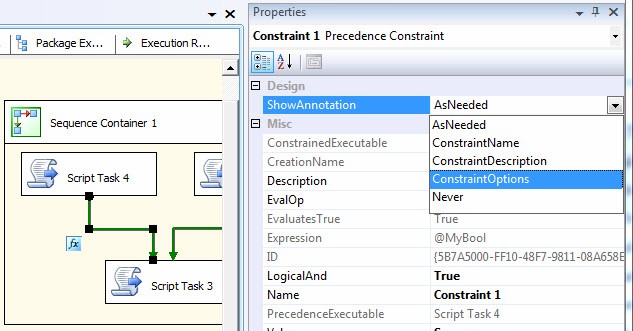
Figure 42
The ConstraintOptions setting of the ShowAnnotation property displays text that clarifies the evaluation operation of the precedence constraint as shown in Figure 43:
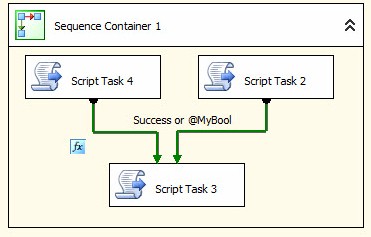
Figure 43
Mixing It Up!
First, let’s edit the code in Public Sub Main for Script Task 2 and Script Task 4 to match what’s listed in Listing 2:
      Public Sub Main()
        Dim sTaskName As String = Dts.Variables("TaskName").Value.ToString
        Dim iResponse As Integer
        iResponse = MsgBox("Succeed " & sTaskName & "?", _
                           MsgBoxStyle.YesNo + MsgBoxStyle.Question, _
                           sTaskName & " Success Question")
        If iResponse = vbYes Then
            Dts.TaskResult = ScriptResults.Success
        Else
            Dts.TaskResult = ScriptResults.Failure
        End If

    End Sub
Listing 2
This code creates prompts for task success from each of these script tasks. Edit the precedence constraint between Script Task 4 and Script Task 3, setting the Evaluation Operation to “Expression and Constraint”, the Value to Failure, and the Expression to “@MyBool” as shown in Figure 44:

Figure 44
Edit the precedence constraint between Script Task 2 and Script Task 3, setting the Evaluation Operation to “Expression” and the Expression to “!@MyBool” as shown in Figure 45:

Figure 45
If the ShowAnnotation property of both precedence constraints is set to ConstraintOptions, your Control Flow should appear similar to that shown in Figure 46:

Figure 46
Note that setting the Evaluation Operation to Expression causes the ConstraintOptions to display “Completion and <Expression>”. As I shared earlier in this article, this matches the logical operation.
What will need to happen before Script Task 3 will execute?
- Nothing. Script Task 3 will execute when the other tasks execute.
- Script Task 3 will execute after either Script Task 4 or Script Task 2 executes and succeeds.
- Script Task 3 will execute after either Script Task 4 and Script Task 2 executes and succeeds.
- Script Task 3 will never execute.
Try it. One variation is to fail Script Task 4 and succeed Script Task 2 as shown in Figure 47:
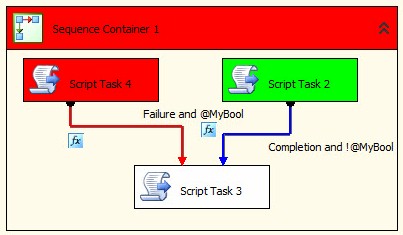
Figure 47
This is a trick question. The answer is 4 – Script Task 3 will never execute. Why? Because both precedence constraints are configured for Multiple Constraints Logical AND. They must both evaluate before Script Task 3 will be allowed to execute. But they contain a mutually exclusive condition with respect to the value of the MyBool SSIS variable: one constraint evaluates when MyBool is True; the other when MyBool is False. MyBool will never be both True and False – not at the same time (at least not in this universe). The lesson here: If mutually exclusive conditions exist, you must configure the Multiple Constraints to Logical OR at the task where the workflow converges.
Let’s make it possible for this configuration to run by making a change to the precedence constraint between Script Task 2 and Script Task 3. Change the Expression to read “@MyBool” as shown in Figure 48:

Figure 48
Change the value of the SSIS variable MyBool from False to True as shown in Figure 49:

Figure 49
If I execute the package in the BIDS debugger, fail Script Task 4, and succeed (or fail) Script Task 2; Script Task 3 executes as shown in Figure 50:
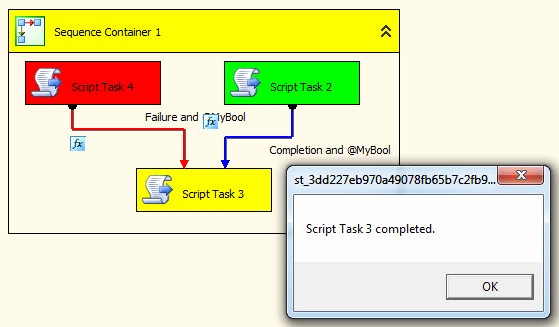
Figure 50
Once we remove the mutually exclusive conditions, multiple constraints configured for Logical AND con evaluate and fire the next task.
Another “Gotcha”
Earlier we disabled the Sequence Container. Let’s now disable Script Task 4 as shown in Figure 51:

Figure 51
When we execute the package in the BIDS debugger, Script Task 4 will not execute. But neither will Script Task 3 – as shown in Figure 52:
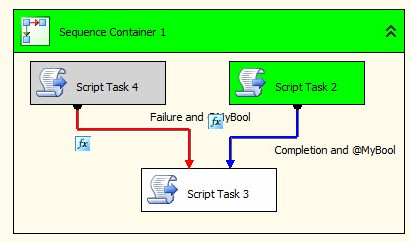
Figure 52
Why not? MyBool is True and Script Task 2 completed. Script Task 4 is “skipped”… what gives? When Script Task 4 is disabled, the Control Flow asserts Success. That means the Failure precedence constraint will not (ever) evaluate. Kudos to my friend Doreena Doherty for bringing this tidbit to my attention.
Conclusion
In this article, we used an SSIS variable to control precedence constraint evaluation, examined Multiple Constraints, and took a look at a couple “gotchas” to avoid when configuring precedence constraints to control workflow in an SSIS package.


