In a previous article in this Stairway I mentioned that I like to run server-side traces continuously on production servers. This practice allows me to proactively identify areas of concern and provides troubleshooting forensics following unexpected problems. In this Level, I’ll walk through creating database objects and standardized folder structure to support automation of server side traces among multiple servers using techniques discussed previously in conjunction with SQL Server Agent jobs to facilitate the task.
Server-Side Trace File Management
Listed below are the functional requirements this server-side trace automation technique addresses:
- Run trace(s) continuously on all managed servers
- Import trace files into a central database periodically
- Delete trace files after import
To this end, I create the following components:
- A trace data database on a central server with a trace data table along with tables containing the list of managed SQL Server instances and traces
- A shared folder on each server for server-side trace files
- An Admin database on each instance with trace management stored procedures
- A SQL Agent job on each instance to start the trace automatically
- A SSIS package and SQL Agent job on a central server to import trace files from each instance
Below is a walkthrough of creating these components along with explanation of each. You can create these objects on a test server if you want to follow along.
Trace Data Database
The trace data database serves as the central repository for data collected by traces and includes additional tables to facilitate centralized trace management. This database must be created on an instance with the latest SQL version in your environment (SQL 2008 R2 in my case) so that all possible trace columns are recognized. Run the script in Listing 1 on that instance to create the database SqlTraceData and tables. I will refer to this server hosting the SqlTraceData database as the trace management instance going forward.
The ServerSideTraceData table, which was discussed in detail in Level 6 of this Stairway, is the target of imported trace data. The other tables, SqlInstance and SqlTrace , contain the list of SQL instances and managed traces respectively. The SqlInstance table contains one row for each instance in the environment, including the server name (server/instance for named instance) and SQL Server version. The SqlTrace table contains one row for each trace to be run with the server name, trace name, trace folder path and the SQL command used to create the trace. The SSIS import package uses these objects and data to run the trace management tasks for each trace in the SqlTrace table.
CREATE DATABASE SqlTraceData;
GO

USE SqlTraceData;
GO

CREATE TABLE [dbo].[ServerSideTraceData]
       (
         [TextData] [nvarchar](MAX) NULL ,
         [BinaryData] [varbinary](MAX) NULL ,
         [DatabaseID] [int] NULL ,
         [TransactionID] [bigint] NULL ,
         [LineNumber] [int] NULL ,
         [NTUserName] [nvarchar](256) NULL ,
         [NTDomainName] [nvarchar](256) NULL ,
         [HostName] [nvarchar](256) NULL ,
         [ClientProcessID] [int] NULL ,
         [ApplicationName] [nvarchar](256) NULL ,
         [LoginName] [nvarchar](256) NULL ,
         [SPID] [int] NULL ,
         [Duration] [bigint] NULL ,
         [StartTime] [datetime] NULL ,
         [EndTime] [datetime] NULL ,
         [Reads] [bigint] NULL ,
         [Writes] [bigint] NULL ,
         [CPU] [int] NULL ,
         [Permissions] [bigint] NULL ,
         [Severity] [int] NULL ,
         [EventSubClass] [int] NULL ,
         [ObjectID] [int] NULL ,
         [Success] [int] NULL ,
         [IndexID] [int] NULL ,
         [IntegerData] [int] NULL ,
         [ServerName] [nvarchar](256) NULL ,
         [EventClass] [int] NULL ,
         [ObjectType] [int] NULL ,
         [NestLevel] [int] NULL ,
         [State] [int] NULL ,
         [Error] [int] NULL ,
         [Mode] [int] NULL ,
         [Handle] [int] NULL ,
         [ObjectName] [nvarchar](256) NULL ,
         [DatabaseName] [nvarchar](256) NULL ,
         [FileName] [nvarchar](256) NULL ,
         [OwnerName] [nvarchar](256) NULL ,
         [RoleName] [nvarchar](256) NULL ,
         [TargetUserName] [nvarchar](256) NULL ,
         [DBUserName] [nvarchar](256) NULL ,
         [LoginSid] [varbinary](MAX) NULL ,
         [TargetLoginName] [nvarchar](256) NULL ,
         [TargetLoginSid] [varbinary](MAX) NULL ,
         [ColumnPermissions] [int] NULL ,
         [LinkedServerName] [nvarchar](256) NULL ,
         [ProviderName] [nvarchar](256) NULL ,
         [MethodName] [nvarchar](256) NULL ,
         [RowCounts] [bigint] NULL ,
         [RequestID] [int] NULL ,
         [XactSequence] [bigint] NULL ,
         [EventSequence] [bigint] NULL ,
         [BigintData1] [bigint] NULL ,
         [BigintData2] [bigint] NULL ,
         [GUID] [uniqueidentifier] NULL ,
         [IntegerData2] [int] NULL ,
         [ObjectID2] [bigint] NULL ,
         [Type] [int] NULL ,
         [OwnerID] [int] NULL ,
         [ParentName] [nvarchar](256) NULL ,
         [IsSystem] [int] NULL ,
         [Offset] [int] NULL ,
         [SourceDatabaseID] [int] NULL ,
         [SqlHandle] [varbinary](MAX) NULL ,
         [SessionLoginName] [nvarchar](256) NULL ,
         [PlanHandle] [varbinary](MAX) NULL ,
         [GroupID] [int] NULL
       ) ;

CREATE TABLE dbo.SqlInstance(
     ServerName sysname NOT NULL
CONSTRAINT PK_SqlInstance PRIMARY KEY
 ,SqlVersion varchar(10) NOT NULL
);

CREATE TABLE dbo.SqlTrace(
ServerName sysname NOT NULL
, SqlTraceName sysname NOT NULL
, SqlTraceFolderPath nvarchar(256) NOT NULL
, SqlTraceCreateStatement nvarchar(MAX) NOT NULL
CONSTRAINT PK_SqlTrace PRIMARY KEY
(ServerName, SqlTraceName)
,CONSTRAINT FK_SqlTrace_SqlInstance
FOREIGN KEY (ServerName)
REFERENCES dbo.SqlInstance(ServerName)
);
Listing 1: SqlTraceData database create script
I run a single trace on a single instance in this walkthrough, just for illustration purposes, but this framework allows any number of instances and traces to be managed simply by adding a row to SqlInstance for each traced instance and a row to SqlTrace for each trace. The server named CENTRAL in this walkthrough serves as the central management server. The server named REMOTE1 is a traced instance. You can use a single server for both roles if you have only one test server.
Listing 2 shows sample inserts that you can customize for your environment. Run this script against the SqlTraceData database you just created after replacing the 3 occurrences of REMOTE1 with your actual server name.
USE SqlTraceData;
GO

INSERT INTO dbo.SqlInstance(
     ServerName
     , SqlVersion)
VALUES(
     N'REMOTE1'
     , 'SQL2008R2');

INSERT INTO dbo.SqlTrace(
     ServerName
     , SqlTraceName
     , SqlTraceFolderPath
     , SqlTraceCreateStatement)
VALUES(
     N'REMOTE1'
     , N'BatchRpcAndDeadlock'
     , N'\\REMOTE1\SqlTraceFiles\BatchRpcAndDeadlock'
, N'EXEC dbo.usp_StartBatchRpcAndDeadlockTrace
@TraceFilePath = N''\\REMOTE1\SqlTraceFiles\BatchRpcAndDeadlock\BatchRpcAndDeadlock'';');
Listing 2: Inserts for SqlInstance and SqlTrace tables
Trace File Folder Structure
- A standardized shared folder structure on each server makes it easy to collect trace data from multiple servers and helps keep trace files better organized. This structure is referenced using the UNC paths specified in the SqlTrace table as shown in Listing 2 so that trace files can be imported remotely.
- On each traced SQL Server instance (REMOTE1 in this example), create a local folder named SqlTraceFiles (for a default instance) or SqlTraceFiles_<instance-name> (for a named instance) and share it as the same name as the folder. Assign share and folder permissions so that the trace management instance SQL Server service account has (at least) read permissions and the SQL Agent Service account has full control. This is the root folder for all instance traces files. Within this root folder, create a subdirectory named BatchRpcAndDeadlock for the trace in this walkthrough along with a subdirectory within that folder named Completed. Figure 1 shows a Windows Explorer view of this folder structure.

Figure 1: Standard trace folder structure
- In the case of a clustered SQL Server instance, the folder structure must be created on a shared disk that is a member of the SQL Server cluster resource group. This allows the share to be accessed using the SQL Server failover cluster name regardless of the active node.
- Trace files for the BatchRpcAndDeadlock trace will be written to the folder of the same name. The SSIS package created in the next Level will move these files to the Completed subfolder, from where they are imported. For additional traces, create a folder named with your trace name under the trace root folder along with a Completed subdirectory.
Admin Database
I create a user database named DBAdmin on every instance with the utility stored procedures, views and functions I use commonly for administration, including procedures I use to manage server-side traces. Although I could create these objects in master or msdb system databases, I prefer to avoid muddying system databases with user objects.
The script in Listing 3 creates the DBAdmin database and trace management procedures. The stored procedure dbo.StartBatchRpcAndDeadlockTrace (re)creates and starts my BatchRpcAndDeadlock trace with a maximum of 10 files of 100MB each. The script in Listing 4 creates a utility stored procedure called dbo.usp_DeleteTraceByTraceFilePath to stop and delete a trace based on the trace file path rather than the trace ID. This way, I don’t need to keep track of trace IDs in order to manage traces; I simply pass the base path of the SQL Trace file (which is the same as the @path parameter of sp_trace_create) to identify the desired trace. As I mentioned earlier in this Stairway, SQL Trace doesn’t provide a way to name a trace directly so I use the trace file path instead. Run the scripts in Listing 4 and 3 on each traced instance (REMOTE1in this walkthrough) to create the DBAdmin database and stored procedures.
CREATE DATABASE DBAdmin;
GO
USE DBAdmin;
GO
CREATE PROCEDURE dbo.usp_StartBatchRpcAndDeadlockTrace
@TraceFilePath nvarchar(245)
AS

DECLARE
@rc int
,@TraceID int
,@maxfilesize bigint;

SET @maxfilesize = 100;

EXEC @rc = dbo.usp_DeleteTraceByTraceFilePath @TraceFilePath;

EXEC @rc = sp_trace_create
@trace_id = @TraceID output
, @options = 2 --rollover
, @tracefile = @TraceFilePath
, @maxfilesize = @maxfilesize
, @stoptime = NULL
, @filecount = 10;
IF (@rc != 0) GOTO Error;

-- Set the events
declare @on bit;
set @on = 1;
exec sp_trace_setevent @TraceID, 148, 11, @on;
exec sp_trace_setevent @TraceID, 148, 12, @on;
exec sp_trace_setevent @TraceID, 148, 14, @on;
exec sp_trace_setevent @TraceID, 148, 1, @on;
exec sp_trace_setevent @TraceID, 10, 15, @on;
exec sp_trace_setevent @TraceID, 10, 16, @on;
exec sp_trace_setevent @TraceID, 10, 9, @on;
exec sp_trace_setevent @TraceID, 10, 17, @on;
exec sp_trace_setevent @TraceID, 10, 2, @on;
exec sp_trace_setevent @TraceID, 10, 10, @on;
exec sp_trace_setevent @TraceID, 10, 18, @on;
exec sp_trace_setevent @TraceID, 10, 11, @on;
exec sp_trace_setevent @TraceID, 10, 12, @on;
exec sp_trace_setevent @TraceID, 10, 13, @on;
exec sp_trace_setevent @TraceID, 10, 6, @on;
exec sp_trace_setevent @TraceID, 10, 14, @on;
exec sp_trace_setevent @TraceID, 12, 15, @on;
exec sp_trace_setevent @TraceID, 12, 16, @on;
exec sp_trace_setevent @TraceID, 12, 1, @on;
exec sp_trace_setevent @TraceID, 12, 9, @on;
exec sp_trace_setevent @TraceID, 12, 17, @on;
exec sp_trace_setevent @TraceID, 12, 6, @on;
exec sp_trace_setevent @TraceID, 12, 10, @on;
exec sp_trace_setevent @TraceID, 12, 14, @on;
exec sp_trace_setevent @TraceID, 12, 18, @on;
exec sp_trace_setevent @TraceID, 12, 11, @on;
exec sp_trace_setevent @TraceID, 12, 12, @on;
exec sp_trace_setevent @TraceID, 12, 13, @on;

-- Set the Filters
DECLARE @bigintfilter bigint;

SET @bigintfilter = 1000000;
EXEC sp_trace_setfilter @TraceID, 13, 0, 4, @bigintfilter;

-- Set the trace status to start
EXEC sp_trace_setstatus @TraceID, 1;

GOTO Finish;

Error:
SELECT ErrorCode=@rc;

Finish:
RETURN @rc;
GO
Listing 3: Stored procedure to start BatchRpcAndDeadlock trace
USE DBAdmin;
GO

CREATE PROCEDURE dbo.usp_DeleteTraceByTraceFilePath
@TraceFilePath nvarchar(245)
AS
DECLARE
@TraceID int
,@RowCount int
,@rc int;

SET @rc = 0;

SELECT @TraceID = id
FROM sys.traces
WHERE path LIKE @TraceFilePath + '%';

SET @RowCount = @@ROWCOUNT;

IF @RowCount = 0
BEGIN
SET @rc = 1;
GOTO Finish;
END
ELSE
BEGIN
IF @RowCount > 1
BEGIN
RAISERROR('Ambiguous trace file path: %d traces found for path %s', 16, 1, @RowCount, @TraceFilePath);
SET @rc = 1;
GOTO Finish;
END
END;

IF @RowCount = 1
BEGIN
EXEC @rc = sp_trace_setstatus
@trace_id = @TraceID
,@status = 0; --stop trace
IF @rc <> 0 GOTO Finish;

EXEC @rc = sp_trace_setstatus
@trace_id = @TraceID
,@status = 2; --delete trace
IF @rc <> 0 GOTO Finish;
END

Finish:
RETURN @rc;
GO
Listing 4: Utility stored procedure to stop trace identified by trace file path
After the DBAdmin database is created, run the Listing 5 script against the REMOTE1 instance to create the trace, specifying your actual server name and trace file path. Note this is the same path that was specified earlier in the Listing 2 insert statement. Verify the trace file was created as expected (“\\REMOTE1\SqlTraceFiles\BatchRpcAndDeadlock\ BatchRpcAndDeadlock.trc”). This file will be used during SSIS package development in the next level of this Stairway.
USE DBAdmin;
GO

EXEC dbo.usp_StartBatchRpcAndDeadlockTrace
    @TraceFilePath = N'\\REMOTE1\SqlTraceFiles\BatchRpcAndDeadlock\BatchRpcAndDeadlock';
GO
Listing 5: Create and delete trace
Trace Create SQL Agent Job
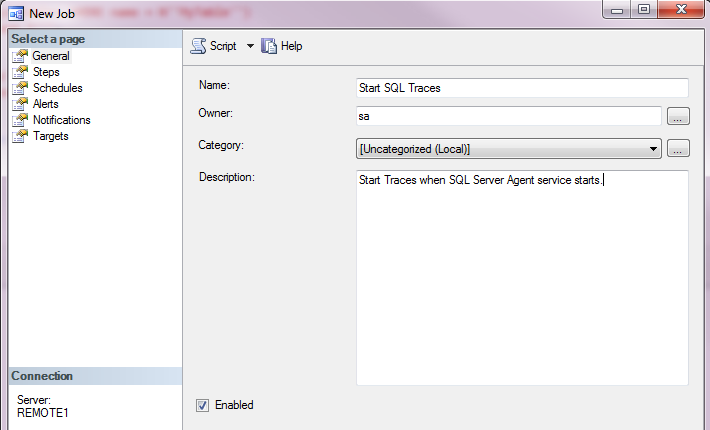
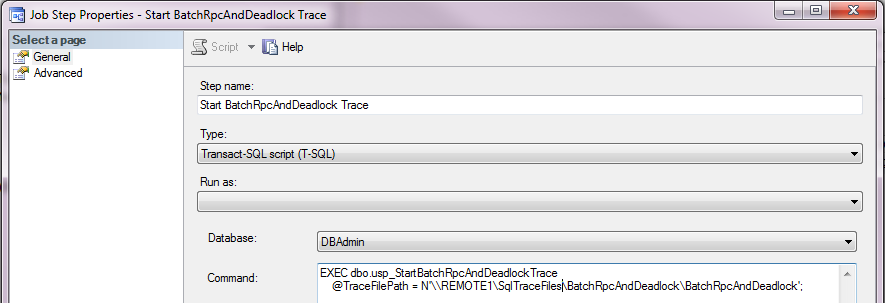
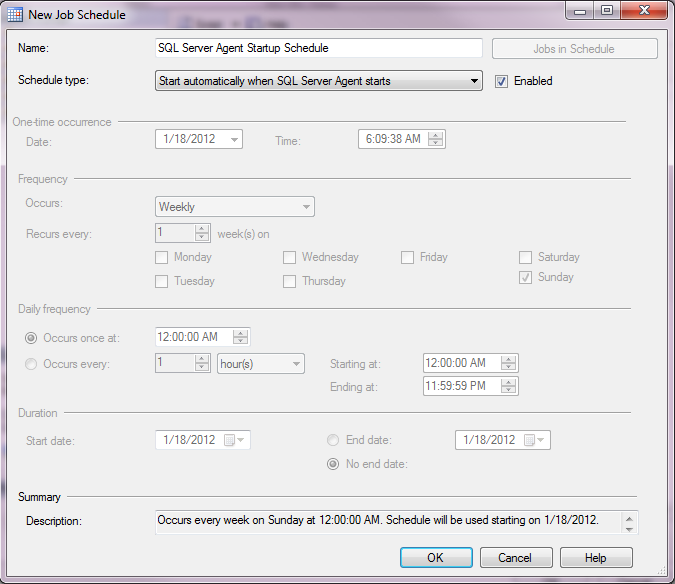
Because server-side traces do not persist across SQL Server service restarts, I verify that the SQL Agent service is configured to start automatically on each server and create a SQL Agent job on each to execute the trace create procedure whenever SQL Agent starts. The SQL Agent service is dependent on the SQL Server service so the trace will be recreated every time SQL Server is restarted. Figures 2, 3 and 4 show this job along with the T-SQL script step and schedule. Create the job as shown, customizing the T-SQL command in Figure 3 with your actual UNC trace file path, which is the same as specified in Listings 2 and 5. Be sure to specify DbAdmin as the database context in the Listing 3 T-SQL job step.
As I mentioned earlier in this Stairway, you can alternatively create the stored procedure in the master database and use sp_procoption to mark as a startup procedure so that it is executed each time the SQL Server service starts. However, since there is no way to pass the trace file path parameter to a startup procedure, it will be necessary to hard-code the value in the stored procedure body. I prefer the SQL Agent job method so that the same trace stored procedure can be deployed to different servers with the server-specific trace file path passed at run time using a T-SQL command job step as illustrated in the Figure 3.

Figure 2: SQL trace start job

Figure 3: SQL trace start job step

Figure 4: SQL trace start job schedule
Next Steps
At this point, the BatchRpcAndDeadlock trace will run continuously and trace files will automatically rollover according to the rollover trace file specification in Listing 3 (100MB). The trace data files can be queried directly using fn_trace_gettable or by opening the file in Profiler. However, one of the goals of this trace automation is to import trace data into the SqlTraceData table regularly so that trace data can be accumulated and queried from a central location.
In the next Level of this Stairway, I’ll create the SSIS trace file import package and job to import managed trace files periodically. This import package will leverage the database objects and folder structure created in this Level.

