Introduction
Setting up an email alert is as simple as creating a Windows Task that is triggered by an Event. You then must specify the action that will occur when that Task is triggered. Since Microsoft has decided to deprecate the “Send an e-mail” option the only choice we have is to Start a Program. In our case that program will be a Powershell script that will collect the Event Log information and parse it so that we can send an email that includes important Log Event details.
This work was verified on Windows Server 2016, but I suspect it should work on Windows Server 2012 R2 and Windows Server 2019 as well. If you get it working on any other platforms please comment and let us know if you had to change anything.
Step 1 – Write a Powershell Script
The first thing that you need to do is write a Powershell script that when run can send an email. While researching this I discovered many ways to accomplish this task, so what I’m about to show you is just one way, but feel free to experiment and use what is right for your environment.
In my lab I do not run my own SMTP server, so I had to write a script that could leverage my Gmail account. You will see in my Powershell script the password to the email account that authenticates to the SMTP server is in plain text. If you are concerned that someone may have access to your script and discover your password then you will want to encrypt your credentials. Gmail requires and SSL connection so your password should be safe on the wire, just like any other email client.
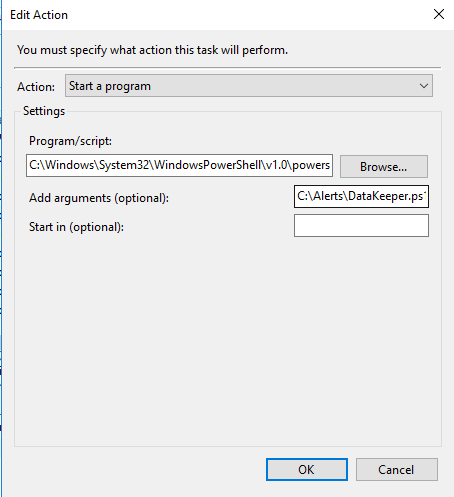
Here is an example of a Powershell script that when used in conjunction with Task Scheduler which will send an email alert automatically when any specified Event is logged in the Windows Event Log. In my environment I saved this script to C:\Alerts\DataKeeper.ps1
$EventId = 16,20,23,150,219,220

$A = Get-WinEvent -MaxEvents 1  -FilterHashTable @{Logname = "System" ; ID = $EventId}
$Message = $A.Message
$EventID = $A.Id
$MachineName = $A.MachineName
$Source = $A.ProviderName


$EmailFrom = "sios@medfordband.com"
$EmailTo = "sios@medfordband.com"
$Subject ="Alert From $MachineName"
$Body = "EventID: $EventID`nSource: $Source`nMachineName: $MachineName `nMessage: $Message"
$SMTPServer = "smtp.gmail.com"
$SMTPClient = New-Object Net.Mail.SmtpClient($SmtpServer, 587)
$SMTPClient.EnableSsl = $true
$SMTPClient.Credentials = New-Object System.Net.NetworkCredential("sios@medfordband.com", "mySMTPP@55w0rd");
$SMTPClient.Send($EmailFrom, $EmailTo, $Subject, $Body)
An example of an email generated from that Powershell script looks like this.
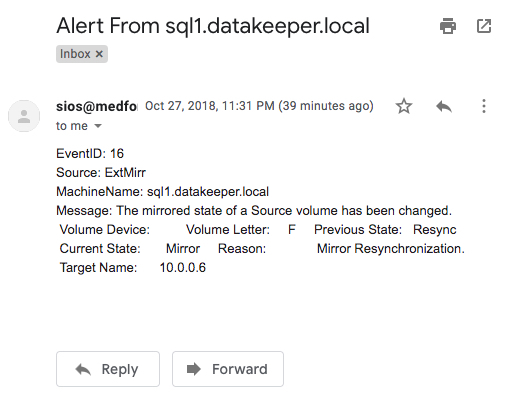
You probably noticed that this Powershell script uses the Get-WinEvent cmdlet to grab the most recent Event Log entry based upon the LogName, Source and eventIDs specified. It then parses that event and assigns the EventID, Source, MachineName and Message to variables that will be used to compose the email. You will see that the LogName, Source and eventIDs specified are the same as the ones you will specify when you set up the Scheduled Task in Step 2.
Step 2 – Set Up a Scheduled Task
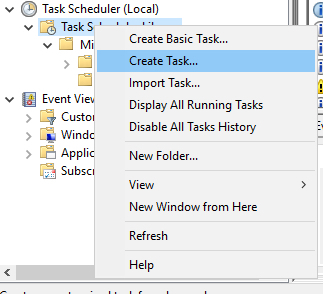
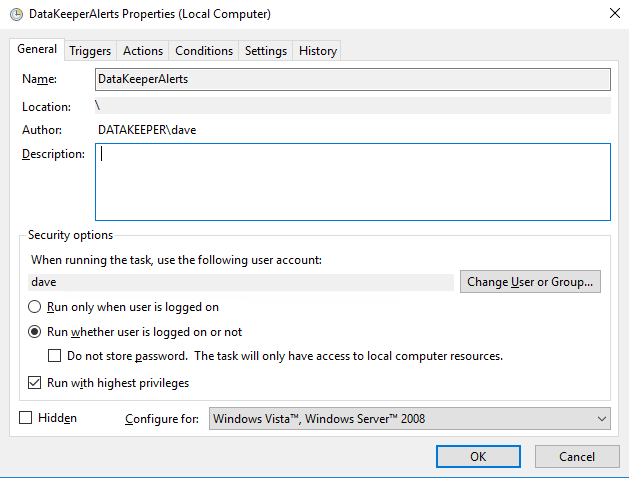
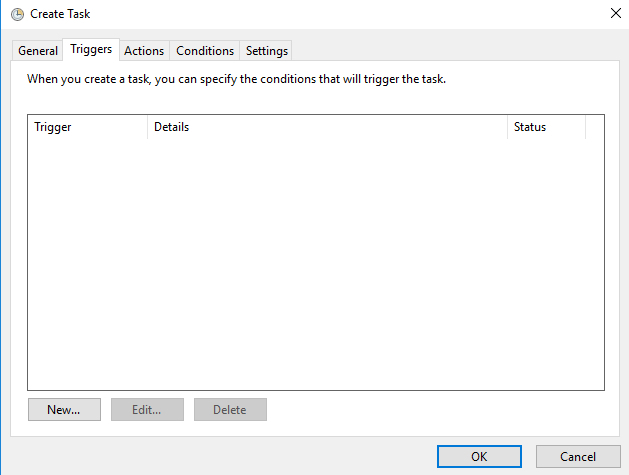
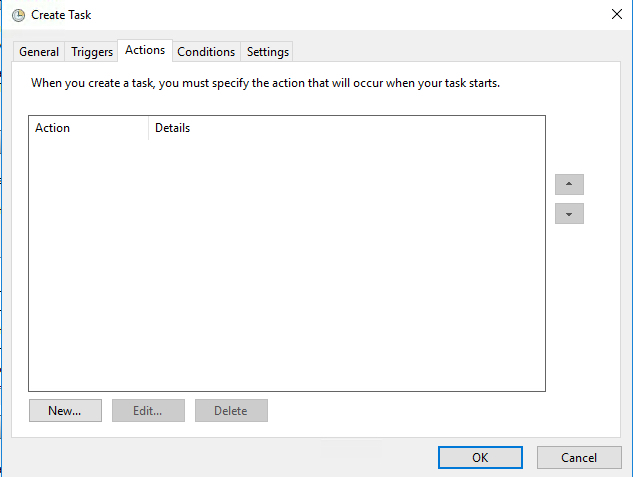
In Task Scheduler Create a Task as show in the following screen shots.
- Create Task

Make sure the task is set to Run whether the user is logged on or not.

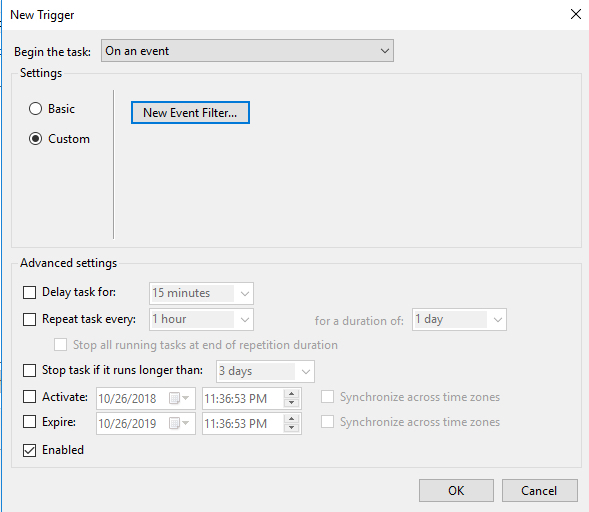
- On the Triggers tab choose New to create a Trigger that will begin the task “On an Event”. In my example I will be creating an event that triggers any time DataKeeper (extmirr) logs an important event to the System log.

Create a custom event and New Event Filter as shown below…
For my trigger I am triggering on commonly monitored SIOS DataKeeper (ExtMirr) EventIDs 16, 20, 23,150,219,220 . You will need to set up your event to trigger on the specific Events that you want to monitor. You can put multiple Triggers in the same Task if you want to be notified about events that come from different logs or sources.

Create a New Event Filter - Once the Event Trigger is configured, you will need to configure the Action that occurs when the event is run. In our case we are going to run the Powershell script that we created in Step 1.

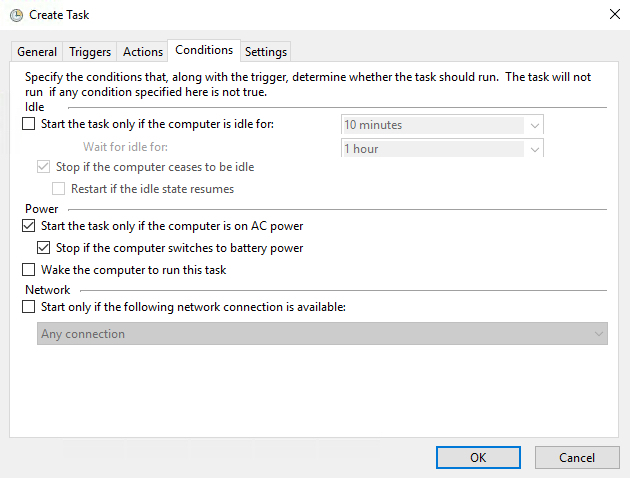
- The default Condition parameters should be sufficient.

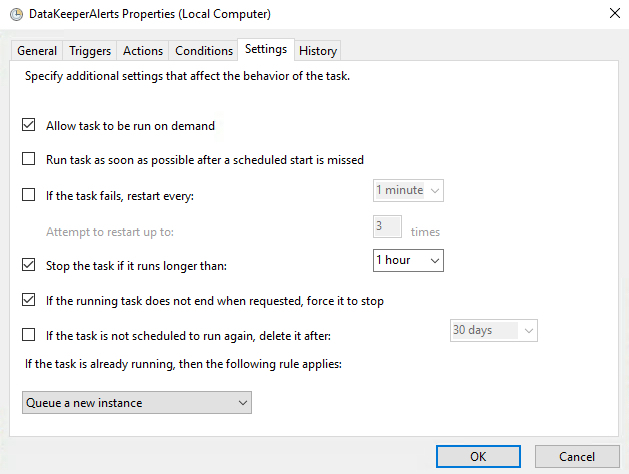
- And finally, on the Settings tab make sure you allow the task to be run on demand and to “Queue a new instance” if a task is already running.

Step 3 (if necessary) – Fix the Microsoft-Windows-DistributedCOM Event ID: 10016 Error
In theory, if you did everything correctly you should now start receiving emails any time one of the events you are monitoring gets logged in the event log. However, I ran into a weird permission issue on one of my servers that I had to address before everything worked. I’m not sure if you will run into this issue, but just in case here is the fix.
In my case when I manually triggered the event, or if I ran the Powershell script directly, everything worked as expected and I received an email. However, if one of the EventIDs being monitored was logged into the event log it would not result in an email being sent. The only clue I had was the Event ID: 10016 that was logged in my Systems event log each time I expected the Task Trigger to detect a logged event.
Log Name: System
Source: Microsoft-Windows-DistributedCOM
Date: 10/27/2018 5:59:47 PM
Event ID: 10016
Task Category: None
Level: Error
Keywords: Classic
User: DATAKEEPER\dave
Computer: sql1.datakeeper.local
Description:
The application-specific permission settings do not grant Local Activation permission for the COM Server application with CLSID
{D63B10C5-BB46-4990-A94F-E40B9D520160}
and APPID
{9CA88EE3-ACB7-47C8-AFC4-AB702511C276}
to the user DATAKEEPER\dave SID (S-1-5-21-25339xxxxx-208xxx580-6xxx06984-500) from address LocalHost (Using LRPC) running in the application container Unavailable SID (Unavailable). This security permission can be modified using the Component Services administrative tool.
Many of the Google search results for that error indicate that the error is benign and include instructions on how to suppress the error instead of fixing it. However, I was pretty sure this error was the cause of my current failure to be able to send an email alert from a Scheduled Event that was triggered from a monitored Event Log entry, so I needed to fix it.
After much searching, I stumbled upon this newsgroup discussion. The response from Marc Whittlesey pointed me in the right direction. This is what he wrote…
There are 2 registry keys you have to set permissions before you go to the DCOM Configuration in Component services: CLSID key and APPID key.
I suggest you to follow some steps to fix issue:
1. Press Windows + R keys and type regedit and press Enter.
2. Go to HKEY_Classes_Root\CLSID\*CLSID*.
3. Right click on it then select permission.
4. Click Advance and change the owner to administrator. Also click the box that will appear below the owner line.
5. Apply full control.
6. Close the tab then go to HKEY_LocalMachine\Software\Classes\AppID\*APPID*.
7. Right click on it then select permission.
8. Click Advance and change the owner to administrators.
9. Click the box that will appear below the owner line.
10. Click Apply and grant full control to Administrators.
11. Close all tabs and go to Administrative tool.
12. Open component services.
13. Click Computer, click my computer, and then click DCOM.
14. Look for the corresponding service that appears on the error viewer.
15. Right click on it then click properties.
16. Click security tab then click Add User, Add System then apply.
17. Tick the Activate local box.
So use the relevant keys here and the DCOM Config should give you access to the greyed out areas:
CLSID {D63B10C5-BB46-4990-A94F-E40B9D520160}
APPID {9CA88EE3-ACB7-47C8-AFC4-AB702511C276}
I was able to follow Steps 1-15 pretty much verbatim. However, when I got to Step 16 I really couldn’t tell exactly what he wanted me to do. At first I granted the DATAKEEPER\dave user account Full Control to the RuntimeBroker, but that didn’t fix things. Eventually I just selected “Use Default” on all three permissions and that fixed the issue.
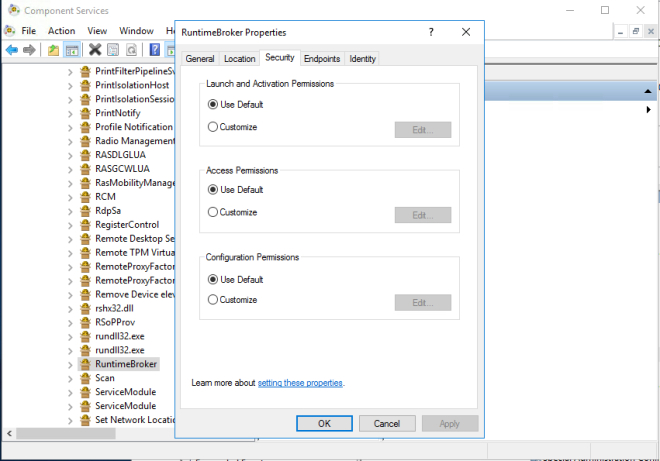
I’m not sure how or why this happened, but I figured I better write it all down in case it happens again because it took me a while to figure it out.
Step 4 – Automating the Deployment
If you need to enable the same alerts on multiple systems you can simply export your Task to an XML file and Import it on your other systems.


Or even better yet, automate the Import as part of your build process through a Powershell script after making your XML file available on a file share as shown in the following example.
PS C:\> Register-ScheduledTask -Xml (get-content '\\myfileshare\tasks\DataKeeperAlerts.xml' | out-string) -TaskName "DataKeeperAlerts" -User datakeeper\dave -Password MyDomainP@55W0rd –Force
In Summary
Hopefully what I have provided will give you everything you need to start receiving alert notification emails on whichever Event Log entries keep you up at night.
In my next post I will show you how to be notified when a specified Service either starts or stops. Of course you could just monitor for EventID 7036 from Service Control Monitor, but that would notify you whenever ANY service starts or stops. We will need to dig a little deeper to make sure we get notified only when the services we care about start or stop.


