Introduction
We often see and think of reporting as visualizing the already available data from a database and process it on to a business intelligence tool. In today’s world where data is the unlock to major decisions, reporting can no longer stay one way and be called fully real time.
Analogous to this I often times when working with customers, I come across problems in this space. I hear “Ohh yes this data is adhoc and we will need to add it to database”. Or instances where “We need to upload the data source but can do it tomorrow as I need to run a query to process it”.
Wouldn’t it be the most efficient to be able to upload this data directly and then see the most recent report? Although there are many ways of doing this and achieving it could have different complexities. Certainly some may argue – ‘Well your data should no longer be outside of a database and require manual ingestion’ – True but is difficult to be so in every case.
There are instances where:
- The data is processed from an external source and needs to be uploaded
- A senior leader would want to share data and the most efficient way is to use a file to share that
- Quick and adhoc approaches that need to resolved sooner than setting up a pipeline end-to-end.
There are a number of ways this can be achieved with some of the solutions being Solara and StreamSync.
I will walk through a solution using Streamlit and Snowflake and the code that will enable the system once you have app setup.
What is Streamlit?
Streamlit is an open-source Python library that makes it easy to create and share custom web apps. By using Streamlit you can quickly build and deploy powerful data applications. One of the main advantages of Streamlit is its ease of use. It provides a simple API that enables users to create intuitive and interactive applications with just a few lines of code. It is also ideal for small data apps or for prototyping larger apps.
Streamlit also comes with a range of pre-built components, such as charts and widgets, that can be easily customized to suit your needs. This makes it easy to add functionality to your app without having to write complex code from scratch.
We will however discuss how we can develop the app locally to:
- Create a front end that allows users to upload data
- Setup a connection between Streamlit web app and database table
- SQL code that parses the uploaded file and stores the data in the Snowflake table
Pre-requisites:
- Streamlit installed and working on the local system. For installation, you can follow the steps on their official documentation page
- Snowflake instance is setup with read and write access to a database
- Intermediate level proficiency in python and SQL queries
Creating a python webserver using Streamlit
Streamlit provides multiple ways to setup the environment on local system and install Streamlit through:
- Command Line
- Anaconda distribution
- Github Codespace
- Streamlit in Snowflake (requires activation)
I used Anaconda (as it already comes with python installation package in the environment) and used the steps mentioned on their documentation link above.
Once the web server is created, it can be started by using the below command in the streamlit environment terminal:
streamlit run app.py
The installation will have created am app.py file in your project folder, where you can use the code below to develop the application.
We will need to first import libraries using the code below (to be added in your app.py file obtained from Streamlit installation):
import pandas as pd
import re
import numpy as np
import streamlit as st
import snowflake.connector as sf
Here is the code to create an upload functionality in the web app:
st.write('Step 1: Upload excel to process and append to the snowflake table')
uploaded_file = st.file_uploader("Choose a file")    #st.file_uploader provides a direct way to add the uploader on web app

    if uploaded_file is not None:
        df1=pd.read_excel(uploaded_file)
This is the function to setup and initiate session and connection to snowflake:
def intialize_session_states():
# Initializing states that will be used to navigate through the app
   session_states = ["snowflake-connection",
   "excel_input"]

st.session_state["snowflake-connection"] = conn
Query to connect to a database in snowflake and insert data from uploaded file to the table:
    conn = sf.connect(

            account='account name',
                user = 'user email for login',
                schema = 'database schema',
                warehouse='database warehouse',
                role = 'user role',
                database = 'database name',
                authenticator='externalbrowser'
            )

    query_to_insert_data_to_table_in_snowflake = "Insert into
        database.schema.sample_input_from_streamlit(
        COL_1,
        COL_2,
        COL_3)
        VALUES (%s,%s,%s)"

    cursor = conn.cursor()
    cursor.execute(query_to_insert_data_to_table_in_snowflake)
    column_data = cursor.fetchall()
Output
Web app with upload widget:
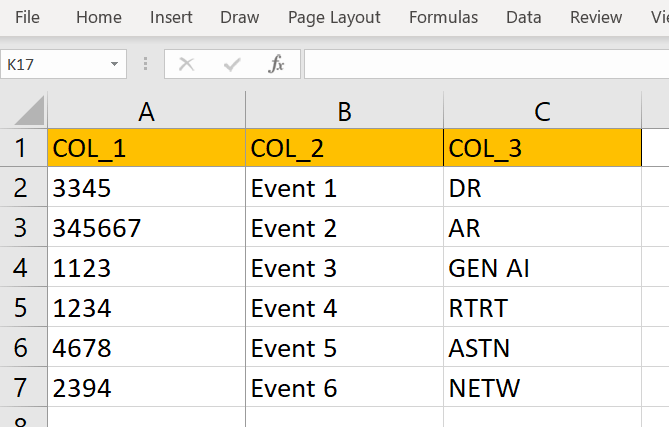
The excel input file for upload:
Once the StreamLit to Snowflake connection is established after the file is uploaded, a new tab will open in the browser which says:
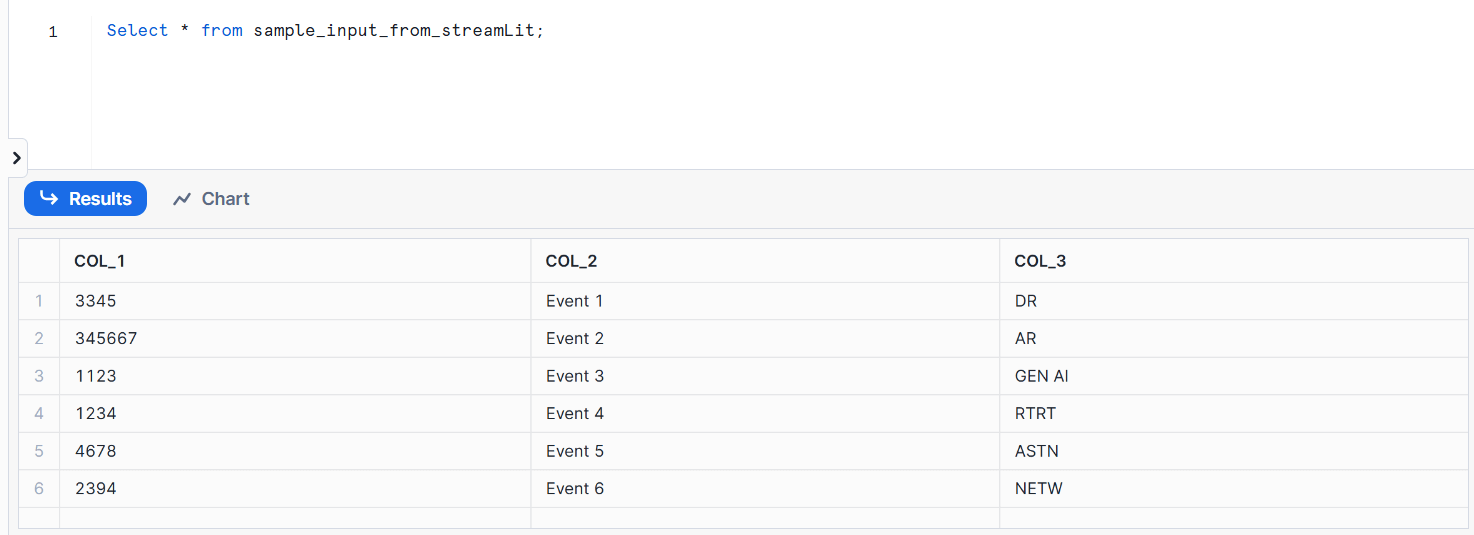
Viewing successfully uploaded data in snowflake table:
Conclusion
This enables a quick and easy way to setup a web app that is able to:
- Allow users to input data to the database for reporting/ processing
- Eliminate queries required to ingest data to cloud or a database
- Generate a platform to further expand scope with validation or manipulation of data in the web app directly
- Get rid of any other transformation steps in the backend (database server)
- Connect the tables for the uploaded data directly to BI reporting tools such as Looker, Tableau etc.
With an increased need for dynamic and real time data processing required for reporting, a way to develop web apps quickly that cater to data manipulation and storage have gained increased momentum. With more advancements that enable a plug and play system for such apps, it will only make it simpler to deliver these solutions.


