Introduction
Azure Data Explorer (ADX) helps to analyze high volumes of data in near real-time. The Azure Machine Learning (AML) Python SDK v2 is an updated Python SDK package. It helps to build a single command or a chain of commands like Python functions to create a single step or a complex workflow. I will discuss the end-to-end solution for data ingestion and data retrieval in ADX Cluster database using AML Python notebooks.
Here are the Azure Resources used:
Steps
The following steps will explain the creation of the Azure Data Resources and data ingestion and retrieval in the ADX Cluster database from Storage account blob. The Python notebook will be created in the AML Workspace and will be executed using AML Workspace Compute Instance.
Step 1
Create a Storage Account first. Then, create a container named ml-adx-demo inside the Storage Account.
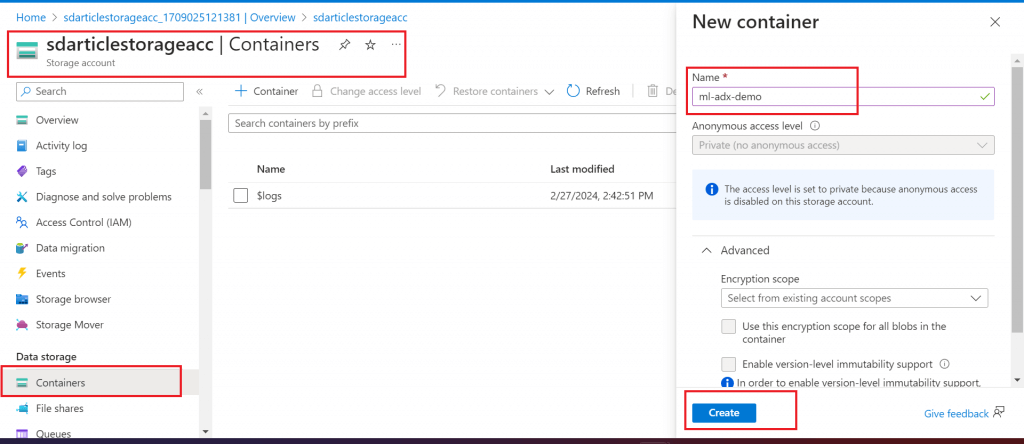
Step 2
Upload a CSV file in the container named ml-adx-demo inside the Storage Account
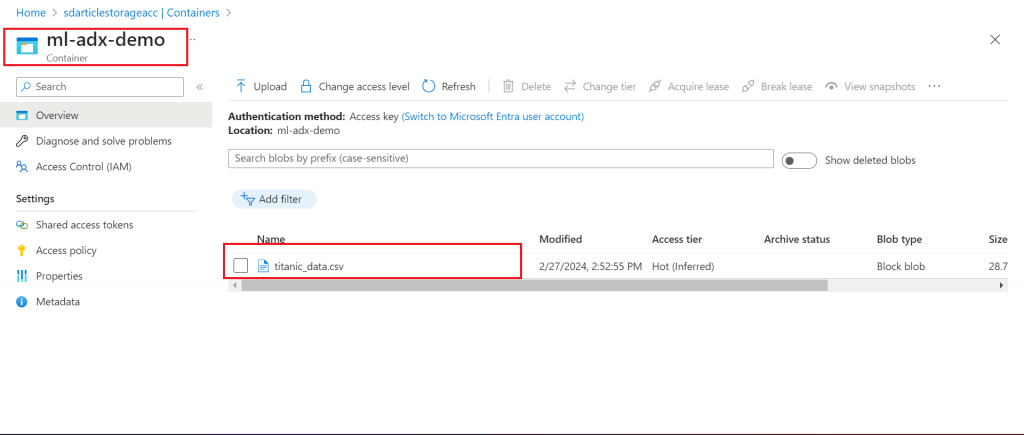
Step 3
Go to Entra ID and add App Registration from the top menu
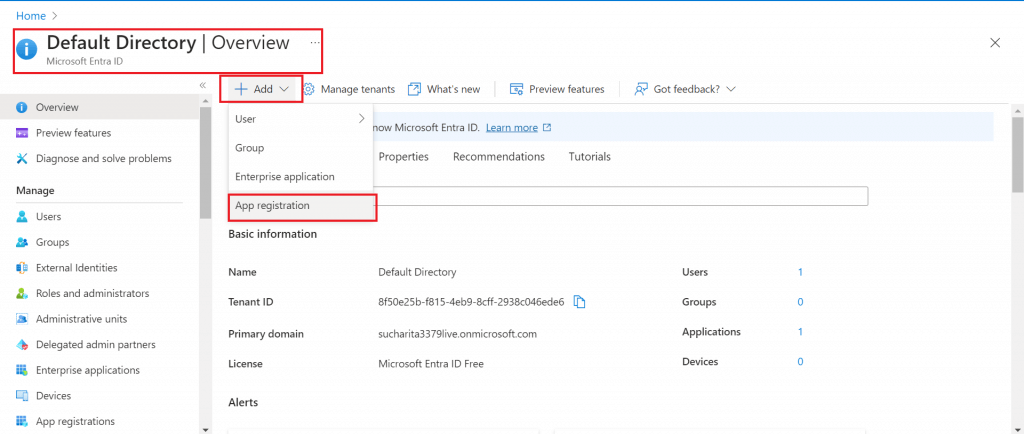
Step 4
Register an application named ml_adx_demo_app
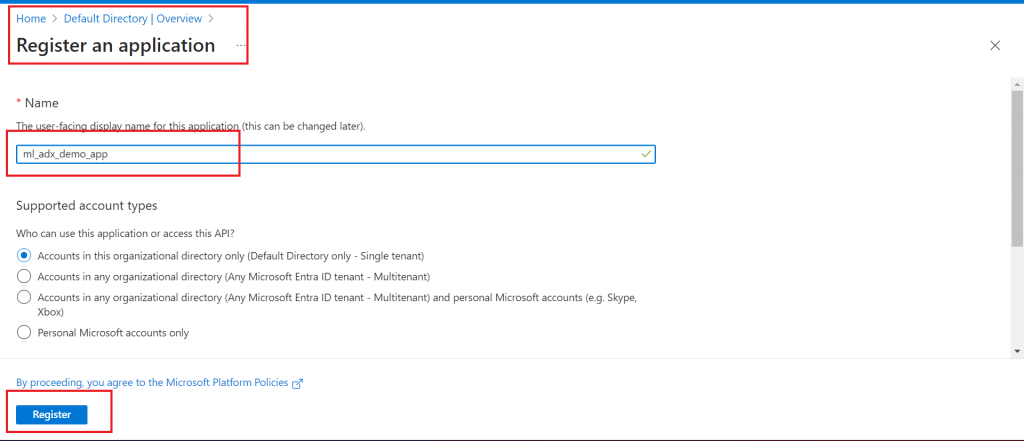
Step 5
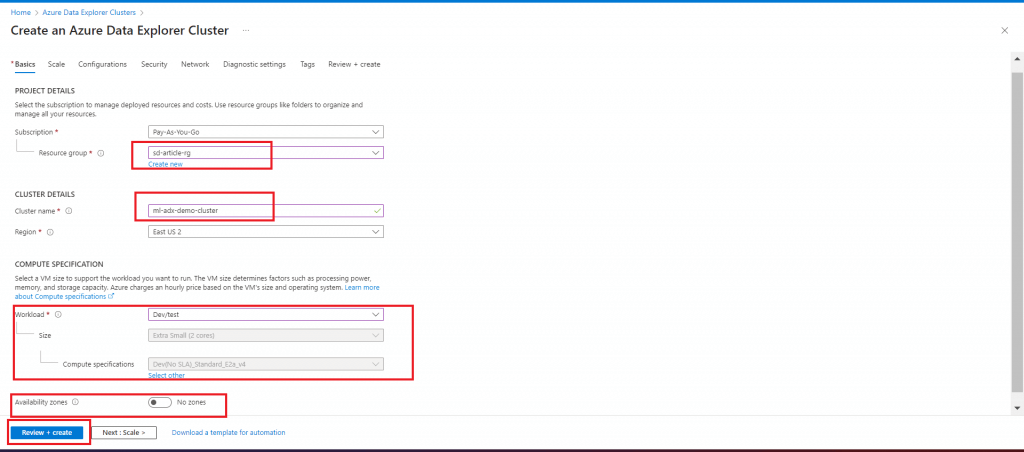
Create an ADX Cluster named ml-adx-demo-cluster with minimum configuration to optimize the cost. Other tab fields are saved with the default options.
Step 6
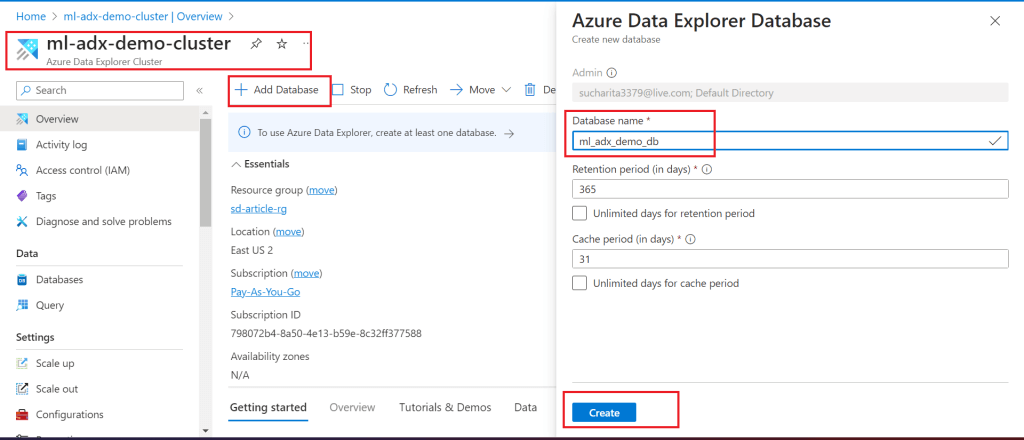
Create a database named ml_adx_demo_db in the ADX Cluster.
Step 7
Go to the ADX Cluster Database and give Database Admin permission to the App Registered in the earlier steps.

Step 8
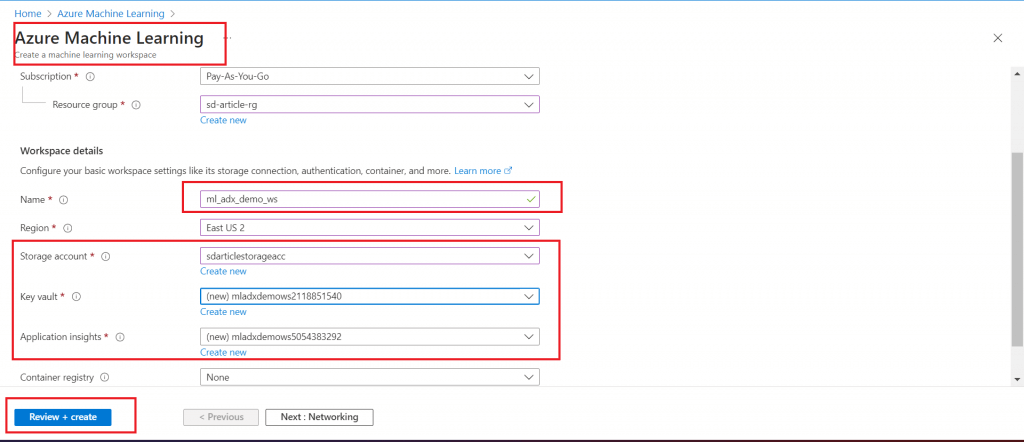
Create an Azure Machine Learning Studio workspace named ml_adx_demo_ws. While creating the ML Workspace, it is required to provide Storage Account, Application Insight and Key Vault details as well. Keep the default options in the other tabs.
Step 9
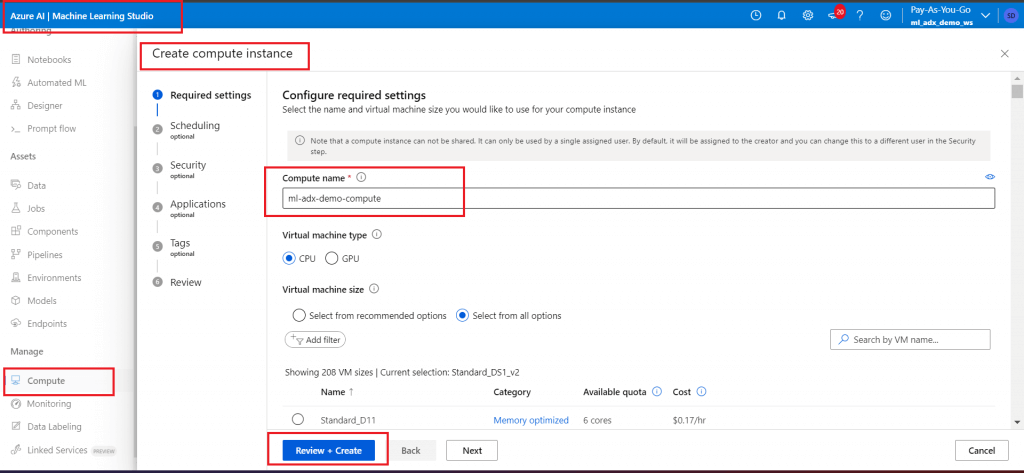
Go to Machine Learning Studio and create a Compute Instance named ml-adx-demo-compute. Lowest cost Virtual Machine is selected. Keep the default options for the other tabs.
Step 10
Once the Compute Instance is in Running state, go to Notebooks menu. Open Terminal and install two Kusto libraries in the Compute Instance created in the last step
pip install azure-kusto-data
pip install azure-kusto-ingest

Step 11
Create a notebook to transfer the CSV file data to the ml_adx_demo_db ADX database

Step 12
Write and execute the following code in the notebook step-by-step.
- Import the required library modules.
# Import the required library modules
from azure.kusto.data import KustoClient, KustoConnectionStringBuilder
from azure.kusto.data.exceptions import KustoServiceError
from azure.kusto.data.helpers import dataframe_from_result_table
- Define all the required constants to be used for data ingestion and retrieval
# Define all the required constants to be used for data ingestion and retrieval
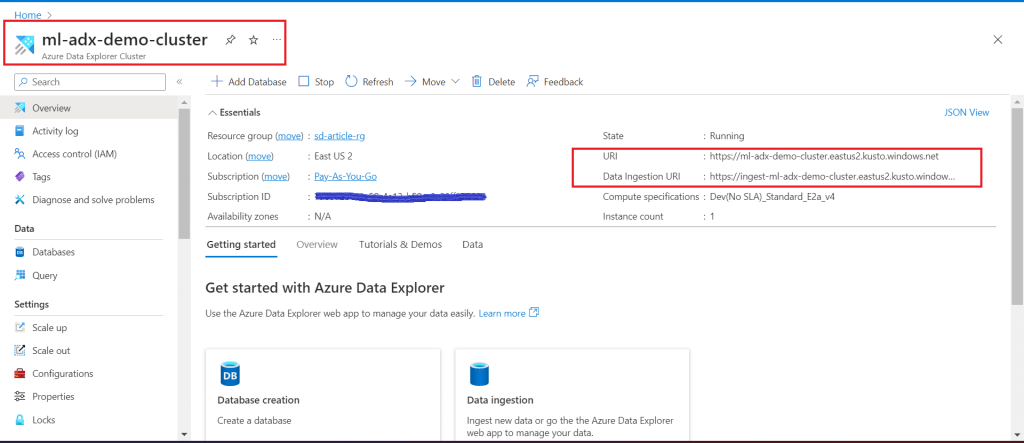
cluster = "https://ml-adx-demo-cluster.eastus2.kusto.windows.net"
KUSTO_INGEST_URI = "https://ingest-ml-adx-demo-cluster.eastus2.kusto.windows.net"
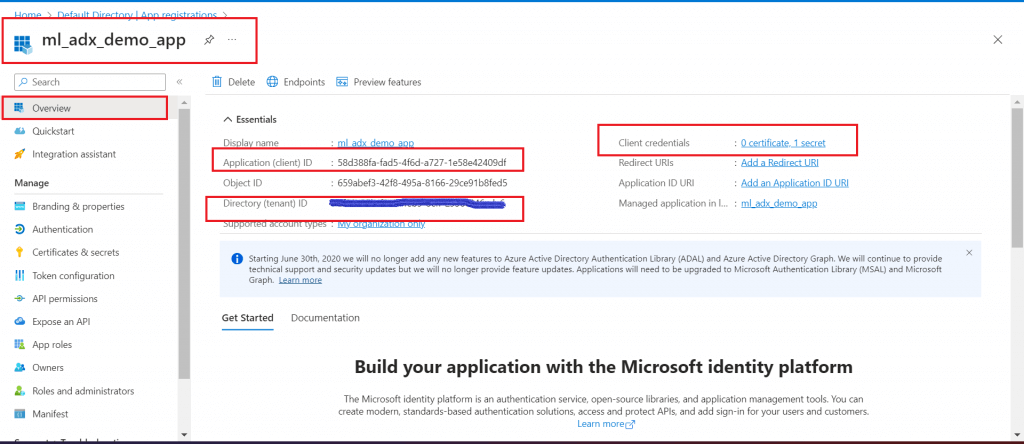
client_id = "58d388fa-fad5-4f6d-a727-1e58e42409df"
client_secret = "1a48Q~VjRAut_Txq1HPC_GWymFL625YjlZgbzbEG"
authority_id = "xxxxe25b-xxxx-xxxx-xxxx-2938c046xxxx"
kcsb = KustoConnectionStringBuilder.with_aad_application_key_authentication(cluster, client_id, client_secret, authority_id)
kcsb_ingest = KustoConnectionStringBuilder.with_aad_application_key_authentication(KUSTO_INGEST_URI, client_id, client_secret, authority_id)
client = KustoClient(kcsb)
client id, client secret and authority id (Directory (tenant) ID) are copied from the App Registration
cluster and KUSTO_INGEST_URI are copied from ADX Cluster
Define the input file details
# define the input file details
from azure.kusto.data import DataFormat
from azure.kusto.ingest import QueuedIngestClient, IngestionProperties, FileDescriptor, BlobDescriptor, ReportLevel, ReportMethod
CONTAINER = "ml-adx-demo"
ACCOUNT_NAME = "sdarticlestorageacc"
SAS_TOKEN = "sv=2022-11-02&ss=b&srt=sco&sp=rwdlatf&se=2024-02-27T19:20:39Z&st=2024-02-27T11:20:39Z&spr=https&sig=JFpZtw6sRetYhZPo2e1WFqyvWcbp92fsOe0.0000001GxeNGGo"
FILE_PATH = "titanic_data.csv"
FILE_SIZE = 29480.96    # in bytes
BLOB_PATH = "https://" + ACCOUNT_NAME + ".blob.core.windows.net/" + \
CONTAINER + "/" + FILE_PATH + SAS_TOKEN
print(BLOB_PATH)
Define the destination database and table name where the data needs to be populated
# Define the destination database and table name where the data needs to be populated
KUSTO_DATABASE = "ml_adx_demo_db"
DESTINATION_TABLE = "titanic"
DESTINATION_TABLE_COLUMN_MAPPING = "titanic_mapping"
Create the destination table and print its structure
# create the destination table and print its structure
CREATE_TABLE_COMMAND = ".create-merge table ['titanic']  (['PassengerId']:long, ['Survived']:long, ['Pclass']:long, ['Name']:string, ['Gender']:string, ['Age']:real, ['SibSp']:long, ['Parch']:long, ['Ticket']:string, ['Fare']:real, ['Cabin']:string, ['Embarked']:string)"
RESPONSE = client.execute_mgmt(KUSTO_DATABASE, CREATE_TABLE_COMMAND)
df = dataframe_from_result_table(RESPONSE.primary_results[0])
print(df)
Create the ingestion mapping for the destination table
# Create the ingestion mapping for the destination table
CREATE_MAPPING_COMMAND = """.create-or-alter table ['titanic'] ingestion csv mapping 'titanic_mapping' '[{"column":"PassengerId", "Properties":{"Ordinal":"0"}},{"column":"Survived", "Properties":{"Ordinal":"1"}},{"column":"Pclass", "Properties":{"Ordinal":"2"}},{"column":"Name", "Properties":{"Ordinal":"3"}},{"column":"Gender", "Properties":{"Ordinal":"4"}},{"column":"Age", "Properties":{"Ordinal":"5"}},{"column":"SibSp", "Properties":{"Ordinal":"6"}},{"column":"Parch", "Properties":{"Ordinal":"7"}},{"column":"Ticket", "Properties":{"Ordinal":"8"}},{"column":"Fare", "Properties":{"Ordinal":"9"}},{"column":"Cabin", "Properties":{"Ordinal":"10"}},{"column":"Embarked", "Properties":{"Ordinal":"11"}}]'"""
RESPONSE = client.execute_mgmt(KUSTO_DATABASE, CREATE_MAPPING_COMMAND)
df = dataframe_from_result_table(RESPONSE.primary_results[0])
print(df)
Input data is queued up for ingestion in the destination table
# Input data is queued up for ingestion in the destination table
INGESTION_CLIENT = QueuedIngestClient(kcsb_ingest)
INGESTION_PROPERTIES = IngestionProperties(database=KUSTO_DATABASE, table=DESTINATION_TABLE, data_format=DataFormat.CSV,ingestion_mapping_reference=DESTINATION_TABLE_COLUMN_MAPPING, additional_properties={'ignoreFirstRecord': 'true'})
BLOB_DESCRIPTOR = BlobDescriptor(BLOB_PATH, FILE_SIZE)
INGESTION_CLIENT.ingest_from_blob(BLOB_DESCRIPTOR, ingestion_properties=INGESTION_PROPERTIES)
print('Done queuing up ingestion with Azure Data Explorer: ' + DESTINATION_TABLE)
Query the destination table to validate the data population from the source file
# Query the destination table to validate the data population from the source file
QUERY = "titanic | count"
RESPONSE = client.execute_query(KUSTO_DATABASE, QUERY)
df = dataframe_from_result_table(RESPONSE.primary_results[0])
print("titanic | count")
print(df)
The data is now available in the destination table.
Step 12
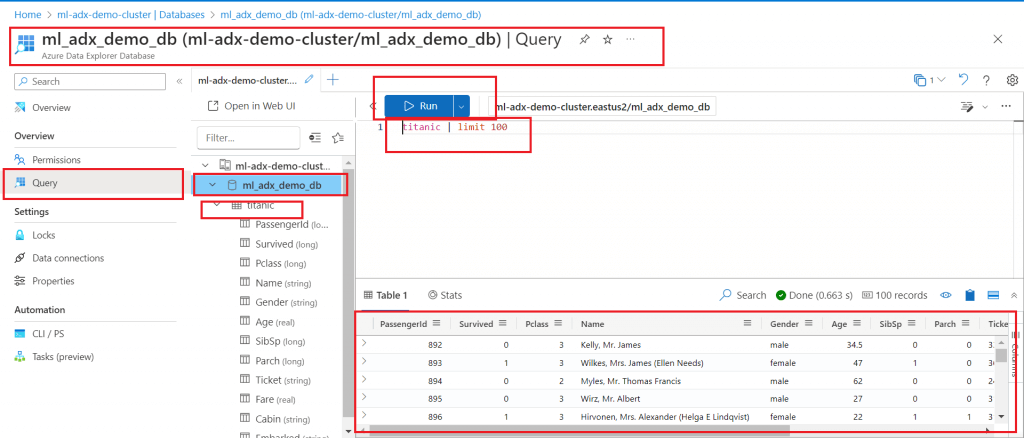
Go to the ADX Cluster database. Check for the newly created table and data inside the table.
Conclusion
The ML Workspace script can be reused for data population in different ADX database tables from a different set of input files available in Storage Account. Apart from csv file, parquet file also can be used as input. In that case, the table mapping needs to be changed from csv to parquet. Data ingestion is queued in the ADX table and it may take 4-5 minutes to reflect the data in the ADX table. Data ingestion can be monitored with the KQL query
".show commands | where CommandType == "DataIngestPull" |order by StartedOn desc| "


