In the second part of our series on creating a SQL Server test lab on your workstation, I’m going to look at creating a domain user, joining a SQL Server to our domain and connecting to that server using our domain account.
Other Posts in the Series
Part One, Installing The Domain Controller
Part Three, Creating a Windows Failover Cluster and a SQL Server Availability Group
Creating a Domain Account
The first thing that we’re going to do is create an account that we’ll be able to use to log into our domain and eventually connect to our SQL Server with. Do do this, you’ll need to log into your domain controller and go to Active Directory Users and Computers. You can get to that via the tools menu in the Server Manager.
![2017-12-31 16_16_03-DC1 [Running] - Oracle VM VirtualBox](/wp-content/uploads/legacy/60a0079490906df478193d253659ac15e198dabf/2017-12-31-16_16_03-dc1-running-oracle-vm-virtualbox.jpg)
When the Active Directory Users and Computers window opens up, right click on your domain and select new\user.
![2017-12-31 16_32_15-DC1 [Running] - Oracle VM VirtualBox](/wp-content/uploads/legacy/e888050e07ccf01a7a4a04367e229f9e6f40bf7f/2017-12-31-16_32_15-dc1-running-oracle-vm-virtualbox.jpg)
Fill in your user’s name, give it a login name and then hit next…
![2017-12-31 16_23_20-DC1 [Running] - Oracle VM VirtualBox](/wp-content/uploads/legacy/21baffa93551fd65dc64ce7d18b455dad71d4ea2/2017-12-31-16_23_20-dc1-running-oracle-vm-virtualbox.jpg)
Set it’s password and set any other setting that might be appropriate. If you’re creating an account for someone else you might want to leave ‘User must change password at next login’ selected. As this is just going to be a personal test lab for me, I’m not worried about that and as I don’t really want to be bothered with changing my password, I’ve also selected ‘Password never expires’. Choose whichever options best suit you.
![2017-12-31 16_25_10-DC1 [Running] - Oracle VM VirtualBox](/wp-content/uploads/legacy/2c36d712fe96e49fa2ec3ee2ef2b31123cb87fd7/2017-12-31-16_25_10-dc1-running-oracle-vm-virtualbox.jpg)
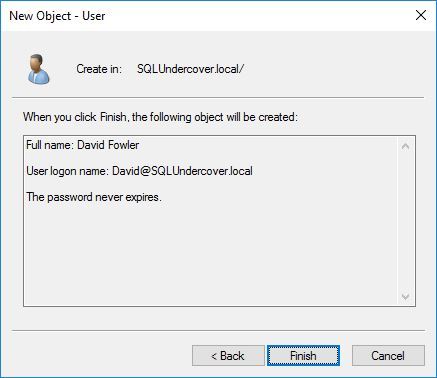
We just need to click finish and we’ve successfully created our first domain account.

The next thing that I want to do with that account is to join it to the Domain Admins group, you may or may not want to do that depending on who that account is for but if you, like me are just creating a little, personal test domain then it might be a good idea.
Under users, find your new account, right click on it and select properties.
![2017-12-31 16_35_13-DC1 [Running] - Oracle VM VirtualBox](/wp-content/uploads/legacy/893280d2851cf8d4be76f7e919e2e79d8596c90f/2017-12-31-16_35_13-dc1-running-oracle-vm-virtualbox.jpg)
Choose the ‘Member of’ tab, this will show you all the groups that the account is a member of and then hit ‘Add’
![2017-12-31 16_36_32-DC1 [Running] - Oracle VM VirtualBox](/wp-content/uploads/legacy/41beae1aceaa07ee19898632ac41e63001d0298a/2017-12-31-16_36_32-dc1-running-oracle-vm-virtualbox.jpg)
Type ‘Domain Admins’ into the ‘Enter object names’ box, hit ‘Check names’ and then OK
![2017-12-31 16_37_47-DC1 [Running] - Oracle VM VirtualBox](/wp-content/uploads/legacy/0cb449e638d352fd84d9c94068fd58fb416bb26a/2017-12-31-16_37_47-dc1-running-oracle-vm-virtualbox.jpg)
Our new account is now a member of the domain admins group. We can now get on with joining a SQL Server into our domain.
Joining a SQL Server into the Test Domain
The first thing that we’re going to need is a server so go ahead and create a new virtual server in the same way as we did in part 1.
Once we’ve got the server up and running, we’re going to need to configure the network settings. Start by going into the Network and Sharing Center and clicking on ‘Change adaptor settings’.
![2017-12-31 16_56_16-SQL1 [Running] - Oracle VM VirtualBox](/wp-content/uploads/legacy/88d2af16cd161111d53652e31931cb087c42f037/2017-12-31-16_56_16-sql1-running-oracle-vm-virtualbox.jpg)
We now need to right click on our network adaptor and choose properties.
![2017-12-31 16_57_10-SQL1 [Running] - Oracle VM VirtualBox](/wp-content/uploads/legacy/bcee02de33a4c363e1f641cfdc5ab1d630e41f20/2017-12-31-16_57_10-sql1-running-oracle-vm-virtualbox.jpg)
Choose ‘Internet Protocol Version 4’ and click properties…
![2017-12-31 16_58_31-SQL1 [Running] - Oracle VM VirtualBox](/wp-content/uploads/legacy/2451c4cbf6e0b5dc7e121d2ad660c4948257e931/2017-12-31-16_58_31-sql1-running-oracle-vm-virtualbox.jpg)
Now give your server an IP address, I’ve gone for 10.10.10.100 (I generally always put my severs in the range 10.100+ and workstations in the range 20.100+ but these are just my personal conventions, you can do what you like :)). Default gateway and preferred DNS server’s should all be pointing to the domain controller that you created in Part 1 (IP 10.10.10.1 if you’re following my conventions).
![2017-12-31 17_02_46-SQL1 [Running] - Oracle VM VirtualBox](/wp-content/uploads/legacy/e777cfbf87e3ffd72f436e583b127edfdaa63bcc/2017-12-31-17_02_46-sql1-running-oracle-vm-virtualbox.jpg)
Hit OK and close and the server should now find the network.
Once that’s done, you’re going to need to join it to the domain.
This can be done through Server Manager and by clicking on the server’s name…
![2017-12-31 16_42_22-SQL1 [Running] - Oracle VM VirtualBox](/wp-content/uploads/legacy/67cba9a578ff08c7dd92e70ac87a5ed12faf9114/2017-12-31-16_42_22-sql1-running-oracle-vm-virtualbox.jpg)
Click ‘Change’
![2017-12-31 16_44_01-SQL1 [Running] - Oracle VM VirtualBox](/wp-content/uploads/legacy/9dc7a1e7a204ba8ee78f323b78d65704d255e29f/2017-12-31-16_44_01-sql1-running-oracle-vm-virtualbox.jpg)
Give the server a sensible name, I’ve gone for SQL1, pop in the name of your domain and click OK.
![2017-12-31 16_45_32-SQL1 [Running] - Oracle VM VirtualBox](/wp-content/uploads/legacy/ed17bcb4fc8dc3b1c58f53eb29369d5b3827e3d6/2017-12-31-16_45_32-sql1-running-oracle-vm-virtualbox.jpg)
You’ll now be prompted for the name and password of a domain account. Pop in the details of the account that we created earlier and hit ok.
![2017-12-31 17_05_41-SQL1 [Running] - Oracle VM VirtualBox](/wp-content/uploads/legacy/1ea4f6e24c2fb033260ce6f567ff87fb93e783fb/2017-12-31-17_05_41-sql1-running-oracle-vm-virtualbox.jpg)
If all goes well, your server will now be joined to the domain…
![2017-12-31 17_07_55-SQL1 [Running] - Oracle VM VirtualBox](/wp-content/uploads/legacy/5e5584be976ce04bbb3bad5b1451787a27bfb807/2017-12-31-17_07_55-sql1-running-oracle-vm-virtualbox.jpg)
You’ll now need to restart your server. When it comes backup, you should be able to log in using the domain credentials that we created earlier.
But I Can’t Seem To Connect To My Domain Controller
If you have issues connecting to the domain controller or joining the domain, it may be down to network settings and NIC settings (see the comment from londondba).
I’ve seen this a couple of times and londondba also mentions it, you may need to change the network settings on both the domain controller and SQL Server.
Depending on your version on Virtual Box you may be able to do this with the servers running or you may have to shut them down first.
In Virtual Box Manager, right click on the server and select ‘Settings’
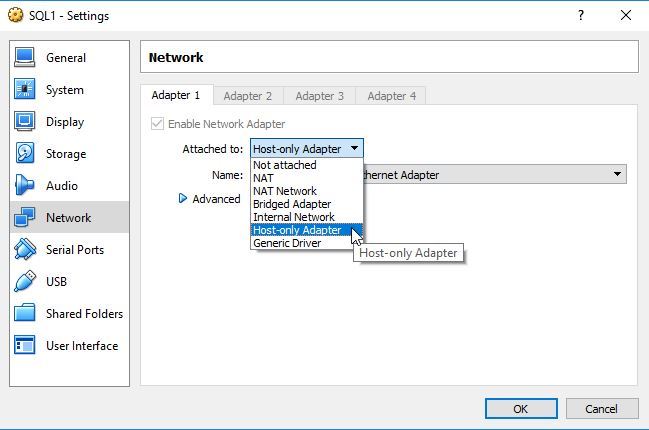
In the network tab, you’ve got a few options under ‘Attached To:’

Full documentation on the network types can be found HERE
If you’re having issues joining the domain then you should try setting the network to either ‘Internal Network’ or ‘Host-only Network’.
There is one main difference between the two, ‘internal network’ will only allow connectivity between virtual machines. ‘Host-only Adapter’ is similar but will also create a virtual network card on your workstation which will allow you connectivity to the virtual network from your workstation. I generally choose ‘Host-only Adapter’ for the extra connectivity.
One thing to note is that these setting will mean that the VMs will loose internet access. If you need to connect to the internet (you need to download SQL Server or SSMS for instance) then you can temporary switch to ‘Bridged Adapter’. There are better ways of doing this however and we’ll look at setting up an internet gateway as well as a few other options that Virtual Box gives us in a later post.
Install SQL Server
Now that you’ve got a server on the domain you’re free to start installing SQL Server. I’m not going to step you through how to do that as I’m going to assume that you know that part. If not then there are plenty of very good walk throughs out there on the web. One point though, you’ll probably want to make sure that you give your new domain account SA access during installation.
With that done, you should be able to spark up SSMS and connect in to your SQL Server using the domain account that you’ve created.
In part 3 we’ll have a look at firewall settings, add a second SQL Server and create an availability group.
Thanks for reading 


