As a seasoned BI developer I am used to producing reports using many different tools, and have been a delighted user of Reporting Services for several years now. However, I must admit that I am not a design guru, and that I prefer spending my time on the queries and code rather than the presentation of the reports that I produce. So I inevitably find it both frustrating and pointlessly time-consuming when I am asked to reformat a report for the umpteenth time, as the new boss (or new analyst or helpful staff member) suggests a complete makeover of the reports that I have just worked half the night to produce to an already tight deadline.
Sound familiar? Many of the BI people that I know have stories echoing these sentiments, and it got me thinking – why are there no stylesheets in Reporting Services? Or at least why is there no easy way of reapplying style elements to a report – or better still to a set of reports - without hours of painstaking effort? After all, HTML developers have CSS stylesheets, and ASP.NET developers have themes and skins, so what about us poor report developers?
After some time reflecting on this question, I came up with a style-based approach that I hope will give other developers the tools to help them increase their productivity, while avoiding repetitive and laborious report refactoring. The techniques described in these three articles apply equally well to SQL Server 2005 as to SQL Server 2008.
Let's be clear about this. It is impossible to duplicate in Reporting Services the functionality of ASP.Net themes or even Cascading Style Sheets. So what we are looking at is a simple and efficient way of changing the colour of cells, text and lines, as well as changing the thickness and type of borders instantly and globally for one or more reports, using a tagged, or named style approach.
The first question is – is it worth the effort to create an abstraction layer like this?
Yes is the resounding answer for the following reasons:
- Reformatting reports is extremely time-consuming.
- The BIDS report designer is extremely clunky, and will only let you reformat cells which are identical – so you spend an unreasonable amount of time selecting individual cells to reformat.
- Remembering and recognising colour codes (especially if you are using Hexadecimal or numeric codes like #990099) can be difficult.
- Abstracting style definitions to a set of user-defined names is not only easier to apply, but forces the designer and creator to be more rational and organised in their approach.
Assuming, then, that the effort of defining styles is worth the investment, let's begin with basic definitions. Firstly. by "Styles" I mean a synonym for a specific report attribute like colour or line weight; by "Stylesheet" I mean an organised collection of styles and their definitions.
I will presume that the reader has basic knowledge of Reporting Services, and can create and format reports. Indeed, this article will not explain how to create reports, as the techniques described can be applied to any report.
Using Reporting Services Embedded Code
Let's start with the fastest way to apply styles to a Reporting Services report, using embedded code. For this example we will only set colour styles, in order to make the example simpler.
The objective is to map the following styles to the following colours
| Style Name | Colour |
| Header | Blue |
| Footer | Green |
| BodyText | Black |
| Subtitle | Dark Blue |
This is how you do it:
Defining Styles
- Open an existing report, or create a new report
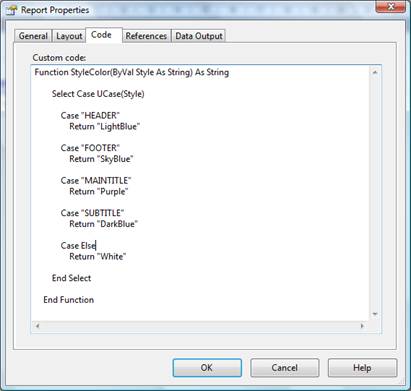
- Access the embedded code of a report by clicking Report/Report Properties in the BIDS menu (you need to have selected either the Data or Layout tabs for this menu option to be available). You can then select the Code tab from the Report Properties dialog – and paste or enter the following code.
Function StyleColor(ByVal Style As String) As String
        Select Case UCase(Style)
            Case "HEADER"
                Return "LightBlue"
            Case "FOOTER"
                Return "SkyBlue"
            Case "MAINTITLE"
                Return "Purple"
            Case "SUBTITLE"
                Return "DarkBlue"
            Case Else
                Return "White"
        End Select
    End Function
You should have the following:

- Click OK to close the dialog.
As you can see, the code snippet consists of a single function, which rakes an input parameter (imaginatively named "Style") and returns the selected colour.
The code itself is extremely simple, but what you have to grasp firmly is the concept – here we are giving pseudonyms to colours, and consequently the naming convention that you use is important. After all the idea is to make life easier, not more complicated! The function that you create will use the style (the "pseudonym" used as an input parameter) to select and apply the correct colour.
Applying Styles
So how do you apply the styles? Simply replace the hard-coded reference to a colour (let's say to the title in our sample report) with the function you created in the Custom Code – not forgetting to pass in the input parameter. This means:
- Click to select the object whose colour you wish to modify.
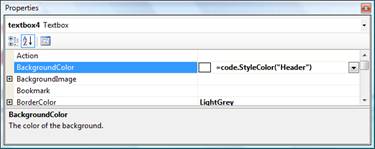
- Open or select the properties window (press F4 if necessary) and replace the current colour with the following: =code.StyleColor("Header")
The result should be something like this:

That is all. Simple, isn't it? All you need to do is prefix the function that you created with "code" (which tells Reporting Services to use the embedded code in the report), and pass in an appropriate style name. Note that the variable name is rendered case-insensitive through the UCase function – if you do not use this function, you will need to make all style names case-sensitive.
You will then need to apply these steps to all elements to which you wish to apply a colour. This can be fonts, cell backgrounds or borders. It is worth noting that the code used to reference a colour can also be embedded in code – so you can use it inside IIF or SWITCH structures also.
When you next preview or run the report, the object's colour will switch to the colour defined by the style.
"OK" you may be saying – but isn't this harder work than just applying a hard-coded colour? Well, yes it is – until you need to change all the colours in a report. Then all you need to do is change the colour reference of a style in your custom code – and the entire report will be altered when you next run it. You can try this by opening the at the Custom Code tab, and (for instance) altering the colour defined by the style you used. If you now preview the report, you will see the colour change wherever it has been applied.
Of course, once you have a tried and tested style sheet in custom code, the code can be copied to all the reports you wish to standardize. This will ensure that the same colour scheme is applied to all the reports you format in this way.
So what are the drawbacks to this approach?
Tips
One tip that you might find useful – if, when updating an existing report to use styles, you want to replace all the occurrences of a colour in an existing report with the expression which uses the custom code, you can:
This saves an immense amount of selecting and pasting.
Another tip is always to use the Case Else in a Select Case – possibly adding a peculiar colour completely outside your chosen colour palette for testing, as this will allow you to isolate elements to which you have erroneously attempted to apply stylesheet formatting more easily. By this I mean that if the colour that is used when an erroneous style parameter is passed into the code is violent purple, then you will see any styling errors far faster when building a report, than if you leave this as white! Of course, remember to reset this "default" colour to something innocuous before deploying reports to production.
Conclusion
So now you know how to gain time and also standardise report presentation when developing Reporting Services reports using custom code stylesheets. The next article will explain how to extend the stylesheet paradigm to centralised style definitions using Custom Assemblies and interactive style definitions stored in SQL Server tables.
- Firstly, the main drawback is the limits of custom code creation and editing in BIDS. The custom code tab is a text box, there are no debugging tools, and it is not easy to read! You may find it easier to create the code in Visual Studio, or even in a text editor, and then copy and paste the code into BIDS.
- Secondly, the custom code is limited to the report which contains it – so any changes to the code have to be carried over to all reports using this code as a stylesheet. Admittedly this extremely "self-contained" aspect of custom code can also be perceived as an advantage – there is nothing special that you have to do to deploy reports for this technique to work.
- Thirdly, the difficulty of successfully creating multiple styles without bugs limits the number of styles that can be managed using this technique.
- Fourthly it is not possible to define a style which encompasses all the attributes of an object. For instance a font has a font family, colour, size and weight (and this list is not exhaustive). You will have to define a style for each individual element, unfortunately, as this is a limitation of BIDS. However, as there is no limit to the number of functions that you can add to the code tab in the Report properties dialog, there is nothing to stop you having different functions for each type of property that you wish to set dynamically.
- Close the report in BIDS if it is already open.
- Right-click on the report in the Solution Explorer, and select "View Code"
- Click Edit/Find and Replace/Quick Replace.
- In the Search and Replace dialog enter "your colour" (the colour reference you wish to replace) in the Find field, and=code.StyleColor("Header")in the replace field (don't forget the equals sign).
- Click Replace All.
- Close the dialog.
- Save the file
- Reopen normally, in BIDS.


