An availability group supports a failover environment for a discrete set of user databases, known as availability databases, that fail over together. An availability group supports a set of primary databases and one to eight sets of corresponding secondary databases. Secondary databases are not backups. Continue to back up your databases and their transaction logs on a regular basis.
To read overview on always on availability groups click [here]
Prerequisites required to enable SQL Server 2012 AlwaysOn Availability Groups Feature.
- Get the operating system installed, patched and configured on all participating nodes
- See either Windows Update or an internal Windows Server Update Services (WSUS) server to get all of the required Windows Updates downloaded and installed
- Dedicated domain user account be created for use by the SQL Server service. This should just be a regular or domain account
- Having separate accounts for SQL Agent service, SSRS, SSIS & SSRS. Having separate account is more secure and resilient, since a problem with one account won’t affect all of the SQL Server Services
- Ensure the password not temporary and there is complex password
- Both SQL & OS Editions, Versions should be at same level on all participating nodes
- All replicas in your AlwaysOn group must be in the same windows domain. They must be able to communicate with each other.
- Always on availability groups is only supported in Enterprise edition starting from SQL server 2012 ( except SQL 2016 it supports basic availability group in standard edition)
- Recommend to have same collation on all replicas
- SQL Server port must be opened at firewall level for communication between replicas
- Create shared network share on all participating nodes
- You need to install 3.5.1 or greater on all participating nodes
- Make sure your databases are in Full Recovery Mode, not Simple or Bulk Logged
- Databases included in your AlwaysOn group must be user databases. System databases cannot participate in AlwaysOn Availability Groups.
- Read-only databases cannot belong to an AlwaysOn group
- Databases may only belong to one availability group at a time
- Make sure full backups of each of your databases are made prior to installing AlwaysOn
- No cluster shared volume is required for Always on, it can be configured in local disks
- Make sure you have a seperate NIC's for public and private communication
- Additional NIC is required if you want to isolate always on replication traffic to dedicated NIC
- Make sure you have two free IP's each for windows cluster IP and Always on listener IP
AlwaysOn Availability Groups require a Windows Server Failover Cluster, we first need to add the Windows Failover Cluster Feature to all the nodes running the SQL Server instances that we will configure as replicas
To know how to install failover cluster click [here]
Once you have installed failover cluster we can now proceed with enabling the AlwaysOn Availability Groups feature in SQL Server 2012. This needs to be done on all of the SQL Server instances that you will configure as replicas in your Availability Group.
How to Enable SQL Server 2012 AlwaysOn Availability Groups Feature
Default standalone SQL instances installed on nodes SQL1 & SQL2
Step 1:
In the Properties dialog box, select the AlwaysOn High Availability tab. Check the Enable AlwaysOn Availability Groups check box. This will prompt you to restart the SQL Server service. Click OK
In below screenshot, AONTESTWFCS01 is the windows cluster name. SQL1 and SQL2 are nodes.

Create and Configure SQL Server 2012 AlwaysOn Availability Groups
Step 3:
To create and configure a SQL Server 2012 AlwaysOn Availability Group,
Open SQL Server Management Studio. Connect to the SQL Server instance
In Object Exporer, expand the AlwaysOn High Availability folder. Right-click on the Availability Groups folder and select the New Availability Group Wizard… option. This will launch the New Availability Group Wizard.
Step 4:
In the Specify Availability Group Name page, enter the name of the Availability Group in the Availability group name: field. Click Next.
Step 5:
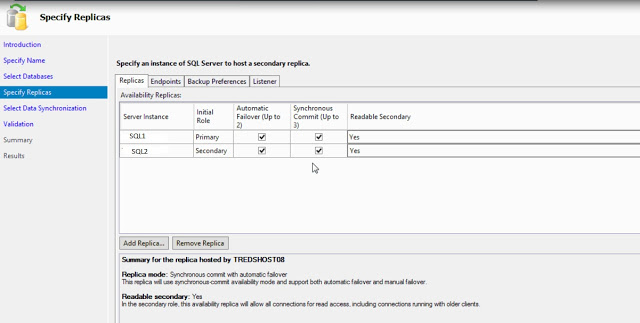
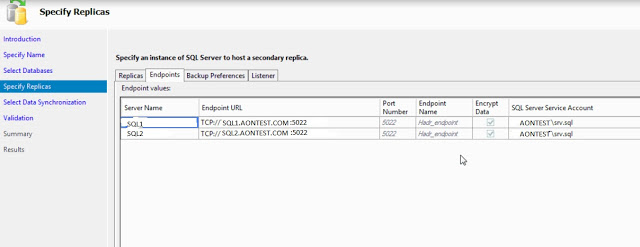
Step 6:
- Automatic Failover
- Synchornous commit
- Readable secondary
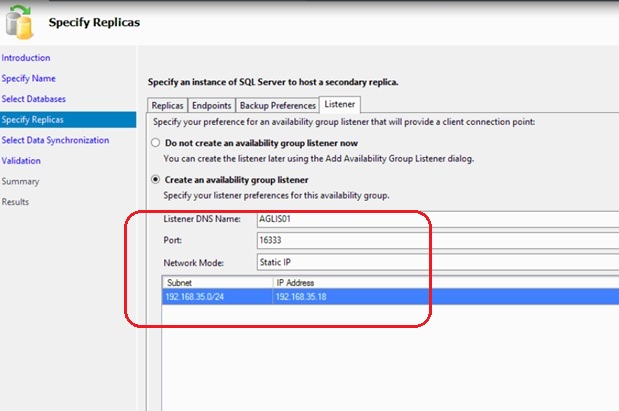
Listener DNS name: AGLIS01
Port: 16333
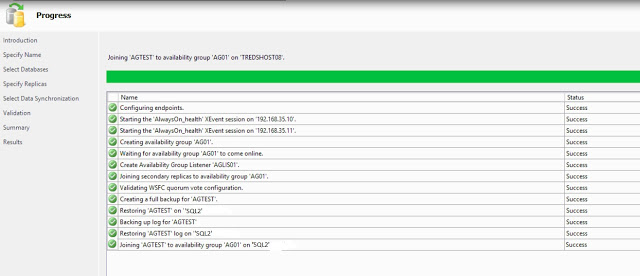
In the Validation page, verify that all validation checks return successful results. Click Next.


