 In the last few posts, we were discussing about database deployment model and purchase model. Out of the three deployment models, managed instance works almost like on-premises SQL server and hence we are not going to discuss much about the managed instance. On the other side, a single database and elastic pool works a completely different ways.
while creating a single database or elastic poor, you need to attach those into the Azure SQL server. In other words, you need to create a SQL server before creating the SQL database. While searching for services in the Azure portal, you can search for 'SQL database' and 'SQL server'. In this post, we are going to discuss about the SQL Server, which is a logical container for your single Azure databases and Elastic Pool.
As per the Azure documentation, "a SQL server is a logical construct that acts as a central administrative point for a collection of databases". At the server level, you can administrate the following components:
- Logins
- Connectivity
- Firewall rules
- Auditing rules
- Threat detection Policy
- Auto Failover group
- Transparent Data Encryption
- Auditing
- Backup Management
When you create an empty SQL Server in Azure, it will not cost you anything until you create a single database or elastic pool under this SQL server. To create an empty SQL server, search for "SQL Server" in the Azure portal, and follow the instructions. While creating the SQL server, it will ask for a user name and password. This is the only SQL login that you can create from the Azure portal. This login has the highest privilege in the server and can access all databases in that server without providing explicit permission in each database. Azure SQL server does not support window authentication but supports Azure active directory authentication. For enabling the Azure active directory authentication, you need to connect your server with Azure AD. You can achieve this by setting the Active directory Admin from the Azure portal. You can find this option under the Settings section of the server. This can be an individual account or a group. This account also will have the highest privilege and can access all the databases under that server without providing explicit permission. These are the only two logins that you can create from the Azure portal. There is no option to change the SQL login once you have created it but you can change the Active directory admin at any time. These are the only two logins will have access to all the databases created under this server. There is no option to create server wide login which will have access to all the databases under this server. Still, you can create server wide login and can explicitly create the corresponding user in each database like we used to do in the on-premise installation.
Azure SQL database provides two types of user :
Login and user: This is the same as we used to do in on-premise installations. Create a login and create corresponding user in each database. For example, connect to master database
create login njohn with password ='Password@123'
--Connect to DB1
create user njohn from login njohn
--Connect to DB2
create user njohn from login njohn
In this case, the login information is stored at the server level and the password remains same across all databases. While copying the database DB1 and DB2 to another server, you also need to copy the login and need to map the SID properly.
Contained user: These are the users created under the database without having the logins. In this case, the user informations are stored in the database level. After the restoration of the databases, DB1 and DB1 to another server, we don't have to copy the login information separately as the user password and other information are stored in the user database. In this scenario, the same user can have different passwords to connect with each database. For example
--Connect to DB1
create user njohn with password ='Password1'
--Connect to DB2
create user njohn with password ='Password2'
When you create the SQL server, by default a virtual master database will be created. This is the only system database that you can see in the Azure SQL server. If you look into this database, you can see two additional database role added with Azure SQL server :
dbmanager: Members of this database role can create and delete the databases. When a member of the dbmanager role creates the database, becomes the owner of the database, and will have full access to that database as dbo. The members of this role will not have access to the database which is not created by them (owner) unless you explicitly created users under the database for those logins like we do in the on-premise installation. This role exists only in the master database and only the users of the master database can be added into this role. The ideal method is, create a login and create a user for that login and add that user to the dbmanager role. Contained database users in the master database also can be added to the dbmanger role, but they will not have permission to create new databases.
loginmanager: can create and delete logins in the master database. Note that, members of this role does not have the permission to create users in the master database.
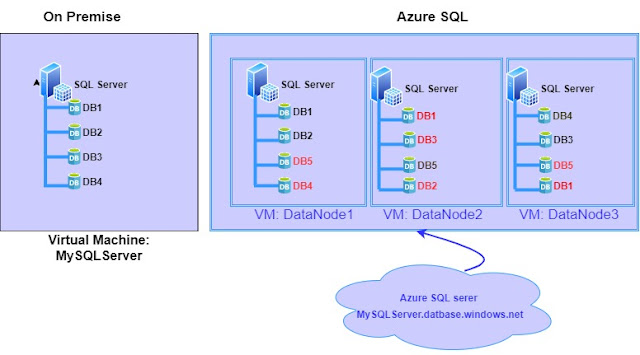
As mentioned earlier, the Azure SQL server is a logical construct and does not represent a specific VM or hardware like on-premise installation. The databases associated with an Azure SQL server, maybe running in different VMs which is not visible for us. In our on-premise installation, the SQL server is installed on VM and all databases created in that database server will be running on the same VM. Whereas Azure SQL server is a logical server and can deploy the databases under that server in multiple VMs. The below diagram helps you to understand the concept in a better way.
We have learned in our earlier post, each Azure SQL database will have one or more standby replica for high availability depending on the service tier. The database name marked in red are standby replica. Azure SQL inherently multi-tenant and it needs to share its resource with multiple clients. You can see one extra database, DB5 which is not there in our on-premises diagram. When you connect to Azure SQL server, "mysqlserver.database.windows.net", based on the database need to be connected, it will redirect the connection to data node hold the primary replica. This is the reason why we need to specify the database name while connecting through SSMS and not allowing us to change the database context using the USE statement. To change the context of the database, it needs to reroute the traffic to different data nodes. If we are not specifying the database name, it will connect to the virtual master database. If the 'datanode1' goes down for some reason, DB1, and DB2 comes online as the primary in Datanode2 and standby replica will get created in another data node. During this time, the connection to these two databases will be broken and the user will get an error message. To overcome these transient errors and to give a smooth experience to the application users, Microsoft suggests to implement retry mechanism for application connecting to Azure SQL. This is also beneficial to
- Handle the errors happens while azure perform the maintenance or patch update. Azure SQL Database is a managed service and Azure performs the regular patch and version update. User does not have control over the date and time of these maintenance windows.
- When we scale up the SQL database, there is a possibility to failover the database to another node due to a lack of resources in the current node. In that scenario, the existing connection will be terminated.
In our next post, we will discuss about connection architecture and different settings available under the "firewall and virtual network"

