Earlier this week I presented a free webinar for Pragmatic Works where I discussed how to migrate virtual machines to Azure. You can click here to watch the recording of the webinar if you missed it. In this follow up I wanted to post the scripts I used, walk through the steps in the process and answer a few questions from the webinar along the way. We will separate this into 4 sections:
- Preparing on-prem pieces for the migration
- Preparing your Azure account for the migration
- Migrating to Azure
- Automation and other resources
If you recall, we told a small story at the beginning of the webinar that would go on to illustrate why Azure was a good use case and to make the steps in this process a little more real for everyone. It’s always easier to have a use case than just talk about random concepts.
Use Case: At many companies, small and medium (or departments at larger companies) we want to be able to focus our money on providing value for our customers rather than supporting infrastructure. At Pragmatic Works, for instance, we want to be able to spend more time putting together quality SQL Server training rather than using that time and money to support a bunch of servers. We also want to be able to provide students with a virtual machine that has all the necessary tools for our classes though. It’s so much easier to teach a class when you take the variances in service packs, side by side installations, UAC settings and other software out of the equation and let everyone focus on the training topics at hand. We want to build one virtual machine and just make copies of it for each student in the class. That way everyone is using the exact same environment and we know it works as planned.
Alternate Use Case: Many companies I go to want to have a development and test environment that are the same. Or they want all their developers to be using the same set of software. Virtualization is a great way to achieve both of those scenarios. Simply create a single VM image and then make one copy for development and another for testing or in the case of workstations simply spin up as many workstations as you have developers.
Possible Solutions: There are a few options for making this happen, Hyper-V and Azure Virtual Machines. Hyper-V sort of solves the problem. It does in fact allow us to virtualize the environment, but we still have to maintain the host hardware, pay for electricity, pay for data center space and manage security. Azure on the other hand has a few major advantages.
#Azure provides agile infrastructure, built-in redundancy and the best security. #AzureVM
Click To Tweet
Advantages of using Azure Virtual Machines:
- Agile Infrastructure
- Add/remove resources
- Scale storage
- Pay for what you use
- No hardware updates to worry about
- Built-in Redundancy
- Geo redundant storage
- Built-in disaster recovery
- Security
- Probably more secure than your data center
- Azure Credit
- Check your EA with Microsoft, you may be throwing away free Azure credit each month
Preparing On-Prem for Migration
Before we can move to Azure, there are a few small steps that have to be completed on-prem.
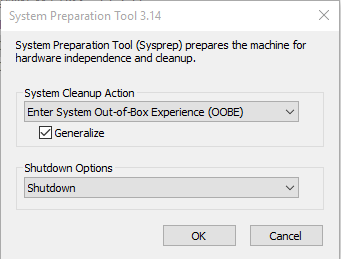
The first consideration is if you need to run Sysprep with the generalize option on the VM before uploading. Sysprep is required only if you want to make multiple copies of a VHD, also called an image. Running sysprep will remove all the unique identification information from the Windows installation, which enables you to use the image on multiple virtual machines. Your programs, like SQL Server, will remain on the VM. In a nutshell, it makes your available for duplicating.
To run sysprep navigate to c:\Windows\System32\sysprep. Be sure to check the Generalize button and choose the out of box experience from the dropdown menu.
- Sysprep run on VM before upload
- Can be made into a disk or an image in Azure
- Available for duplicating by creating an Image
- Images can be reused, just like the gallery options when creating a VM
- Do not run on a Domain Controller VM
- Sysprep NOT run on VM before upload
- One time use
- Cannot be used as an Image
- Necessary for uploading a Domain Controller VM
The rest of the operations we will complete are going to be through PowerShell. To get Azure PowerShell installed on your local machine visit the following webpage or click here for a direct download.
The last piece to do before uploading a VM to Azure is convert any VHDx files to VHD. Currently Azure only accepts VHD files for virtual machines, but I would expect that to change at some point in the future.
Launch Azure PowerShell and run the following command replacing my path with the location of your VHDx file: Convert-VHD –Path “C:\AzureVM\MyVM.vhdx” –DestinationPath “C:\AzureVM\MyVM.vhd”
Note that currently you can only upload VHDs that are generation 1. There is not a tool to convert generation 2 back to generation 1.
The last item I mentioned in the webinar but was actually updated earlier this year, was the size of the disk. I incorrectly stated the disk needs to be 127GB in size or smaller. This was a requirement up until around April of 2015 when the limit was increased to 1TB (1023GB actually, but close enough). Thanks to Tim Plas for shooting me an email after the webinar and setting me straight on that one!
Preparing Azure for Migration
Now that our On-prem pieces are in place it’s time to make sure our Azure environment is all setup. This is only going to be a couple PowerShell scripts but does assume from this point that a few things are already in place.
- You have an Azure subscription already activated
- You have a cloud service already created
These are both more general Azure items and not specific to uploading the VM and therefore will not be covered in this walk through.
The main pieces for this section are going to be connecting to Azure from the PowerShell environment locally and then creating the necessary locations to store the VHD for when we upload it in the next section.
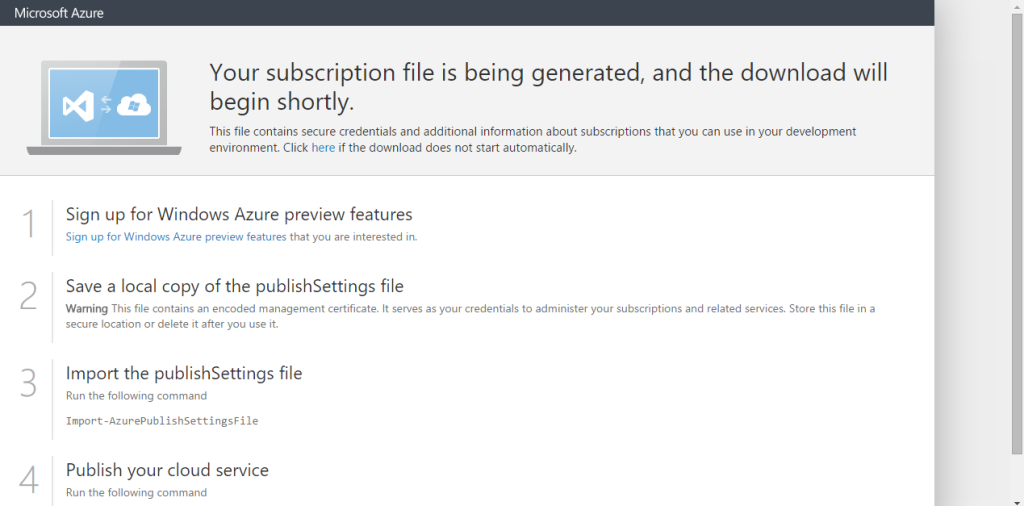
First, launch Azure PowerShell and run Get-AzurePublishSettingsFile
This will launch a web browser where you will be prompted to log into your Azure account using your Windows ID.
After authenticating a file will be downloaded that has all your connection information.
This file will be named with the following format: <SubscriptionName>-<TodaysDate>-credentials.publishsettings
I generally remove the date from the file and move it into a location on my computer where I can reference it later if necessary. After renaming and moving the file we want to run the PowerShell command Import-AzurePublishSettingsFile “C:\AzureVM\Pay-As-You-Go-credentials.publishsettings” which references the name and location of the settings file we just downloaded. What this step is going to do is tell our PowerShell environment what Azure subscription we are going to be interacting with. That means every time I want to run a command I don’t have to reconnect using a series of PowerShell cmdlets.
Next, we will create our storage account and a container where we will later upload the VHD. You can think of the storage account like your own network share or a hard drive and the container like a folder on your hard drive.
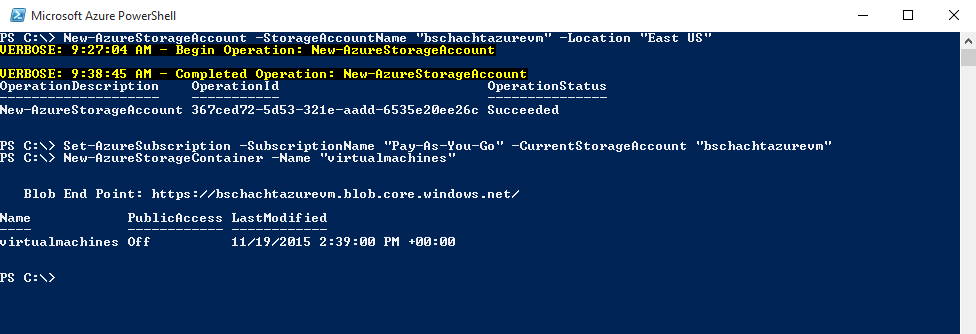
To create the storage account we will run New-AzureStorageAccount -StorageAccountName “bschachtazurevm” -Location “East US” and replace the account name and location as necessary. Please note that the StorageAccountName parameter does have to be unique across all of Azure. I found that out the hard way and spent way more time messing with it than I would like to admit before finding that gem of information.
Next, we will run a command that essentially sets context for the next few commands we are going to run. By running Set-AzureSubscription -SubscriptionName “Pay-As-You-Go” -CurrentStorageAccount “bschachtazurevm” we are telling Azure that anything I do involving storage should be run against the bschachazurevm storage account created in the previous step. We need to do this because most of the storage cmdlets don’t ask for a storage account parameter.
Finally, we will create a container, or a folder, inside the new storage account. This will be the location that our VHD is uploaded to in the next section. This is a very simple command New-AzureStorageContainer -Name “virtualmachines” where, as mentioned, you can see there is no parameter for the storage account which drives home why we ran the previous statement.
A screenshot will all three commands and their output can be seen below.
Upload a VHD to Azure
This next section is really easy. One command and a bunch of waiting is all it takes. Fair warning, uploading a VM takes a long time. So you don’t want to do this 10 minutes before you are going to need it. Just be sure to replace the local reference to the VHD and the storage account/container references in the following command.
Add-AzureVHD –LocalFilePath “C:\AzureVM\MyVM.vhd” –Destination “https://bschachtazurevm.blob.core.windows.net/virtualmachines/MyVM.vhd” –NumberOfUploaderThreads 3
Creating a Disk
As mentioned before we have two options when creating our virtual machines: Disks and Images.
Disks are one time use, images can be reused across many virtual machines. Disks don’t require sysprep to be run, images do require sysprep to be run on the VHD. Even if you have run sysprep you can still create a disk, it does not prohibit you from creating a disk. However, NOT running sysprep means you can ONLY create a disk.
There are two things we need to do in order to get our VM up and running now. First is creating the Disk (we will talk about images later) and then creating the actual VM itself.
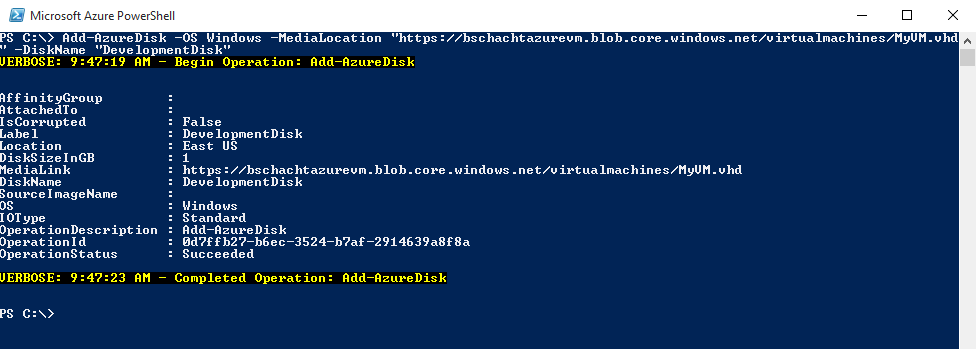
First, run the following command to create the Disk noting several parameters such as the OS type, the location of the VHD including the storage account and container then finally the name of the disk. As you can see the disk name does not have to actually match the physical name of the VHD: Add-AzureDisk -OS Windows -MediaLocation “https://bschachtazurevm.blob.core.windows.net/virtualmachines/MyVM.vhd” -DiskName “DevelopmentDisk”
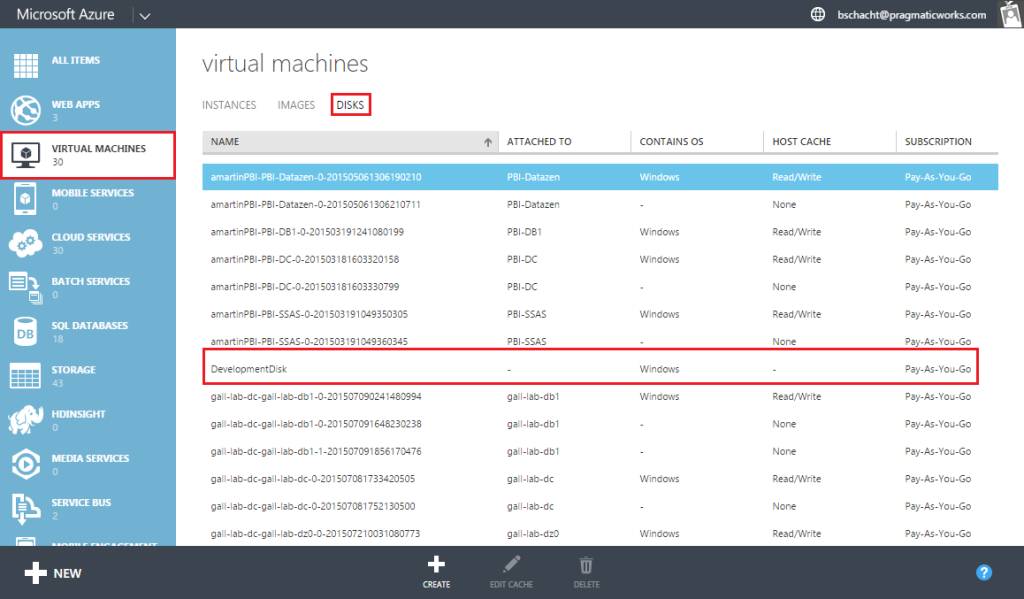
If we then navigate to the Virtual Machines section of the Azure Portal and go to Disks, you will see the newly created Disk. We aren’t quite done yet though, next we have to create the VM and tell it to use the disk we just created.
This time we are going to use a variable to store some information from the New-AzureVMConfig cmdlet and then reference the variable in the subsequent cmdlet. The New-AzureVMConfig tells us the name of the virtual machine, which disk to use (the DevelopmentDisk that we just created) and the resources that should be assigned to the VM, in this case we will just use a small vm which has a low amount of memory and CPU allocated to it.
The command after the config is called New-AzureVM. This will tell where the VM is to be located. Remember we created our storage account in the East US data center, so we want to put our Virtual Machine there as well. The service name is that cloud service we referenced needed to be setup at the beginning of this post and finally the configuration information from the previous command.
$migratedVM = New-AzureVMConfig -Name “QuickDemoVM” -DiskName “DevelopmentDisk” -InstanceSize “Small”
New-AzureVM -Location “East US” -ServiceName “bschachtazurevm” -VMs $migratedVM
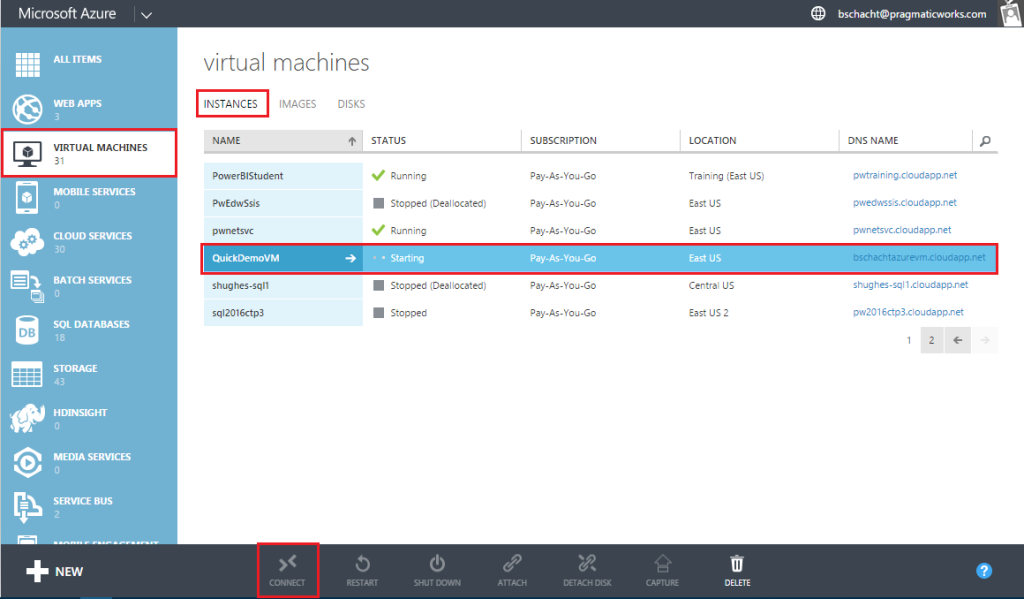
Navigating to the Instances tab of the Virtual Machine section in the Azure Portal, we can now see our new VM. All we need to do is click the Connect button at the bottom of the screen once the provisioning finishes and an RDP shortcut will be saved locally. Simply double click that and connect to the virtual machine as though it was running on your network!
Creating an Image
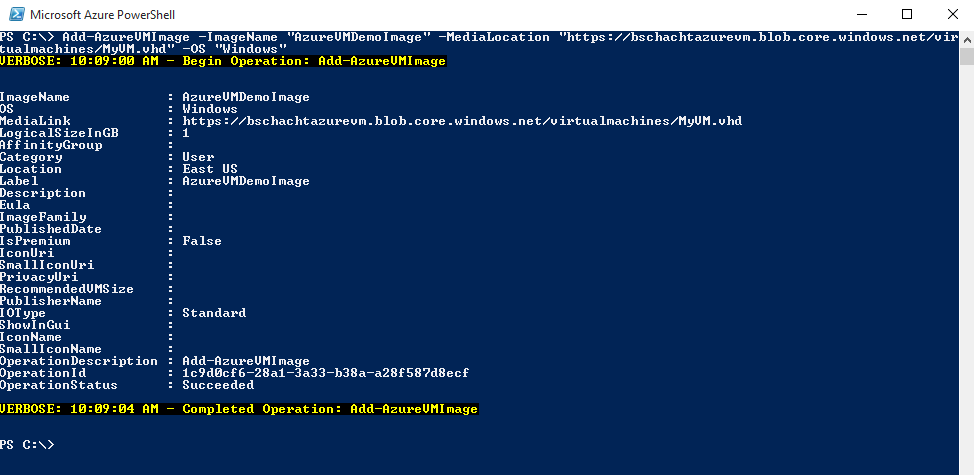
Creating an image is just as easy as creating a disk, except it is reusable across multiple virtual machines. Note that this command will create the image, but we aren’t actually creating a VM just yet. Some of the parameters are the same, but notice there is no sizing information, that is all tied to the VM, not the disk or image.
Add-AzureVMImage -ImageName “AzureVMDemoImage” -MediaLocation “https://bschachtazurevm.blob.core.windows.net/virtualmachines/MyVM.vhd” -OS “Windows”
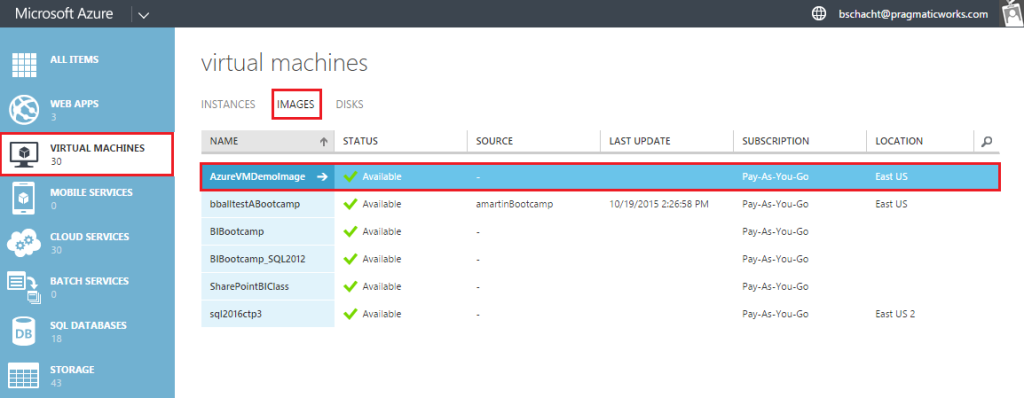
If we now navigate in the Azure Portal to the Images section of Virtual Machines we will see this new image.
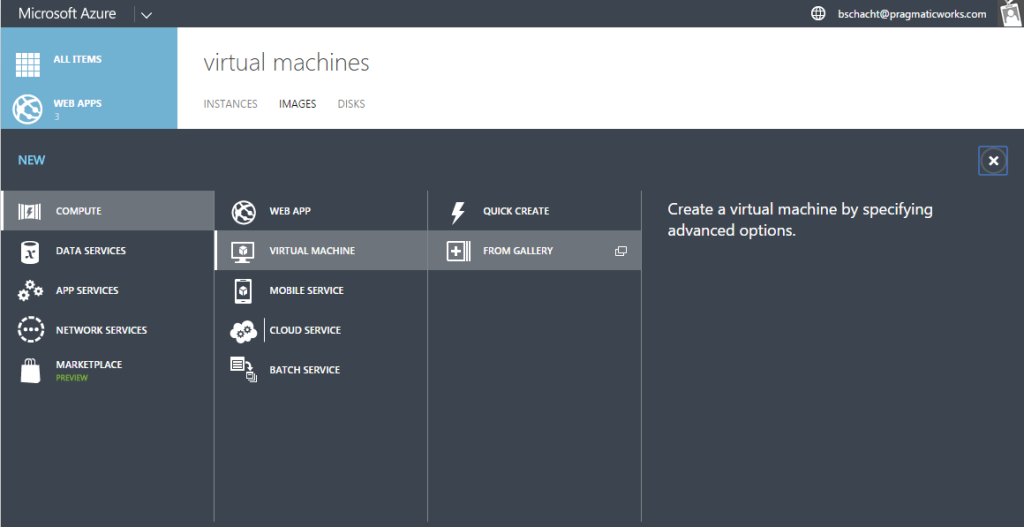
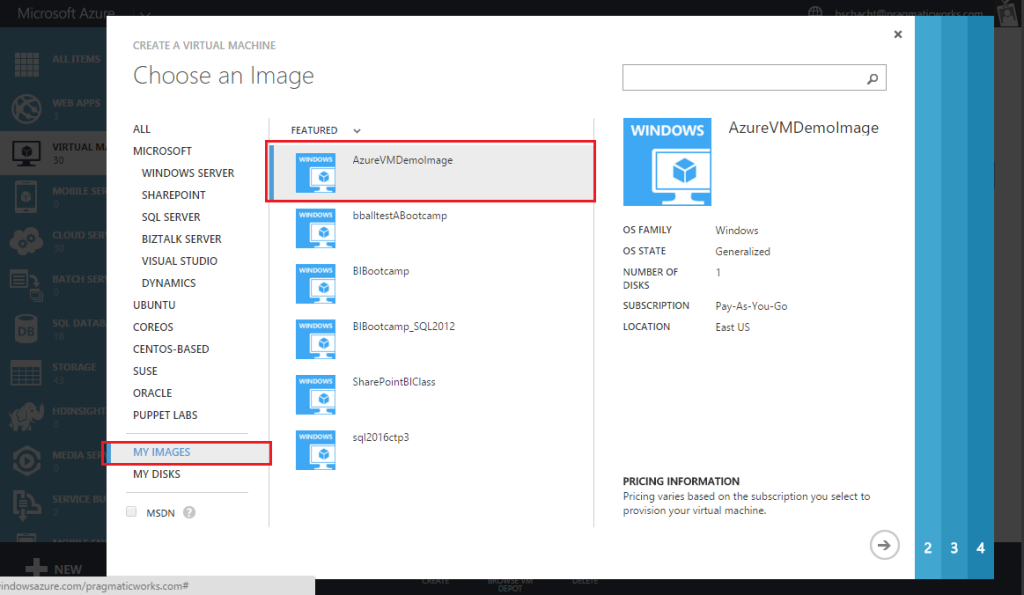
The really cool thing about images is that we can now use that just like we would any of the Microsoft templates that are in the gallery. To create a VM from this image, click New in the bottom left corner of the Azure Portal. Select Compute -> Virtual Machine -> Gallery.
Now if you navigate to the My Images section you, and everyone in your subscription, will see the image that was just created and we can make as many VMs on that single image as we would like. Now, when we do a class at Pragmatic Works we can use that image to spin up 20 different student VMs that all look the exact same. At your organization you can spin up a Development and a Test/QA VM that both look the exact same but have different resource allocations.
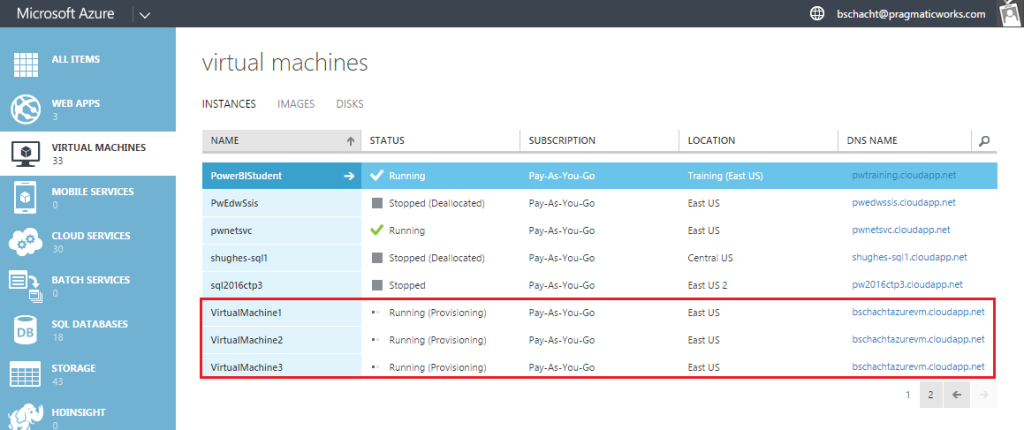
In addition to using the UI to spin up a series of virtual machines, you can build these using PowerShell as well. I don’t want to sit there and create 20 or 30 VMs for a class. That would be quite time consuming even with the Image as my starting point. I can create a PowerShell file (.ps1) that I can execute. This will run the same command over and over again, N number of times, and simply iterate the name of the VM. As you can see, we have a parameter for how many VMs we want to create called $vmcount and it is at a default of 3. So if we run this script it will simply create 3 VMs. The virtual machines will all have name VirtualMachineN (VirtualMachine1, VirtualMachine2, VirtualMachine3, etc.). We also provide some login information for the VMs, the image name which we create in the previous step and the size of the VM. I’m going to take this code and save it in a file called CreateVMs.ps1 and then execute it from PowerShell as you will see in the screenshot below.
param([Int32]$vmcount = 3)# Create Azure VMs for Class
# run in Powershell window by typing .\CreateVMs.ps1 -vmcount 3
$startnumber = 1
$vmName = “VirtualMachine”
$password = “pass@word01”
$adminUsername = “Student”
$cloudSvcName = “bschachtazurevm”
$image = “AzureVMDemoImage”
$size = “Small”
$vms = @()
for($i = $startnumber; $i -le $vmcount; $i++)
{
$vmn = $vmName + $i
New-AzureVMConfig -Name $vmn -InstanceSize $size -ImageName $image |
Add-AzureEndpoint -Protocol tcp -LocalPort 3389 -PublicPort 3389 -Name “RemoteDesktop” |
Add-AzureProvisioningConfig -Windows -AdminUsername $adminUsername -Password $password |
New-AzureVM -ServiceName $cloudSvcName
}
Automation and Resources
Hopefully by this point you’ve seen some of the flexibility that combining images with Azure VMs provides over simply creating disks. The flexibility to reuse an image many times combined with the ability to spin up dozens of VMs with a very simple PowerShell script is a huge win for Azure. The magic doesn’t stop there though. Automation in Azure is very powerful and can help us extend the VM capability even more. While out of scope for this particular blog I will point you to a very detailed post by Devin Knight (Twitter | Blog) on the topic. His blog walks through how to set up automation in a way we use it at Pragmatic Works. Each day, Monday-Friday, we turn on all the student virtual machines at 7AM eastern then shut them all down on 8PM eastern. This allows us to save money since we only teach classes during the week and we don’t want them running all night when we aren’t teaching classes. It’s a very simple illustration of how automation can extend the solution, but is a very popular use case in Azure.
Devin’s blog on Setting up Automation in Azure
Migrating Your SQL Servers VMs to Azure with PowerShell


