The SQL Server Import and Export Wizard has been around for a while. It’s a simple and very useful tool for importing or exporting data. You simply need to give the Wizard a data source, name a destination, and let the Wizard do the magic: importing or exporting data. But there can be instances where the SQL Server Import and Export Wizard fails to perform as designed and needs help to finish the basic importing or exporting of data.
This article will discuss a case study of utilizing the SQL Server Import and Export Wizard on the example of a text file. My “Success” story describes the import process when it works without a hitch, while my “Challenge” story highlights a common difficulty encountered when using the Microsoft Import and Export Wizard, and then offers a solution.
Both stories describe an import process of a text file. The simplified sample text file has only three columns delimited by a vertical bar, and no column names. My goal is to import this file into an existing table named dbo.EmployeeFeed using the Microsoft Import and Export Wizard, which from now on I will call simply the Wizard. All of the supporting scripts and additional documentation are included in this article. The file “Current Process and Documents Described.doc” provides a description of the documentation, scripts, and their usage.
Part One – The Success Story
Here I will document the step by step process of importing a text file into a table using the Wizard:
Step 1: Create a destination table named dbo.EmployeeFeed.
CREATE TABLE [dbo].[EmployeeFeed]
    (
      [EmployeeNumber] [VARCHAR](6) NULL
    , [LastName] [VARCHAR](50) NULL
    , [FirstName] [VARCHAR](30) NULL
    , [Hobby] [VARCHAR](100) NULL
    )
ON  [PRIMARY];
Step 2: Import the data from the text file into a table using the Wizard.
Right click on the database where you have created the table dbo.EmployeeFeed. I created my table in the database Tease.
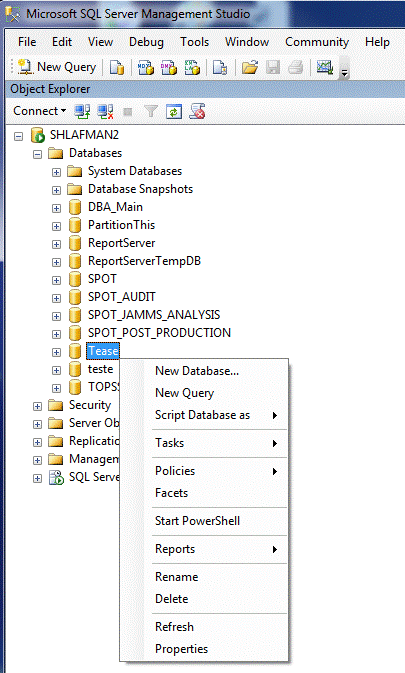
Select Tasks, and then click on Import Data.
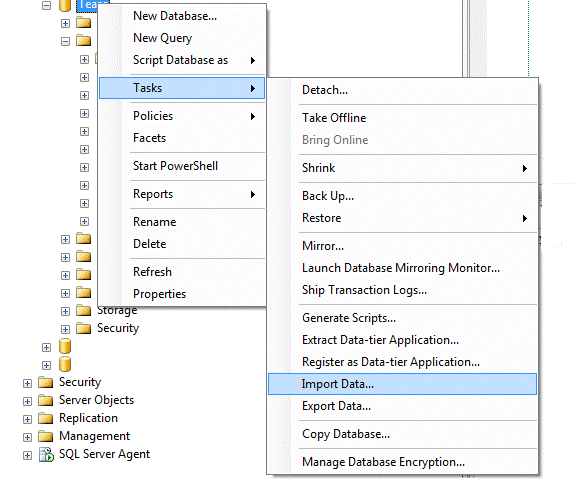
The Wizard will start.

Click the Next button. Hint: I would like to point out that the Wizard is input data driven application. Clicking the Next button will bring you to a new page with more input to enter. If you have inaccurate or incomplete data in your current page, and then click the Next button, you may end up with incorrect or unexpected results. So always make sure that you have entered everything fully and correctly before you click the Next button. If you need, you can go back to previous page(s) by clicking on the Back button.
On the Choose a Data Source page, select Flat File Source from the drop down Data source list.
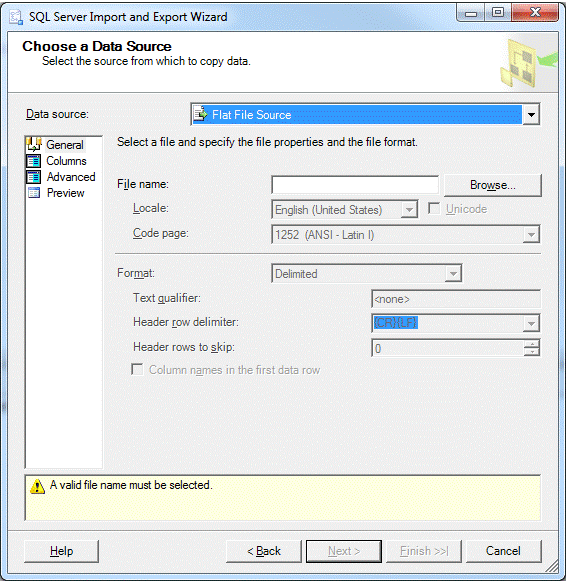
Click on the Browse button, and navigate to a directory where you have stored your EmployeeFeedBasketball.txt file. Double click on the file. The Choose a Data Source page will look like this:
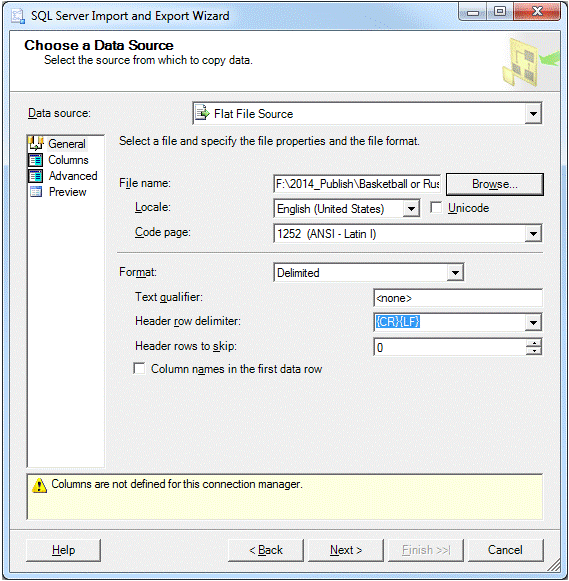
Please notice a warning message – “Columns are not defined for this connection manager”. This is an indication that the input file does not have column names.
Click the Next button. It will show you the data from the input file parsed into four columns – Column 0 through Column 3.
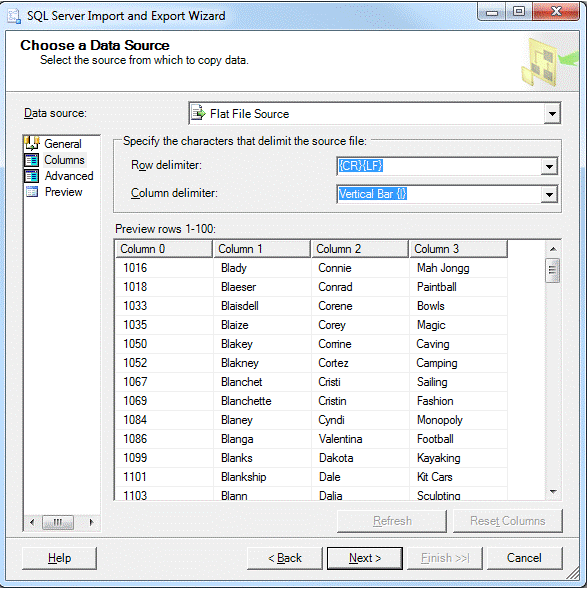
As you can see from the image above, the column delimiter is a vertical bar (|)
Click the Next button, and it will bring you to the Choose a Destination page
In the Destination drop down list select "SQL Server Native Client 10.0"
Select a server name in the Server Name drop down list, and then select Database in the drop down list. Technically speaking, the Server Name and Database Name should automatically be filled in by the Import and Export Wizard, but you should always double check this information to be sure that there is no mistake. Here is how the Choose a Destination should appear after the last two tasks:
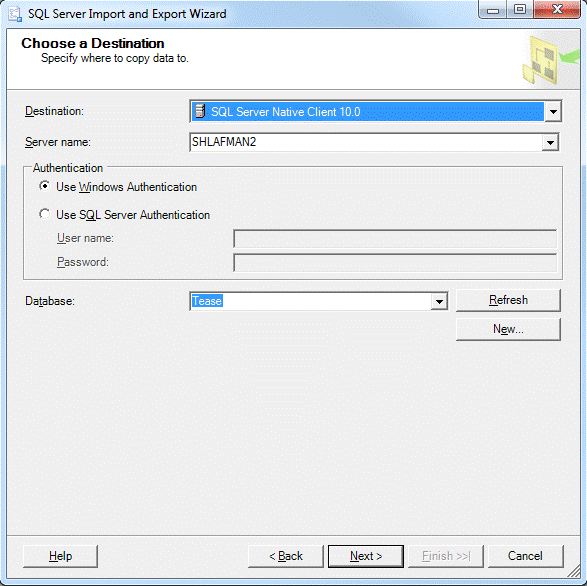
Click the Next button. On Select Source Tables and Views page, select the table dbo.EmployeeFeed from the Destination drop down list. You should see the path to the source file in the Source column - EmployeeFeedBasketball.txt
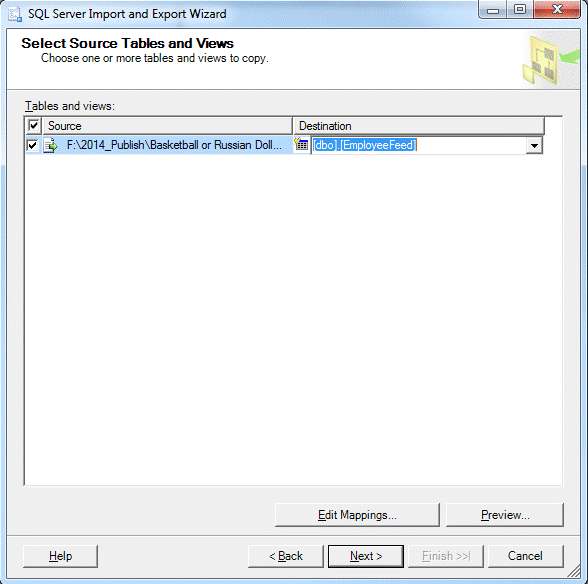
Click the Next button
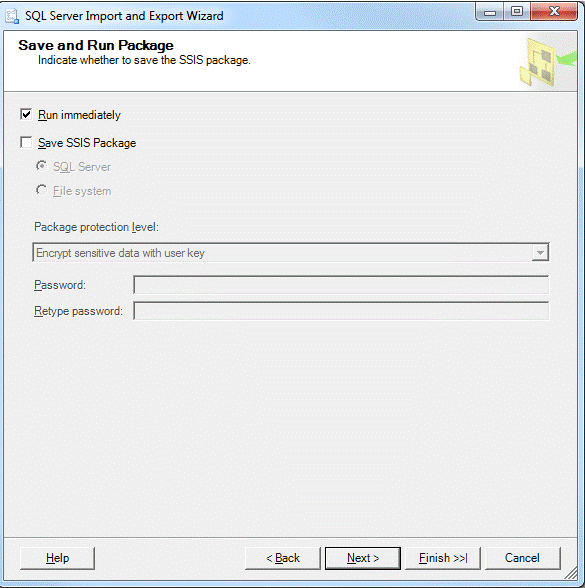
On the Save and Run Package page, click the Next button. The first thing to do is to make sure you keep the Run Immediately box checked because we only want to run this process once. In cases when you need to rerun the Wizard multiple times, you could select Save SSIS package and later reuse it.
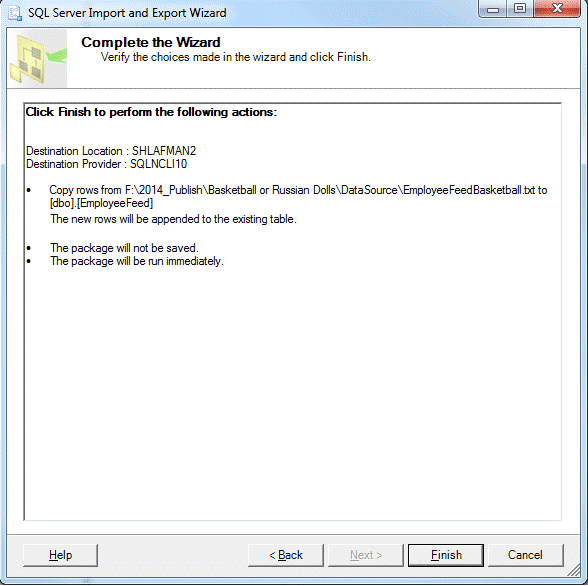
Do not click the Finish button. In my opinion this button doesn’t belong on this page since it performs exactly the same function as the Next button – it simply takes you to the next page. (Could that be a logical bug in the Wizard? Should Microsoft fix it?)
On the Complete the Wizard page, click the Finish button.
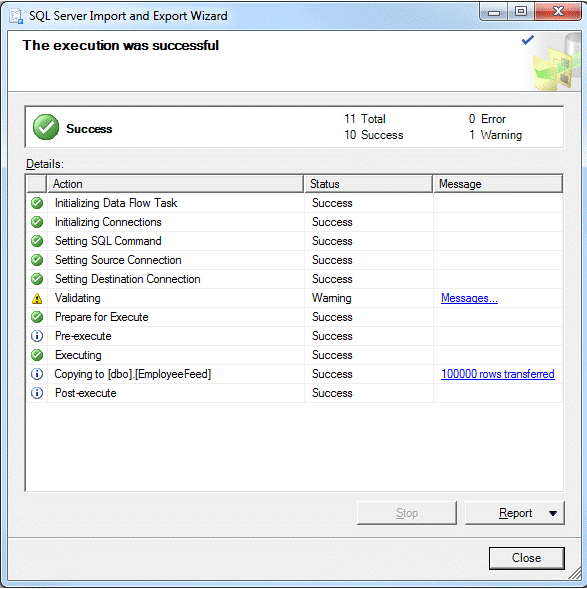
On the Execution was successful page, you can see all of the steps the Wizard has completed. On this page, there are three columns: Action, Status and Message.
On the line Copying to [dbo].[EmployeeFeed] you should see the Status Success and Message - “10000 rows transferred” in the Action column
Click the Close Button to complete the text file Import process. You can check the results by running this query:
select *
 from dbo.EmployeeFeed;
In our “Success” story, the process of importing data from an existing file using the Wizard worked very well, demonstrating that it is a very simple and powerful tool to copy data from a source to a destination. But what happens when there is a glitch? Our “Challenge” story will illustrate a common problem encountered during the process, and offer a solution.
Part Two: Challenge Story with a Small Detour.
For our “Challenge” story we will use the input file EmployeeFeed_BasketballOrDolls.txt. In the Hobby column, employees were asked to input their favorite hobby. All of the entries in the Employee Feed file have a length of less than 50 characters except for one employee, who mistakenly entered more than one hobby. In fact, he entered his three hobbies: Basketball, Collecting Russian Dolls, and Hot Air Ballooning. This gives his entry a length of more than 50 characters. In cases such as this, the Wizard would not be able to import the file, and you would get an Operation Stopped Page, as well as multiple error messages. How can this issue be resolved?
First, run the following query to remove all rows from the destination table.
Truncate table dbo.EmployeeFeed;
Second, open the Wizard and start the import process repeating all steps from Step 2 section. This time however you should select the source file EmployeeFeed_BasketballOrDolls.txt. You should get the Operation Stopped page with error messages:
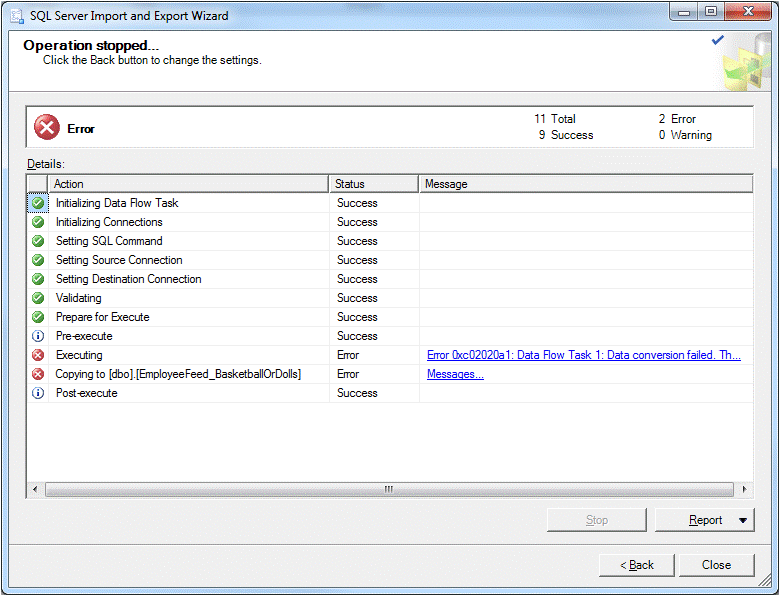
On the Executing line, click on the blue underlined error message in the Message column, and you should get this error description:

If you click on the Message on the Copying to [dbo].[ EmployeeFeed] line you should get this error description:
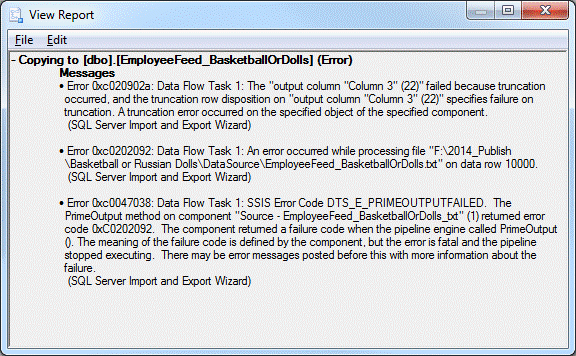
In plain English, the Wizard is telling you that it cannot resolve the issue on its own. On a positive note, it does inform you of the row that caused the issue. However, even if you could change data type of all columns in the destination table to varchar (max), the Wizard would still give you the same error message.
Let’s assume that you can manually remove or fix the flawed row. You would then need to have a software/text editor to open your file with row numbers. For example, you could use Access if you only have a few flawed rows. You could make the length of an input value less than 50 characters, load the file, and fix the faulty row to the initial values by running an update statement.
But what if you have numerous rows that might be causing the same issue? What if there are faulty rows scattered across the file? The quick manual fix I mentioned is one way to get around it, but it will not help if you have many faulty rows.
Part Three – How to Fix It Quickly
Start the Wizard. Select the input file on "Choose a Data Source" page - the file EmployeeFeed_BasketballOrDolls.txt. Click Advanced under the section Data source
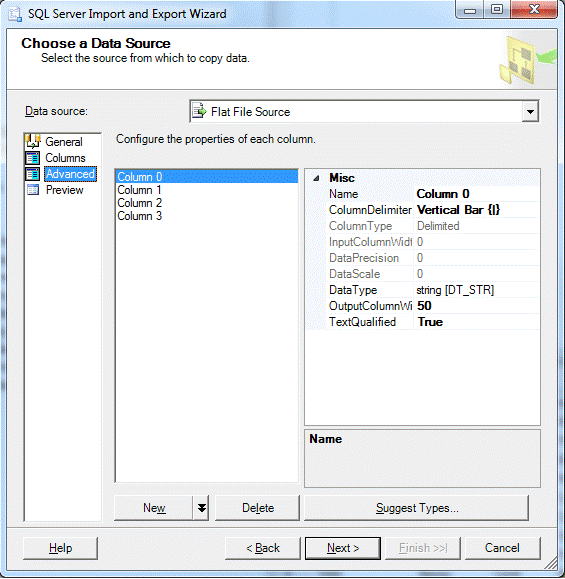
Click on each Column - Column 0 through Column 3. For example, here is the Column 3:
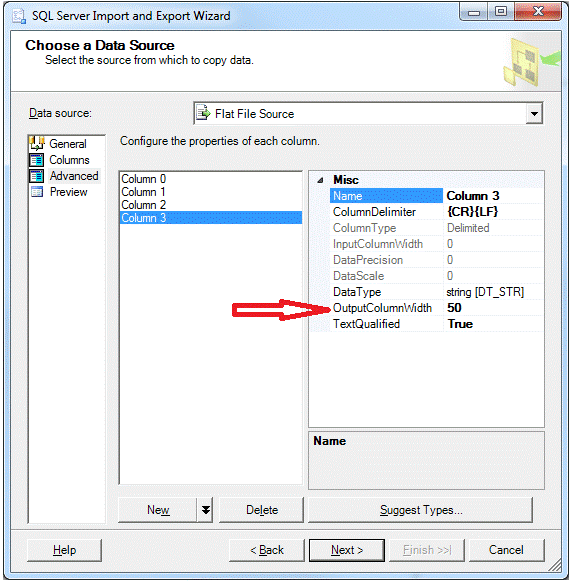
You will see that the OutputColumnWidth is 50 characters long by default for all columns. You can click on the Suggest Types button, bringing up the page Suggest Column Types
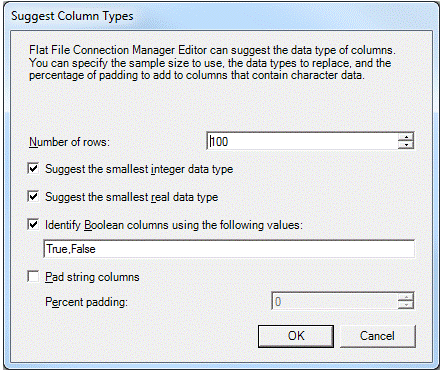
The maximum number of rows you can enter into the Number of Rows window is 10,000. So if your input file has more than 10,000 rows, this feature will not help (and by the way, I have found that it also does not work properly, which you can try out for yourself.)
Click the Cancel button to close the Suggest Column Types page. On the "Choose a Data Source" page, click on Column 3. Change the value OutputColumnWidth from 50 to 100.
Click the Next button twice and then Select your destination table - dbo.EmployeeFeed.
Click the Next button twice again.
Click Finish: voila, all 10,000 rows were imported.
The process I described above demonstrates that the issue that caused the error in our “Challenge” story was not with your table and the definition of the column, but with the column length definition on the Choose a Data Source page. This shows that if you change the data type for your columns, it would not help to resolve the issue. However, if you provide the Wizard with the maximum length for each column, it will successfully load the data.
There is no way you can change the default value of fifty to another default value in the Wizard.
But how you can know in advance the maximum length every time you get a new file with a new set of columns? Is there a better way to control the load process? One way to solve the issue is to specify a maximum length allowed for each data type. For example, for the string [DT_STR] data type you can specify 8000. This is how it would look in our case:
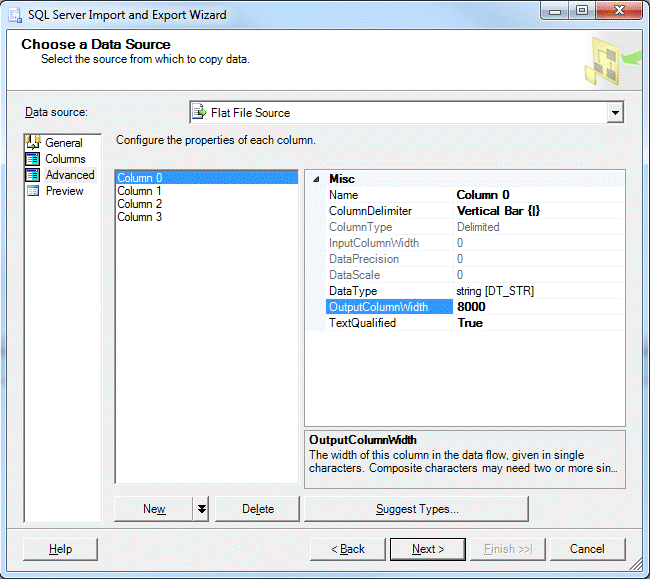
This should solve the issue. But if you want to do an extra step, I suggest that you create a simple SSIS package with Visual Basic 2008 script that will first scan your input file, and then produce a list of columns in the file defining their maximum length. You can use this list later on to change the OutputColumnWidth value if needed.
In our “Challenge” story, the case with the faulty row, the input file EmployeeFeed_BasketballOrDolls.txt, SSIS package would generate an output like this:
0 - 4
1 - 13
2 - 11
3 – 59
The first column represents the column number, while the second column shows the maximum data length in the corresponding column. The first column has the column number zero. The output column numbering matches with column numbering in the Wizard. Based on the results provided, the third column (the Hobby Column) has at least one row with a data length of 59. This explains why the Wizard could not handle the import process.
Disclaimer: all names and hobbies in this article are purely fictional.
For more information on script usage, please see the enclosed detailed documentation and source scripts.
Credits
My family, my teacher Ilya Petrenko, and my friends.
Reference
How to: Run the SQL Server Import and Export Wizard - http://technet.microsoft.com/en-us/library/ms140052(v=sql.105).aspx


