Overview
In this paper we will look at the Central Management Server (CMS) in SQL Server and how it can help you manage a disperse environment. We will look at the requirements for setting up a CMS, the advantages you gain from implementing it, and some of the disadvantages. We will also take a look at how to import the local connections you already have into your CMS as well as how to export them for use with another CMS.
Central Management Server
The CMS allows you to store all of your SQL Server connection information in one central place on a single server. All of the connection information is stored in the MSDB database ofthe CMS server, so make sure you are backing it up regularly.
The SQL instance you choose to house your CMS must be running SQL 2008 or later. It is supported on all editions of SQL Server including the free Express Edition. Hosting a CMS on Express Edition can yield some significant cost savings in smaller shops, since it is suggested to not house your CMS on a production SQL instance. You also cannot create a connection to your CMS server on itself. We will see later that there is a workaround for this, but using a separate instance is a better solution.
Although your CMS server must be SQL 2008 or later, you can register connections to SQL 2000 and 2005 instances. This makes CMS very powerful in a mixed environment, and can be a valuable asset in a migration scenario.
Security
Securing your CMS server is very simple and straightforward. Access levels are granted through the following two database roles in the MSDB database:
- ServerGroupAdministratorRole
- ServerGroupReaderRole
The ServerGroupAdministratorRole allows users to manage all aspects of the CMS. Users in this role will be able to add connections, remove connections, and alter existing connections.
The ServerGroupReaderRole simply allows users to connect to CMS, see the available connections, and use them to connect to their respective SQL instances.
Remember that this is simply a connection repository and does not grant permissions to the connections’ instances. If a user tries to use a connection to an instance where they do not have a login, then they will not have access to that server.
Advantages
We have already alluded to some of the advantages of a CMS, but let’s see some specific things where it can help us. The most obvious advantage is that it holds an inventory of all the SQL servers in our environment. We can now connect to a single place and get a quick view of every server in our environment without having to remember each server and instance name.
We also have the flexibility to arrange our server connections in folders. Doing so allows us to get an even better picture of our environment at a glance. We can arrange our connections in any manner that we choose. This is entirely dependent on your business model so that you can match your folder structure to your business support model. Common examples are to model your folder structure in a logical manner by server function, geographic location, SQL Server version, or any combination thereof.
Let’s say our company has their support model broken up into regions, so if an administrator supports the West region he can easily discover and manage the servers he supports. Our business model also dictates that every production environment should have both a test and development environment. That encompasses our business model, but as the administrator you also want to separate and identify different versions of SQL Server. This helps avoid running a query that may be supported on one version but not another. Here is what that implementation might look like:

Beyond housing a server inventory and being able to arrange it according to our business needs, a CMS gives us the power to run a query against multiple servers. This is the most powerful feature of CMS and the biggest reason to utilize it. If your manager comes up to your desk and says that the company has acquired a budget to upgrade your SQL Servers and he has to submit the request within two hours, how long would it take you to find and evaluate the version of every SQL Server in your environment? What if a new cumulative update patch comes out that fixes a security issue and you need to know which servers need the patch? Using our example, we can find out the version of all SQL Servers in the West region by right clicking the West folder and selecting “New Query”. In the new query window we type in “SELECT @@VERSION” and this is what we get.

That was fast and easy, and we can instantly report to our manager that we have 3 instances of SQL Server running SQL 2008 RTM SP2. We can also see that one of them is running 64bit and the other two are running 32bit.
There are several other things to make a note of here. First is that there is an added column returned named “Server Name”. CMS adds that column to every multi-server query so you know which result came from which server. You will also notice in the lower right corner that the name of the group (West) we queried is displayed to show what the query was executed against in our CMS.
The last thing to note is what you will see in the query window prior to executing your query. The status bar at the bottom will be a pink color as opposed to the usual yellow color. This lets you know that the query window is attached to multiple connections. You will also notice that it says “Connected. (3/3)”. This lets you know how many connections any queries in this window will be executed against.

The last advantage of CMS comes when using it conjunction with Policy Based Management. It allows you to evaluate policies against multiple SQL instances simultaneously, much like using the multi-server query feature. It’s as simple as right clicking on a server connection or folder and selecting “Evaluate Policies”. PBM and CMS complement each other very well.
Disadvantages
There are two drawbacks to how CMS works. We’ll get into some internals in regards to working around the first one. The second one can be a pain in large companies with multiple environments, but we will be able to see that there is some security merit behind this restriction.
You cannot add a connection to your CMS server, on your CMS server. This is primarily because you already have a connection defined for it simply by virtue of it being your CMS. In our example below you can see that the server named “File2” is our CMS server at the root of the tree, and you can right click on it to perform several CMS actions.
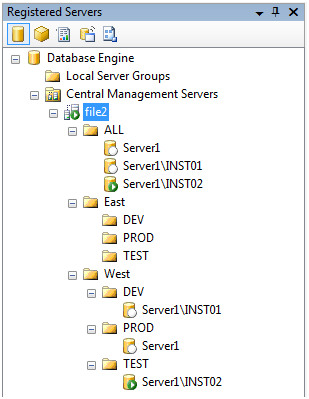
If you double click it, a connection to File2 and only to File2 will be automatically opened in your object explorer window. However, if you right click and select Object Explorer it will open connections to every server in your CMS in the object explorer window. The same will occur against all servers in your CMS if you select “New Query” or “Evaluate Policies”. If you want to perform any of these actions against the CMS server alone then you will notice an option in the right click context menu called “Central Management Server Actions”. Choosing options from there will execute against the CMS alone and not every server connection defined within your CMS.
If your CMS (File2 in our example) is also a production SQL Server in the East region, we might need to add it to that folder. If we attempt to do that, here is what we get:
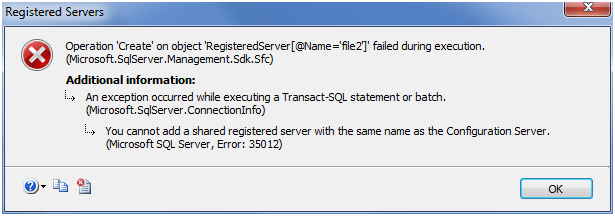
When you use the GUI to add a server to CMS, it passes the parameters that you define to following stored procedure:
msdb.dbo.sp_sysmanagement_add_shared_registered_server
If you were to look at that stored procedure, you would see several checks on the server name that is passed to it. It is designed to disallow you adding a server with the same name as the CMS. It also will not let you add a server named “.” or “localhost”. The check it uses to ensure you do not add a server connection with the same name as the CMS is to compare the name you passed to it to @@servername. The @@servername system variable holds the NetBIOS name of the machine, and in our case that is File2.
What does all that mean and how can you circumvent it? It’s quite simple. We just need to add the connection with another name that will resolve to our server other than the NetBIOS name. The easiest method is to add it using the server’s IP address. Of course that does not look very pretty in our CMS console, but we can alias it when creating the connection. Here is how we do that:
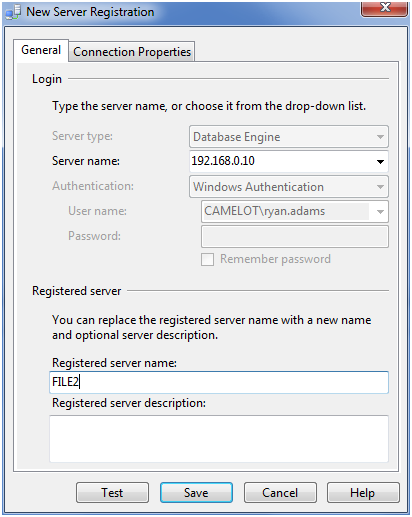
We have two other options for alternate names. As you can see in the above screen shot, we are in a domain named “Camelot”. This means we can use the FQDN of file2.camelot.com. The last option we have is to create an alias or CNAME record in DNS. Here is what it would look like if we added it twice in the East Production group using the IP address for one connection and the FQDN for the other:
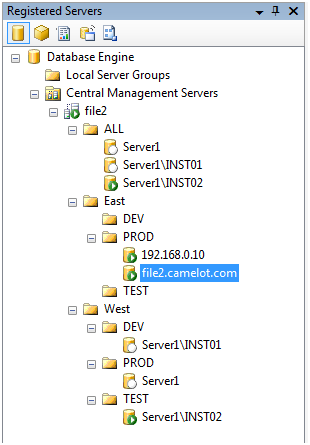
There is one other disadvantage. All registered server connections in the CMS can only use Windows authentication. This means you can only add servers to your CMS that are in the same domain or a trusted domain. You will not be able to add standalone servers that are not in a domain. We generally see this in a DMZ scenario where the SQL Server hosts data for a public facing web server. Along those lines, we typically see that test and development environments are hosted in separate untrusted domains. You will not be able to add these servers either. In these scenarios, you will need a separate CMS in each untrusted domain.
The inability to use SQL authentication can seem like quite a setback in large companies with multiple environments. Although this restriction can be a hindrance in many environments, you have to think about the security risks if it were allowed. Allowing SQL authentication would mean having connections with stored usernames and passwords. Anyone allowed to connect to the CMS could use that connection to access a server with another set of credentials. This would make it impossible to have user and group based access controls to your data. You would also not be able to audit or track access to your server and identify an offending user.
Setup
Open SQL Server Management Studio and connect to the SQL instance you want to host your CMS. By default SSMS does not show you the Registered Servers pane. If you do not see a tab for the Registered Servers pane on the bottom left hand pane next to the Object Explorer pane, go up to view and select Registered Servers. To enable CMS, simply right click on the Central Management Servers node in the hierarchy tree and select Register Central Management Server. A create connection dialog will open where we can put in the connection details for our CMS. Continuing with our example, we’ll use the server File2 for our CMS.
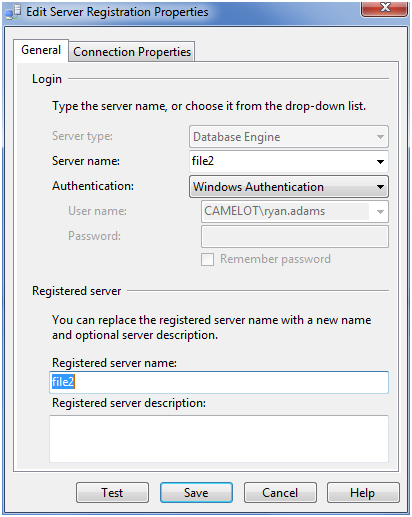
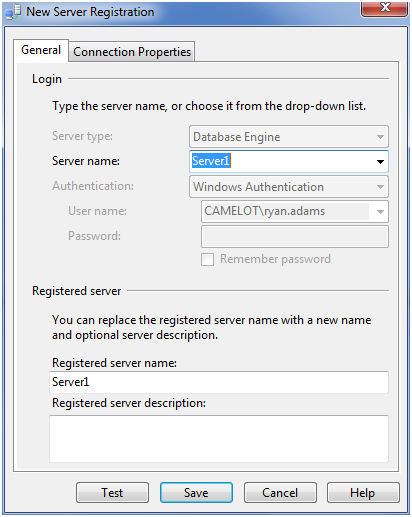
Your CMS server is now ready to configure with connections. You will want to first decide how to layout the server group folders according to your business. Once you have done that, you can right click on your server and select “New Server Group” to begin setting up your folder structure. Once you have your structure built out, you can right click the appropriate folder and select “New Server Registration”. In our example we will right click the PROD folder under the WEST folder and select “New Server Registration”. Here is what the registration details will look like:
Import and Export
Many people already have connections setup in their local SSMS to all the servers in their environment. We can import those connections into our new CMS so we don’t have to manually recreate them all. We can also export the connections in our CMS to have available for importing to another CMS, another local SSMS, or simply as an additional backup. Please note that this should be an additional backup, because you should be backing up the MSDB on your CMS server.
Let’s continue with our example and export our four local connections to the East/Dev group in our CMS. Here is what our local connection options look like, followed by what we see in SSMS.
Alias | Server/Instance | Authentication Type |
Server1 | Server1 | Windows |
Server1/INST01 | Server1/INST01 | SQL |
File2 | File2 | Windows |
File2.camelot.com | File2 | Windows |
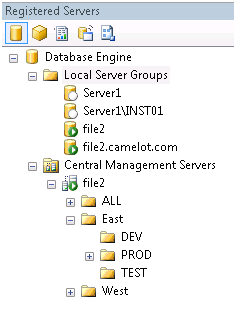
We start by right clicking on Local Server Groups and going to Tasks | Export. The following dialog allows us to choose which local group we want export, where to export it to, and if we want to include passwords. By default, the option is selected to NOT include passwords, but we are going to uncheck that box so we can see what gets exported from a security perspective.
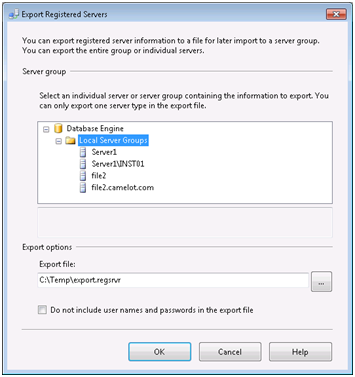
Before we import this into our CMS we want to make sure that no passwords are exported in clear text. We want to look at this for a connection using Windows Authentication as well as a connection using SQL authentication. We know from our matrix above that Server1 is using Windows Authentication, so let’s check that out first and see what got exported.
<RegisteredServers:ConnectionStringWithEncryptedPassword
type="string">server=Server1;trusted_connection=true;pooling=false;
packet size=4096;multipleactiveresultsets=false</RegisteredServers:ConnectionStringWithEncryptedPassword>
We can see that the connection string is using the trusted_connection=true option as expected, so no password is included or necessary. Now we know we don’t have to worry about plain text passwords being included with Windows Authenticated connections. Now we need to look at a SQL Authenticated connection.
<RegisteredServers:ConnectionStringWithEncryptedPassword
type="string">server=Server1\INST01;uid=sa;password=AQAAANCMnd8BFdERjHoAwE/Cl+sBAAAAWN50rqJbK0KumkZmeSq0rQQAAAACAAAAADZgAAwAAAABAAAACf0muawUxos7e658B76JBJAAAAAASAAACgAAAAEAAAANgj0Wy9O+YOw2tppBqYAAAAplr80XKV/SuFiRHFwGnEQTno6rDFFAAAAP3b2Ll4WMHyOKzOMuCQqekAivqX;pooling=false;
packet size=4096;multipleactiveresultsets=false</RegisteredServers:ConnectionStringWithEncryptedPassword>
Here we can see that the username is displayed in plain text, but the password is encrypted. If displaying the username is a security or auditing concern for your company then you need to be aware of this. However, we can rest easier knowing that the password is not exposed in plain text.
NOTE: Remember that CMS does not allow SQL Authenticated connections, so pay attention to what happens when you import it.
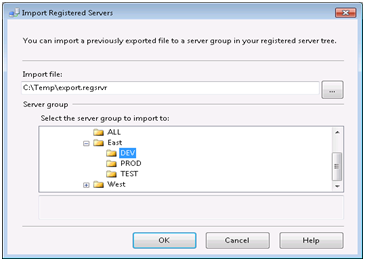
Switching back into SSMS, we can import these connections to our CMS by right clicking the folder we want to put them in and going to Tasks>Import. The dialog we receive asks for the file to import and the folder we want them imported to. The folder to import to will default to the folder you right clicked on in the previous step, but you can change it here if you wish.
We got an error! That’s okay because we should have expected it. It’s the same error we got earlier while trying to create a connection in our CMS with same name as the CMS (File2). You should recognize this error right away and know that it can be safely ignored.
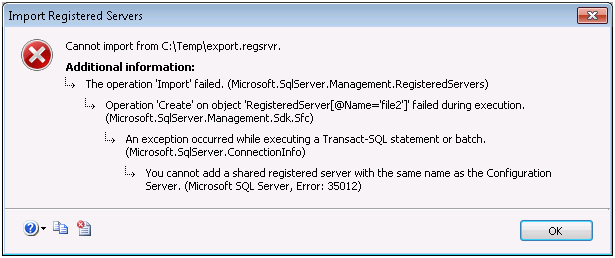
The real caveat is that SSMS does not export the local connections in the same order in which you have them listed. It’s random. It also stops importing the connections as soon as this error is encountered. If this was the last connection in the import file, then everything else will have been successfully imported. However, if this was the second connection then only the first connection is imported and everything after is not processed. If you run into this issue you can either manually remove the XML entry for this connection from the export file or you can remove it from your local connections and repeat the export/import operation. Once we remove the connection with one of the above methods and do the operation again, this is what our CMS will look like.
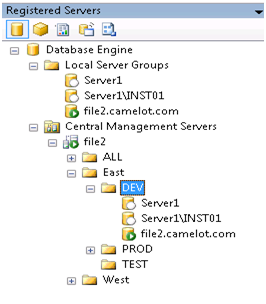
You will notice that “file2.camelot.com” imported just fine even though “file2” failed with our previous import. This proves that imports behave the same way as adding connections with regards to the issue of using the CMS server name we saw earlier.
We have now successfully exported our local connections into our CMS. There is only one thing left to check. The connection for Server1/INST01 was using SQL Authentication in our local SSMS and that is not allowed in our CMS. Here is what happens when you import a connection that uses a SQL Authenticated login.
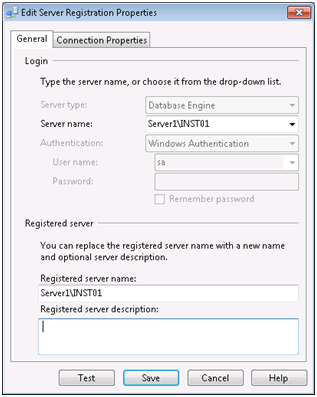
You can still see the SQL Login ID that was specified for the connection, but Windows Authentication is now selected and greyed out. SQL Authenticated logins automatically get switched to Windows Authenticated logins upon import.
Conclusion
You should now have a firm understanding of how CMS works. We looked at both the advantages and disadvantages of using a Central Management Server in your environment. We also worked through how to setup a CMS, how the authentication methods come into play, and how to import local connections to give you a jump start on getting connections into the CMS. We also took a look at how to secure your CMS and put some security concerns to rest with regards to exported connections.


