Introduction
I recently had a situation where I had to move a number of production databases from one server to another in a hurry with as little downtime as possible (no more than a few minutes). I decided on this solution and while not available in every situation it should help in an emergency.
The Environment
This was a public facing high volume web site. The site was built using ASP.Net and the database server which needed moving was SQL server 2005. I couldn't detach the databases to copy them across the network then re-attach them as they were between 50-150 GB each so the downtime required would be too long. The web servers were in a web farm so I could restart IIS or recycle the IIS application pools if needed.
The Solution
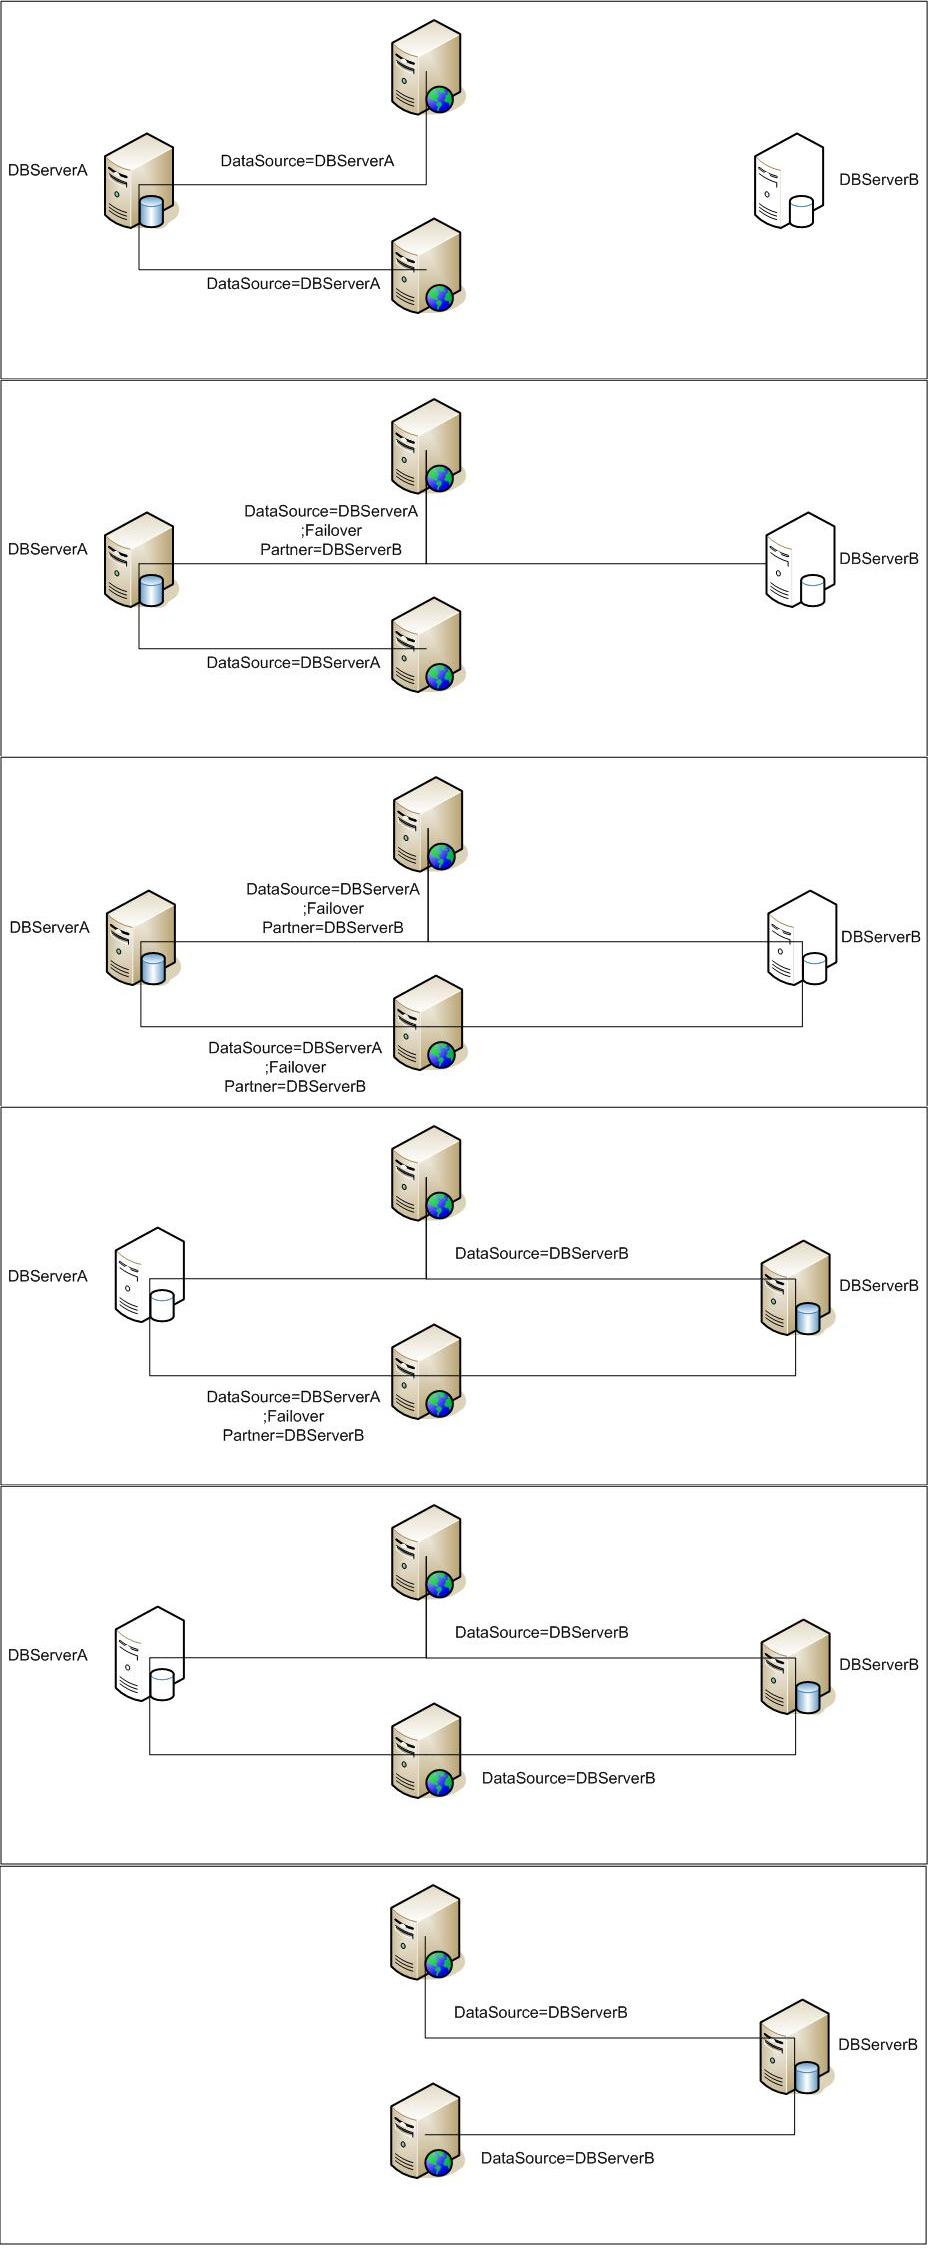
The idea is quite simple, to mirror the databases from the current server to the new one then failover the databases and finally remove the mirroring. The entire process could be done with only a few seconds of downtime. It does rely on being able to change the connection strings in the ASP.Net app and recycling the IIS app pools so the application can carry on working after updating the configs - or taking an application out of load and restarting it.
Step by Step
The first step is to make sure the databases are in full recovery as we need to make use of the transaction log.
To check the recovery model, using SQL server management studio (SSMS) right click the database in the object explorer and choose properties. When the "Database Properties" dialog appears choose "Options" and the "Recovery Model" drop down displays the current model.
Verify that you have SQL connectivity between the old and new server as they will need to communicate (by default this is tcp:1433). If you connect from one to the other using SSMS then it should be enough.
- Copy across all of the security logins you need for your application.
For all your windows accounts just create server logins for each one by expanding "Security" in the object explorer and then right clicking "Logins" and use the "Login - new " dialog.
If your user accounts are SQL users then you will need to script out the logins because even though you might create the logins with the same name, the internal SID of the user will be different and SQL will not match them up automatically.
To copy the users keeping the same SID, on your source server do "SELECT name, SID FROM sys.sysusers" inside the database you are going to move. This will give you the name and SID of the user to copy. If you then take these and run this command on the destination server:
"CREATE LOGIN [UserName] WITH PASSWORD='PasswordToUse', SID=0x51D51D51D51D51D"
Using your username, password and SID for each login you need to create. This will create your logins and when the database is on the destination server the sids will match and your users will have access.
Take a full and a transaction log backup.
To do this right click on the database in object explorer, choose "Tasks" then "Backup..." the "Back up Database" dialog will appear, set the backup type to "Full" and choose the "Backup to Disk" radio button, add a destination filename then click on "OK" (you could also backup to tape if wanted you but for brevity I will only cover physical files.)
When the backup is complete, return to the "Back Up Database" dialog and this time set the "Backup type" to "Transaction Log" - if you set the destination to the same file that you have already created then both backups will be within the same file so you only have one to copy to the destination server.
Copy the backup to the new server.
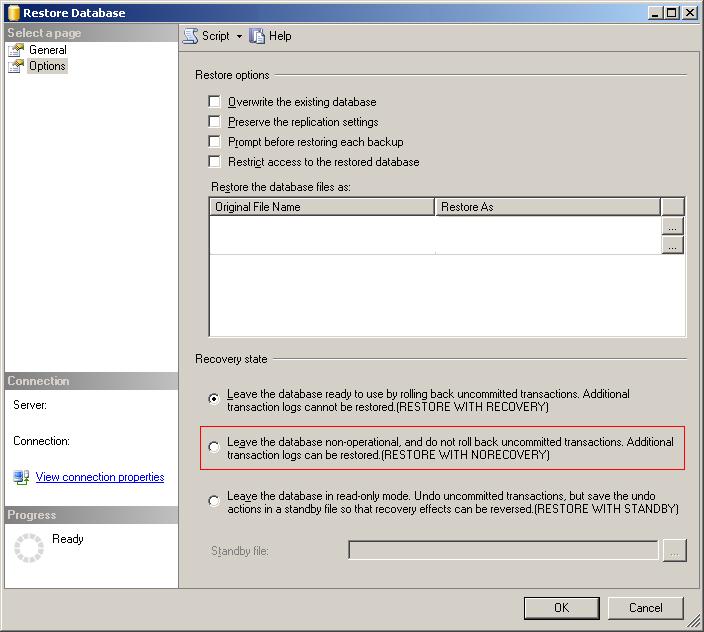
On the destination server, restore the backup and transaction log using RESTORE NORECOVERY.
To restore the files using SSMS, right click the "Databases" folder in object explorer, and choose "Restore Database", when the dialog appears change the source of the restore to "From Device", click on the "..." button and add the backup file you created in step 4. This will show two backup sets to restore, tick the "Restore" check box for both backups and add the name of the database to restore, if the database doesn't already exist it should be at the bottom of the drop down list.
Before you restore the files we need to tell SQL to not recover the database and to keep it unavailable, you do this by clicking on "Options" and of the three "Recovery States" choose "Leave the database non-operational, and do not roll back uncommitted transactions..." - what this does is to leave the database so you can add further transactions, normally another transaction logs but in the case of mirroring transactions sent from the primary server to the secondary. When you are ready click on "OK" to restore the backups.
Choose the correct recovery option:

The database should now appear in the object explorer (normally at the bottom until you refresh it) and will be labelled "Restoring...", you will be unable to open it. This is because it is waiting for more transactions or to be brought on-line.
Configure mirroring on the old server.
To do this just right click the database, choose tasks then mirroring. The "Database Properties" dialog appears on the "Mirroring" page, the only thing enabled on the dialog should be "Configure Security", click on that. Although it is called the "Database Mirroring Security Wizard" it does much more than that and sets up the endpoints on both servers..
When the dialog appears, if you get the welcome page, skip on to the next one. When asked whether to include a witness server use the "No" radio button, it is only temporary and so we don't need a witness. Click next and allow the primary and secondary server to save the security configuration.
You are then asked to specify the "Principal", I would keep the defaults and choose "Next", for the "Mirror Server Instance" you will have to click "Connect" and login to the destination server as you would when starting SSMS.
When you are connected, click "Next" and if you need to enter in the details of service accounts, enter them in the "Service Accounts" screen - the description text will help you decide whether or not you need to. Then click "Next" and "Finished" this will then configure the servers and ask you whether to start mirroring, choose "No" at this point.
If everything is successful the "Mirroring" page will have the details of the "Principal" and "Mirror". If these are correct, set the "Operating Mode" to "High safety without automatic failover (synchronous)".
The reason we choose this is because we want to control when the failover of the databases happens, if we choose "...with automatic failover" then it could failover when we don't want it to (this option does require a witness so it should be disabled). We don't want to choose "High Performance" as it has the potential to loose transactions.
When you are ready, click "Start Mirroring", the "Status" should show that it is connected and synchronised. Close down the dialog.
Change the application connection string to include the new server as a failover partner.
You will need to update your connection string so that they include "Failover Partner=SERVER;". You will need to make sure you have "Initial Catalog" set as it is a requirement for using a failover partner. You may need to recycle the app pools or restart the applications (unless the application has been coded to deal with any changes to the config gracefully).
When all the configs have been updated, failover the database to the new server.
To do this just right click the database, choose tasks then mirroring. Verify that the status window shows that mirroring is up to date (fully synchronised) - if there were a lot of transactions between taking the backups and setting up the mirroring it might take a while to catch up. When you are happy then click "Failover". There should be a delay of a few seconds while the database and then the app fails over to the new server.
If this is successful you can remove the mirroring and update the configs again to take out the failover partner and set the new server as the primary data source.
To remove the mirroring, just right click the database, click "Tasks" then "Mirror.." and then click the "Remove Mirroring" button.
Conclusion
I hope that this has shown how it can be straight forward to move between servers in certain situations.
This comes with a pretty big warning that this should all be tested in a non production environment and planned correctly to minimise the impact to users. Before I ran this I restored a version of the databases and had an unused web server point to it so I could test that all the settings, like logins, were correct before I did the actual migration.
A High Level overview of the process in image:


