Introduction
BCP is a Bulk Copy Program used to import data from SQL Server to a file or export from a file to an Azure DW. In this article, we will show how to export data from Azure SQL Data Warehouse (ASDW) to a file or how to import data in an ASDW table.
Requirements
- A local machine with BCP 13.1 or later installed. There is a BCP version for Linux, however, we will focus on BCP for Windows which is similar to the Linux version, but not identical.
- We will also need an ASDW, with the Adventureworks LT database. For more information to create the database, you can check our article related.
Getting started
We will first check to the BCP version. You can use the following command in the cmd:
bcp -v
The version 13.x belongs to SQL Server 2016 and 12.x the version 2014. For more information about the versions, you can check the following link: How to determine the version, edition and update level of SQL Server and its components
The next example will show how to copy the Azure table information to a data file:
bcp sqlcentralwarehouse.dbo.dimdate out c:\sql\dates.dat -S sqlcentralserver.database.windows.net -U Daniel -P MySecretpwd012 -n –q
The example copies the dbo.dimdate table information to a file named dates.dat -S is the Azure Server name. You can get the server name from the Azure Portal. To get that information, in the Azure Portal, select More Services and look for SQL servers:

Select your Azure SQL Server and go to Properties. You will find the Azure server name there:
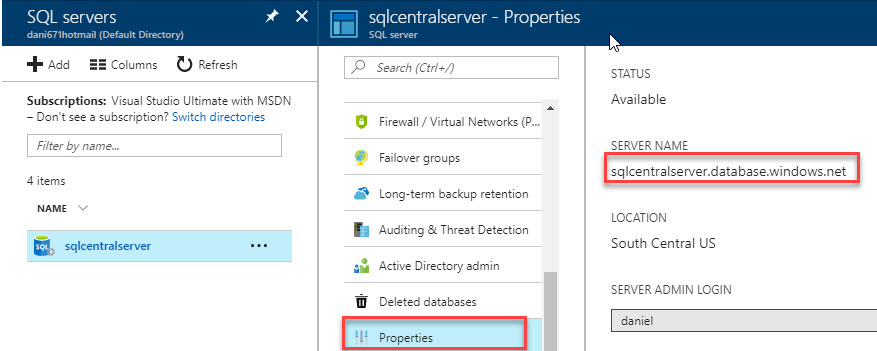
If you did not enable before, you may need also to go to the Firewall/Virtual Networks section and Add your client IP. Do not forget to save the information: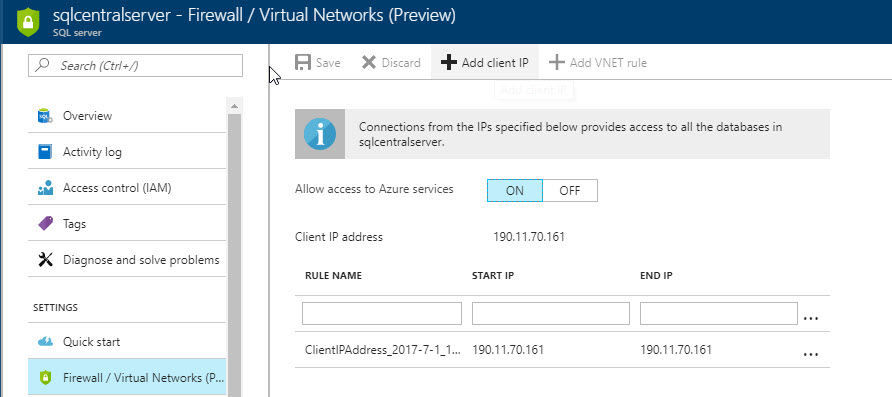
Sqlcentralwarehouse is the name of the SQL database. You can find the name when you click the Databases icon. In properties, you will find the User name which is daniel. You use -U to specify the user name to login:
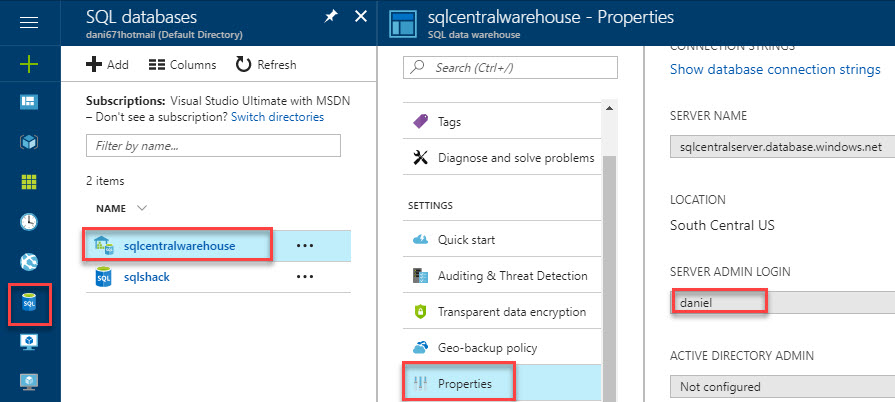
-P is to specify the password, -n is used to perform operation in native format and -q is used to handle quoted identifiers.
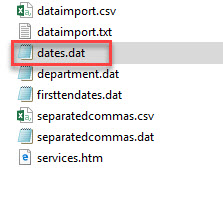
If everything is OK, you will have a file named dates.dat in your local machine:
BCP with prompt password
In the previous example, you can see the password in a plain text. Sometimes to automate, there is no other option. However, there are options to manually specify the password:
bcp sqlcentralwarehouse.dbo.dimdate out c:\sql\dates.dat -S sqlcentralserver.database.windows.net -U Daniel -n –q
This example is equal to the previous one, but now we are not specifying the password (-P) parameter.
Hints in BCP
The -h (you need to be very careful with uppercased or lowercased parameters with BCP) is used to apply hints. For example, you can order by alphabetical order using the -h with ORDER to specify the order of a specified column or you can specify the rows per batch or lock the table while the import or export operation is done.
The following example will lock the table while the BCP operation is done. This hint (-h TABLOCK) increases the performance when the table is big and there are several users accessing the table. With this hint multiple concurrent users can load the table:
bcp sqlcentralwarehouse.dbo.dimdate out c:\sql\dates.dat -S sqlcentralserver.database.windows.net -U Daniel -n -q -h TABLOCK
Show the first 10 rows in BCP
The next example shows how to show all the columns until the row 10. With the -L parameter, you can specify your last row to display. The following example export the table data until the row 10:
bcp sqlcentralwarehouse.dbo.dimdate out c:\sql\firstten.dat -S sqlcentralserver.database.windows.net -U Daniel -n –q -L10
Export specified rows
In BCP you can export from row x to row y. You use the First (-F) and Last (-L) parameters for this. The following example will export to a file the row 10 until the row 20:
bcp sqlcentralwarehouse.dbo.dimdate out c:\sql\firstten.dat -S sqlcentralserver.database.windows.net -U Daniel -n –q -F10 -L20
Export queries to a file
You can also work with queries in Azure and export them to a file using BCP. The following example will run a query to the dbo.dimdate table in Azure to a .dat file:
bcp "SELECT [EnglishMonthName],[FiscalYear],[FiscalSemester] FROM dbo.dimdate" queryout c:\sql\firstten.dat -d sqlcentralwarehouse -S sqlcentralserver.database.windows.net -U Daniel -n –q
Working with batches in BCP
When the data to export is a lot, you can bulk copy using batches. The batches parameter (-b) is used. In the following example, we will export the Azure query to a dat file in batches of 100 rows:
bcp "SELECT [EnglishMonthName],[FiscalYear],[FiscalSemester] FROM dbo.dimdate" queryout c:\sql\firstten.dat -d sqlcentralwarehouse -S sqlcentralserver.database.windows.net -U Daniel -n –q -b100
Error files in BCP
You can create a file with the rows that could not be transferred. We use the -e parameter for this followed by the path:
bcp "SELECT [EnglishMonthName],[FiscalYear],[FiscalSemester] FROM dbo.dimdate" queryout c:\sql\firstten.dat -d sqlcentralwarehouse -S sqlcentralserver.database.windows.net -U Daniel -n –q -b100 -e c:\sql\error.log
Import from a file to an Azure table
We can also import from a file to a table.
To do this, we will create a table first in Azure, to databases and select the ASDW. In Overview, select Query editor:
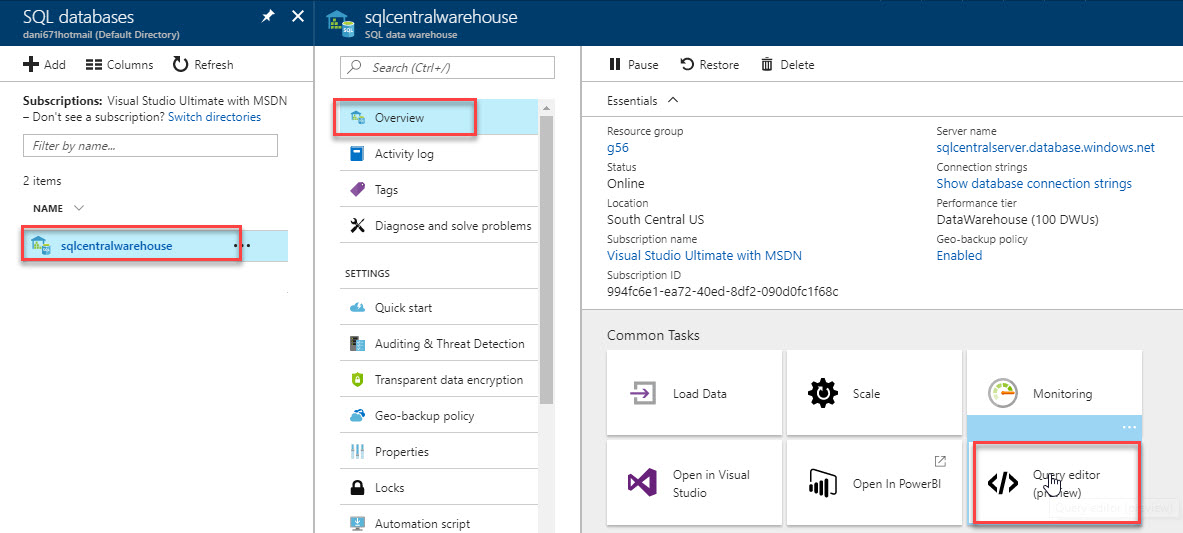
Login and create a table:
CREATE TABLE [dbo].[ImpDate]
(
[EnglishMonthName] [nvarchar](10) NOT NULL,
[FiscalYear] [smallint] NOT NULL,
[FiscalSemester] [tinyint] NOT NULL
)
In your local machine, in the cmd, run the following commands:
bcp sqlcentralwarehouse.dbo.ImpDate in c:\sql\firstten.dat -n -U daniel -S sqlcentralserver.database.windows.net -q
In this example, we are importing in our Azure table dbo.ImpDate the values of the firstten.dat file (created in previous examples).
Conclusion
BCP is a useful tool to automatically import and export data. For UI users, it is not an intuitive tool, but for experimented users it is simple and very fast. One of the best tools to import when we talk about performance.

